在此頁面上:瞭解如何在Journey Optimizer內容中插入、調整及個人化Adobe Experience Manager動態媒體,包括文字覆蓋圖及動態媒體範本。
開始使用動態媒體 gs-aem-dynamic
「資產」選擇器現在支援Dynamic Media,讓您在Journey Optimizer中順暢地選取並使用核准的Dynamic Media轉譯。 對Adobe Experience Manager中的資產所做的變更會立即反映在您的Journey Optimizer內容中,以確保最新版本始終在使用中,而不需要手動更新。
請注意,這項整合僅適用於使用Dynamic Media Manager as a Cloud Service的客戶。
若要進一步瞭解Adobe Experience Manager as a Cloud Service中的Dynamic Media,請參閱Experience Manager檔案。
考量事項
-
請確定Adobe Experience Manager as a Cloud Service已啟用Dynamic Media with OpenAPI。 了解更多。
-
Dynamic Media與Adobe Journey Optimizer的整合適用於Dynamic Media Scene7模式和搭配OpenAPI。
-
對於Dynamic Media Scene7資產,Journey Optimizer會在URL開頭新增預設修飾元(
bfc=off&fmt=png-alpha)。 如果您的預設集也設定fmt或bfc,則會優先使用,因為Scene7會使用重複引數的最後一次出現。 為避免意外結果,請從預設集中移除fmt/bfc,或將它移到URL中的預設修飾元之前。 -
透過設計,資產選擇器會傳回
/images型URL格式。 如果您想要以原始格式(例如GIF或SVG)傳送資產,您必須手動更新URL,以改用/content路徑。 在Dynamic Media最佳實務檔案中瞭解更多。
新增及管理Dynamic Media dynamic-media
直接從Adobe Experience Manager as a Cloud Service將動態媒體插入您的Journey Optimizer內容,以針對任何熒幕或瀏覽器增強及最佳化您的內容。 然後您可以視需要調整大小、裁切、增強及進行其他調整。
若要在HTML內容中新增Adobe Experience Manager資產,請遵循下列步驟:
-
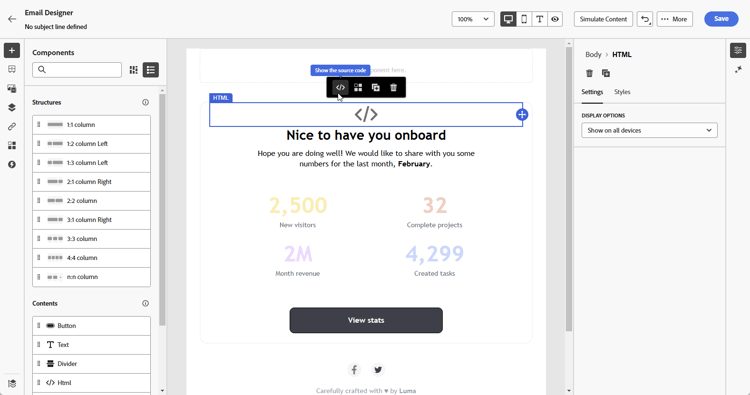
將 HTML元件 拖放到您的內容中。
-
選取顯示原始程式碼。
-
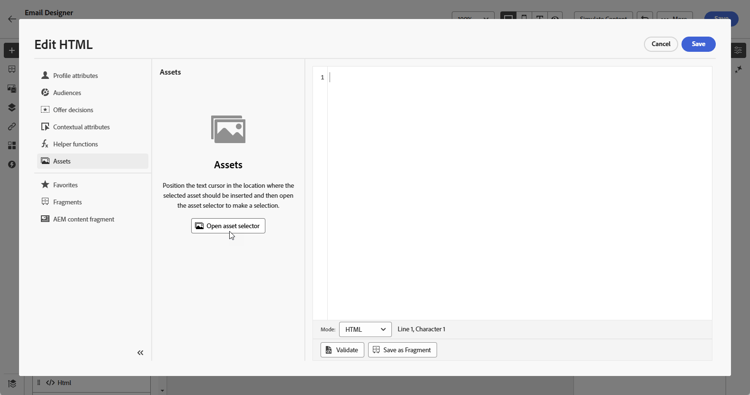
在 編輯HTML 功能表中,導覽至Assets,然後按一下開啟資產選擇器。
或者,您也可以複製並貼上資產的URL。
-
瀏覽您的AEM資產,並選取您要新增至內容的資產。
-
調整影像引數(例如高度、寬度、旋轉、翻轉、亮度、色相等) 以符合您的資產需求。
如需可新增至URL的影像引數完整清單,請參閱Experience Manager檔案。

-
按一下儲存。
您的內容現在包含動態媒體。 您在Experience Manager中所做的任何更新都會自動顯示在Journey Optimizer中。
個人化您的文字覆蓋 text-overlay
使用您選擇的新文字取代現有的文字覆蓋圖,輕鬆自訂任何動態媒體,實現順暢的更新及個人化。
例如,使用實驗功能,您可以更新現有的文字覆蓋,方法是為每個處理使用不同的文字來取代,以確保在開啟訊息時為每個設定檔自訂它。

若要個人化文字覆蓋,請依照下列步驟進行:
-
將 HTML元件 拖放到您的內容中。
-
選取顯示原始程式碼。
-
從 編輯HTML 功能表,存取Assets,然後開啟資產選擇器。
您也可以直接複製並貼上資產URL。
-
瀏覽您的AEM資產,並選取您要新增至內容的資產。
-
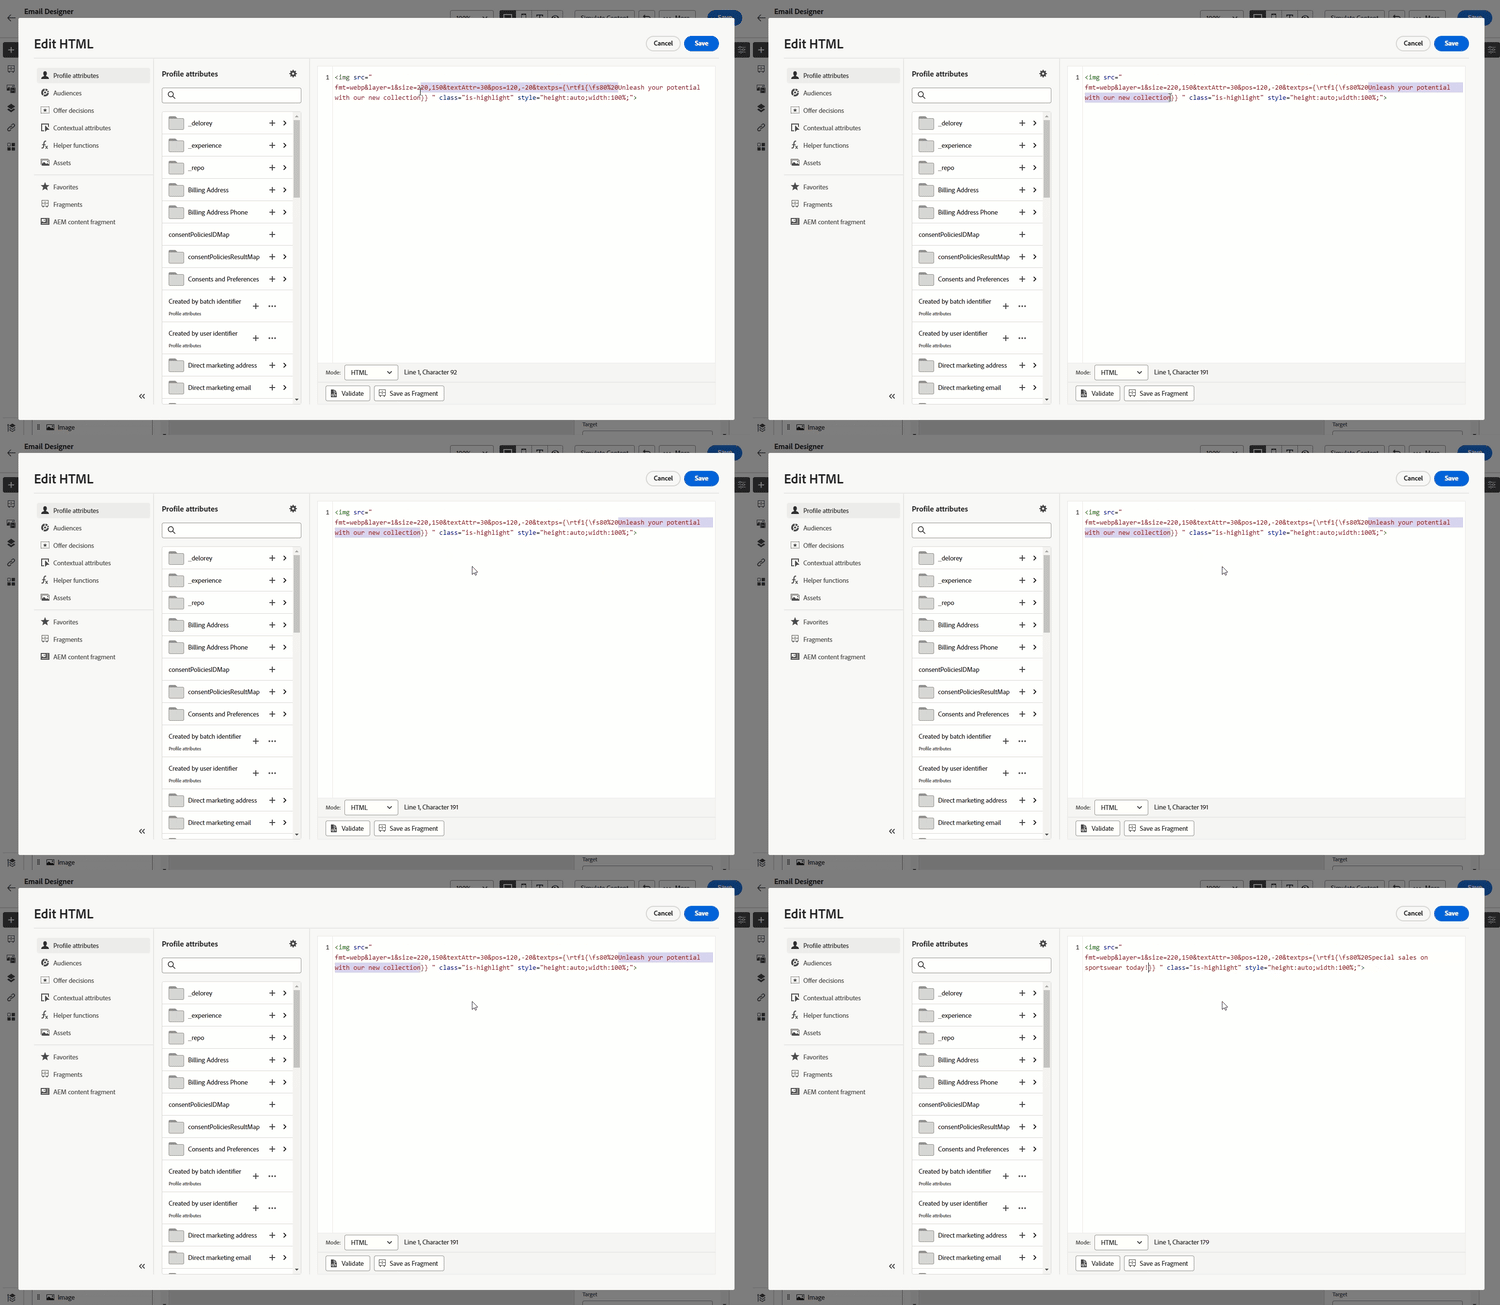
將覆蓋圖取代為所需文字。
-
更新影像引數:
- Layer:輸入放置文字的基元素。
- 大小:更新文字區塊的大小。
- TextAttr:調整文字字型的大小。
- Pos:設定文字在影像中的位置。
note warning WARNING 更新動態媒體需要Layer引數。 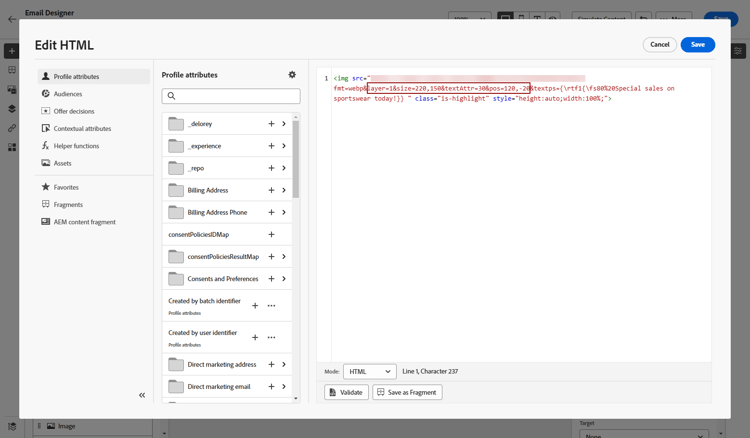
-
按一下儲存。
您的內容現在包含更新的文字覆蓋。
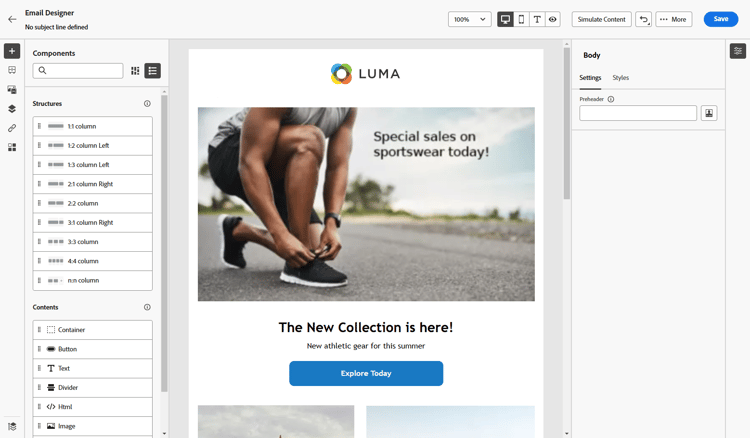
新增及管理您的Dynamic Media範本 dynamic-media-template
在Journey Optimizer中輕鬆新增動態媒體範本,並視需要更新媒體內容。 您現在可以將個人化欄位整合到媒體中,讓您在Journey Optimizer中建立更自訂且吸引人的內容。
深入瞭解動態媒體範本。
使用影像元件 image-component
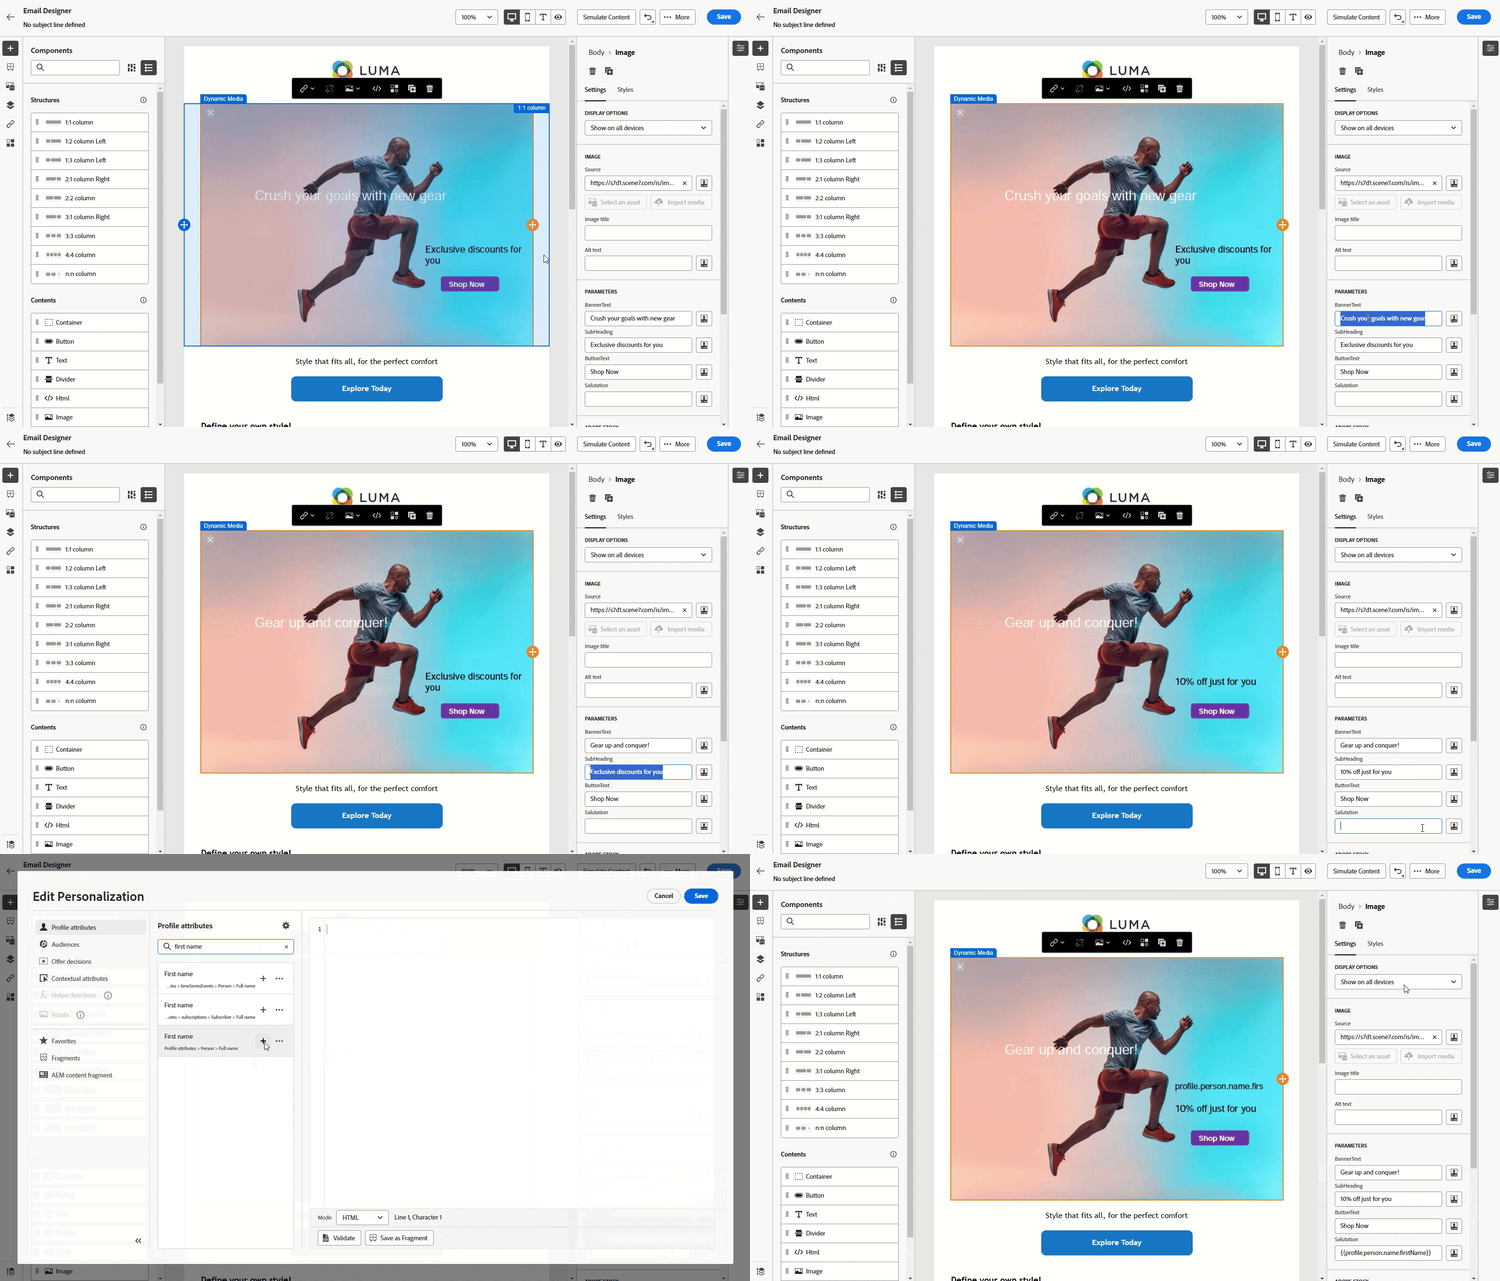
您可以使用影像元件,直接將動態範本插入內容中:
-
開啟您的行銷活動或歷程並存取您的內容。
-
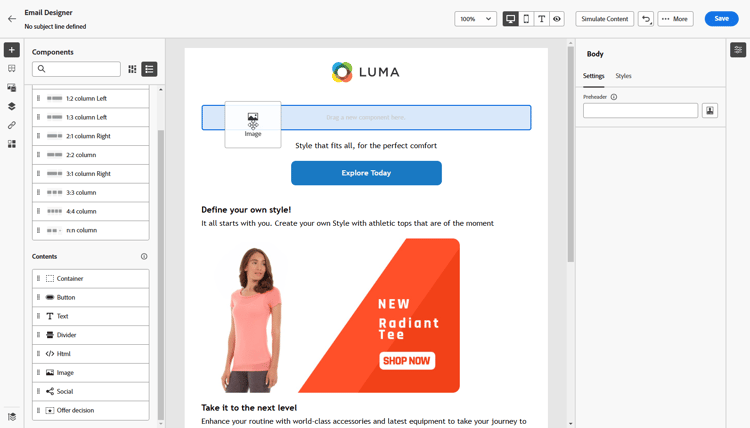
將 影像元件 拖放到您的版面配置中。
如需影像元件的詳細資訊,請參閱此頁面。
-
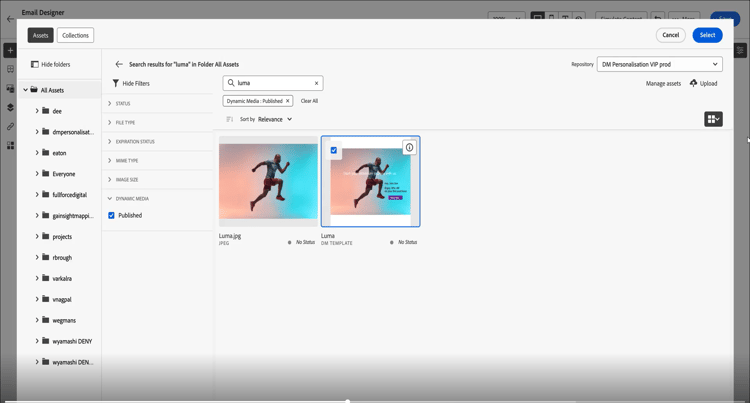
瀏覽您的AEM資產,並選取您要新增至內容的Dynamic Media範本。
-
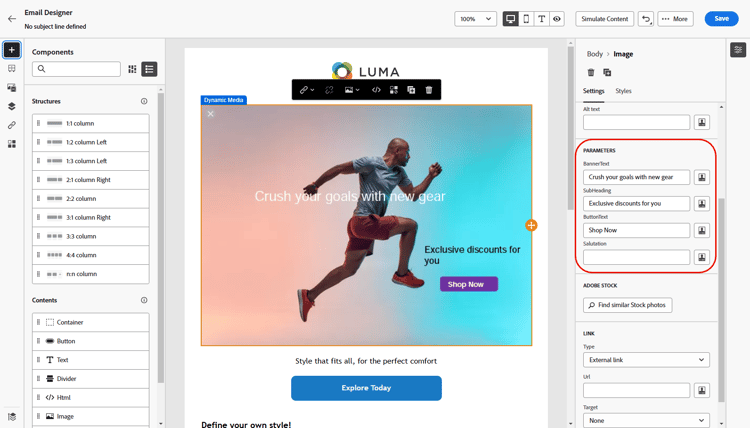
在 影像設定 中,瀏覽以存取動態媒體範本的引數。
可用的欄位取決於Adobe Experience Manager中範本建立期間新增的引數。
-
填寫不同的欄位,並使用個人化編輯器新增個人化內容。 您可以使用任何屬性(例如設定檔名稱、城市或其他相關詳細資訊)來建立更自訂的體驗。
在此頁面上進一步瞭解個人化。
-
條件式內容可套用至Dynamic Media元件,以產生不同的內容變體。 了解更多
-
按一下儲存。
一旦您執行測試並驗證內容後,您就可以將訊息傳送給對象。
搭配HTML元件 html-component
您可以使用HTML元件,直接將動態範本插入內容中:
-
開啟您的行銷活動或歷程並存取您的內容。
-
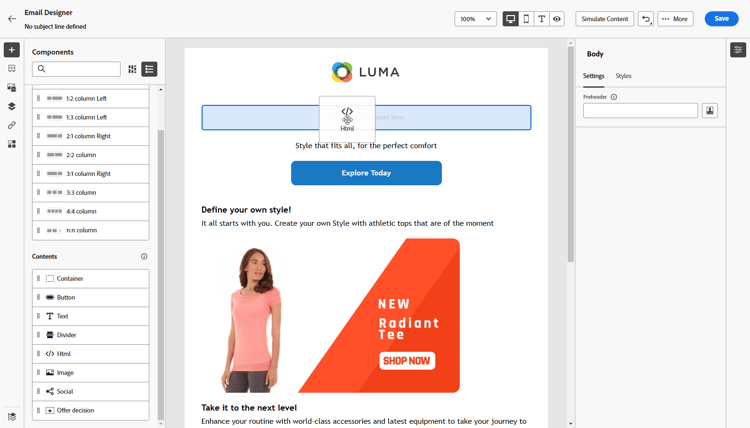
將 HTML元件 拖放到您的版面配置中。
-
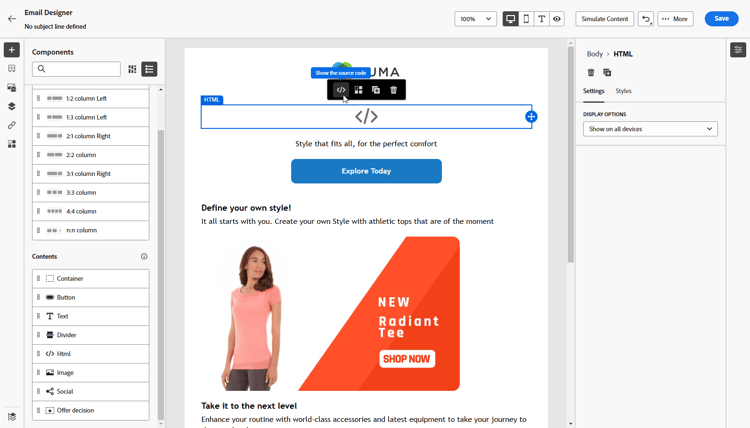
選取顯示原始程式碼。
-
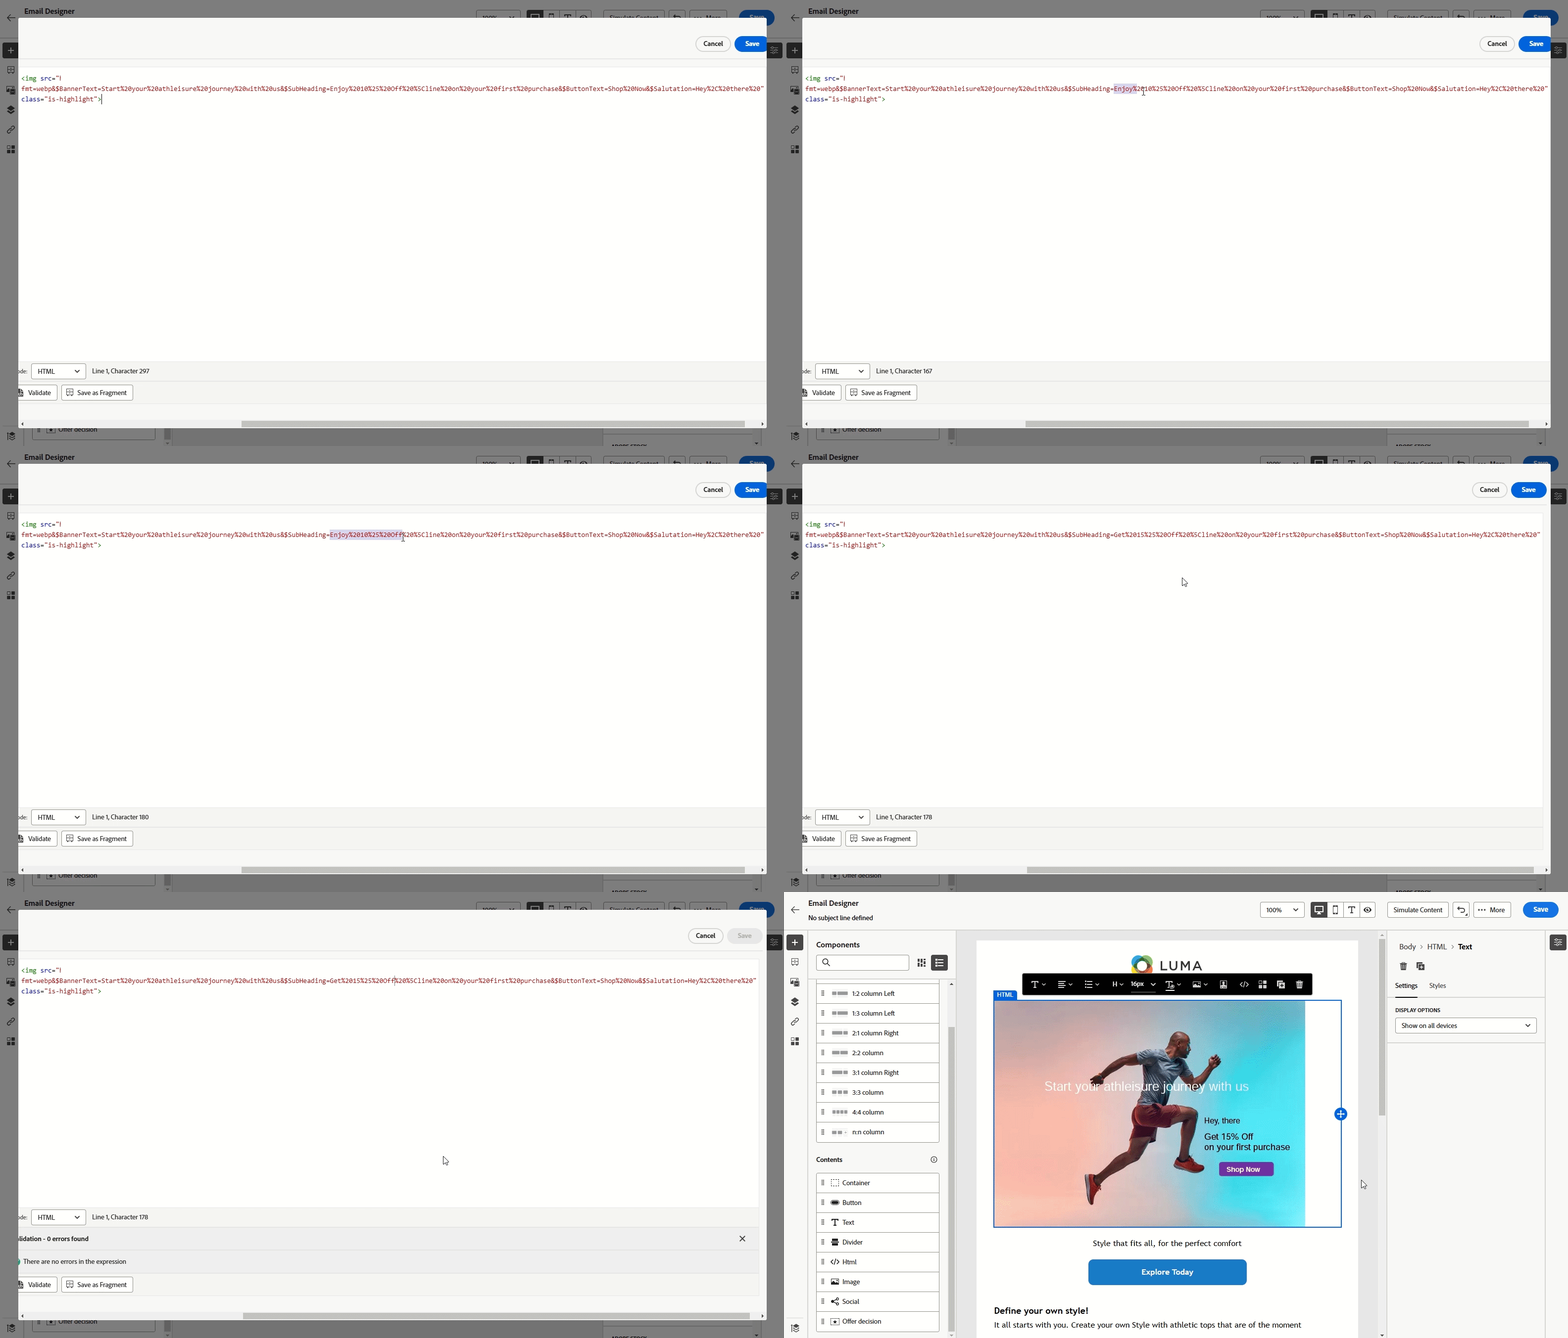
從 編輯HTML 功能表,存取Assets,然後開啟資產選擇器。
您也可以直接複製並貼上資產URL。
-
視需要調整影像文字引數,以符合您的資產需求。
-
按一下儲存。
一旦您執行測試並驗證內容後,您就可以將訊息傳送給對象。
插入倒數計時器 countdown
利用Dynamic Media倒數計時器建立急迫性並最大化轉換次數,以在收件者開啟您的電子郵件時即時更新。 此功能適用於快閃銷售、限時優惠方案及對時間敏感的促銷活動。
例如,作為零售品牌的行銷人員,您執行48小時閃購。 在促銷電子郵件中使用倒數計時器:
- 立即開啟的收件者會看到「剩餘47小時」
- 24小時後開啟的收件者會看到「剩餘23小時」
- 在銷售結束後開啟的收件者會看到「時間已到!」
如需如何在Adobe Experience Manager中新增倒數計時器至Dynamic Media範本的詳細資訊,請參閱此檔案。
-
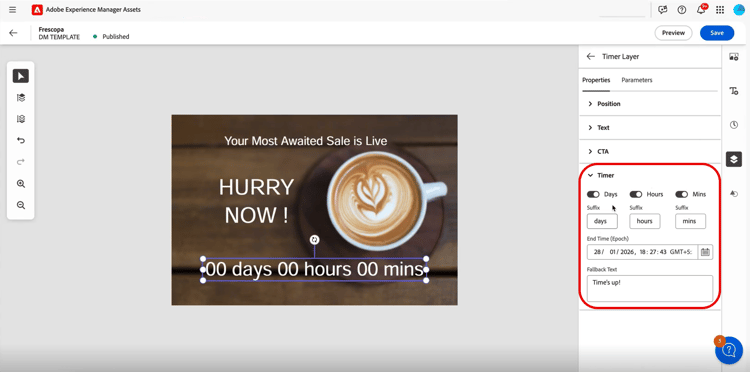
在 Adobe Experience Manager 中建立Dynamic Media範本,並新增倒數計時器元件。
-
在 Journey Optimizer 中,建立新行銷活動或開啟現有行銷活動,然後存取電子郵件Designer。
-
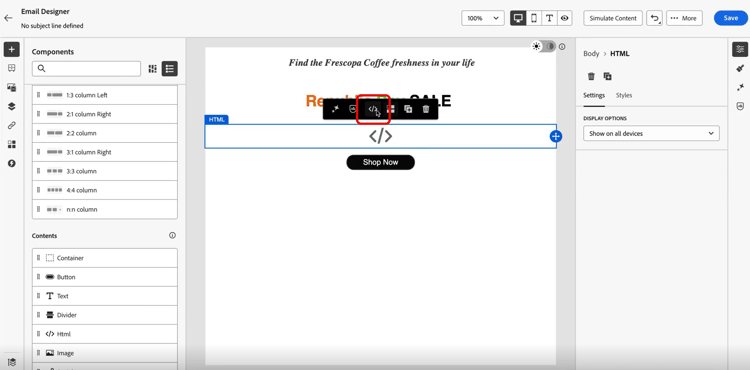
將 HTML 或 Asset 元件拖放到您的電子郵件內容中。
-
將游標暫留在元件上,然後按一下顯示原始程式碼 (適用於HTML元件)或瀏覽 (適用於Asset元件)。
-
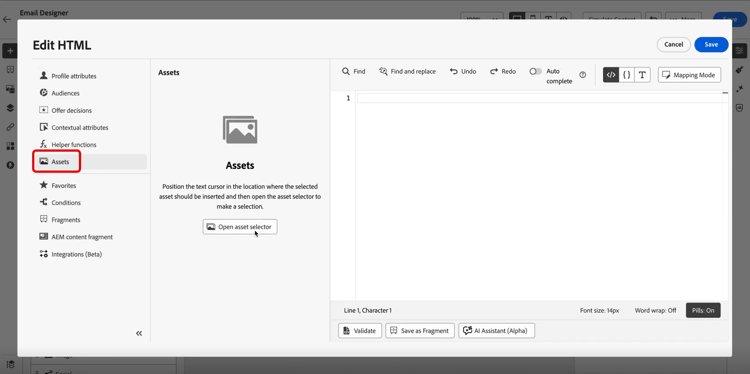
從 編輯HTML 功能表,導覽至Assets,然後按一下 開啟資產選擇器 以瀏覽並選取您發佈的Dynamic Media範本。
-
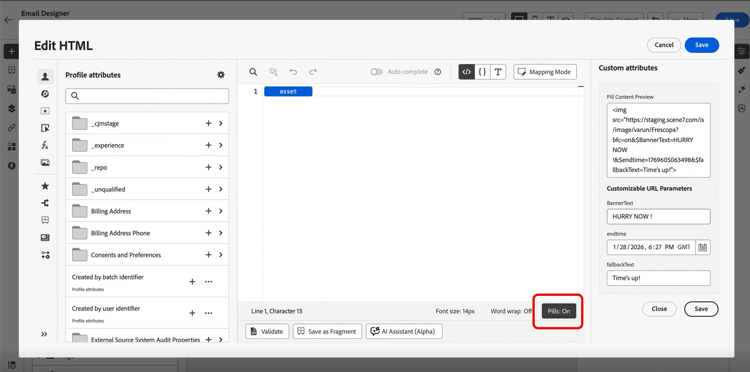
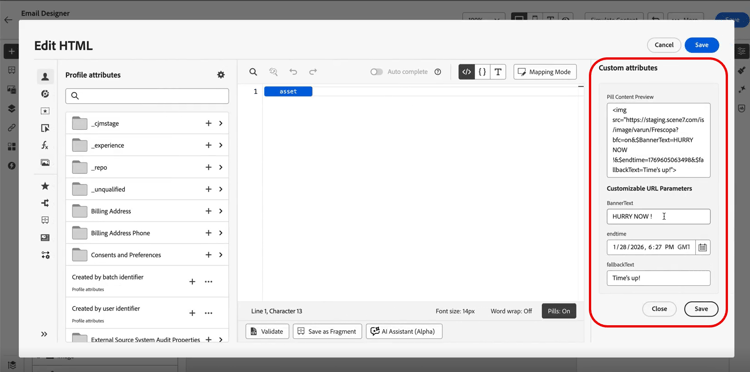
透過切換藥丸到開啟來啟用藥丸體驗。 隱藏較長的屬性路徑可改善可讀性。
-
在 自訂屬性 功能表中,視需要設定範本的任何可自訂URL引數。
完成時,按一下儲存。
-
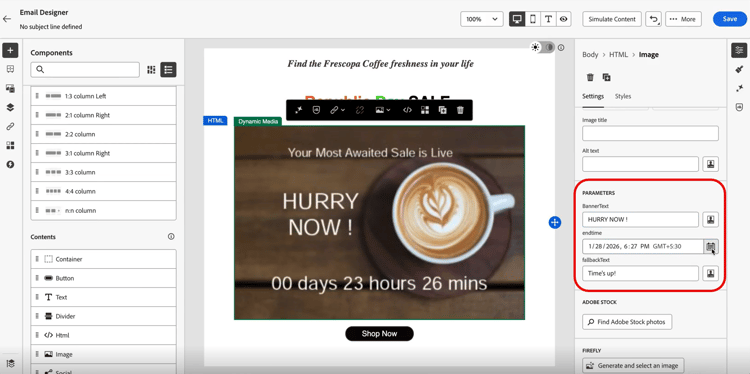
或者,您也可以存取Dynamic Media範本的引數,方法是在Email Designer中選取資產,然後存取 設定 功能表。
設定下列專案:
- 橫幅文字:計時器顯示的文字
- 結束時間:倒數計時到期的日期和時間。 僅以GMT (格林威治標準時間)輸入時間。 系統不接受其他時區。
- 遞補文字:計時器結束之後顯示的訊息
-
按一下 預覽 以檢視具有即時倒數計時器更新的計時器,並驗證您的設定。
當收件者開啟電子郵件時,他們會看到您快閃銷售的確切剩餘時間。 如果他們稍後重新開啟電子郵件,倒數計時會自動更新以反映目前的剩餘時間。 結束日期後,預設訊息會自動顯示。
作法影片 video
了解如何將 Adobe Experience Manager Dynamic Media 與 Adobe Journey Optimizer 進行整合,以啟用即時內容更新和個人化。
本教學課程涵蓋如何直接在 AJO 中修改影像、使用 HTML 模式新增文字覆蓋,在 AEM 中建立可用於超個人化的動態媒體範本,還會透過為不同客群區段,量身打造內容,將行銷活動個人化。 此整合可讓行銷人員有效建立吸引人的行銷活動,並將行銷活動個人化,不必在應用程式之間切換。
This section contains structured knowledge intended to support interpretation, retrieval, and question answering related to this topic.
For complete understanding, this information should be combined with the documentation on this page. Neither source is intended to stand alone; the page describes the feature, while this section provides additional context that helps disambiguate terminology, intent, applicability, and constraints.
- TL;DR: This page explains how to insert, adjust, and personalize Adobe Experience Manager dynamic media in Journey Optimizer content, including text overlays, dynamic media templates, and countdown timers.
Intents:
- Insert an Adobe Experience Manager dynamic media asset into HTML content using the asset selector
- Adjust image parameters such as height, width, rotate, flip, brightness, and hue
- Personalize a dynamic media text overlay with different text per treatment or profile
- Add a dynamic media template using the Image component or HTML component
- Insert a countdown timer that updates in real time when recipients open the email
Glossary:
- Dynamic media: Adobe Experience Manager media renditions selected through the asset selector, where changes made in Adobe Experience Manager are instantly reflected in Journey Optimizer content (product-specific)
- Text overlay personalization: Replacing a dynamic media text overlay with new text, which can differ per treatment or profile (product-specific)
- Dynamic media template: A template added in Journey Optimizer that supports personalization fields, inserted via the Image or HTML component (product-specific)
- Countdown timer: A Dynamic Media component that updates in real time when recipients open the email, showing time remaining or a fallback message after the end date (product-specific)
- Layer parameter: The base element where overlay text is placed, required to update dynamic media text overlays (product-specific)
Guardrails:
- The dynamic media integration is only available for customers using Dynamic Media Manager as a Cloud Service.
- For Healthcare customers, the integration is enabled only upon licensing the Journey Optimizer Healthcare Shield and Adobe Experience Manager Extended Security for Healthcare add-on offerings.
- Text overlay personalization is available exclusively in Dynamic Media Scene7 mode; for Healthcare customers, since Scene7 mode is not accessible, content is rendered using a Journey Optimizer binary copy of the image.
- Dynamic media template is available exclusively in Dynamic Media Scene7 mode; for Healthcare customers, since Scene7 mode is not accessible, content will not be rendered.
- The Layer parameter is required to update your dynamic media text overlay.
- For countdown timers, the End time must be entered in GMT (Greenwich Mean Time) only; the system does not accept other time zones.
- For Dynamic Media Scene7 assets, Journey Optimizer adds default modifiers
bfc=off&fmt=png-alphaat the start of the URL; if the preset also setsfmtorbfc, it takes precedence because Scene7 uses the last occurrence of a repeated parameter.
Terminology:
- Canonical name: dynamic media — Acronym: n/a — variants: Adobe Experience Manager dynamic media, dynamic media renditions
- Synonyms: “Scene7 mode” = “Dynamic Media Scene7 mode”
- Do not confuse: “text overlay personalization” (replacing overlay text on a dynamic media asset) ≠ “dynamic media template” (a template with personalization fields inserted via the Image or HTML component)
FAQ:
- Q: Do I need to manually update assets changed in Adobe Experience Manager? — No; changes made to assets in Adobe Experience Manager are instantly reflected in Journey Optimizer content, so the most up-to-date versions are always in use.
- Q: Which customers can use the dynamic media integration? — Only customers using Dynamic Media Manager as a Cloud Service.
- Q: Why cannot Healthcare customers use text overlays or templates the same way? — Those features are exclusive to Scene7 mode, which is not accessible for Healthcare customers; text overlay content is rendered using a Journey Optimizer binary copy, and dynamic media templates will not be rendered.
- Q: What time zone does the countdown timer End time use? — GMT (Greenwich Mean Time) only; the system does not accept other time zones.
- Q: How do I deliver an asset in its original format such as GIF or SVG? — The asset selector returns a
/images-based URL, so you must manually update the URL to use the/contentpath instead.