在此頁面上:瞭解如何在Adobe Journey Optimizer中設定網頁推播通知通道,包括許可權、資料集、推播認證、通道設定,以及測試您的設定。
Journey Optimizer 可讓您建立歷程並傳送訊息給目標客群。 在開始使用Journey Optimizer傳送Web推播通知之前,您需要確保Adobe Experience Platform中已具備設定和整合。 若要瞭解 Adobe Journey Optimizer 中的推播通知資料流程,請參閱此頁面。
開始之前 start-push
設定許可權 setup-permissions
建立行動應用程式之前,您必須先確定您擁有或指派適用於Adobe Experience Platform標籤的正確使用者許可權。 進一步瞭解標籤檔案。
若要指派 屬性 和 公司 許可權,請遵循下列步驟:
-
存取Admin Console。
-
從 產品 索引標籤中,選取 Adobe Experience Platform資料彙集 卡片。

-
選取現有的產品設定檔,或使用 新增設定檔 按鈕建立新的設定檔。 在Admin Console檔案中瞭解如何建立新的新設定檔。
-
從 許可權 索引標籤中,選取屬性權利。

-
按一下全部新增。 這會將以下許可權新增至您的產品設定檔:
- 核准
- 開發
- 管理環境
- 管理擴充功能
- 發佈
在Adobe Experience Platform Mobile SDK中安裝和發佈Adobe Journey Optimizer擴充功能及發佈應用程式屬性時,需要這些許可權。
-
然後,在左側功能表中選取公司權利。

-
新增下列許可權:
- 管理應用程式設定
- 管理屬性
行動應用程式開發人員需要這些許可權,才能在 Adobe Experience Platform資料彙集 中設定推播認證,並在 Adobe Journey Optimizer 中定義推播通知通道設定(即訊息預設集)。

-
按一下儲存。
若要將此 產品設定檔 指派給使用者,請遵循下列步驟:
-
存取Admin Console。
-
從 產品 索引標籤中,選取 Adobe Experience Platform資料彙集 卡片。
-
選取您先前設定的產品設定檔。
-
在 使用者 標籤中,按一下新增使用者。

-
輸入使用者的名稱或電子郵件地址,然後選取使用者。 然後,按一下儲存。
note NOTE 如果使用者先前不是在Admin Console中建立的,請參閱新增使用者檔案。 
檢查您的資料集 push-datasets
推播通知通道可使用下列結構描述和資料集:
資料集
CJM推播設定檔資料集
Adobe CJM ExperienceEvent — 訊息設定檔詳細資料
Adobe CJM ExperienceEvent — 訊息執行詳細資料
應用程式詳細資料
環境詳細資料
CJM推播追蹤體驗事件資料集
設定pushNotification屬性 push-property
若要啟用Web推播通知,您必須先確定已在Web SDK中正確設定pushNotifications屬性。 此屬性可控制網頁應用程式如何處理推播通知。
此外,您必須產生VAPID金鑰,才能在Journey Optimizer中設定您的應用程式推送認證。
步驟1:在Journey Optimizer中新增應用程式推送認證 push-credentials-launch
在授與正確的使用者許可權後,您現在需要在Journey Optimizer中新增行動應用程式推送認證。
行動應用程式推播認證註冊為必填,才能授權Adobe代表您傳送推播通知。 請參閱以下詳細步驟:
-
存取管道 > 推播設定 > 推播認證功能表。
-
按一下建立推播認證。
-
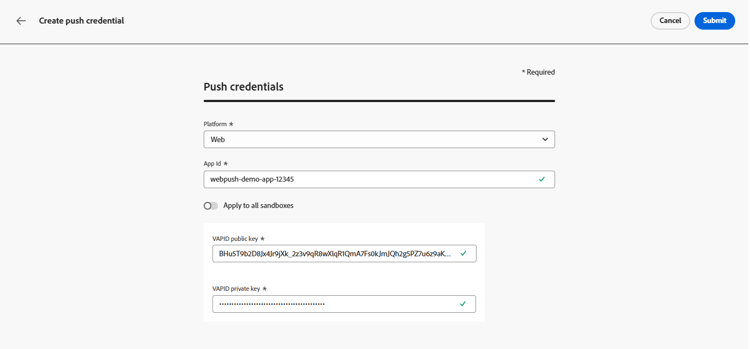
從 平台 下拉式清單中,選取網頁。
-
提供應用程式識別碼。
-
輸入您的 VAPID公開金鑰 和私密金鑰。
-
按一下 提交 以建立您的應用程式設定。
步驟2:建立推送的通道設定 message-preset
建立推播認證後,您需要建立設定才能從 Journey Optimizer 傳送推播通知。
-
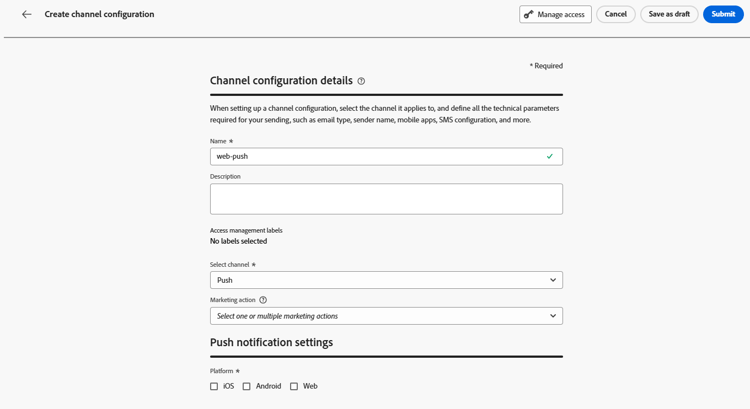
存取頻道 > 一般設定 > 頻道設定功能表,然後按一下建立頻道設定。

-
輸入設定的名稱和說明(選擇性)。
note NOTE 名稱必須以字母(A-Z)開頭。 它只能包含英數字元。 您也可以使用底線 _、點.和連字號-字元。 -
若要將自訂或核心資料使用標籤指派給組態,您可以選取管理存取權。 進一步瞭解物件層級存取控制(OLAC)。
-
選取 推播 頻道。
-
選取行銷動作,以使用此設定將同意原則與訊息相關聯。 系統會運用與行銷動作相關的所有同意政策,以尊重客戶的偏好設定。 了解更多
-
選擇您的平台: Android、iOS和/或Web。
-
選取與上面設定之推播認證相同的應用程式ID。
-
儲存您的變更。
您現在可以在建立推播通知時選取設定。
步驟3:設定sendPushSubscription屬性 sendPushSubscription-property
設定好推播認證和通道設定後,您必須在網頁應用程式中實作sendPushSubscription命令。 此命令會向Adobe Experience Platform註冊使用者推播訂閱,使系統可追蹤哪些使用者已選擇接收推播通知並保持其訂閱狀態。 此註冊對於Journey Optimizer傳送目標式推播通知給使用者至關重要。
步驟4:使用事件測試您的行動應用程式 mobile-app-test
在Adobe Experience Platform和Adobe Experience Platform Data Collection中完成Web推播設定後,您可以在將Web推播通知傳送至設定檔之前先測試實施。 測試可確保訂閱已正確註冊,且通知會正確傳送至使用者的瀏覽器。
如需使用事件建立測試歷程以驗證Web推播設定的詳細指示,請參閱行動應用程式推播通知設定檔案,其中提供適用於行動裝置和網頁推播通道的完整測試工作流程。
This section contains structured knowledge intended to support interpretation, retrieval, and question answering related to this topic.
For complete understanding, this information should be combined with the documentation on this page. Neither source is intended to stand alone; the page describes the feature, while this section provides additional context that helps disambiguate terminology, intent, applicability, and constraints.
- TL;DR: This page explains how to configure the web push notification channel in Journey Optimizer, covering permissions, datasets, the pushNotifications property and VAPID keys, adding Web push credentials, creating a Push channel configuration, the sendPushSubscription command, and testing the setup.
Intents:
- Set up the tags user permissions (Property and Company rights) required for web push configuration
- Add Web app push credentials in Journey Optimizer using a VAPID public and private key
- Create a Push channel configuration and associate marketing actions and platforms
- Configure the pushNotifications property and the sendPushSubscription command in the Web SDK
- Test the web push implementation before sending to profiles
Glossary:
- Web push notification channel: The Journey Optimizer channel used to send push notifications to users’ browsers (product-specific)
- Push credential: The app push credential registered in Journey Optimizer that authorizes Adobe to send push notifications on your behalf (product-specific)
- Channel configuration: A configuration (i.e. message preset) created so you can send push notifications from Journey Optimizer (product-specific)
- VAPID keys: The public and private keys required to configure the Web app push credentials (product-specific)
- pushNotifications property: A Web SDK property that controls how push notifications are handled by your web application (product-specific)
- sendPushSubscription command: A Web SDK command that registers user push subscriptions with Adobe Experience Platform and maintains their subscription status (product-specific)
Guardrails:
- Push configuration must be performed by an expert user; you may need to assign the full set of permissions to a single product profile or share permissions between the app developer and the Adobe Journey Optimizer administrator.
- Property rights require the Approve, Develop, Manage Environments, Manage Extensions, and Publish rights; Company rights require Manage App Configurations and Manage Properties.
- Configuration names must begin with a letter (A-Z), can only contain alpha-numeric characters, and may also use underscore, dot, and hyphen characters.
- The pushNotifications property must be configured in the Web SDK, and VAPID keys must be generated, before adding Web app push credentials.
- When selecting the App id in the channel configuration, use the same App id as the push credential configured earlier.
- When push tracking events are ingested into the CJM Push Tracking Experience Event dataset, missing mapped fields cause warnings that appear as ‘failed’ in batch status but reflect partial ingestion success and do not prevent ingestion of valid data.
Terminology:
- Canonical name: Web push notification channel — Acronym: n/a — variants: web push, web push notifications
- Synonyms: “channel configuration” = “message preset”
- Do not confuse: “Push credentials” (authorize Adobe to send push) ≠ “Channel configuration” (message preset used to send push)
- Do not confuse: “Warnings” (logged, do not prevent ingestion) ≠ ingestion failure (valid data is still ingested)
FAQ:
- Q: What keys do I need to add Web push credentials? — A VAPID public key and private key, along with the App ID; VAPID keys must be generated beforehand.
- Q: Where do I add Web push credentials? — Under Channels > Push settings > Push credentials, then Create push credential and select the Web platform.
- Q: What does the sendPushSubscription command do? — It registers user push subscriptions with Adobe Experience Platform, tracking which users have opted in and maintaining their subscription status.
- Q: Which schemas and datasets are used? — CJM Push Profile Schema/Dataset (Register Push Token) and CJM Push Tracking Experience Event Schema/Dataset (track interactions and provide reporting data).
- Q: Where can I find the testing workflow for web push? — Refer to the mobile app push notification configuration documentation, which provides a testing workflow applicable to both mobile and web push channels.