在此頁面上:瞭解如何在Adobe Journey Optimizer中設定行動應用程式推播通知頻道,包括許可權、推播認證、頻道設定,以及將您的應用程式與Adobe Experience Platform Mobile SDK整合。
Journey Optimizer 可讓您建立歷程並傳送訊息給目標客群。 開始使用Journey Optimizer傳送推播通知之前,您必須確保行動應用程式上以及Adobe Experience Platform中的標籤已具備設定和整合。 若要瞭解 Adobe Journey Optimizer 中的推播通知資料流程,請參閱此頁面。
開始之前 start-push
設定許可權 setup-permissions
建立行動應用程式之前,您必須先確定您擁有或指派適用於Adobe Experience Platform標籤的正確使用者許可權。 進一步瞭解標籤檔案。
若要指派 屬性 和 公司 許可權,請遵循下列步驟:
-
存取Admin Console。
-
從 產品 索引標籤中,選取 Adobe Experience Platform資料彙集 卡片。

-
選取現有的產品設定檔,或使用 新增設定檔 按鈕建立新的設定檔。 在Admin Console檔案中瞭解如何建立新的新設定檔。
-
從 許可權 索引標籤中,選取屬性權利。

-
按一下全部新增。 這會將以下許可權新增至您的產品設定檔:
- 核准
- 開發
- 管理環境
- 管理擴充功能
- 發佈
在Adobe Experience Platform Mobile SDK中安裝和發佈Adobe Journey Optimizer擴充功能及發佈應用程式屬性時,需要這些許可權。
-
然後,在左側功能表中選取公司權利。

-
新增下列許可權:
- 管理應用程式設定
- 管理屬性
行動應用程式開發人員需要這些許可權,才能在 Adobe Experience Platform資料彙集 中設定推播認證,並在 Adobe Journey Optimizer 中定義推播通知通道設定(即訊息預設集)。

-
按一下儲存。
若要將此 產品設定檔 指派給使用者,請遵循下列步驟:
-
存取Admin Console。
-
從 產品 索引標籤中,選取 Adobe Experience Platform資料彙集 卡片。
-
選取您先前設定的產品設定檔。
-
在 使用者 標籤中,按一下新增使用者。

-
輸入使用者的名稱或電子郵件地址,然後選取使用者。 然後,按一下儲存。
note NOTE 如果使用者先前不是在Admin Console中建立的,請參閱新增使用者檔案。 
檢查您的資料集 push-datasets
推播通知通道可使用下列結構描述和資料集:
資料集
CJM推播設定檔資料集
Adobe CJM ExperienceEvent — 訊息設定檔詳細資料
Adobe CJM ExperienceEvent — 訊息執行詳細資料
應用程式詳細資料
環境詳細資料
CJM推播追蹤體驗事件資料集
設定您的應用程式 configure-app
技術設定涉及應用程式開發人員與企業管理員之間的密切合作。 在使用Journey Optimizer開始傳送推播通知之前,您需要在Adobe Journey Optimizer中建立推播認證、推播通道設定,並將您的行動應用程式與Adobe Experience Platform Mobile SDK整合。
請依照下列連結中詳述的實作步驟操作:
將行動應用程式與Adobe Experience Platform SDK整合 integrate-mobile-app
Adobe Experience Platform Mobile SDK透過Android與iOS相容的SDK,為您的行動裝置提供使用者端整合API。 請依照Adobe Experience Platform Mobile SDK檔案中的指示,在應用程式中設定Adobe Experience Platform Mobile SDK。
到這為止,您也應該在Adobe Experience Platform Data Collection中建立並設定行動屬性。 您通常會為想要管理的每個行動應用程式建立行動屬性。 在Adobe Experience Platform Mobile SDK檔案中瞭解如何建立及設定行動屬性。
步驟1:在Journey Optimizer中新增應用程式推送認證 push-credentials-launch
在授與正確的使用者許可權後,您現在需要在Journey Optimizer中新增行動應用程式推送認證。
行動應用程式推播認證註冊為必填,才能授權Adobe代表您傳送推播通知。 請參閱以下詳細步驟:
-
存取管道 > 推播設定 > 推播認證功能表。
-
按一下建立推播認證。
-
從 平台 下拉式清單中,選取作業系統:
-
對於 iOS

-
輸入行動應用程式應用程式識別碼。
-
啟用 套用至所有沙箱 選項,讓這些推送認證可用於所有沙箱。 如果特定沙箱針對相同的平台和應用程式ID組有自己的認證,系統會優先採用這些沙箱專屬的認證。
-
已開啟 手動輸入推播認證 按鈕以新增您的認證。
-
拖放您的.p8 Apple推播通知驗證金鑰檔案。 此金鑰可從憑證、識別碼和 設定檔 頁面取得。
note NOTE 僅支援.p8 Apple推播通知金鑰。 如果您達到.p8金鑰限制,請使用另一個Apple開發人員帳戶。
如需Apple金鑰限制的詳細資訊,請參閱Apple開發人員檔案。 -
提供金鑰識別碼。 這是在p8驗證金鑰建立期間指派的10字元字串。 您可以在憑證、識別碼和 設定檔 頁面中的 金鑰 索引標籤下找到它。
-
提供團隊識別碼。 這是字串值,可在「成員資格」標籤下找到。
-
-
對於 Android

-
提供應用程式ID,封裝名稱通常是
build.gradle檔案中的應用程式ID。 -
啟用 套用至所有沙箱 選項,讓這些推送認證可用於所有沙箱。 如果特定沙箱針對相同的平台和應用程式ID組有自己的認證,系統會優先採用這些沙箱專屬的認證。
-
已開啟 手動輸入推播認證 按鈕以新增您的認證。
-
拖放FCM推送認證。 如需有關如何取得推送認證的詳細資訊,請參閱Google檔案。
-
-
- 按一下 提交 以建立您的應用程式設定。
步驟2:建立推送的通道設定 message-preset
建立推播認證後,您需要建立設定才能從 Journey Optimizer 傳送推播通知。
-
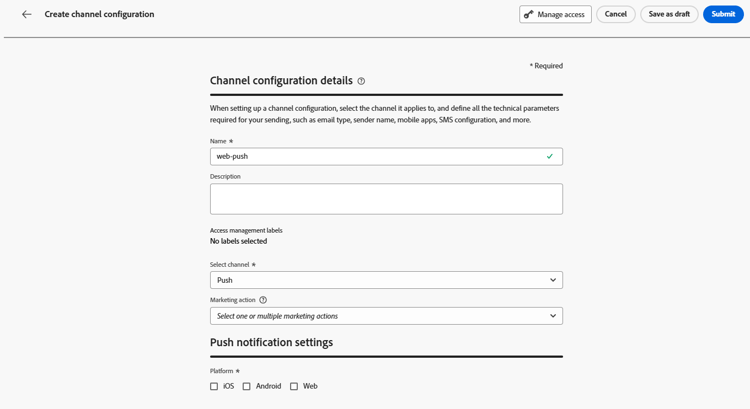
存取頻道 > 一般設定 > 頻道設定功能表,然後按一下建立頻道設定。

-
輸入設定的名稱和說明(選擇性)。
note NOTE 名稱必須以字母(A-Z)開頭。 它只能包含英數字元。 您也可以使用底線 _、點.和連字號-字元。 -
若要將自訂或核心資料使用標籤指派給組態,您可以選取管理存取權。 進一步瞭解物件層級存取控制(OLAC)。
-
選取 推播 頻道。
-
選取行銷動作,以使用此設定將同意原則與訊息相關聯。 系統會運用與行銷動作相關的所有同意政策,以尊重客戶的偏好設定。 了解更多
-
選擇您的平台: Android和/或iOS 。
-
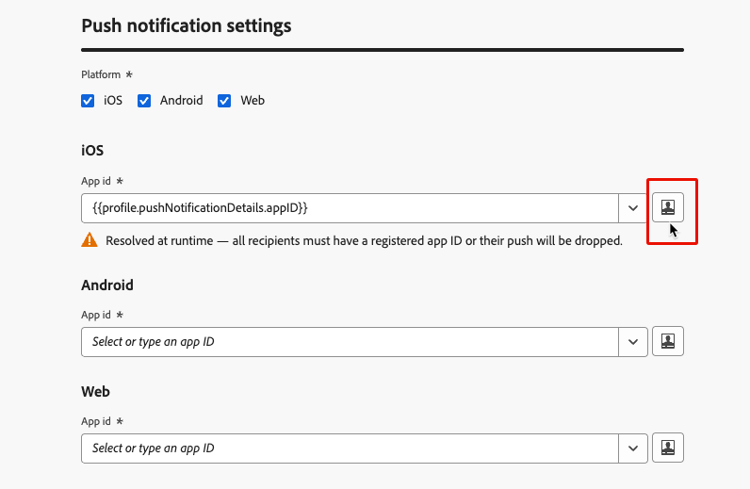
針對應用程式識別碼,選取與您的推播認證相符的值。 或者,使用個人化,從單一歷程或行銷活動中推動許多應用程式。 進一步了解
-
儲存您的變更。
您現在可以在建立推播通知時選取設定。
將應用程式 ID 個人化 (選擇性) app-id-personalization
當您有多個品牌或租使用者使用不同的應用程式時,您可以將每個 應用程式ID 儲存在設定檔上,並使用單一通道設定將推播通知傳送至每個收件者的正確應用程式。
若要這麼做,請按一下 應用程式ID 欄位旁的Personalization圖示,選取對應至應用程式ID的設定檔屬性,然後儲存。 此欄位使用每個收件者在傳送時評估的對應Handlebars運算式。
步驟3:在行動屬性中設定Adobe Journey Optimizer擴充功能 configure-journey-optimizer-extension
適用於Adobe Experience Platform Mobile SDK的 Adobe Journey Optimizer擴充功能 可支援行動應用程式的推播通知,並可協助您收集使用者推播權杖,並管理與Adobe Experience Platform服務的互動測量。
在Adobe Experience Platform Mobile Journey Optimizer檔案中瞭解如何設定SDK擴充功能。
步驟4:使用事件測試您的行動應用程式 mobile-app-test
在Adobe Experience Platform和Adobe Experience Platform Data Collection中設定行動應用程式後,您現在可以在將推播通知傳送至設定檔之前對其進行測試。 在此使用案例中,我們會建立歷程來鎖定行動應用程式,並設定觸發推播通知的事件。
為了讓此歷程正常運作,您需要建立XDM結構描述。 如需詳細資訊,請參閱XDM檔案。
-
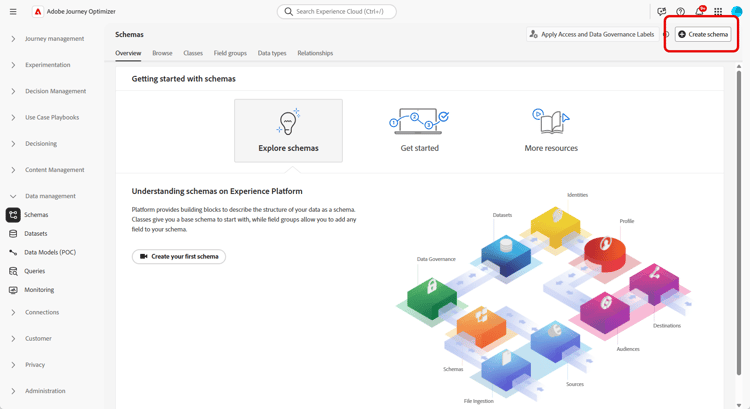
在「資料管理」功能表區段中,按一下結構描述。
-
按一下建立結構描述,在右上角選取體驗事件,然後按一下下一步。

-
輸入結構描述的名稱和描述,然後按一下完成。

-
在 欄位群組 區段中,按一下左側的 新增 並選取建立新欄位群組。
-
輸入 顯示名稱 和描述。 完成時,按一下新增欄位群組。 有關如何建立欄位群組的詳細資訊,請參閱XDM系統檔案。

-
在左側,選取結構。 在右窗格中,為 設定檔 啟用此結構描述。

-
在左側,選取欄位群組,然後按一下+圖示以建立新欄位。 在 欄位群組屬性 的右側,輸入欄位名稱、顯示名稱並選取 字串 作為型別。

-
檢查 必要 並按一下套用。
-
按一下「儲存」。 您的結構描述現在已建立,並可在事件中使用。
然後,您需要設定事件。
-
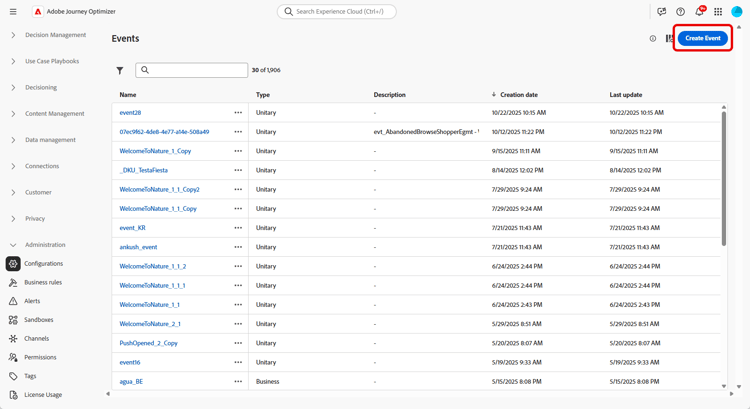
從首頁的左側功能表的[管理]底下,選取組態。 按一下 事件 區段中的 管理 以建立您的新事件。
-
按一下建立事件,事件設定窗格會在畫面右側開啟。
-
輸入事件的名稱。 您也可以新增說明。
-
在 事件識別碼型別 欄位中,選取以規則為基礎。
-
在 引數 中,選取您先前建立的結構描述。

-
在欄位清單中,檢查是否選取了在結構描述欄位群組中建立的欄位。

-
按一下 事件識別碼條件 欄位中的編輯。 拖放您先前新增的欄位,以定義系統用來識別觸發歷程之事件的條件。

-
輸入您在測試應用程式中觸發推播通知所需使用的語法,在此範例中為訂單確認。

-
選取 ECID 作為您的名稱空間。
-
按一下「確定」,然後按「儲存」。
您的事件現在已建立,並可用於歷程中。

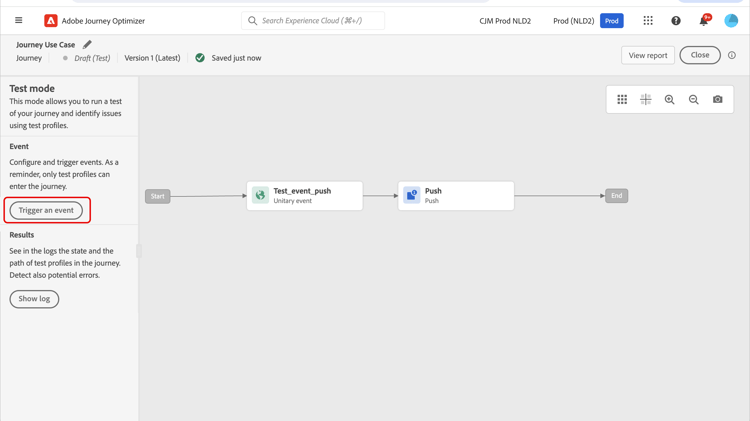

您的事件將會觸發,而您將會收到傳送至行動應用程式的推播通知。
This section contains structured knowledge intended to support interpretation, retrieval, and question answering related to this topic.
For complete understanding, this information should be combined with the documentation on this page. Neither source is intended to stand alone; the page describes the feature, while this section provides additional context that helps disambiguate terminology, intent, applicability, and constraints.
- TL;DR: This page explains how to configure the mobile app push notification channel in Journey Optimizer, covering permissions, datasets, adding iOS and Android push credentials, creating a Push channel configuration (with optional App id personalization), configuring the Adobe Journey Optimizer extension, and testing with a journey and event.
Intents:
- Set up the tags user permissions (Property and Company rights) required for push configuration
- Add mobile app push credentials in Journey Optimizer for iOS and Android
- Create a Push channel configuration and associate marketing actions and platforms
- Personalize the App id to drive multiple apps from a single channel configuration
- Configure the Adobe Journey Optimizer extension in the mobile property
- Test the mobile app by creating a schema, event, and journey that triggers a push notification
Glossary:
- Push credential: The mobile app push credential registered in Journey Optimizer that authorizes Adobe to send push notifications on your behalf (product-specific)
- Channel configuration: A configuration (i.e. message preset) created so you can send push notifications from Journey Optimizer (product-specific)
- Apply to all sandboxes: A push credential option that makes the credentials available across all sandboxes; sandbox-specific credentials for the same Platform and App ID pair take precedence (product-specific)
- App id personalization: Storing each App id on the profile and using a single channel configuration, with a Handlebars expression evaluated per recipient at send time (product-specific)
- Adobe Journey Optimizer extension: The Adobe Experience Platform Mobile SDK extension that powers push notifications, collects user push tokens, and manages interaction measurement (product-specific)
Guardrails:
- Push configuration must be performed by an expert user; you may need to assign the full set of permissions to a single product profile or share permissions between the app developer and the Adobe Journey Optimizer administrator.
- Property rights require the Approve, Develop, Manage Environments, Manage Extensions, and Publish rights; Company rights require Manage App Configurations and Manage Properties.
- Only .p8 Apple Push Notification keys are supported; use another Apple Developer account if you reach the .p8 key limit.
- The iOS Key ID is a 10 character string assigned during creation of the p8 auth key.
- Configuration names must begin with a letter (A-Z), can only contain alpha-numeric characters, and may also use underscore, dot, and hyphen characters.
- When personalizing the App id, Journey Optimizer does not check that push credentials exist for every value the expression may return; ensure credentials exist for every possible app id and test with representative profiles, or recipients whose resolved app id has no matching credentials will not be delivered as expected.
- When push tracking events are ingested into the CJM Push Tracking Experience Event dataset, missing mapped fields cause warnings that appear as ‘failed’ in batch status but reflect partial ingestion success and do not prevent ingestion of valid data.
Terminology:
- Canonical name: Mobile app push notification channel — Acronym: n/a — variants: Push channel
- Synonyms: “channel configuration” = “message preset”
- Do not confuse: “Push credentials” (authorize Adobe to send push) ≠ “Channel configuration” (message preset used to send push)
- Do not confuse: “APNs” (Apple, iOS) ≠ “FCM” (Firebase Cloud Messaging, Android)
FAQ:
- Q: What credentials do I provide for iOS? — A .p8 Apple Push Notification Authentication Key file, the Key ID (a 10 character string), and the Team ID; only .p8 keys are supported.
- Q: What do I provide for Android? — The App ID (usually the package name from your build.gradle file) and the FCM push credentials.
- Q: How can one channel configuration serve multiple apps? — Store each App id on the profile and use App id personalization; the Handlebars expression is evaluated per recipient at send time, and you must ensure push credentials exist for every possible app id.
- Q: What does the Apply to all sandboxes option do? — It makes the push credentials available across all sandboxes; sandbox-specific credentials for the same Platform and App ID pair take precedence.
- Q: How do I test the push setup? — Create an XDM Experience Event schema, set up a Rule Based event, build a journey with the event and an Action activity with the Push channel selected, then use the Test toggle to trigger an event and send the notification.