이 페이지에서: Adobe Campaign v7 및 v8과의 통합을 사용하여 트랜잭션 템플릿, 이벤트 및 작업을 만드는 등 여정에서 전자 메일을 보내는 방법에 대해 알아봅니다.
이 사용 사례에서는 Adobe Campaign v7 및 Adobe Campaign v8과의 통합을 사용하여 전자 메일을 보내는 데 필요한 모든 단계를 설명합니다.
먼저 Campaign에서 트랜잭션 이메일 템플릿을 만듭니다. 그런 다음 Journey Optimizer에서 이벤트, 작업을 만들고 여정을 디자인합니다.
Campaign 통합에 대한 자세한 내용은 다음 페이지를 참조하십시오.
Adobe Campaign
이 통합을 위해 Campaign 인스턴스를 프로비저닝해야 합니다. 트랜잭션 메시지 기능을 구성해야 합니다.
-
Campaign 컨트롤 인스턴스에 로그인합니다.
-
관리 > 플랫폼 > 열거형에서 이벤트 유형(eventType) 열거형을 선택합니다. 새 이벤트 유형("이 예제의 경우 “여정-이벤트”)을 만듭니다. 나중에 JSON 파일을 작성할 때 이벤트 유형의 내부 이름을 사용합니다.

-
생성을 적용하려면 인스턴스 연결을 끊고 다시 연결하십시오.
-
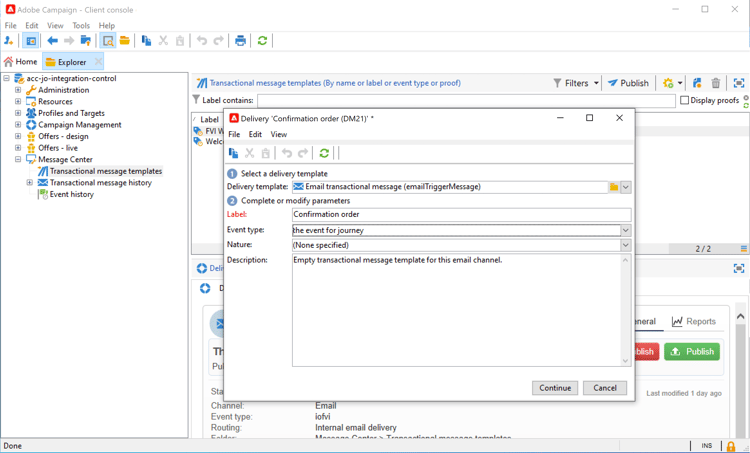
메시지 센터 > 트랜잭션 메시지 템플릿에서 이전에 만든 이벤트 유형을 기반으로 새 전자 메일 템플릿을 만듭니다.
-
템플릿 디자인 이 예에서는 개인화가 프로필의 이름과 주문 번호에 적용됩니다. 이름은 Adobe Experience Platform 데이터 원본에 있으며 주문 번호는 Journey Optimizer 이벤트의 필드입니다. Campaign에서 올바른 필드 이름을 사용해야 합니다.

-
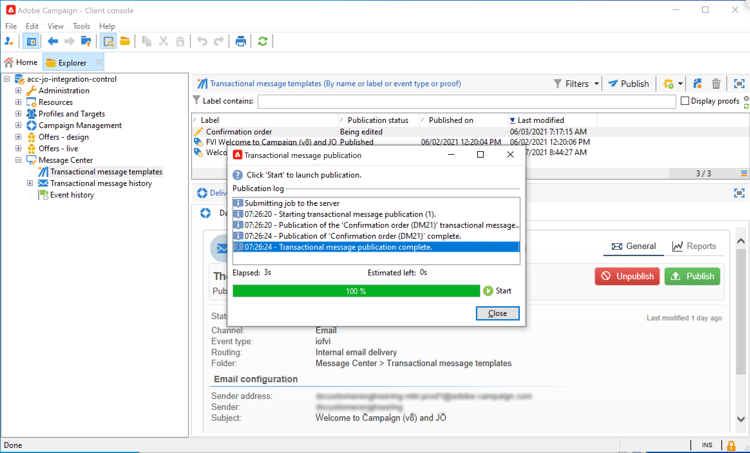
트랜잭션 템플릿을 게시합니다.
-
템플릿에 해당하는 JSON 페이로드를 씁니다.
{
     "channel": "email",
     "eventType": "journey-event",
     "email": "Email address",
     "ctx": {
          "firstName": "First name", "purchaseOrderNumber": "Purchase order number"
     }
}
- 채널의 경우 "email"을 입력해야 합니다.
- eventType의 경우 이전에 만든 이벤트 유형의 내부 이름을 사용합니다.
- 이메일 주소는 변수가 되므로 임의의 레이블을 입력할 수 있습니다.
- ctx에서 개인화 필드도 변수입니다.
Journey Optimizer
-
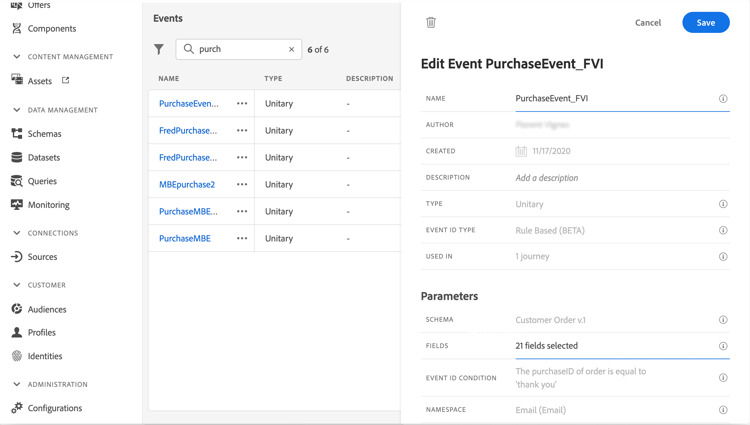
이벤트를 만듭니다. “purchaseOrderNumber” 필드를 포함합니다.
Adobe Campaign 클래식 통합에 대한
-
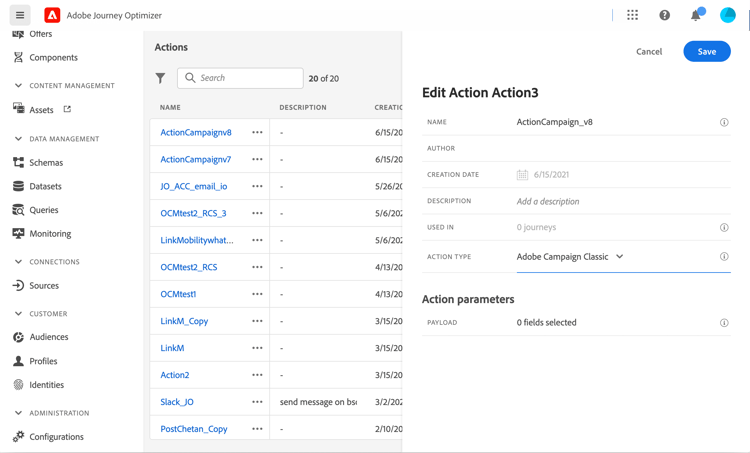
Journey Optimizer에서 Campaign 템플릿에 해당하는 작업을 만듭니다. 작업 유형 드롭다운에서 Adobe Campaign클래식을 선택합니다.
-
페이로드 필드를 클릭하고 이전에 만든 JSON을 붙여 넣습니다.

-
전자 메일 주소와 두 개의 개인화 필드의 경우 상수을(를) 변수(으)로 변경하십시오.

-
이제 새 여정을 만들고 이전에 만든 이벤트로 시작합니다.
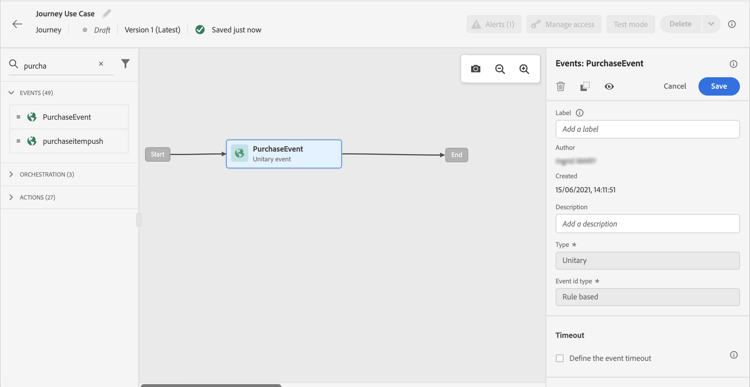
-
작업을 추가하고 각 필드를 Journey Optimizer의 올바른 필드에 매핑합니다.
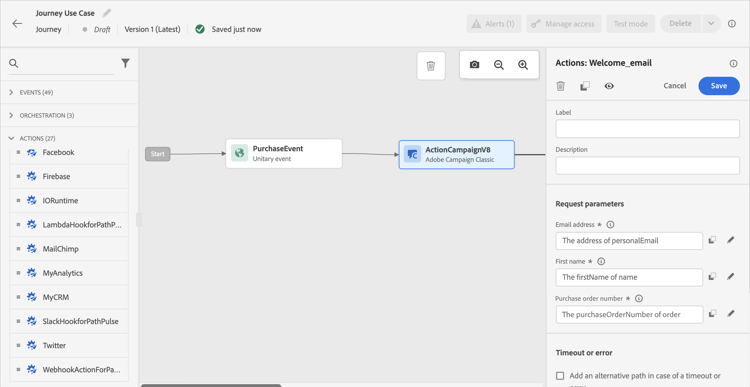
-
여정 헤더에서 유효성 검사를 클릭합니다. 계속하기 전에 경고 패널에서 오류를 해결하고 다시 확인합니다. 여정 유효성 검사에 대해 알아보세요.
-
여정을 테스트합니다.
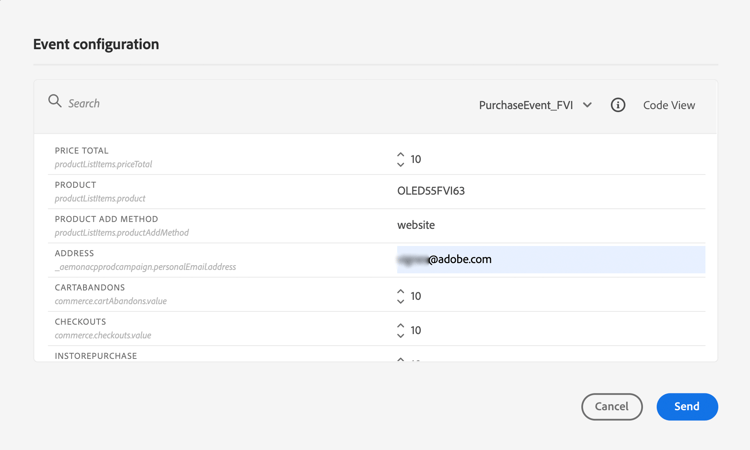
-
이제 여정을 게시할 수 있습니다.
This section contains structured knowledge intended to support interpretation, retrieval, and question answering related to this topic.
For complete understanding, this information should be combined with the documentation on this page. Neither source is intended to stand alone; the page describes the feature, while this section provides additional context that helps disambiguate terminology, intent, applicability, and constraints.
- TL;DR: This page provides a step-by-step use case for sending a transactional email from Adobe Journey Optimizer using the integration with Adobe Campaign v7/v8, covering Campaign template creation, event and action configuration, and journey design.
Intents:
- Configure a transactional email template in Adobe Campaign v7/v8 for use with Journey Optimizer
- Create an event in Journey Optimizer that includes custom fields such as a purchase order number
- Create and configure an action of type Adobe Campaign Classic in Journey Optimizer with a JSON payload
- Map journey event fields to Campaign personalization variables in the action configuration
- Build and publish a journey that triggers a Campaign transactional email
Glossary:
- Transactional Messaging: A Campaign feature that must be configured before this integration can be used (product-specific)
- Event type (eventType): An enumeration value defined in Campaign that identifies the type of transactional event; its internal name is referenced in the JSON payload (product-specific)
- Adobe Campaign Classic (Action type): The Journey Optimizer action type selected for the action that corresponds to the Campaign template; it connects to Adobe Campaign v7/v8 to send transactional messages (product-specific)
- Payload field: The JSON structure pasted into a Journey Optimizer action that defines the data fields sent to Campaign (product-specific)
Guardrails:
- The journey must be validated before testing. Errors in the Alerts panel must be resolved and validation rerun before continuing.
- Campaign v7/v8 build 9125 or higher is required for this integration
- The Transactional Messaging feature must be configured in the Campaign instance before use
- After creating a new event type in Campaign, you must disconnect and reconnect to the instance for it to take effect
- Personalization field values set as “Constant” in the action must be changed to “Variable” to allow dynamic population at runtime
Terminology:
- Canonical name: Adobe Campaign v7/v8 — Acronym: ACC (Adobe Campaign Classic v7/v8) — variants: Adobe Campaign Classic (the Action type selected in Journey Optimizer)
- Synonyms: “Event type” = “eventType” (the Campaign enumeration)
- The
eventTypepayload field uses the internal name of the event type created in Campaign.
FAQ:
- Q: What Campaign version is required for this integration? — Campaign v7/v8 build 9125 or higher is required.
- Q: What must be configured in Campaign before starting? — The Transactional Messaging feature must be configured and a transactional email template must be created based on the event type.
- Q: How do I make personalization fields dynamic in the Journey Optimizer action? — In the action payload configuration, change the field configuration from “Constant” to “Variable” for fields that will be populated at runtime.
- Q: Where does the first name personalization data come from in this use case? — The first name comes from the Adobe Experience Platform data source, while the order number comes from the Journey Optimizer event payload.
- Q: How do I connect the Journey Optimizer action to the Campaign template? — Select “Adobe Campaign Classic” as the Action type, then paste the JSON payload that matches the transactional message template structure.