이 페이지에서: KPI에 대한 성과를 추적하고 고객 여정의 효과를 실시간으로 측정하기 위해 여정 지표를 구성하고 할당하는 방법에 대해 알아봅니다.
여정 지표를 통해 고객 여정의 효과를 명확하게 파악할 수 있습니다. 이 기능을 사용하면 정의된 KPI에 대해 성과를 추적하고 작동 중인 항목에 대한 통찰력을 확보하고 최적화할 영역을 식별할 수 있습니다. 실시간으로 영향을 측정함으로써 지속적인 개선을 유도하고 데이터 정보에 기반한 의사 결정을 내려 고객 참여를 높일 수 있습니다.
전제 조건 prerequisites
여정 지표를 사용하기 전에 Adobe Experience Platform의 구성 > 보고에서 Commerce Details, Web 및 Mobile 필드 그룹을(를) 포함하는 데이터 집합을 추가해야 합니다.
이러한 필드 그룹은 사용자 지정 그룹이 아닌 기본 제공 옵션에서 선택해야 합니다. 데이터 세트 추가 섹션을 참조하십시오.
사용 가능한 지표 metrics
지표 목록은 데이터 집합에 포함된 필드 그룹에 따라 다릅니다.
데이터 세트가 구성되지 않은 경우 다음 지표만 사용할 수 있습니다. 클릭, 고유 클릭, 클릭스루 비율 및 열기 비율.
Customer Journey Analytics 라이선스를 사용하면 사용자 지정 성공 지표를 만들 수 있습니다. 자세히 알아보기
기여도 attribution
각 지표는 특정 결과에 기여하는 터치포인트 또는 상호 작용을 결정하는 속성 세트를 제공합니다.
-
Journey Optimizer 라이선스가 있는 지표 속성:
Journey Optimizer 라이센스만 있는 경우, 선택한 지표에 대해 사용 가능한 최대 전환 확인 기간은 7일로 설정됩니다. 이러한 지표의 경우 속성 모델은 기본적으로 마지막 터치, 즉 전환 전 가장 최근 상호 작용으로 설정됩니다.
예를 들어 고객이 지난 7일 이내에 여정과 상호 작용한 후 구매가 이루어졌는지 여부를 추적할 수 있습니다.
-
Customer Journey Analytics 라이선스가 있는 지표 속성:
Journey Optimizer 및 Customer Journey Analytics 라이선스를 모두 사용하여 특정 속성 설정으로 사용자 지정 지표를 만들거나 기본 제공 지표의 속성을 변경할 수 있습니다.
속성 모델에 대해 자세히 알아보기
여정 지표 할당 assign
여정 지표 추적을 시작하려면 아래에 설명된 단계를 수행합니다.
-
여정 메뉴에서 여정 만들기를 클릭합니다.
-
여정의 구성 창을 편집하여 여정 이름을 정의하고 속성을 설정합니다. 이 여정에서 페이지의 속성을 설정하는 방법을 알아보세요.
-
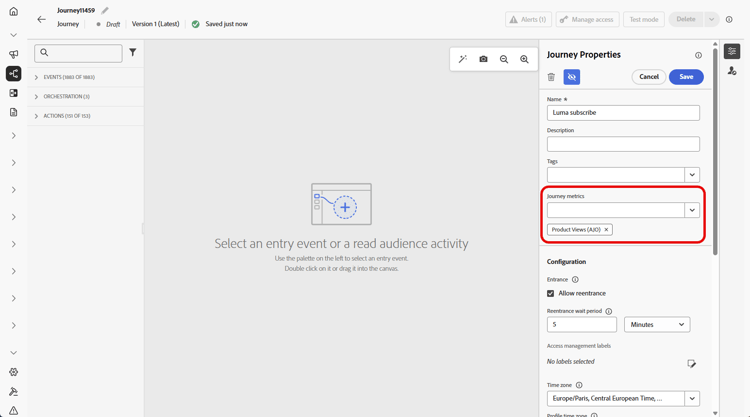
여정 효과를 측정하는 데 사용할 여정 지표를 선택하십시오.
지표는 여정 자체에 적용되며 여정의 모든 요소에 적용할 수 있습니다.
-
저장을 클릭합니다.
-
필요한 활동(으)로 여정을 디자인합니다.
-
여정 헤더에서 유효성 검사를 클릭합니다. 계속하기 전에 경고 패널에서 오류를 해결하고 다시 확인합니다. 여정 유효성 검사에 대해 알아보세요.
-
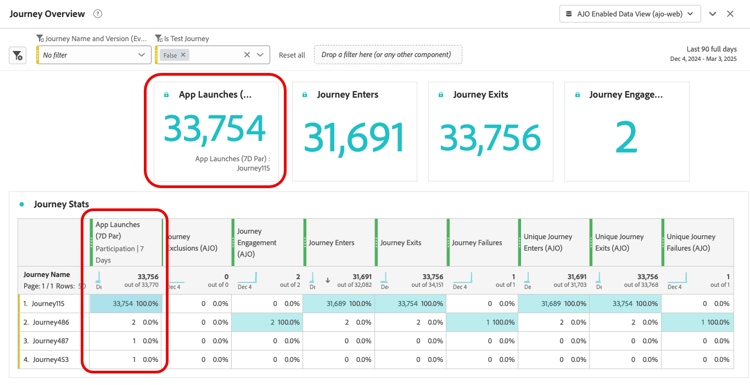
여정 보고서를 열어 지정된 성공 지표의 성과를 추적합니다.
선택한 지표는 보고서의 KPI 및 여정 상태 테이블에 표시됩니다.
This section contains structured knowledge intended to support interpretation, retrieval, and question answering related to this topic.
For complete understanding, this information should be combined with the documentation on this page. Neither source is intended to stand alone; the page describes the feature, while this section provides additional context that helps disambiguate terminology, intent, applicability, and constraints.
- TL;DR: This page explains how to configure and track journey success metrics in Adobe Journey Optimizer by assigning a KPI to a journey and reviewing its performance in journey reports.
Intents:
- Add the required Adobe Experience Platform dataset field groups (Commerce Details, Web, Mobile) as a prerequisite for journey metrics
- Assign a journey metric (KPI) to a journey during journey creation or configuration
- Understand which metrics are available based on the configured dataset field groups
- Interpret attribution models for journey metrics under Journey Optimizer and Customer Journey Analytics licenses
- Create custom success metrics using a Customer Journey Analytics license
- Track journey performance against the assigned KPI in journey reports
Glossary:
- Journey metrics: KPIs assigned to a journey to measure its effectiveness, visible in journey reports (product-specific)
- Last Touch attribution: With Journey Optimizer license only, the default attribution model that credits the most recent interaction before a conversion
- Commerce Details field group: A built-in field group enabling commerce-related metrics such as Purchases, Checkouts, and Cart Adds (product-specific)
- Lookback window: The time range over which attribution is evaluated; set to a maximum of 7 days (hard limit) with Journey Optimizer license only
Guardrails:
- The journey must be validated before testing or publishing. Errors in the Alerts panel must be resolved and validation rerun before continuing.
- Only one journey metric is allowed per journey (hard limit)
- Dataset field groups (Commerce Details, Web, Mobile) must be selected from built-in options, not custom groups, and added under Configuration > Reporting in Adobe Experience Platform
- Without a configured dataset, only Click, Unique Click, Clickthrough Rate, and Open Rate are available
- The maximum lookback window is 7 days (hard limit) with a Journey Optimizer license only
- Custom metrics and custom attribution settings require a Customer Journey Analytics license
Terminology:
- Canonical name: Journey metrics
- Canonical name: Clickthrough rate — Acronym: CTR
- Canonical name: Clickthrough open rate — Acronym: CTOR
- Synonyms: “journey metrics” = “success metrics”
- Do not confuse: With Journey Optimizer license only, attribution defaults to Last Touch; with both Journey Optimizer and Customer Journey Analytics licenses, custom metrics can have specific attribution settings and built-in metrics’ attributions can be changed.
FAQ:
- Q: How many journey metrics can I assign to a single journey? — Only one journey metric is allowed per journey (hard limit).
- Q: What metrics are available if I have not configured a dataset with field groups? — Only Click, Unique Click, Clickthrough Rate, and Open Rate are available without a configured dataset.
- Q: What field groups do I need to enable purchase and commerce metrics? — You need to add the Commerce Details field group to your reporting dataset in Adobe Experience Platform.
- Q: What is the default attribution model for journey metrics with Journey Optimizer license only? — Last Touch, which credits the most recent interaction before conversion, with a maximum 7-day lookback window (hard limit).
- Q: Can I create custom success metrics? — Yes, but only with a Customer Journey Analytics license.
- Q: Where can I see the journey metrics results after publishing? — In the journey report’s KPIs and Journey Stats table.