このページ:権限、データセット、プッシュ資格情報、チャネル設定、アプリのテストなど、Adobe Journey Optimizer で web プッシュ通知チャネルを設定する方法について説明します。
Journey Optimizer では、ジャーニーを作成し、ターゲットとなるオーディエンスにメッセージを送信できます。 Journey Optimizer で web プッシュ通知の送信を開始する前に、Adobe Experience Platform の設定と統合が行われていることを確認する必要があります。 Adobe Journey Optimizer でのプッシュ通知のデータフローについては、このページを参照してください。
開始する前に start-push
権限の設定 setup-permissions
モバイルアプリケーションを作成する前に、まず、Adobe Experience Platform のタグに適切なユーザー権限が既にあるか、もしくは割り当てられているかを確認する必要があります。 詳しくは、タグのドキュメントを参照してください。
プロパティと 会社 の権限を割り当てるには、次の手順に従います。
-
Admin Console にアクセスします。
-
「製品」タブから、Adobe Experience Platform データ収集カードを選択します。

-
既存の 製品プロファイル を選択するか、「新規プロファイル」ボタンで新しい製品プロファイルを作成します。 新しいプロファイルを作成する方法については、Admin Console のドキュメントを参照してください。
-
「権限」タブで、「プロパティ権限」を選択します。

-
「すべて追加」をクリックします。 これにより、製品プロファイルに次の権限が追加されます。
- 承認
- 開発
- 環境の管理
- 拡張機能の管理
- 公開
これらの権限は、 Adobe Journey Optimizer 拡張機能をインストールして公開し、Adobe Experience Platform Mobile SDK でアプリプロパティを公開するために必要です。
-
次に、左側のメニューで「会社権限」を選択します。

-
次の権限を追加します。
- アプリ設定の管理
- プロパティの管理
モバイルアプリ開発者が Adobe Experience Platform データ収集でプッシュ資格情報を設定し、Adobe Journey Optimizer でプッシュ通知チャネル設定(メッセージプリセット)を定義するには、これらの権限が必要です。

-
「保存」をクリックします。
この 製品プロファイル をユーザーに割り当てるには、次の手順に従います。
-
Admin Console にアクセスします。
-
「製品」タブから、Adobe Experience Platform データ収集カードを選択します。
-
以前に設定した 製品プロファイル を選択します。
-
「ユーザー」タブで「ユーザーを追加」をクリックします。

-
ユーザーの名前またはメールアドレスを入力し、ユーザーを選択します。 次に、「保存」をクリックします。
note NOTE Admin Console でユーザーをまだ作成していない場合は、ユーザーの追加に関するドキュメントを参照してください。 
データセットの確認 push-datasets
プッシュ通知チャネルでは、次のスキーマとデータセットを使用できます。
データセット
CJM プッシュプロファイルデータセット
Adobe CJM ExperienceEvent - メッセージプロファイルの詳細
Adobe CJM ExperienceEvent - メッセージ実行の詳細
アプリケーションの詳細
環境の詳細
CJM プッシュトラッキングエクスペリエンスイベントデータセット
pushNotification プロパティの設定 push-property
Web プッシュ通知を有効にするには、最初に pushNotifications プロパティが Web SDK 内で適切に設定されていることを確認する必要があります。 このプロパティは、web アプリケーションによるプッシュ通知の処理方法を制御します。
また、Journey Optimizerで アプリのプッシュ資格情報を設定するために必要な VAPID キーを生成する必要があります。
手順 1:Journey Optimizer でのアプリのプッシュ資格情報の追加 push-credentials-launch
正しいユーザー権限を付与した後、モバイルアプリケーションのプッシュ資格情報を Journey Optimizer に追加する必要があります。
モバイルアプリのプッシュ資格情報の登録は、自分の代わりに Adobe がプッシュ通知を送信することを承認するために必要です。 以下に説明する手順を参照してください。
-
チャネル/プッシュ設定/プッシュ資格情報メニューにアクセスします。
-
「プッシュ認証情報を作成」をクリックします。
-
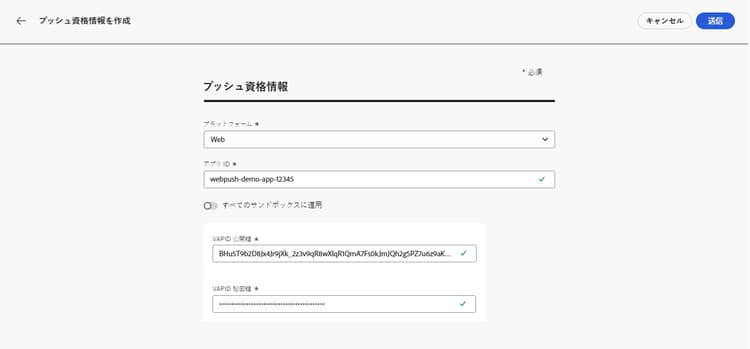
プラットフォームドロップダウンから、「Web」を選択します。
-
アプリ ID を指定します。
-
VAPID 公開鍵および 秘密鍵 を入力します。
-
「送信」をクリックして、アプリ設定を作成します。
手順 2:プッシュ用のチャネル設定の作成 message-preset
プッシュ資格情報を作成したら、Journey Optimizer からプッシュ通知を送信できるように、設定を作成する必要があります。
-
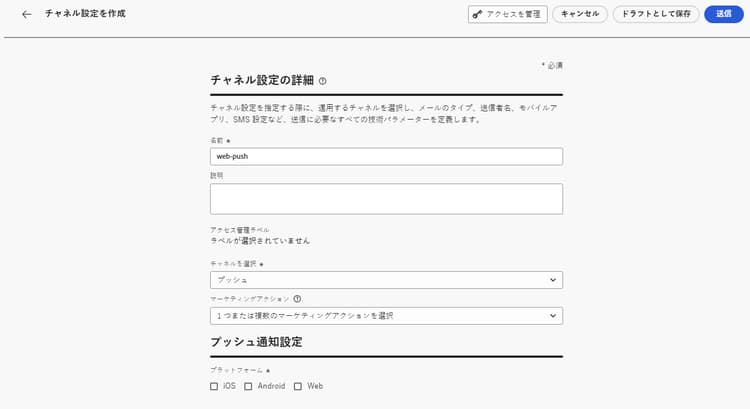
チャネル/一般設定/チャネル設定メニューにアクセスし、「チャネル設定を作成」をクリックします。

-
設定の名前と説明(オプション)を入力します。
note NOTE 名前は、文字(A ~ Z)で始める必要があります。 使用できるのは英数字のみです。 アンダースコア( _)、ドット(.)、ハイフン(-)も使用できます。 -
設定にカスタムまたはコアのデータ使用ラベルを割り当てるには、「アクセスを管理」を選択します。 詳しくは、オブジェクトレベルのアクセス制御(OLAC)を参照してください。
-
プッシュチャネルを選択します。
-
この設定を使用してメッセージに同意ポリシーを関連付けるには、マーケティングアクションを選択します。 顧客の意向に従うために、そのマーケティングアクションに関連付けられているすべての同意ポリシーが活用されます。 詳細情報
-
プラットフォーム(Android、iOS、web)を選択します。
-
上記で設定したプッシュ資格情報と同じアプリ ID を選択します。
-
変更を保存します。
プッシュ通知を作成する際に、設定を選択できるようになりました。
手順 3:sendPushSubscription プロパティを設定 sendPushSubscription-property
プッシュ資格情報とチャネル設定を設定したら、web アプリケーションに sendPushSubscription コマンドを実装する必要があります。 このコマンドは、ユーザーのプッシュ通知を Adobe Experience Platform に登録し、システムがプッシュ通知の受信とサブスクリプションステータスの維持にオプトインしたユーザーを追跡できるようにします。 これは、Journey Optimizer がターゲットにするプッシュ通知をユーザーに送信するために不可欠です。
手順 4:イベントでモバイルアプリのテスト mobile-app-test
Adobe Experience Platformと Adobe Experience Platform Data Collection の両方で web プッシュ設定を完了したら、プロファイルに web プッシュ通知を送信する前に実装をテストできます。 テストにより、サブスクリプションが適切に登録され、通知がユーザーのブラウザーに正しく配信されることが確保されます。
イベントを使用してテストジャーニーを作成し、web プッシュ設定を検証する方法について詳しくは、モバイルアプリプッシュ通知設定ドキュメントを参照してください。このドキュメントでは、モバイルプッシュチャネルと web プッシュチャネルの両方に適用できる包括的なテストワークフローを説明します。
This section contains structured knowledge intended to support interpretation, retrieval, and question answering related to this topic.
For complete understanding, this information should be combined with the documentation on this page. Neither source is intended to stand alone; the page describes the feature, while this section provides additional context that helps disambiguate terminology, intent, applicability, and constraints.
- TL;DR: This page explains how to configure the web push notification channel in Journey Optimizer, covering permissions, datasets, the pushNotifications property and VAPID keys, adding Web push credentials, creating a Push channel configuration, the sendPushSubscription command, and testing the setup.
Intents:
- Set up the tags user permissions (Property and Company rights) required for web push configuration
- Add Web app push credentials in Journey Optimizer using a VAPID public and private key
- Create a Push channel configuration and associate marketing actions and platforms
- Configure the pushNotifications property and the sendPushSubscription command in the Web SDK
- Test the web push implementation before sending to profiles
Glossary:
- Web push notification channel: The Journey Optimizer channel used to send push notifications to users’ browsers (product-specific)
- Push credential: The app push credential registered in Journey Optimizer that authorizes Adobe to send push notifications on your behalf (product-specific)
- Channel configuration: A configuration (i.e. message preset) created so you can send push notifications from Journey Optimizer (product-specific)
- VAPID keys: The public and private keys required to configure the Web app push credentials (product-specific)
- pushNotifications property: A Web SDK property that controls how push notifications are handled by your web application (product-specific)
- sendPushSubscription command: A Web SDK command that registers user push subscriptions with Adobe Experience Platform and maintains their subscription status (product-specific)
Guardrails:
- Push configuration must be performed by an expert user; you may need to assign the full set of permissions to a single product profile or share permissions between the app developer and the Adobe Journey Optimizer administrator.
- Property rights require the Approve, Develop, Manage Environments, Manage Extensions, and Publish rights; Company rights require Manage App Configurations and Manage Properties.
- Configuration names must begin with a letter (A-Z), can only contain alpha-numeric characters, and may also use underscore, dot, and hyphen characters.
- The pushNotifications property must be configured in the Web SDK, and VAPID keys must be generated, before adding Web app push credentials.
- When selecting the App id in the channel configuration, use the same App id as the push credential configured earlier.
- When push tracking events are ingested into the CJM Push Tracking Experience Event dataset, missing mapped fields cause warnings that appear as ‘failed’ in batch status but reflect partial ingestion success and do not prevent ingestion of valid data.
Terminology:
- Canonical name: Web push notification channel — Acronym: n/a — variants: web push, web push notifications
- Synonyms: “channel configuration” = “message preset”
- Do not confuse: “Push credentials” (authorize Adobe to send push) ≠ “Channel configuration” (message preset used to send push)
- Do not confuse: “Warnings” (logged, do not prevent ingestion) ≠ ingestion failure (valid data is still ingested)
FAQ:
- Q: What keys do I need to add Web push credentials? — A VAPID public key and private key, along with the App ID; VAPID keys must be generated beforehand.
- Q: Where do I add Web push credentials? — Under Channels > Push settings > Push credentials, then Create push credential and select the Web platform.
- Q: What does the sendPushSubscription command do? — It registers user push subscriptions with Adobe Experience Platform, tracking which users have opted in and maintaining their subscription status.
- Q: Which schemas and datasets are used? — CJM Push Profile Schema/Dataset (Register Push Token) and CJM Push Tracking Experience Event Schema/Dataset (track interactions and provide reporting data).
- Q: Where can I find the testing workflow for web push? — Refer to the mobile app push notification configuration documentation, which provides a testing workflow applicable to both mobile and web push channels.