Create a storefront
Create a new storefront project with its own GitHub repository, Commerce connection, and starter content in Document Authoring on DA.live. Connect these parts so the project is ready for local development.
If your team already has a configured storefront, run it locally instead of repeating project setup. Use this procedure only to create or complete a storefront environment.
Before creating the project, confirm your backend type and access to its required services using the backend requirements table. If Commerce data or services are missing, return to the backend checklist before treating it as a repository problem.
Prerequisites lists the accounts, permissions, and tools needed for project creation. For local tooling, content preview URLs, and verification, use Run your storefront locally.
You can return later for optional steps such as SidekickBrowser extension that helps creators edit, preview, and publish content from a content folder, and helps developers open source documents from published pages. and Experience WorkspaceAdobe's recommended visual editor for Document Authoring (DA.live) projects. It lets you edit text and images directly on a page's rendered preview or live URL, without opening the underlying document..
Site Creator or this walkthrough
Section titled “Site Creator or this walkthrough”Use Site Creator in DA.live when your organization allows it. Its new-site flow creates the repository, adds starter content, and fills most storefront configuration.
For more control over repository creation and configuration, follow the manual tasks below. That path still uses Site Creator to provision starter content for an existing repository. It is not a Site Creator-free setup.
Which should you use?
Section titled “Which should you use?”Use Site Creator first when you want the fastest path and your organization allows it.
Follow the manual tasks when you need to see how the pieces connect or use your team’s repository process. Typical cases include the following:
- You are new to the stack and want to see what each step does before you run it in a live project.
- Your organization limits who can create repositories or install GitHub Apps, so you follow an approved process step by step.
- You are fixing a store that is only partly configured, or you must run steps in a fixed order for automation.
- You already have a repository and you use Site Creator only to connect content. You may still run some tasks by hand, and the sections below explain what each part is for.
If your organization does not allow Site Creator at all, ask the project owner for an approved content-provisioning process before starting. The manual repository tasks do not provide an alternative content-provisioning tool.
Big picture
Section titled “Big picture”This how-to uses Edge Delivery ServicesAdobe's hosting and delivery infrastructure that turns authored documents into fast HTML pages served from servers close to the shopper. You push code to GitHub; Edge Delivery Services builds and publishes automatically. (EDS) to host the storefront, the Commerce boilerplate for code, and Document Authoring (DA.live) for page content. You create a new EDS storefront from the Commerce boilerplate template . After you connect your own backend, the same repo holds local preview, demo content, and a path to production.
Complete the repository, code connection, Commerce configuration, and content setup first. Then continue to local development. Authoring tools can wait; review access controls before sharing the site.
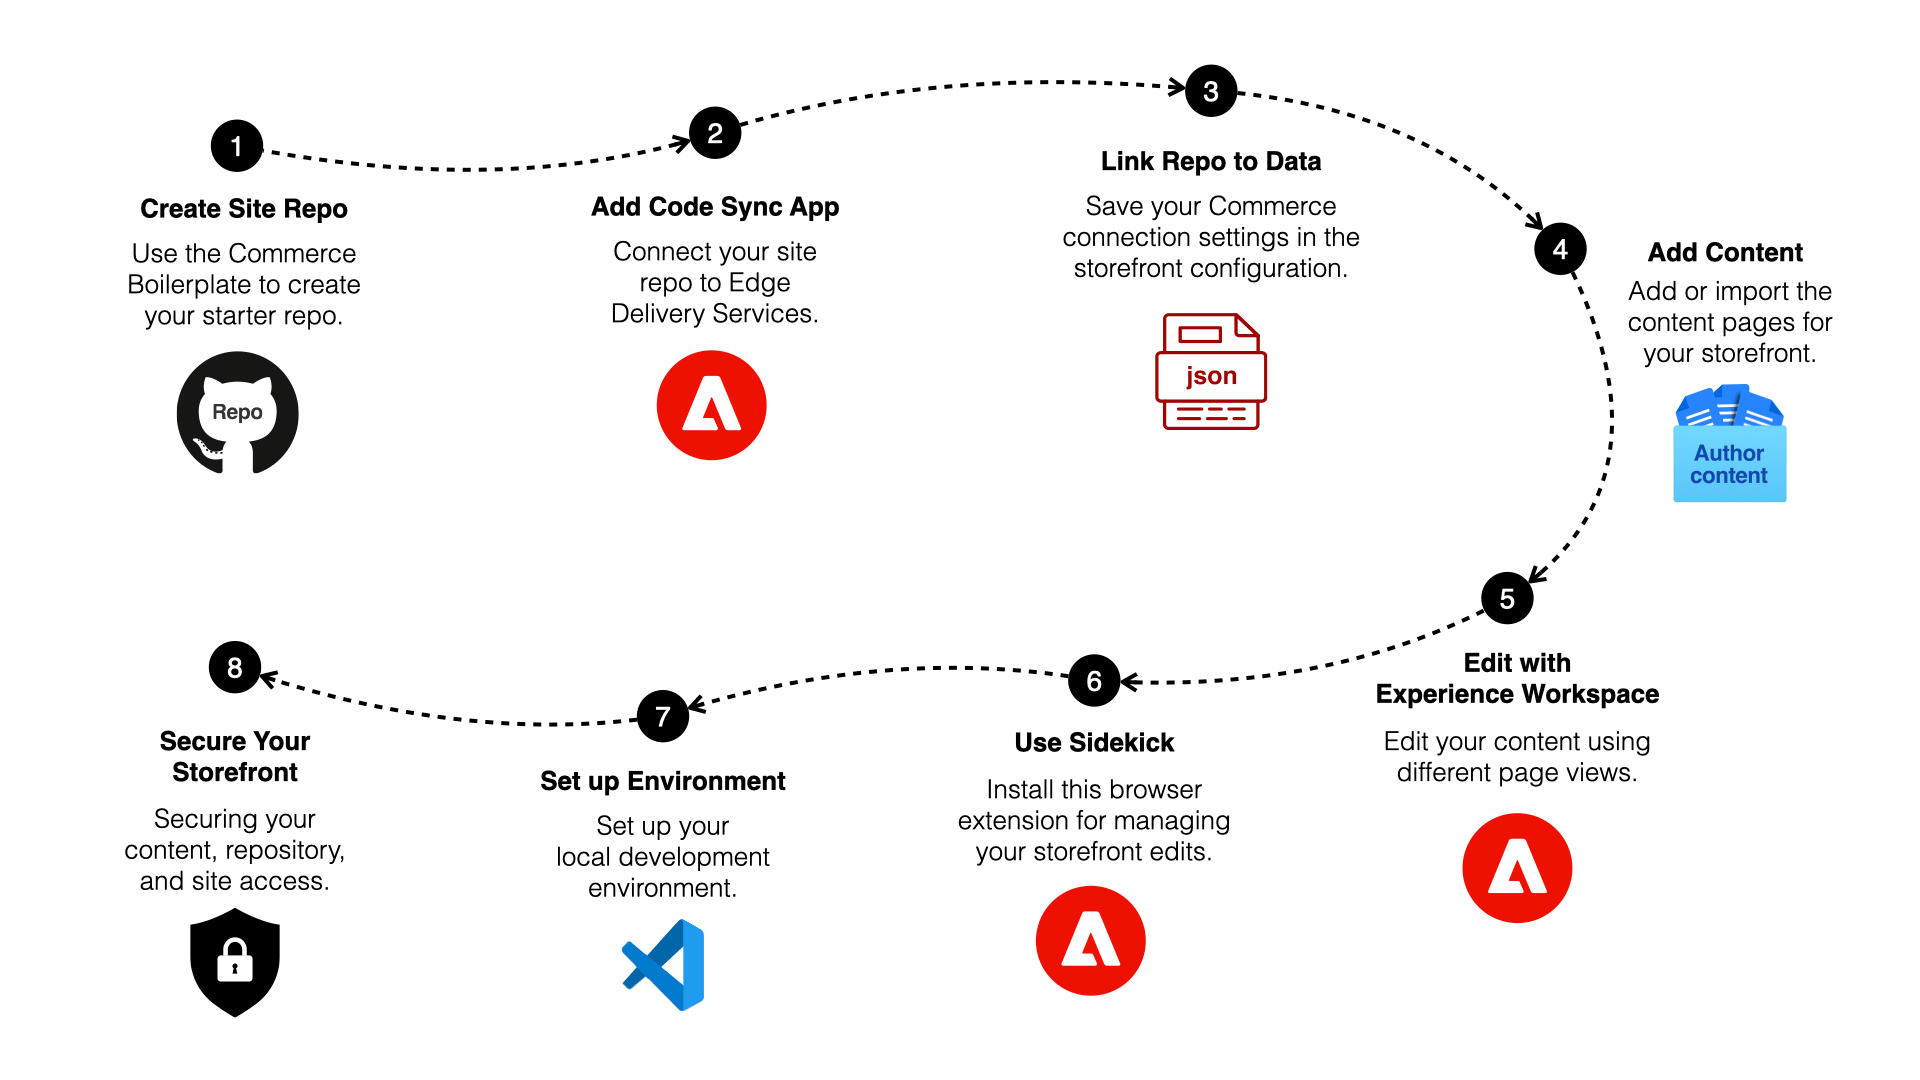
- Create the site repository: Generate a storefront repository from the boilerplate template , or reuse your team’s existing storefront repository.
- Add the Code Sync app: Connect Edge Delivery Services to the repository so it can deliver the storefront code.
- Link the repository to Commerce data: Save the approved connection values in shared site configuration or a local or feature-branch override, as appropriate for the project.
- Add content: Use the team’s existing content source or copy starter content with Site Creator’s existing-code-repository option.
- Experience Workspace: Edit content in context on the rendered page.
- Sidekick: Preview, publish, and open source documents from the live site.
- Set up a local environment: Clone the repo onto your computer. Run your storefront and confirm your data: Install dependencies, start the local server, and check that your own Commerce data appears.
- Secure the storefront: Tighten access to content, the repository, and the site before production or a wide audience.
Which backend do you have?
Section titled “Which backend do you have?”Confirm which platform handles cart, checkout, and accounts for your project. Using the included drop-ins requires an active Adobe Commerce as a Cloud Service or Adobe Commerce Optimizer license. See Licensing requirements if you are unsure.
| Your project’s backend | What to confirm before continuing |
|---|---|
| Adobe Commerce as a Cloud Service | Confirm access to the intended environment. Adobe manages its platform packages; your team configures the storefront connection. |
| Adobe Commerce on Cloud or on-premises with Adobe Commerce Optimizer | Complete PaaS: required packages and services on the existing Commerce deployment. Optimizer catalog services do not replace those requirements. |
| Adobe Commerce Optimizer with a third-party platform | Confirm the catalog connection and who owns the project-specific cart, checkout, and account integration. Connecting the catalog does not complete that integration. |
Use Backend options for the full requirements. If your team already selected and configured a backend, confirm that setup rather than choosing a different platform for this procedure.
The steps below apply to every backend unless a note says otherwise. Backend-specific detail starts at Link your repository to Commerce data.
Use a known product to confirm catalog synchronization. For Adobe Commerce Optimizer, check Data Sync . If the project uses Adobe Commerce Optimizer Connector, also review Connector troubleshooting . For Catalog Service or Live Search configurations, use Data export validation.
If this Commerce project already has a working Edge Delivery storefront, reuse its repository and content source. Continue with Run your storefront locally rather than importing or recreating the project.
Example site
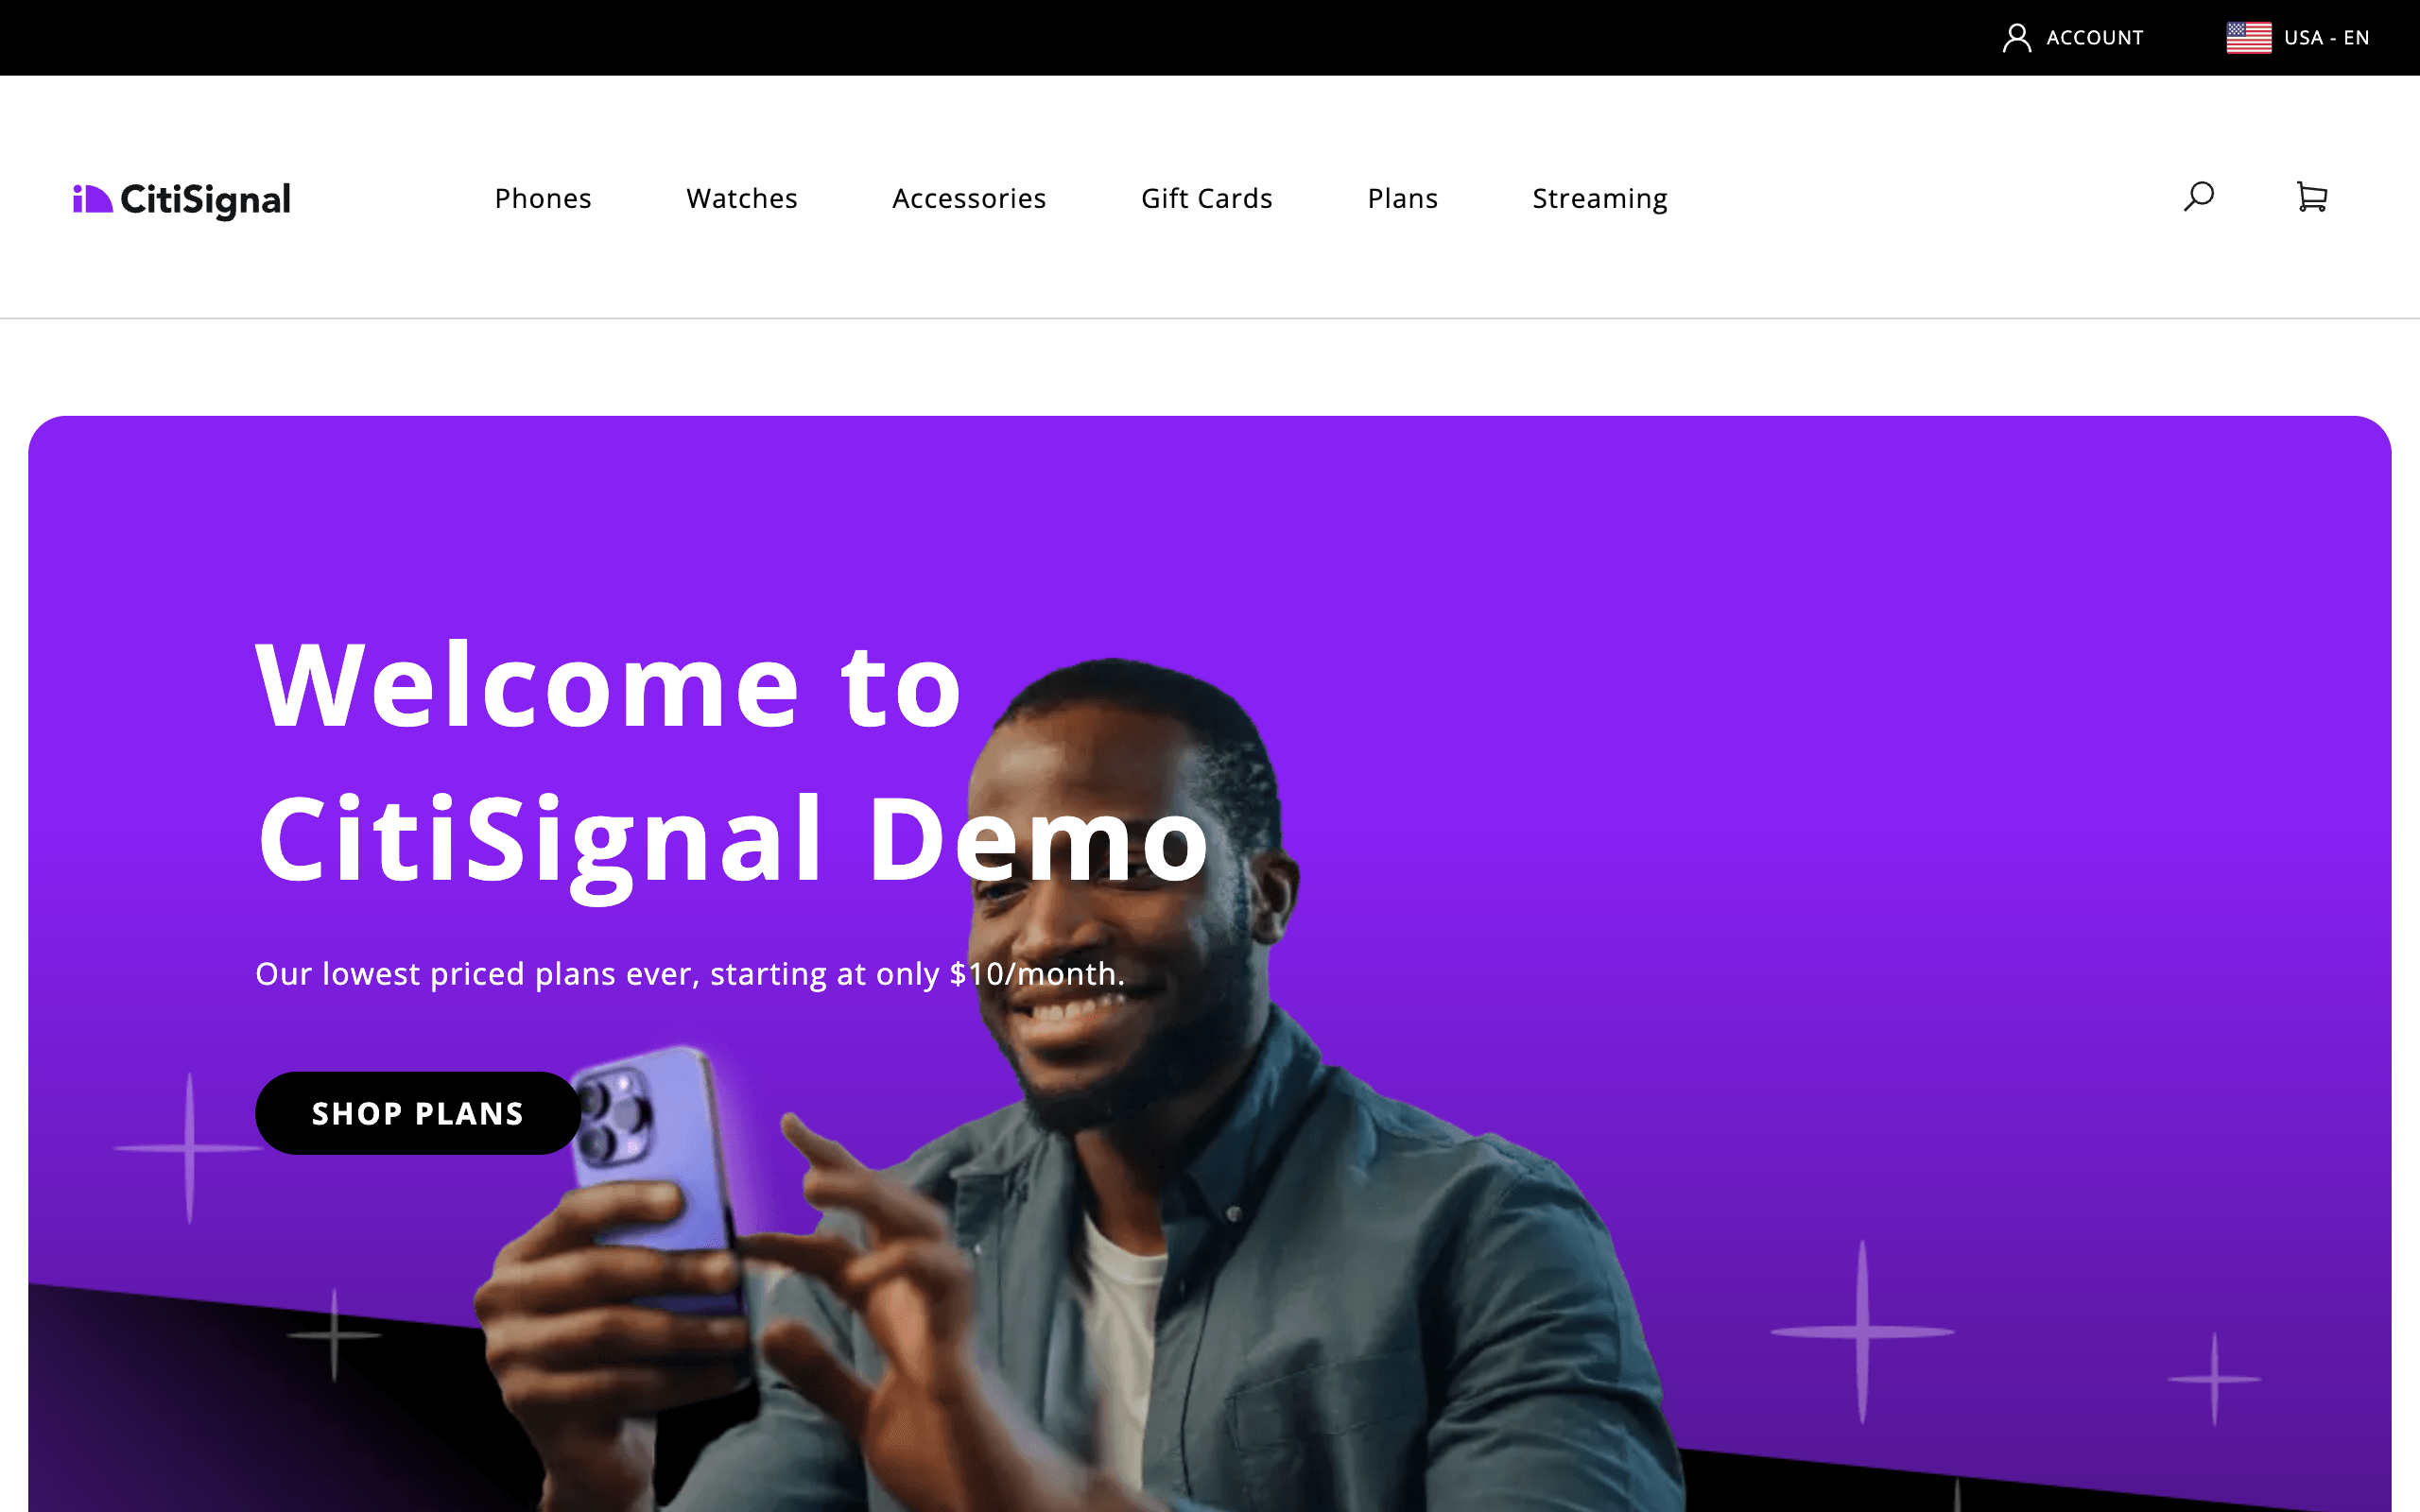
Section titled “Example site”To see what you can build from the same boilerplate, explore the CitiSignal demo storefront at main--citisignal-one--adobedevxsc.aem.live .
Manual repository setup
Section titled “Manual repository setup”Create the repository from the Commerce boilerplate template and install the AEM Code Sync app through your approved GitHub process. Then use Site Creator’s Use existing code repo (content only) option in Add content.
If your team already has a configured storefront with working content, reuse it and continue with Run your storefront locally.
Step-by-step
Section titled “Step-by-step”Set up the repository and Code Sync first, then connect Commerce data, add Document Authoring content, and prepare for local development and security. Follow this order unless a note tells you to wait or skip. If a label or step is unfamiliar, use Architecture or Prerequisites for background.
Create the site repository
Section titled “Create the site repository”This task requires a GitHub account with access to the organization or account where you want to create the new repository. All three backends use the same boilerplate template.
Create the repo under your personal account by choosing your username as the Owner. You’ll install the Code Sync app on that repository in the next step.
Create the repo under your organization by choosing the organization as the Owner. Because installing the Code Sync app may require admin approval, confirm that you have permission to create repositories and install GitHub Apps in the organization.
-
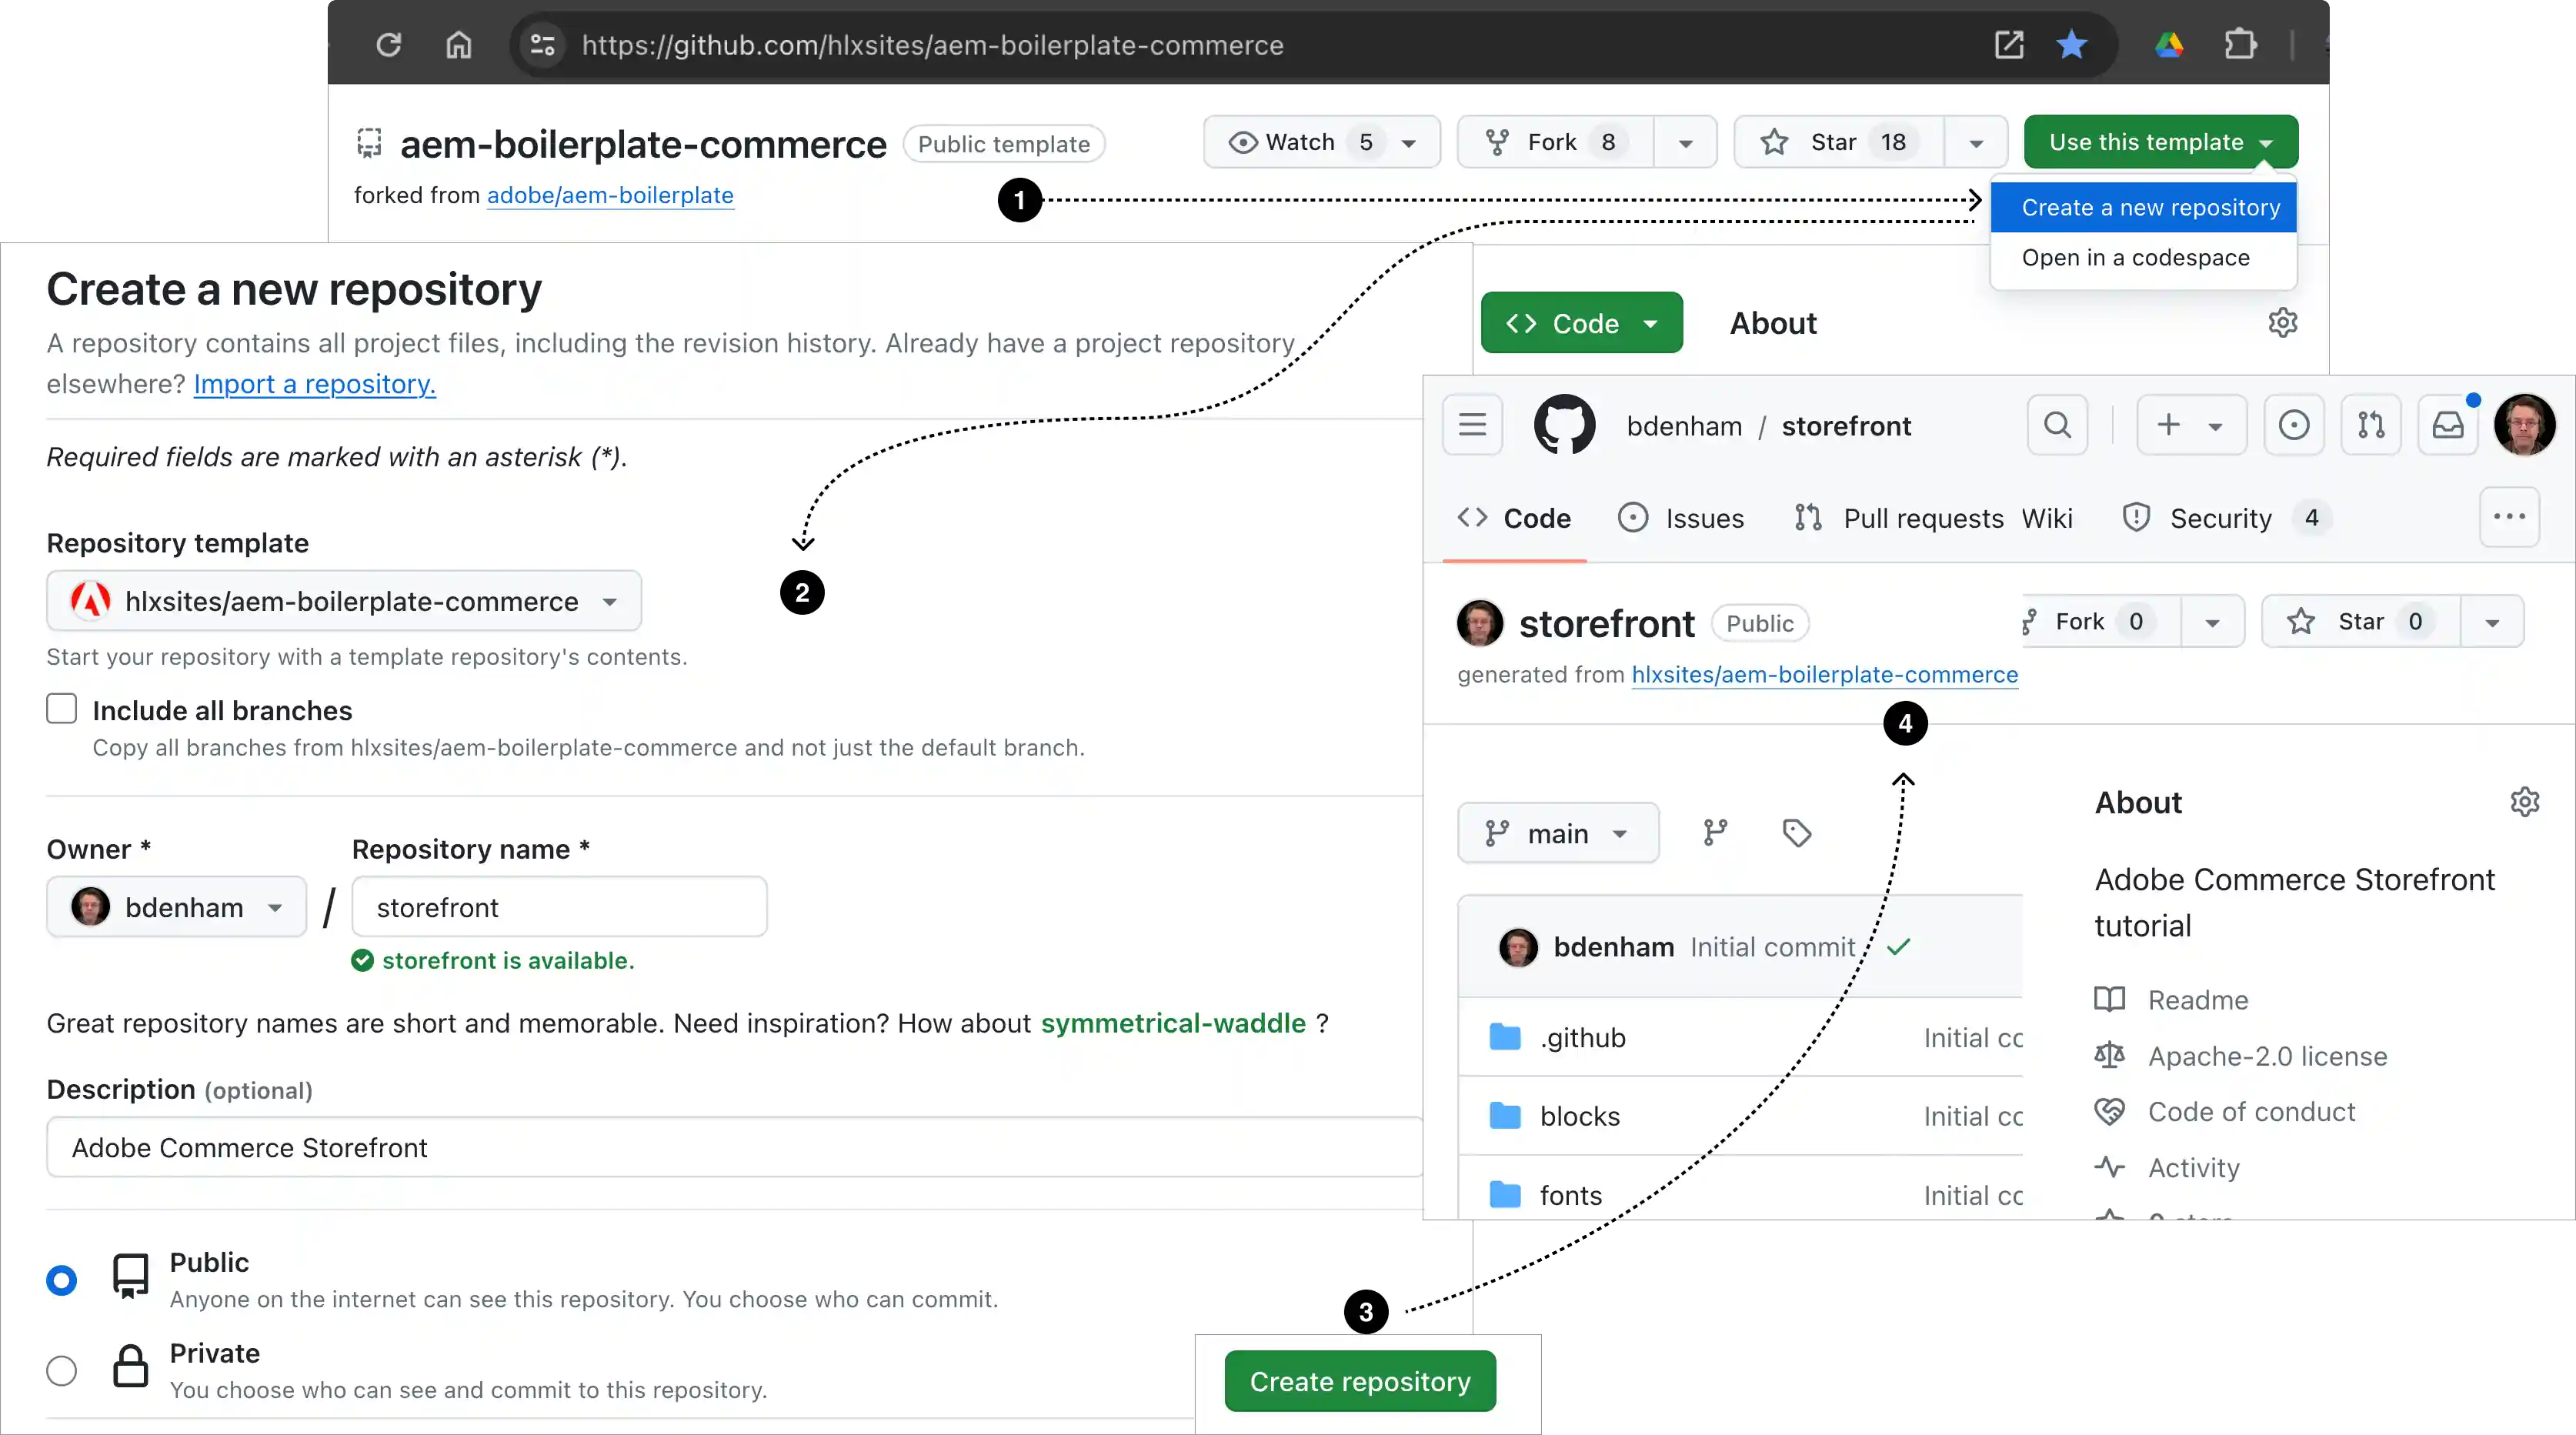
Navigate to aem-boilerplate-commerce .
-
Select the Use this template button.
-
Select Create a new repository when GitHub shows that option. The repository creation form opens.
-
Complete the form with the following details:
- Repository template:
hlxsites/aem-boilerplate-commerce(default). - Include all branches: Do not include all branches (default).
- Owner: Your organization or account (required).
- Repository name: A unique name for your new repo (required). GitHub allows letters, numbers, hyphens, and underscores. For Commerce on Edge Delivery Services, use lowercase letters, numbers, and hyphens only so preview and live URLs match the usual
main--your-repo--your-orgpattern. - Description: A brief description of your repo (optional).
- Public or Private: We recommend public (default).
- Repository template:
-
Select the Create repository button and watch GitHub create your new storefront repo.
-
After a few seconds, you should be redirected to the home page of your new repo.
Add the Code Sync app
Section titled “Add the Code Sync app”Install the Code Sync app on your repository (it cannot be installed globally on a user or org). It redeploys your storefront site whenever you push or merge changes to the main branch. That behavior is the same for every backend in the table above.
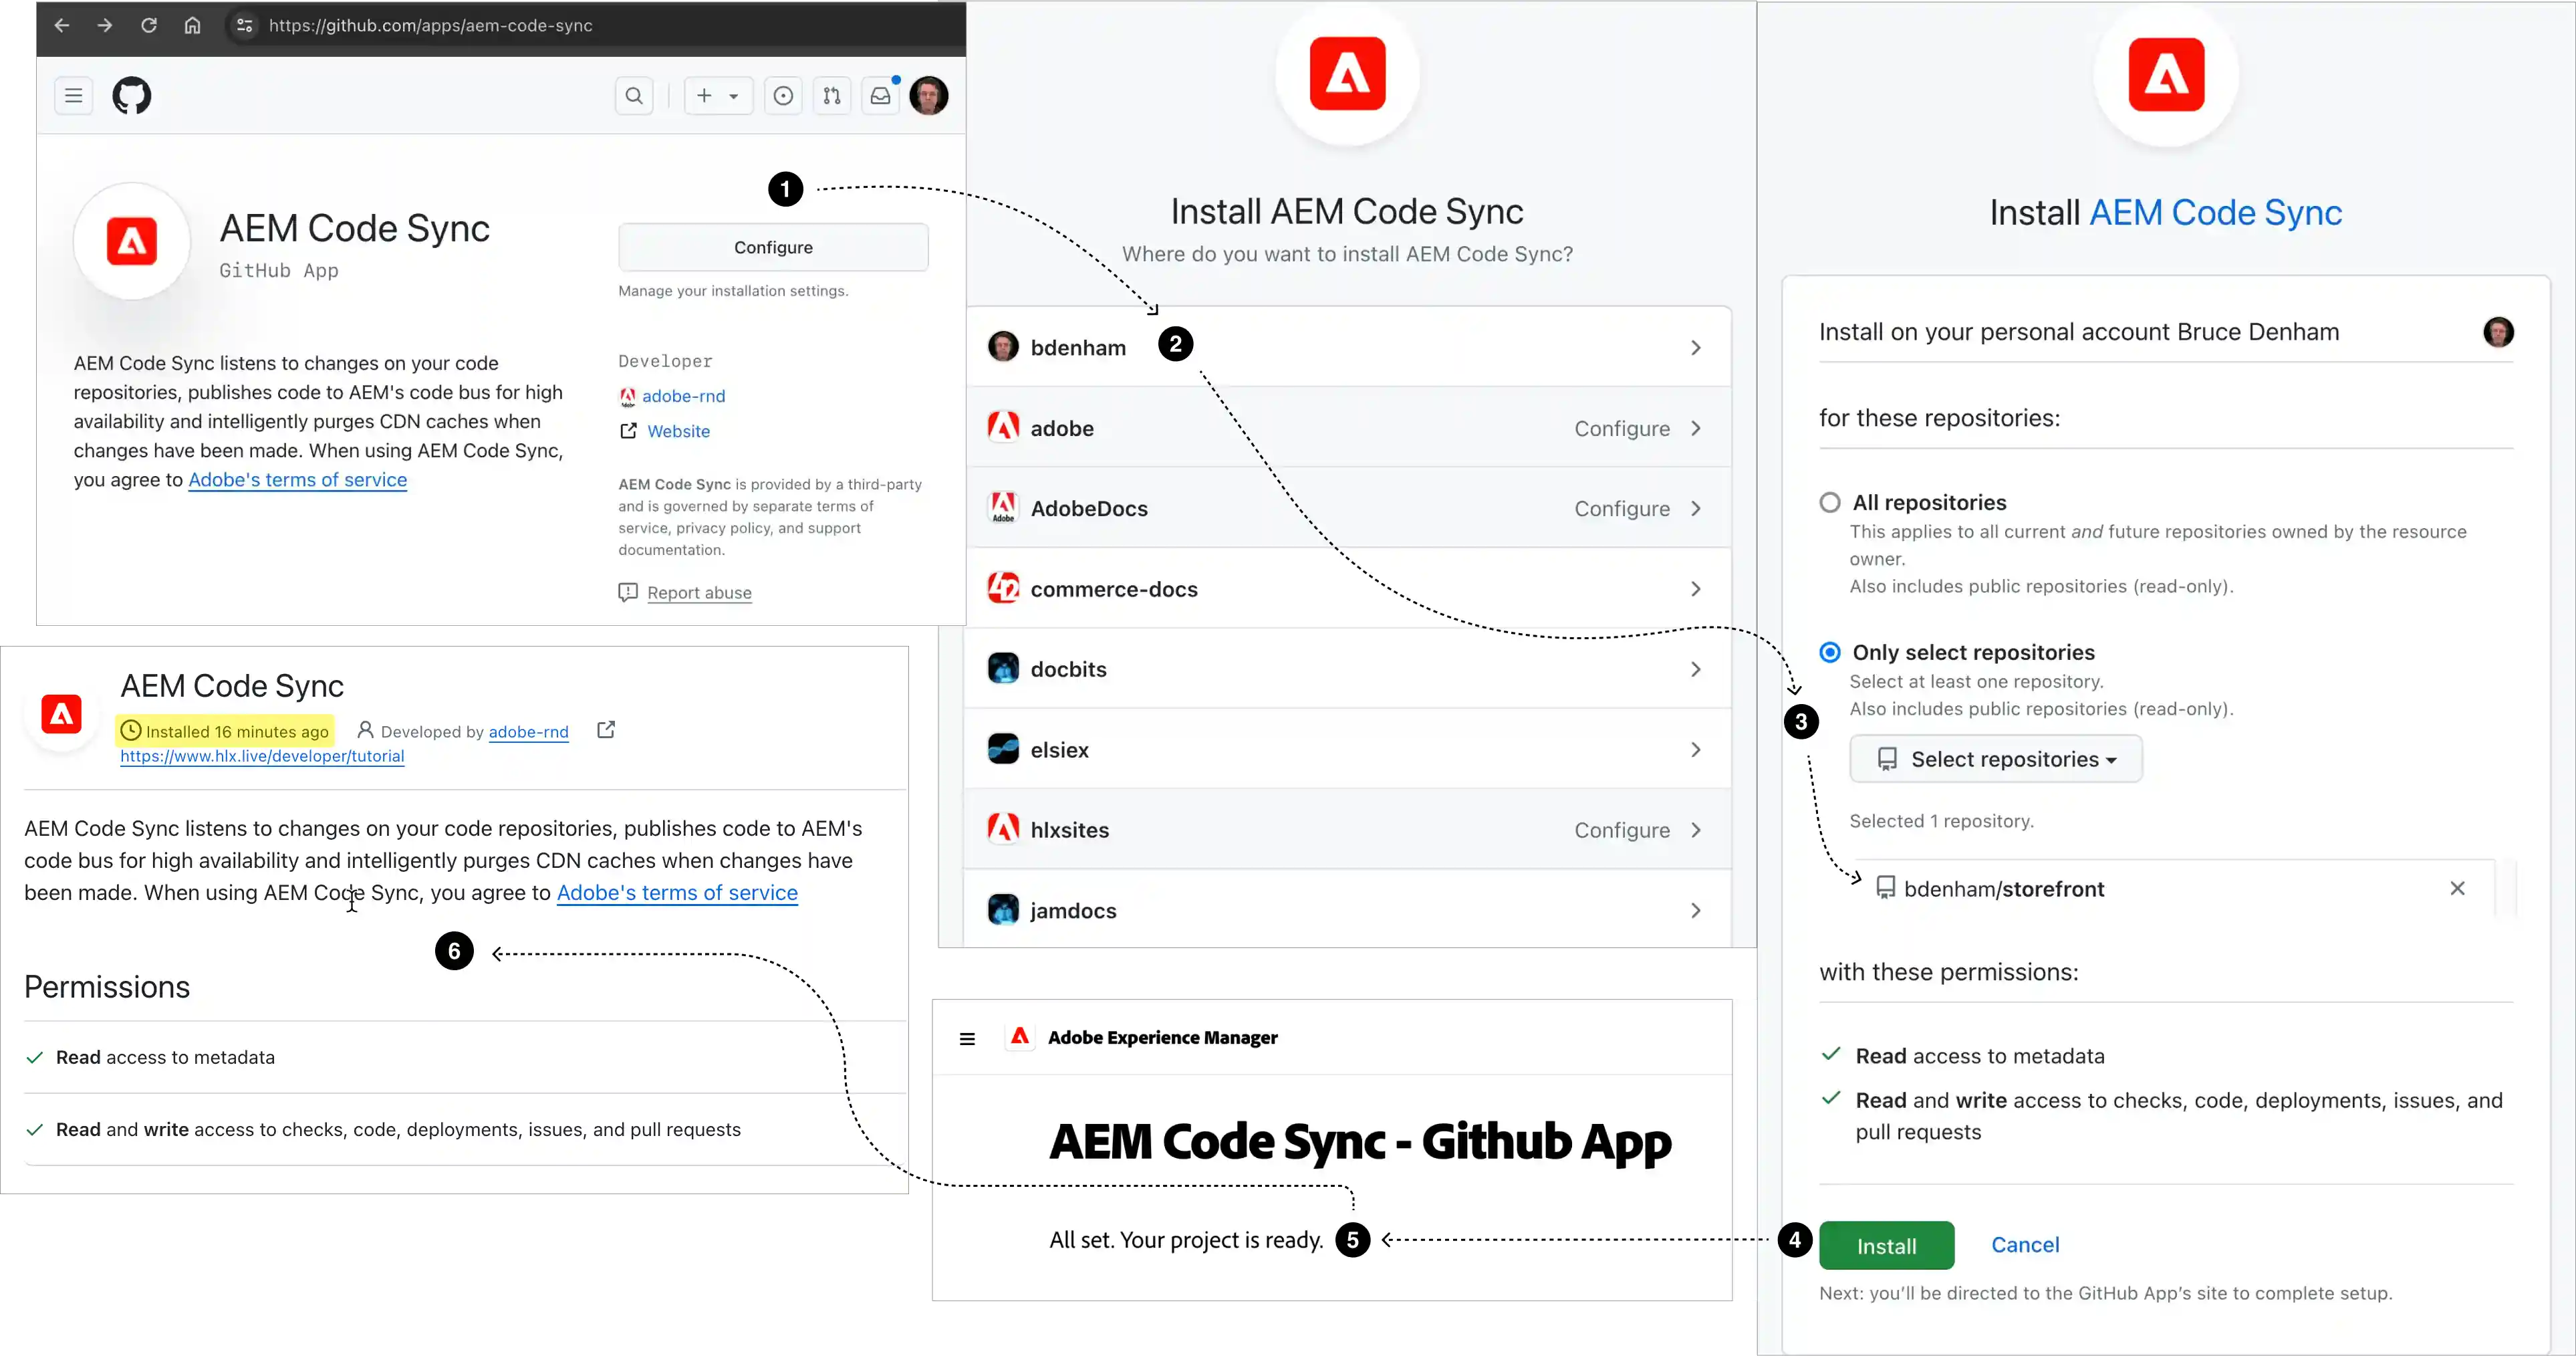
Select your username when choosing where to install. You will see your personal repositories in the selector.
Select your organization. You may need admin approval to install the Code Sync app on repositories. If your organization uses SAML SSO, you may need to authorize the app for SAML SSO access.
-
Navigate to the AEM Code Sync app .
-
Select the Configure button (top right). GitHub opens the page where you choose which repository receives the app.
-
Select the organization or account that owns the repo you just created.
-
In the form, choose Only select repositories.
-
Open the Select repositories selector and choose your repo from the list.
-
Select Install (or Save, as noted above) to install Code Sync on your repository.
-
You should see a success screen if the installation completed without errors. Your repo is now connected to the Edge Delivery Services code bus.
-
(Optional) If you return to the account selection page , your repo’s organization or account will now be gray with Configure added. Select your organization or account again to access the Code Sync configuration page, where you can see which repositories have Code Sync installed and add it to more repositories.
Link your repository to Commerce data
Section titled “Link your repository to Commerce data”Follow Connect your storefront to Commerce to gather connection values, generate the configuration, and save it in the right source for your project. That task covers both shared site configuration and local or feature-branch overrides.
If Site Creator already configured the connection, review the existing settings rather than generating a replacement. After content is available and the preview is running, use Confirm the loaded configuration to check the settings the browser actually uses.
Add content
Section titled “Add content”With the repository connected, create and initialize its content in the Document Authoring environment, using the same steps for every backend.
-
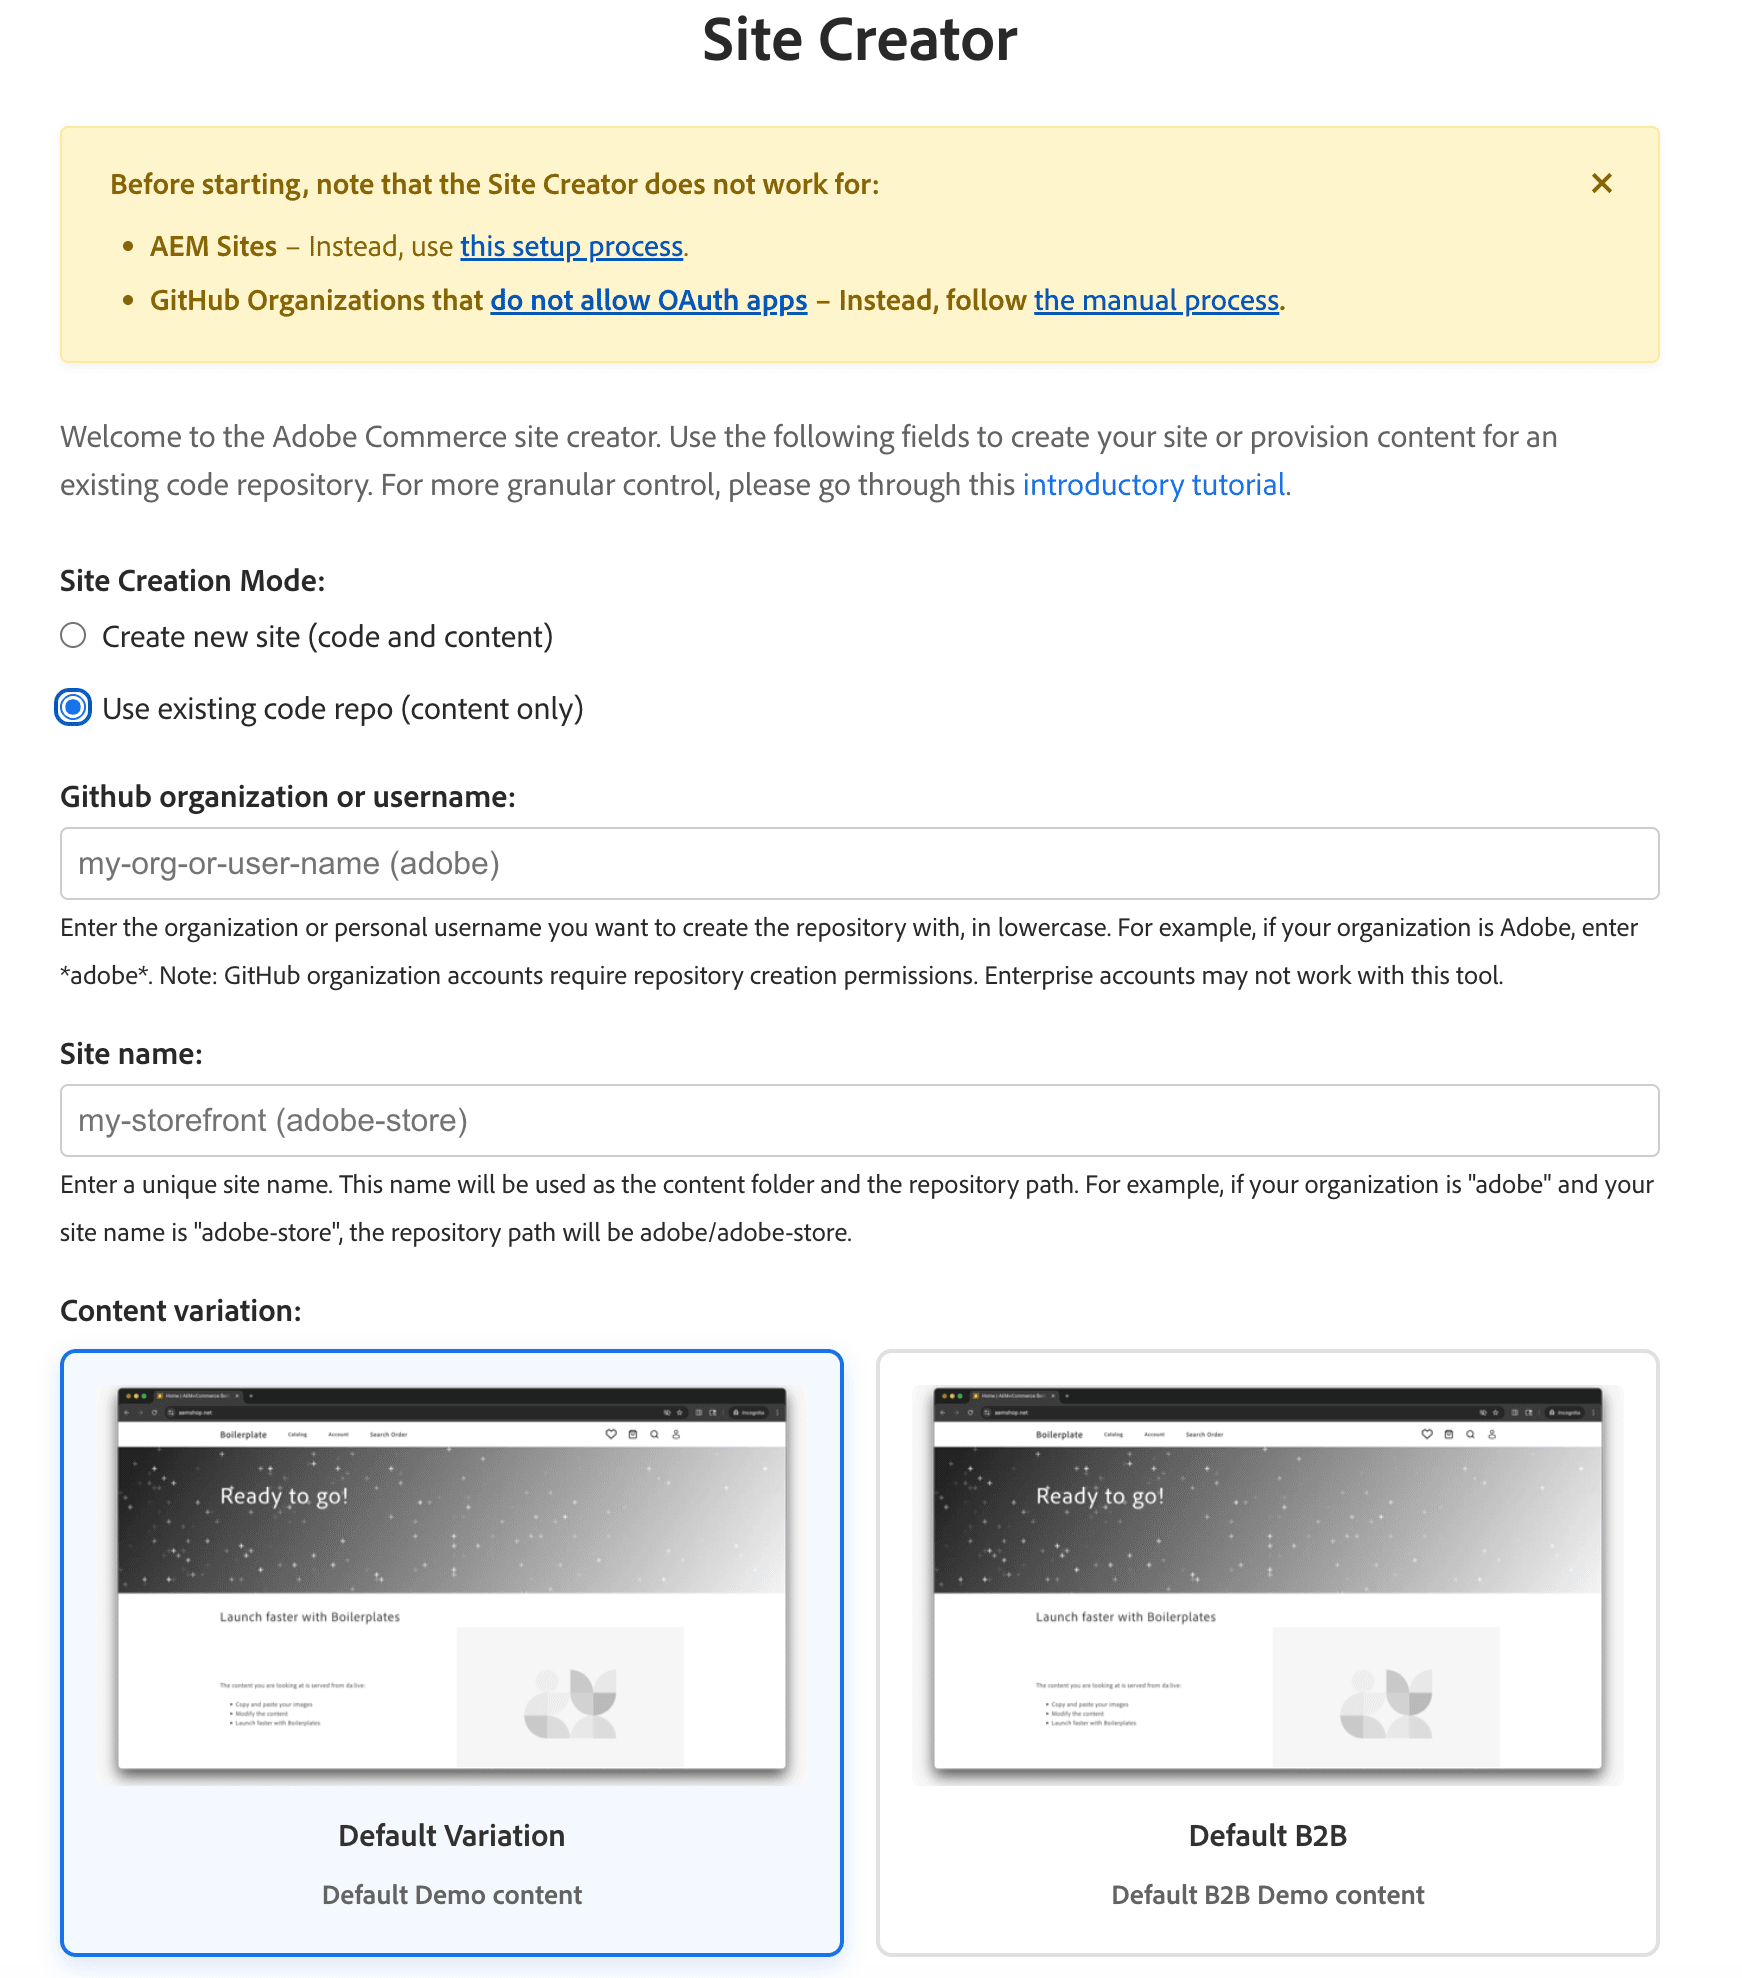
Open the Site Creator app in DA.live.
-
Select Use existing code repo (content only).
-
Copy the GitHub owner and site values into the input fields.
-
Select Create site.
-
Follow the prompts until Site Creator finishes copying starter content into your content folder.
-
If prerequisites were incomplete, you may need to preview or publish the content manually.
Confirm project creation
Section titled “Confirm project creation”Before continuing, confirm that:
- The storefront repository exists in the intended GitHub organization.
- Code Sync has access to that repository.
- The approved Commerce connection values are saved.
- The intended content source and its preview URL are available.
Keep the repository URL, content preview URL, and selected Commerce environment together for local setup. These milestones confirm that the project has been created, not that every shopping feature has passed testing.
What’s next
Section titled “What’s next”Continue with Run your storefront locally. It covers cloning or reusing the repository, installing dependencies, preparing drop-in assets, and starting the preview.
For a new or changed Commerce connection, then complete Verify your storefront setup for the shopping features in your project’s agreed scope.
Optional authoring tools
Section titled “Optional authoring tools”These tools support content editing. They are not prerequisites for the local code preview.
Use Experience Workspace for content editing
Section titled “Use Experience Workspace for content editing”Experience Workspace lets authors edit content directly on the rendered page as well as in the document editor. Because it’s off by default, you may need to update your storefront’s code to enable it. Follow Using Experience Workspace for setup, then share that topic with your authors for day-to-day use.
Use Sidekick for content editing
Section titled “Use Sidekick for content editing”Install the Sidekick browser extension from the Chrome Web Store, or follow the Edge installation steps in Using AEM Sidekick . Once installed, Sidekick detects your project’s preview and live URLs automatically. If it doesn’t recognize your project, add it manually from Sidekick’s menu. For the access and setup you need first, see Prerequisites.
Secure your storefront before sharing
Section titled “Secure your storefront before sharing”Before sharing the site outside your team or preparing for production, configure access to content, the repository, and the site. Follow Security and access in the Launch checklist.
More help on this topic
Section titled “More help on this topic”- Storefront configuration: Look up connection settings and configuration sources.
- Drop-ins overview and Extending drop-ins: Understand and customize the included shopping features.
- Launch checklist: Check security, performance, and other requirements before production.