On this page: Learn how to create experiences and target them to audiences in an Experience Targeting activity, how to put them in order, and how to rename, edit, duplicate, or delete them.
The Visual Experience Composer (VEC) in Adobe Target provides a visual interface for editing the experiences on your page in an Experience Targeting (XT) activity.
Create targeted experiences create-experiences
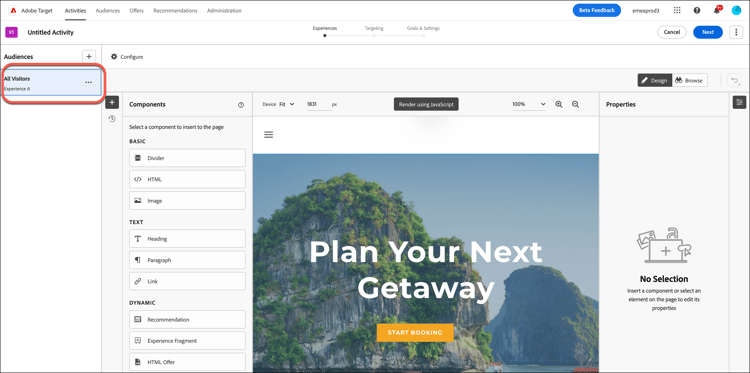
While creating an Experience Targeting activity, step one of the three-part guided workflow (Experiences) displays the default Experience A with an All Visitors audience.
-
Select the elements that you want to change and make the desired changes. Any changes you make now apply to Experience A.
As you hover over the elements on your page, the elements are highlighted. Any highlighted element can be altered using the VEC. For a list of actions that can be performed on an element to change the experience, see Visual Experience Composer Options.
note NOTE By default, the VEC does not allow changes to elements containing JavaScript, such as rotating banners. You can disable JavaScript to alter those elements using the VEC. -
To create additional experiences, click Add (

The Add Audience dialog box displays. To target an experience to an audience, select the audience before you add the experience.
accordion More about audiences The audience library contains audiences that have previously been defined, including some common audiences that are pre-built as a part of Target. You can select an audience from the library or create a new audience.
In addition to selecting an existing audience, you can combine multiple audiences to create on demand combined audiences rather than creating a new audience. For more information, see Combining Multiple Audiences.
When creating an audience, you can select a location and specify parameters for that location. Under Custom (Create Audience > Custom), select the location, then specify the desired parameters.
Audiences are automatically imported in the background when you open the audience list and the imported audiences are more than ten minutes old.
-
Select one or more audiences to target with the experience, then click Assign Audience.
Experience B now displays in the preceding illustration and this experience is targeted to the appropriate audience.
-
Select the elements that you want to change for this experience and make the desired changes, as explained in step 1.
-
Repeat the preceding steps to create additional targeted experiences, as needed.
-
Click Next when you are finished designing your experiences.
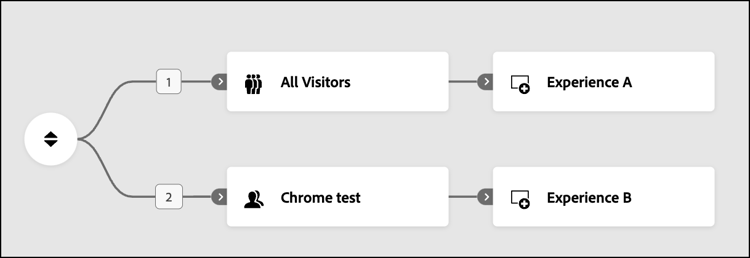
The activity diagram displays:
akamai.net and delivered on adobe.com). Images hosted elsewhere do not display in the thumbnail of the page shown in the flow diagram.Reorder experiences reorder-experiences
While creating or editing an Experience Targeting activity, you can drag and drop audience and experience pairs to arrange them in the desired order. Visitors are evaluated for experiences in order, from top to bottom. Experience Targeting assumes that order matters. If a visitor falls into the first audience and experience pair, the first experience is delivered.
To reorder the pairs, click the Reorder icon (

Suppose you were not aware that order matters while creating an Experience Targeting activity. You later realize during testing that visitors that you think should qualify for experiences B or C are instead qualifying for experience A. This situation could be because the audiences are not mutually exclusive and are not in the proper order (for example, experience A = United States, experience B = San Francisco, and experience C = California).
In this scenario, all users from the United States qualify for experience A, even if they are in San Francisco or elsewhere in California. You can reorder the audience and experience pairs from most restrictive to least restrictive (San Francisco > California > United States) without recreating the entire activity.
If you have an All Visitors audience, ensure that it is not the first audience in the diagram. An experience targeted to “All Visitors” can be used as the last experience in the Experience Targeting activity to “catch” any visitors that have not fallen into any other experience.
Rename, edit, duplicate, or delete an experience manage-experiences
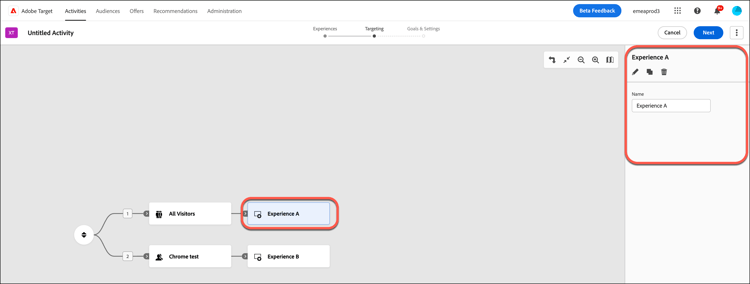
Click an experience in the diagram in an Experience Targeting activity to display the Experiences column on the right side.
Choose from the following options, as necessary:
- Rename: Type the desired name in the Name field.
- Edit: Click the Edit icon (

- Duplicate: Copy an experience in an Experience Targeting activity so you can make minor changes to it without having to recreate the entire experience. Click the Duplicate icon (

- Delete: Click the Delete icon (

Training video: Using the Visual Experience Composer
This video provides information about using the Experience Targeting (VEC) options.
- Change the content of a page
- Change the layout of a page