Integrations
Connect Outlook to send emails, recognize prospect replies, and schedule meetings. To make leads, contacts, accounts, opportunities, activities, and owners available to the Account Qualification Agent (AQA) and Outbound Workflows, you can also connect Adobe Marketo Qualifier to Salesforce or Microsoft Dynamics 365. Marketo Qualifier reads CRM data, can write outreach activities and opt-out status back to the CRM, and can synchronize outreach activities to Marketo. It does not otherwise modify CRM records.
This article explains how to connect Outlook, manage a CRM connection, map fields, sync activities, and configure email opt-out. To connect a CRM for the first time, see Get started.
Marketo Qualifier and Marketo Qualifier Admins user groups. Standard users can use the configured CRM data and filters but cannot change the settings.Connect Outlook
Each representative connects their own Outlook account:
- Select Connect Outlook.
- Sign in with your Microsoft account.
- Review and approve the requested access.
The connection lets Marketo Qualifier send from your mailbox, recognize when a prospect replies, and schedule meetings on your calendar.
When you connect, you approve access that allows Marketo Qualifier to:
- Recognize replies from prospects.
- Create and send email on your behalf.
- Use your calendar to schedule meetings.
- Read your mailbox time zone and working hours for scheduling.
- Remain signed in automatically so that these features continue to work without requiring you to sign in again.
Outlook approvals (if required)
By default, no administrator action is required. Each representative approves access for themselves when they connect Outlook.
If your organization has turned off user consent to third-party apps in Microsoft 365 or Microsoft Entra, a Microsoft 365 or Entra administrator must approve Marketo Qualifier once for the entire organization. The administrator completes this approval before representatives connect their Outlook accounts. After the organization-wide approval, each representative can connect their account.
How Marketo Qualifier handles your mailbox data
Marketo Qualifier reads only replies to emails that it sent, not the rest of your inbox. It does not store incoming attachments or emails outside an active engagement. Stored sign-in credentials are encrypted.
Open CRM settings
In the left navigation, expand Administration and select Admin Settings. The settings are organized into two groups:
For the Knowledge Center, see Build a Knowledge Center playbook.
Manage CRM connections
Select CRM connections. The page contains cards for Salesforce and Microsoft (Microsoft Dynamics 365). Each card shows one of these statuses:
An unconfigured card shows Connect. A configured card shows Manage and a More menu with Edit configuration and Disconnect.
Connect or edit a connection
-
On the CRM card, select Connect, or select More > Edit configuration to update an existing connection.
-
Enter the credentials from your CRM administrator.
[!BEGINTABS]
[!TAB Salesforce]
Enter the Client ID (Consumer Key), Instance URL, and Client Secret. Use the canonical instance URL form
https://{{mydomain}}.my.salesforce.com.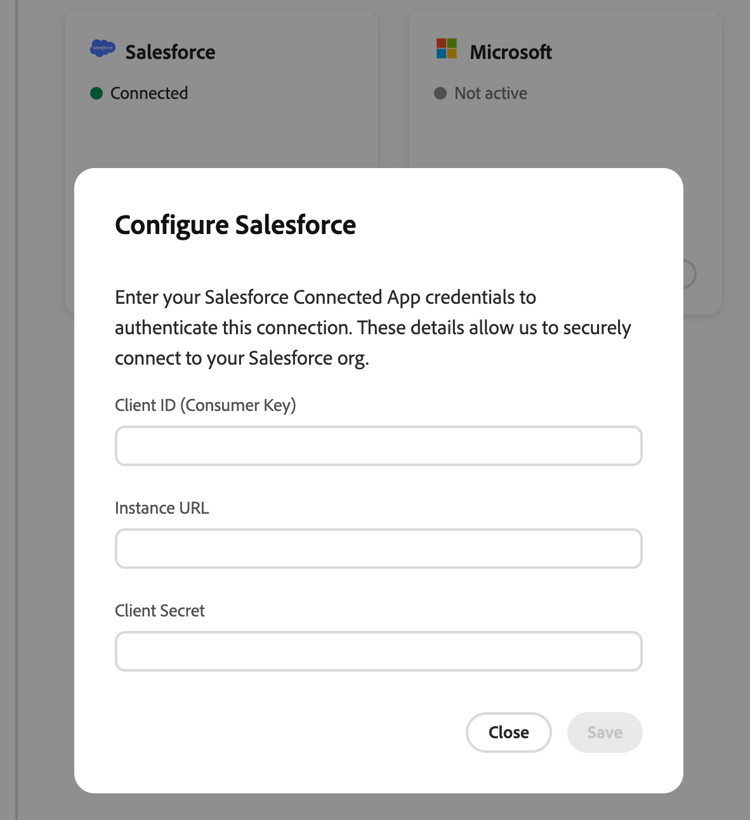
[!TAB Microsoft Dynamics]
Enter the Client ID (Consumer Key), Tenant ID, Microsoft Dynamics Instance URL, and Client Secret. Use the canonical instance URL form
https://{{mydomain}}.crm.dynamics.com.[!ENDTABS]
-
Select Connect (or Save when editing).
If Marketo Qualifier rejects the credentials, it identifies the cause, such as invalid or expired credentials, missing permissions, or an unrecognized Dynamics tenant. Correct the value and try again.
Disconnect a connection
- On the connected CRM card, select More > Disconnect.
- Review the warning and select Disconnect to confirm.
Map CRM fields (inbound mapping) map-crm-fields-inbound-mapping
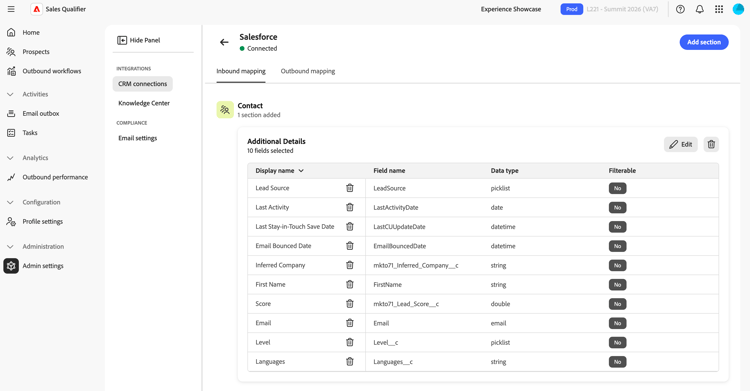
Inbound mapping controls which CRM fields Marketo Qualifier imports and where they appear. Fields are grouped into sections, and each section belongs to an entity type.
-
On the connected CRM card, select Manage.
-
On the Inbound mapping tab, select Add section.
-
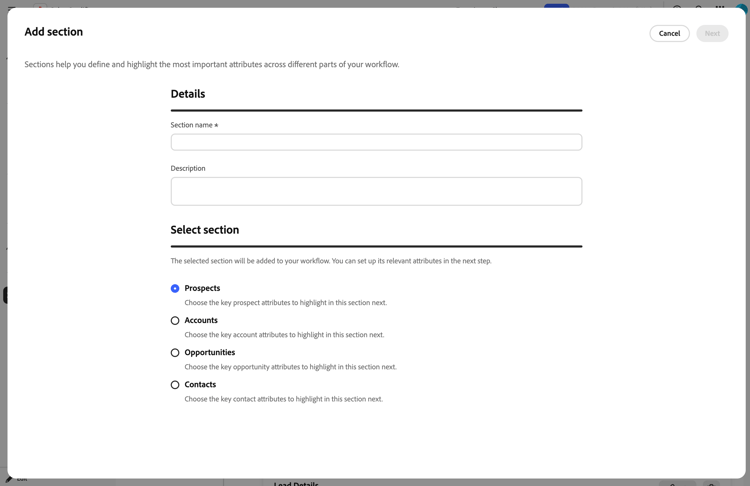
On the Select section step, choose the entity type, then select Next:
table 0-row-2 1-row-2 2-row-2 3-row-2 4-row-2 Entity Where its fields appear Prospects The Person tab of a prospect. Contacts The contact record. Accounts The Account tab. See Accounts. Opportunities The account’s opportunity details. -
Enter a Section name and an optional Description. Then, select Next.
-
On the Add field step, search for and select the CRM fields to import. Then, select Next. Each field shows its Display name, Field name, and Data type.
-
For Prospects, Contacts, and Opportunities sections, turn on Filterable for each field that representatives need on the Prospects list.
A field cannot be made filterable if its data type does not support filtering or if it is already used in another section.
In My Opportunity Contacts, filterable opportunity fields appear as separate columns with labels such as Stage (Opportunity). The suffix distinguishes opportunity attributes from fields on the associated contact.
-
On the Preview step, confirm your selection and select Add.
To change a section later, select Edit on the section card. To remove a section, select Remove on the section card. To remove an individual field, select the delete action in the field row. Confirm each removal.
Configure activity sync (outbound mapping) configure-activity-sync-outbound-mapping
Activity sync writes Marketo Qualifier outreach activities to your CRM and Marketo. Email sent, opened, clicked, and replied activities include the Outbound Workflow name. Representatives can see the activities in the CRM, while marketing teams can use the Marketo activities in lead scoring and engagement timelines.
- On the connected CRM card, select Manage.
- Open the Outbound mapping tab.
- Turn on Activity sync. The setting saves immediately.
When activity sync is off, Marketo Qualifier continues to use inbound CRM data but does not synchronize outreach activities to the CRM or Marketo.
Set up Marketing Highlights turn-on-marketo-engagement-filtering
Marketing Highlights lets representatives find and prioritize prospects by their live Marketo engagement, such as email opens and clicks. See Filter by Marketing Highlights.
An administrator completes a one-time setup that connects Marketo to Marketo Qualifier for the relevant org and sandbox. The setup covers creating API credentials in the Adobe Developer Console, configuring a webhook in Marketo, and adding that webhook to a trigger Smart Campaign. See Set up Marketing Highlights for complete steps.
Marketing Highlights is available in all production regions: North America, EMEA, and Australia.
Configure global email opt-out configure-global-email-opt-out
The opt-out setting appends an unsubscribe footer to every outbound email. Standard users cannot turn it off for an individual email.
-
In the left navigation, expand Administration and select Admin Settings.
-
Select Email settings under Compliance.
-
Turn on Include opt-out link in every email.
-
In Opt-out message template, enter the footer text. Include the
{opt_out_link}token where the clickable unsubscribe link should appear.For example:
If you'd prefer not to receive these emails, you can {opt_out_link}.
The setting and template save automatically.
When a prospect selects the link, Marketo Qualifier stops sending emails to that prospect and syncs the opt-out status to the connected CRM.
CRM access scope
Marketo Qualifier reads the CRM entities it needs and writes back only a defined set of data:
- Read—Users, contacts, owner mappings, leads, accounts, opportunities, and activities.
- Write—Logged outreach activities (when activity sync is on) and opt-out status.
Your CRM administrator prepares API access in Salesforce or Dynamics. A Marketo Qualifier administrator then connects the CRM, maps inbound fields, and chooses whether to synchronize activities. The initial connection requires read-only access. Activity synchronization and opt-out write-back require the corresponding write access.