Admin settings
Use Admin Settings to configure CRM integrations, manage the Knowledge Center, and configure email opt-out.
Adobe Marketo Qualifier connects to Salesforce or Microsoft Dynamics 365. The connection gives the Account Qualification Agent (AQA) a consistent view of leads, accounts, contacts, activities, and owners. Marketo Qualifier can also write outreach activities and opt-out status back to the CRM and synchronize outreach activities to Marketo.
To configure CRM connections, field mapping, and activity synchronization, go to Administration > Admin Settings > CRM connections. Standard users can use the configured CRM data and filters but cannot change these settings. To connect a CRM for the first time, see Get started.
Marketo Qualifier and Marketo Qualifier Admins user groups.CRM MCP and the embedded plugin
Marketo Qualifier works with your CRM in these ways:
- CRM MCP queries—The Account Qualification Agent queries live CRM data so that answers and insights reflect the current state of your records.
- Embedded plugin—The CRM plugin displays Marketo Sales Insights (MSI) insights and agentic data in your CRM. Use the plugin to add a prospect to Marketo Qualifier.
- Activity synchronization—When an administrator turns on Activity sync, outreach activities synchronize to the CRM and Marketo.
CRM access scope
Marketo Qualifier reads users, contacts, owner mappings, leads, accounts, opportunities, and activities from the CRM. It writes only logged outreach activities and opt-out status to the CRM, and it synchronizes outreach activities to Marketo. Your CRM administrator prepares API access in Salesforce or Dynamics. A Marketo Qualifier administrator then connects the CRM, maps inbound fields, and chooses whether to synchronize activities.
Map CRM fields (inbound mapping)
After the CRM is connected, select Manage for the connection and open Inbound mapping. Inbound mapping controls which CRM fields Marketo Qualifier pulls into the application.
-
Select Add section.
-
Enter a section name and description.
-
Select an entity type. Prospects is selected by default. Contacts, Accounts, and Opportunities are also available.
-
Select the CRM fields to import.
Each field row displays its Display name, Field name, and Data type.
-
Turn on Filterable for each prospect, contact, or opportunity field that you want to make available as a filter on the Prospects list.
-
Preview the section and select Add.
Mapped fields appear in the corresponding areas of Marketo Qualifier:
- Prospect fields appear on the Person tab.
- Account fields appear on the Account tab.
- Opportunity fields appear in the Account Opportunity section. Filterable opportunity fields also appear as their own columns in My Opportunity Contacts, with labels such as Stage (Opportunity) to distinguish them from contact fields.
Configure activity sync (outbound mapping)
- From CRM connections, select Manage for the connected CRM.
- Open Outbound mapping.
- Turn on Activity sync to sync Marketo Qualifier outreach activities back to the CRM and Marketo.
When activity sync is off, Marketo Qualifier continues to use inbound CRM data but does not synchronize outreach activities to your CRM or Marketo.
Configure CRM Sync Rules
Marketo Qualifier can write lead status updates back to Salesforce and Microsoft Dynamics automatically as a prospect moves through an Outbound Workflow, so representatives no longer update the CRM by hand.
What CRM Sync Rules do
An update can target the Lead, Contact, Account, or Opportunity record, not only the lead.
Updates fire on these Outbound Workflow moments:
- Added to a workflow, replied, or meeting booked
- Removed by a representative or workflow completed with no reply
- Opted out or email bounced
Field values can be personalized with dynamic tokens so that the CRM update reflects the prospect’s actual journey rather than a static value. Tokens are available for details such as the representative’s name, the Outbound Workflow name, and the meeting date and time.
Only CRM-compatible values are written, one failed field does not block the others, and temporary issues retry automatically. Every update is tracked so that you can see what synced and what needs attention.
Set up CRM Sync Rules
To set up CRM Sync Rules:
- In the left navigation, expand Administration and select Admin Settings > CRM connections.
- Select Manage for the connected CRM, then select Sync Rules.
- Choose the target CRM entity and fields, map them to the workflow moments above, and turn on the toggle.
With CRM Sync Rules configured, sales teams see accurate, personalized, up-to-date status across leads, contacts, accounts, and opportunities at every stage, with less data lag and manual work.
Build a Knowledge Center playbook knowledge-center
The Knowledge Center gives the Account Qualification Agent (AQA) access to your sales materials. Marketo Qualifier uses these materials to generate research, qualification insights, and outreach that reflect how your organization sells. Only administrators can build and manage the playbook.
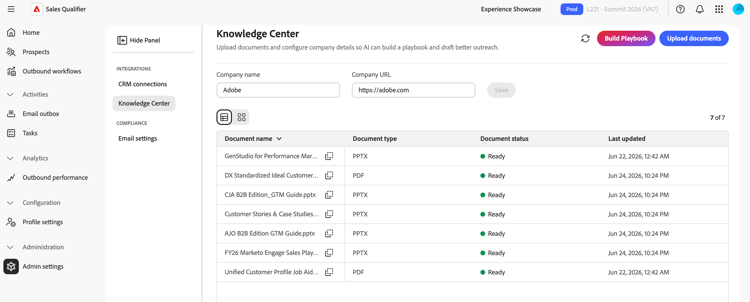
- In the left navigation, expand Administration, select Admin Settings and select Knowledge Center
- u
- Set the Company name and Company URL that Marketo Qualifier uses to research your company and draft emails.
- Upload sales plays, ideal customer profiles (ICPs), positioning guides, and other sales collateral in PDF, PPTX, or DOCX format.
- Select Build Playbook.
Each uploaded document displays its processing status, such as Ready, and when it was last updated.
When the playbook is ready, representatives can use it in two places:
- Outbound email prompts—In a touchpoint prompt, name the document and describe the context to use. For example, enter
Use the ABC positioning guide from the Knowledge Center and focus on the security value proposition. See Generate and review touchpoints. - AI Chat: Refer to the Knowledge Center in your question. For example, enter
From the Knowledge Center, help me position our security solution for ABC Corp before tomorrow's call. See AI Chat.
In both cases, the generated content reflects the messaging in your playbook rather than generic research.
Configure global email opt-out
- In the left navigation, expand Administration and select Admin Settings.
- Select Email settings under Compliance.
- Turn on Include opt-out link in every email to append an unsubscribe footer to outbound emails.
- In Opt-out message template, enter the footer text. Include the
{opt_out_link}token where the unsubscribe link should appear.
The settings save automatically.
When a prospect selects the link, Marketo Qualifier stops sending emails to that prospect and synchronizes the opt-out status to the connected CRM.
Reference: sample API parameters
Your CRM team can use these examples to confirm read access returns the expected lead fields.
Dynamics OData example
$select=fullname,_ownerid_value,leadid,emailaddress1,jobtitle,statuscode,createdon,modifiedon,statecode
$filter=_ownerid_value eq '<crmUserId>' [AND additional filters]
$expand=Lead_ActivityPointers(...),parentaccountid(...)
$orderby=modifiedon desc
Salesforce SOQL example
SELECT Id, Salutation, FirstName, LastName, Name, Title, Company, Email,
  LeadSource, Status, OwnerId, LastModifiedDate, LastActivityDate, CreatedDate,
  (SELECT Id, Subject, ActivityDate, Status FROM Tasks ORDER BY ActivityDate DESC LIMIT 1),
  (SELECT Id, Subject, ActivityDateTime FROM Events ORDER BY ActivityDateTime DESC LIMIT 1)
FROM Lead
WHERE OwnerId = '<crmUserId>' AND IsDeleted = false
ORDER BY LastModifiedDate DESC