Outbound Workflows
An Outbound Workflow is a goal-driven outreach cadence. You define the goal and targeting criteria. AI then proposes a multitouch cadence and writes personalized email content for each prospect. Before you activate the cadence, review and approve each email.
An Outbound Workflow connects four elements:
- Goal—The outcome you want from the outreach, such as booking a discovery call or increasing event registration.
- Targeting filters—Conditions that determine which prospects are eligible.
- Touchpoint cadence—The ordered sequence of email, phone call, and LinkedIn InMail steps.
- Personalized email content—AI-generated content based on the prospect profile, account context, engagement history, and recent news.
The AI uses the goal to suggest targeting filters, design the cadence, draft touchpoint prompts, and personalize every generated email.
Key concepts
The following sections explain how to create an Outbound Workflow, review generated emails, approve prospects, and manage Outbound Workflows.
Create an Outbound Workflow
The Outbound Workflow wizard has five steps: Goal, Targeting, Generate touchpoints, Settings, and Add prospects. Your goal shapes the remaining steps.
- In the left navigation, select Outbound Workflows.
- On the Browse tab, select + Create Outbound Workflow in the upper-right corner.
Administrators can assign the Outbound Workflow to a teammate instead of themselves. Before launching the workflow, select Assign User from the dropdown and choose the teammate.
Step 1: Define your goal
The goal defines the intended outcome and guides targeting, cadence, and email generation.
-
To write your own goal, select Start from scratch, or to use a saved template, select Start from template.
-
Select one of the Recommended goals matched to your company. Each recommendation includes a short explanation of why it fits. To fill in the goal, select a recommendation. To browse the full set of recommendations, select View all, or enter your own goal. You can also choose from the Popular goals list.
-
Select Next: Targeting.
State a specific outcome in the goal. For example, enter Book a 15-minute discovery call with marketing leaders evaluating campaign automation instead of Promote campaign automation.
The AI preserves requirements in the goal exactly in the generated touchpoints. Include exact sentences, required opening or closing lines, named sessions and dates, or a specific structure when the generated content must preserve them.
Step 2: Configure targeting filters
Targeting filters define which prospects are eligible. When you add prospects later, only those prospects who match these filters appear in the selection list.
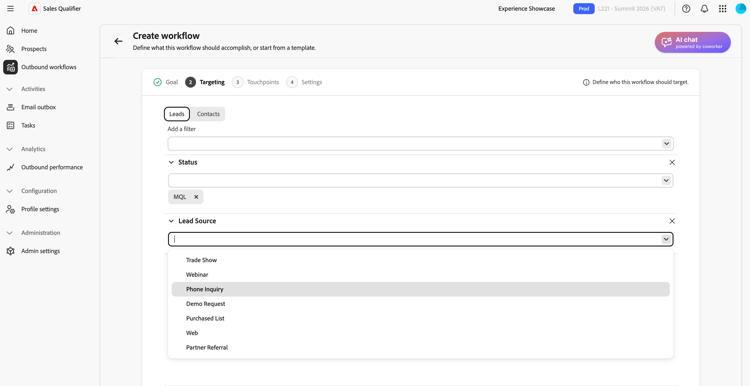
Describe your ideal prospect in natural language. For example, enter Hot leads at companies with 500 or more employees who requested a demo. Adobe Marketo Qualifier converts the description into targeting criteria that you can review and refine.
-
To open the Add a filter list, select the down arrow, then select a filter.
-
Set values for the filter.
-
Add more filters if you need to narrow the audience.
-
Select Next: Generate touchpoints.
Targeting can use activity type, score, rating, and other available attributes. Combine criteria with AND or OR, and use operators such as equals, contains, greater than, less than, and between.
Automatically enroll prospects from Marketing Highlights
An Outbound Workflow can evaluate live Marketing Highlights activity against its targeting criteria. When activity matches, Marketo Qualifier resolves the prospect’s CRM owner by email and enrolls the prospect only in an eligible workflow that belongs to that representative.
Automatic enrollment follows this sequence:
- A representative defines the workflow’s targeting criteria.
- Live Marketo activity arrives for a prospect.
- Marketo Qualifier resolves the prospect’s owner from Salesforce or Microsoft Dynamics and evaluates the activity against the owner’s eligible workflows.
- When the criteria match, the prospect is enrolled and outreach starts.
If another representative is already contacting the prospect, Marketo Qualifier displays a warning before duplicate outreach starts.
Step 3: Generate and review touchpoints
After you configure targeting, AI analyzes the goal and targeting criteria, defines the cadence, and writes a prompt for each touchpoint. The cadence can include email, phone call, and LinkedIn InMail steps.
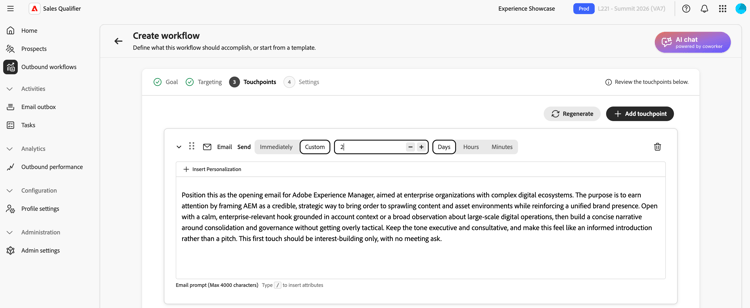
To read its prompt, expand an email touchpoint. The prompt guides the AI as it writes each prospect’s email, including tone, length, focus, and call to action.
Typing a forward slash / brings up the list of defined tokens you can use to personalize the email.
Regenerate the cadence
If the cadence is not what you want, select Regenerate and enter a refinement instruction. For example:
Use three touchpoints across two weeksLead with an executive briefing offer in the first emailAdd a nurture touch focused on a relevant case study
AI rewrites the full cadence based on your instruction. To adjust one email touchpoint, edit its prompt instead of regenerating the entire cadence.
Set a touchpoint delay in days, hours, and minutes. Set the days, hours, and minutes to 0 to send the touchpoint with no wait after enrollment or completion of the preceding touchpoint. Use a longer delay to space later touchpoints within the cadence.
Use the Knowledge Center in prompts
If your organization has built a Knowledge Center playbook, refer to it in the prompt. Name the document and describe the context to use. For example, enter Use the ABC positioning guide from the Knowledge Center and focus on the security value proposition.
When the cadence and prompts are ready, select Next: Settings.
Refine the touchpoint prompts before generating prospect emails. AI uses these prompts for every selected prospect.
Step 4: Configure Outbound Workflow settings
The Settings step controls how the Outbound Workflow runs.
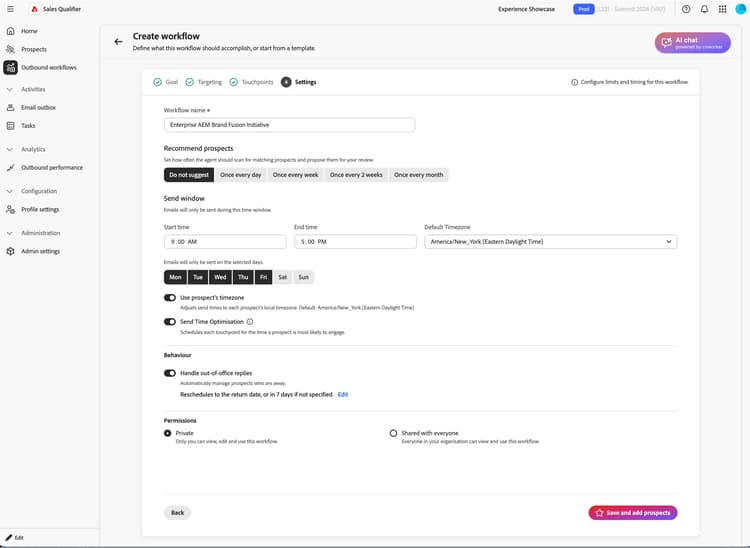
- Review the Outbound Workflow name and change it if needed.
- In Max prospects per Outbound Workflow, confirm the maximum number of prospects that the Outbound Workflow can manage at once.
- Set the Send window for the hours when outbound emails are allowed to send.
- Select the days of the week when emails can send. To avoid weekend sends, select only the weekdays instead of using a separate Skip Weekends setting.
- Choose whether to send during each prospect’s most active hours.
- To stop follow-up touchpoints automatically once a prospect books a meeting, turn on Meeting Booking Pause.
- Choose whether to use each prospect’s time zone or the Outbound Workflow Timezone for send timing. If you use the Outbound Workflow time zone, confirm that it matches your audience.
- Under Permissions, keep Private (the default) or select Shared with everyone. For details, see Share an Outbound Workflow.
- Select Save and add prospects.
To revert the send window, time zone, days, follow-up and out-of-office rules, visibility, and suggestion cadence back to their defaults, turn on Reset to default settings. The Outbound Workflow name is left unchanged.
An administrator configures the opt-out footer globally, which applies to outbound emails independently of the Outbound Workflow settings. See Configure global email opt-out.
Step 5: Add prospects and start email generation
Saving opens the prospect selection view with the targeting filters from step 2 applied.
-
Review the list.
Rows typically include prospect name, account, email, job title, engagement status, and prospect status.
-
Adjust filters here if you need to expand or narrow the list.
-
Select prospects using the checkboxes.
-
To start per-prospect email generation, select Next: Review touchpoints.
AI generates a personalized email for each selected prospect and email touchpoint. Phone and LinkedIn InMail touchpoints remain scheduled steps. To continue working during generation, select Notify when ready.
For each prospect, the AI combines the touchpoint prompt with person and account data, engagement history, and recent news to produce a subject line and body.
Generated emails use any additional data saved against a prospect, including custom fields imported with the prospect, so drafts are more relevant. There is no fixed list of supported fields, and new or custom fields work without extra setup. The AI uses this data when it is relevant; if a prospect has no extra data, email generation works as before.
Emails can also be generated in the prospect’s language, with correct greetings, natural phrasing, and appropriate business tone. Supported languages include French, German, Spanish, and more.
Review and refine generated emails
When generation finishes, the Outbound Workflow detail view prompts you to review the drafts. Marketo Qualifier does not send email until you approve it.
-
In the Outbound Workflow detail view, select Review drafts in the banner.
-
The Review touchpoints step has two tabs:
- Ready for Review—Emails that have finished generating.
- Generating—Emails that are still being written.
-
To load a prospect’s touchpoints on the right, select the prospect’s name in the list on the left.
-
To expand a touchpoint and read the full subject line and body, use its chevron (>).
Read the AI reasoning
For each generated email, Reasoning explains how the AI crafted that message, including signals, attributes, and sources that shaped the content and call to action. Review this information and validate personalization before you approve.
Edit emails directly
For small wording or tone changes:
- To open the editor, select the Edit icon on the expanded touchpoint.
- Edit the subject line or body.
- Select Save.
Refine emails with AI
For structural or emphasis changes, use Generate with AI. AI rewrites the email while retaining its personalization context.
-
In the email editor, select Generate with AI.
-
Enter a clear instruction, for example:
Make it shorter and more direct. Keep it under 100 words.Focus more on the prospect's role and how the solution helps them specifically.Change the call-to-action to suggest a 15-minute introductory call instead.
-
Review the revision and edit it if needed.
-
Select Save.
Approve and enroll prospects
Approval activates the cadence for a prospect. The system does not send emails to a prospect until you approve and enroll them.
- In the left prospect list, select the prospects whose emails you have reviewed and are ready to send.
- Select Approve and enroll prospects in the lower-right corner.
Approved emails are sent according to the Outbound Workflow’s selected days, send window, active-hours option, and time-zone setting. A touchpoint with zero delay sends immediately; every other touchpoint follows its configured delay. Unapproved prospects remain in Ready for Review.
Share an Outbound Workflow
Each Outbound Workflow has a Permissions setting. Outbound Workflows are Private by default. To make an Outbound Workflow available to the team, the owner can select Shared with everyone.
On a shared Outbound Workflow, teammates can enroll their own prospects. Each person can manage or pause only the prospects that they enrolled, including when using bulk actions. The Outbound Workflow owner alone can edit plan-level settings, including schedule, time zone, and cadence. These settings are read-only for teammates.
When you enroll prospects in a shared Outbound Workflow, choose whether email is sent as the workflow owner or as each lead’s assigned representative.
Use these filters to keep shared Outbound Workflows and results focused:
- On Engaged Prospects and Performance, use Enrolled by to filter prospects by the person who enrolled them. The filter defaults to prospects that you enrolled.
- On the Browse tab, use the sharing filter to select Shared by me, Shared with me, Private, or All.
Out-of-office reply handling
When a prospect replies with an out-of-office message, the Outbound Workflow handles it automatically.
- Automatic resume: On by default. If the out-of-office reply includes a return date, the Outbound Workflow resumes the cadence on that date. If no return date is given, the Outbound Workflow resumes after a resume-after buffer that your team can configure.
- Manual options: A rep can still select Resume now or schedule a specific resume date. See Manage existing Outbound Workflows.
Manage existing Outbound Workflows
On the Outbound Workflows page, the Browse tab lists every Outbound Workflow available to you. Each card shows the goal, configured touchpoints, and performance metrics. Use this view to monitor Outbound Workflows, review drafts, or add prospects.
Email outbox
The Email Outbox lists the automated emails sent on your behalf and any replies.
Meeting booking
When you connect your calendar, Marketo Qualifier generates a personal booking link that prospects can use to schedule time with you.
- Booking links—Configure your calendar connection and availability in Profile settings. Add the booking link to your email signature so that it appears in outbound emails.
- Cadence placement—Marketo Qualifier inserts your booking link at relevant points in a cadence. You can change its placement.
- Booking pause—When a prospect books a meeting, Meeting Booking Pause stops further follow-ups. See Step 4: Configure Outbound Workflow settings.
Track booking outcomes on the Outbound performance page.
Outbound Workflow best practices
- Define a specific goal. Targeting, cadence, and emails all derive from the goal. State the outcome that you want the Outbound Workflow to achieve.
- Finalize touchpoint prompts before per-prospect generation. After bulk generation, changes are typically made one prospect at a time.
- Use Reasoning as a quality check. If the wrong signal is emphasized or a relevant signal is missing, edit the email or revise the touchpoint prompt and regenerate the cadence.
- Match the editing tool to the change. Use direct edits for wording and tone. Use Generate with AI for restructuring or reframing.
- Approve only what you have reviewed. Expand touchpoints, read the content, and refine where needed before enrollment.