On this page: Create and manage named content variants, select which variants to render, compare their details and previews, and check for invalid links before sending your content.
The Simulate content variations experience has been redesigned to make testing and comparing your variants faster and easier. Variants render in a scrollable grid, with controls available directly on each card and in the bottom action bar. You can render all variants or select a subset to preview.
To access the new experience, from your content, click Simulate content to open the content simulation screen. If variants are already available, the preview grid is shown immediately. If none exist yet, a blank variant is displayed and you can start creating them using any of the methods described below.
If you prefer the previous layout, click Old experience in the bottom action bar at any time. The classic experience documentation is available at Simulate content variations (classic experience).
Create and manage variants manage-variants
Variants can be created in different ways: manually one by one or by importing a file, by generating them with AI, or by selecting existing simulated users. You can add up to 30 variants manually or via file upload. When using AI generation, up to 40 variants can be created depending on your content’s complexity.
Add variants manually add-variants
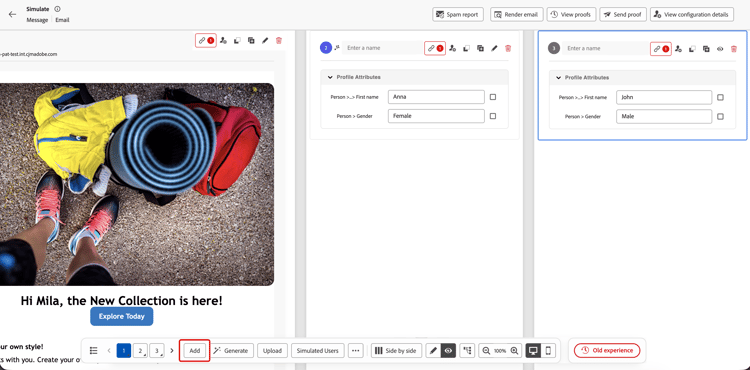
To add a blank variant manually, click Add in the bottom action bar. A new blank variant is added and you can enter the attribute values directly.
To import variants, click Upload in the bottom action bar. You can upload a CSV, JSON, or JSONL (JSON Lines) file where each row or entry becomes a variant. Download the file template from the upload dialog to use the correct format. Variant names can be included in the uploaded file.
Auto-generate variants auto-generate
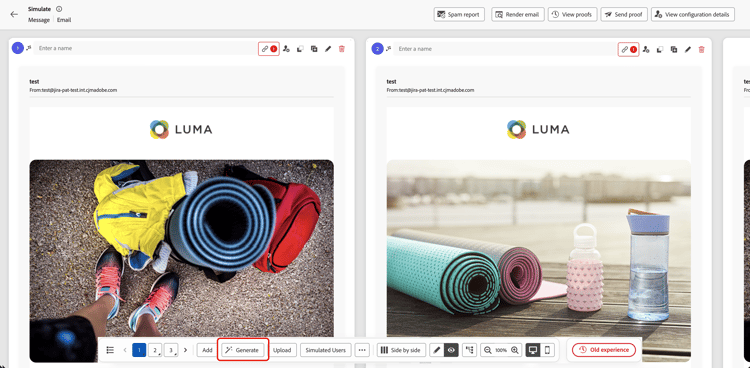
To auto-generate variants using AI, click the Generate button in the bottom action bar. The system analyzes your content, identifies personalization fields and conditional branches, and generates as many variants as needed to cover them with realistic values. AI-generated variants can be identified by the sparkle icon displayed on their card.
Select variants from simulated users simulated-users
You can base your variants on simulated users which are reusable, profile-like test entities that are saved across sessions and can be shared with other users. Unlike manually entered variants, simulated users persist beyond the current browser session.
Simulated users are created and managed from the journey Simulation feature. For the full procedure, see Create and manage simulated users.
To use simulated users as variants:
-
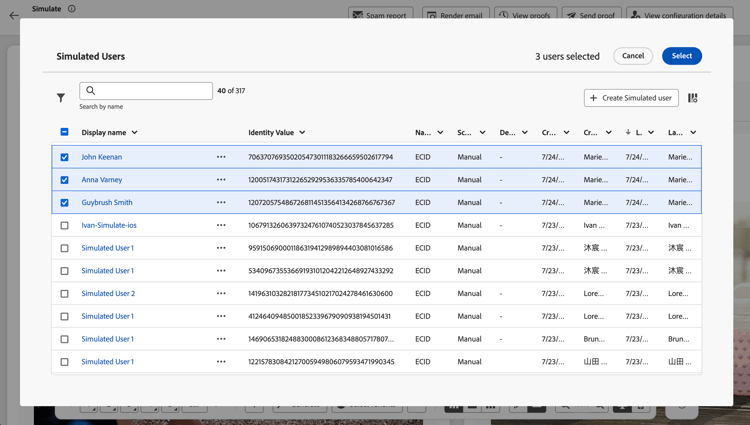
Click the Simulated Users button in the bottom action bar.
-
Select the checkboxes for the simulated users you want to use from the list.
-
Click Select to add the selected users as variants.
The selected simulated users are added as variants. You can edit a variant’s attribute values locally for testing, but those changes are not saved back to the simulated user record.
Manage variants from their cards variant-card-controls
Each variant card provides controls to manage the variant without opening the bottom action bar’s overflow menu.
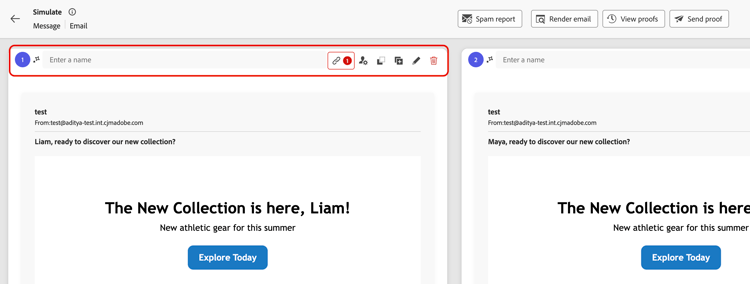
- Name the variant to distinguish it from other variants at a glance. Names are also displayed for variants created from simulated users or generated with AI.
- URL check to validate the links in the variant’s content.
- View configuration details to see the channel and other settings associated with the variant (email only).
- Copy attributes directly from the card.
- Duplicate the variant to create a copy of an existing variant, then edit its attribute values for another test scenario.
- Show variant details to view and edit the attribute values for that variant.
- Remove a variant using control on its card.
Export variants export-variants
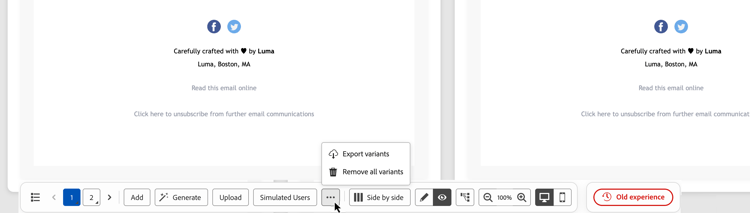
You can export all current variants, whether added manually, generated with AI, or selected from simulated users, to a CSV file. Click … in the bottom action bar, then select Export variants.
Preview variants preview-grid
Select variants to render select-variants-to-render
You can render all variants or select only the variants you want to preview from the full list. Unselected variants remain hidden until you show them again, they are not removed.
-
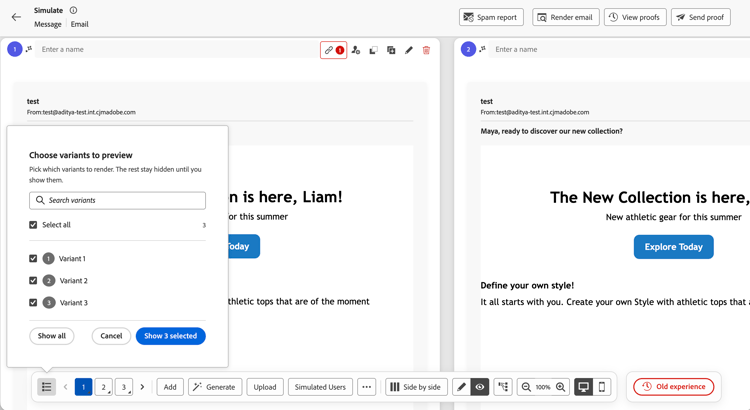
Click the variant list icon from the bottom action bar.
-
Select the checkboxes for the variants you want to render. Use Select all to select or clear the full list.
To find a specific variant, use the Search variants field.
-
Click the blue button showing the number of selected variants, for example Show 3 selected, to apply your selection.
To display every variant again, open the panel and click Show all. Click Cancel to close the panel without applying your selection.
Switch between variants switch-variants
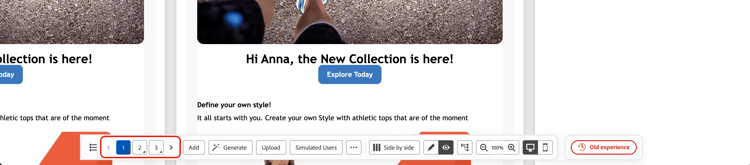
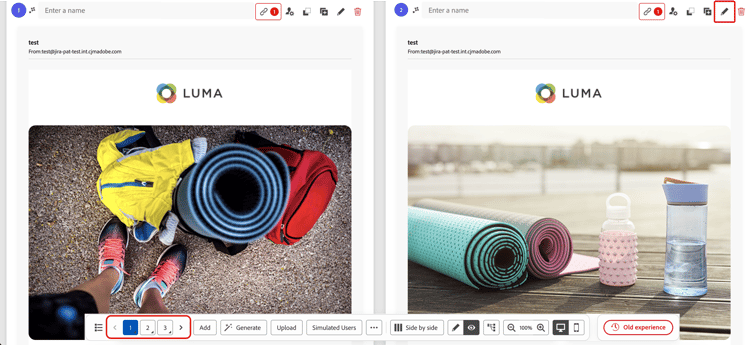
When in preview mode, all variants render side by side with a numbered indicator at the top. To switch between variants, click the number or use the < > navigation buttons in the bottom action bar.
Display variants in preview or editing mode edit-variants
You can display variants either as content previews or as variant details, where you can edit their attribute values. Click the eye icon to show previews or the pencil icon to show variant details in the bottom action bar to switch all variants at once between the two modes.
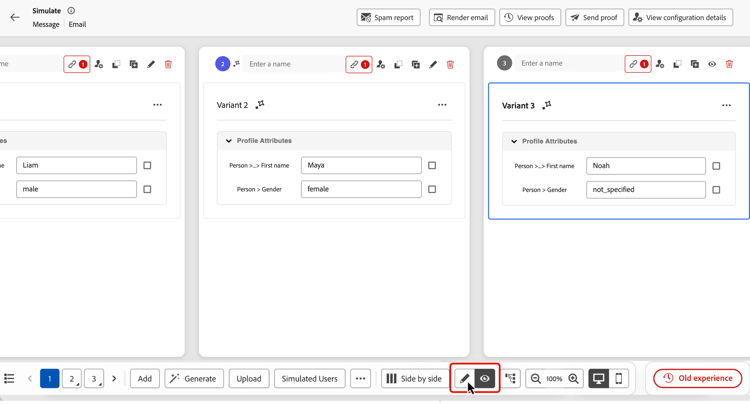
To toggle a single variant individually, click the eye icon to show its preview or the pencil icon to show its details at the top of its card. You can also long-press its number in the bottom action bar (or use Alt + Up/Down).
Show full attribute paths attribute-paths
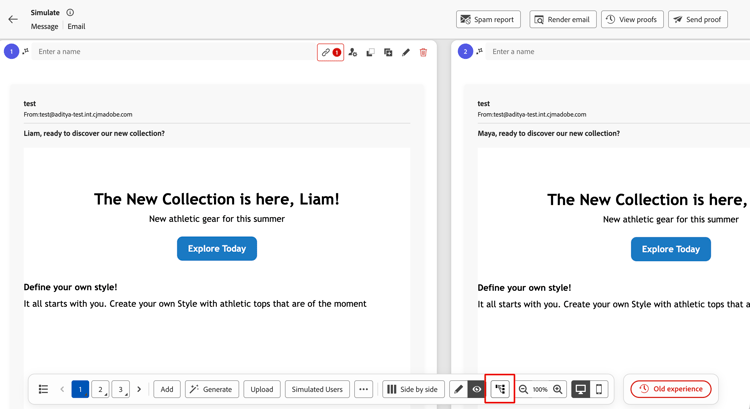
Use the attribute-path toggle in the bottom action bar to show or hide full attribute paths in variant details. Show the full paths when you need to identify an attribute’s location in the profile data.
Change the layout change-layout
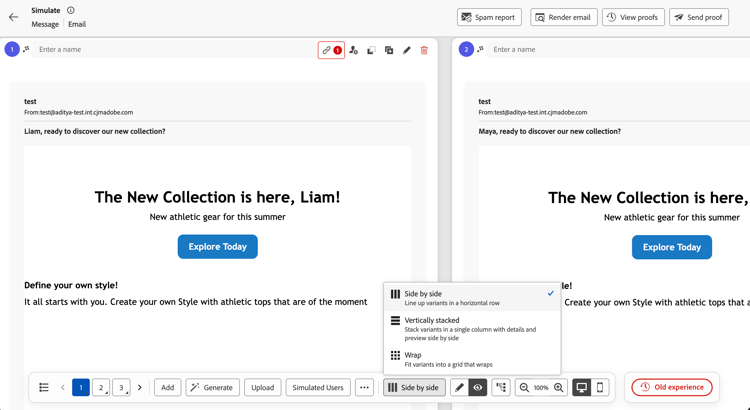
To change the way variants are displayed, click the layout selector in the bottom action bar, which shows the current layout, for example Side by side. Select Side by side, Vertically stacked, or Wrap.
In the Vertically stacked layout, each variant’s details and content preview are displayed side by side so you can compare attribute values with the rendered content.
Switch between desktop and mobile views switch-views
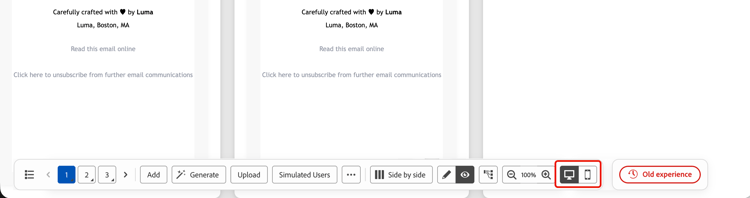
When device-view controls are available for your content, click the desktop or mobile icon in the bottom action bar to switch between the two views. The preview grid updates to show how the variants will look on the selected device.
Validate links validate-links
URLs are automatically validated for each rendered variant. When invalid links are found, a red invalid-links count is displayed next to the link icon on the variant’s card.
Click the count to open the URL validation failed dialog that lists each invalid URL and its Reason, such as Malformed URL. Review the reason for each link to identify what needs to be corrected in your content.
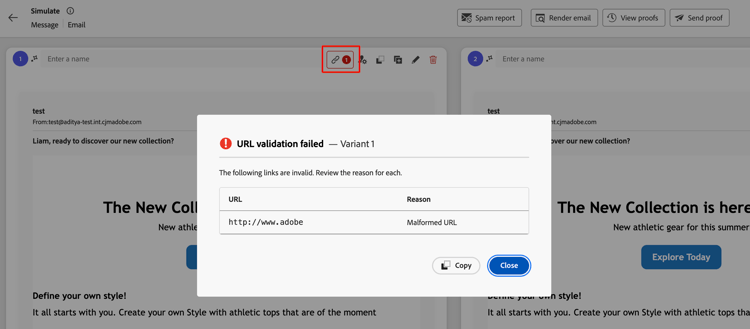
Click Copy to copy the validation details, or Close to return to the simulation screen.
Additional capabilities for the Email channel email-capabilities
When simulating email content, a top bar provides additional email-specific tools.
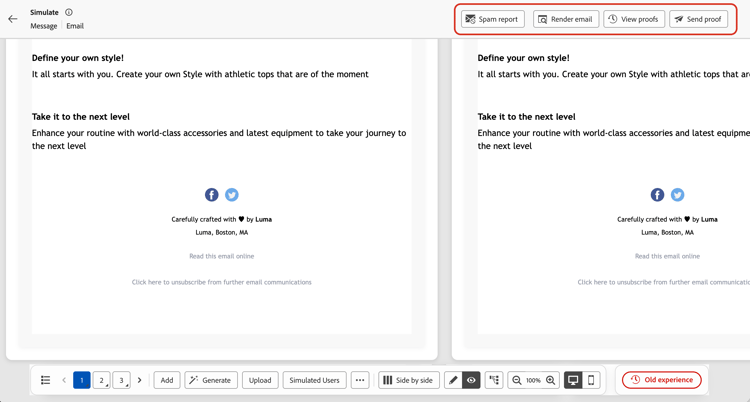
- Spam report — Analyze your email content against spam filters and get a deliverability score. Learn more
- Render email — Preview how your email renders across popular email clients and devices. Learn more
- Send proof — Send a proof of one or more variants to a set of email recipients. Click Send proof, add up to 10 recipient addresses, select the variant(s) to include, then click Send proof to confirm. To review previously sent proofs, click View proofs. Learn more
This section contains structured knowledge intended to support interpretation, retrieval, and question answering related to this topic.
For complete understanding, this information should be combined with the documentation on this page. Neither source is intended to stand alone; the page describes the feature, while this section provides additional context that helps disambiguate terminology, intent, applicability, and constraints.
- TL;DR: This page explains the redesigned Simulate content variations experience for creating and managing named variants, selecting variants to render, comparing details with previews, and reviewing automatically detected invalid links.
Intents:
- Open the content simulation screen by clicking Simulate content
- Create variants manually, by uploading a CSV, JSON, or JSONL (JSON Lines) file, by AI generation, or from simulated users
- Name, duplicate, or remove variants, copy attributes, and view configuration details (email only) from their cards
- Select variants to render, preview them or edit their attribute values, show full attribute paths, change the layout, and switch between desktop and mobile views when device-view controls are available
- Export current variants to a CSV file, or use Email-specific tools: Spam report, Render email, and Send proof
- Review invalid-link details for rendered variants or switch back to the classic experience
Glossary:
- Simulate content variations: The redesigned experience that renders all variants or a selected subset in a scrollable grid, with controls on each card and in the bottom action bar. (product-specific)
- Variant: A version of the content with different attribute values, created manually, by file upload, with AI, or from a simulated user. (product-specific)
- Simulated users: Reusable, profile-like test entities that are saved across sessions and can be shared with other users; unlike manually entered variants, they persist beyond the current browser session. (product-specific)
- Generate: The bottom-action-bar button that auto-generates variants with AI; clicking it replaces all existing variants. (product-specific)
- Content previews and variant details: Views for displaying rendered content with the eye icon or editing attribute values with the pencil icon. (product-specific)
- Vertically stacked: The layout where each variant’s details and content preview are displayed side by side. (product-specific)
- Full attribute paths: Paths that identify an attribute’s location in profile data and can be shown or hidden in variant details. (product-specific)
- Invalid-links count: The red count next to the link icon on a variant card when automatic URL validation finds invalid links in that rendered variant. (product-specific)
- URL validation failed: The dialog that lists each invalid URL and its Reason for a variant, such as Malformed URL. (product-specific)
- Send proof: An Email-channel tool that sends a proof of one or more variants to a set of email recipients. (product-specific)
Guardrails:
- You can add up to 30 variants manually or via file upload.
- When using AI generation, up to 40 variants can be created depending on your content’s complexity.
- AI generation and desktop/mobile views are available when their controls are provided for the content.
- Clicking Generate replaces all existing variants, including any added manually or from a file.
- Editing a simulated-user variant’s attribute values is local to testing and is not saved back to the simulated user record.
- Send proof accepts up to 10 recipient addresses.
- URLs are automatically validated for each rendered variant.
- Unselected variants remain hidden until they are shown again; they are not removed.
- The mirror page link is not active in proofs sent for variants; it only activates in the final message.
Terminology:
- Canonical name: Simulate content variations
- Synonyms: “content variants” = “variants”
- Do not confuse: “Simulate content” (the button that opens the simulation screen) ≠ “Simulate content variations” (the experience) ≠ “Old experience” (returns to the classic layout)
- Do not confuse: content previews (eye icon, view rendering) ≠ variant details (pencil icon, edit attribute values)
- Do not confuse: manually entered variants ≠ “simulated users” (saved, reusable across sessions and persistent beyond the current browser session)
- Do not confuse: selecting simulated users to add as variants ≠ selecting which existing variants to render
- Do not confuse: “Send proof” (send variant proofs to email recipients) ≠ “Render email” (preview across email clients and devices) ≠ “Spam report” (deliverability score)
FAQ:
- Q: How do I open the new experience? — From your content, click Simulate content to open the content simulation screen.
- Q: Can I render only some variants? — Yes. Use the variant list icon in the bottom action bar to select the variants to render. Search variants helps find a variant, and Show all displays every variant again.
- Q: Does clicking Generate keep my existing variants? — No. Clicking Generate replaces all existing variants, including any added manually or from a file.
- Q: Can I compare variant details with the preview? — Yes. In the Vertically stacked layout, each variant’s details and content preview are displayed side by side.
- Q: How do I review invalid links? — Click the red invalid-links count on the variant card to open the URL validation failed dialog and review each URL and its Reason. Use Copy to copy the validation details.
- Q: How do I go back to the old layout? — Click Old experience in the bottom action bar.