On this page: Build reusable decision rules and targeting rules, so you can control which decision items and personalized content are shown to which audiences across your campaigns and journeys.
About rules about
In Journey Optimizer, you can create two types of reusable rules:
Decision rules decision-rules
Decision rules allow you to define the audience for decision items by applying constraints, either directly at the decision item level, or within a specific selection strategy. This enables you to precisely control which items should be presented to whom.
For instance, let’s consider a scenario where you have decision items featuring Yoga-related products designed for women. With decision rules, you can specify that these items should only be displayed to profiles whose gender is ‘Female’ and who have indicated a ‘Point of Interest’ in ‘Yoga’.
Targeting rules targeting-rules
Targeting rules allow to determine specific qualifications that must be met for a customer to be eligible to receive personalized content or to enter a specific journey path, based on specific audience segments, which enables you to target sub-audiences in your journeys and campaigns.
Many times, they are a combination of multiple attributes, in addition to customer behavior events and context data. To save you time and effort, you can create targeting rules once and reuse them across your journeys and campaigns, with the ability to quickly modify them inline at the time of authoring.
You can use these rules either:
- When creating content optimization targeting in journeys or campaigns;
- When building journey path optimization.
Access rules access
The list of rules is accessible in the Decisioning > Strategy setup menu.
The following actions are available:
-
You can filter on the rule entity (Decision item or Targeting - Learn more).
-
Select a rule by clicking its name and edit it using the rule builder. Learn how
-
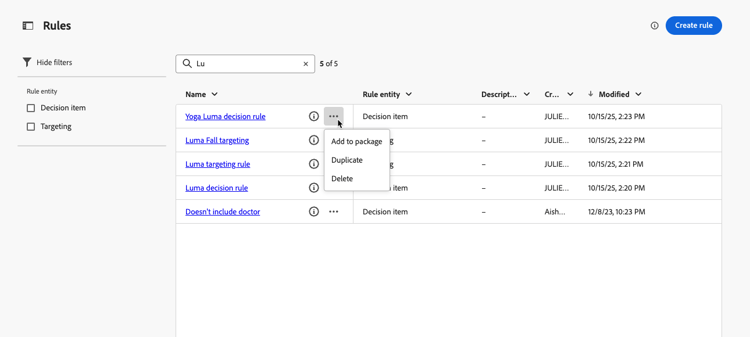
From the More actions button located next to each item, you can:
- If you selected the Decision item entity, add the rule to a package in order to export it to another sandbox. Learn how to export objects to another sandbox.
- Duplicate a rule.
- Delete a rule.
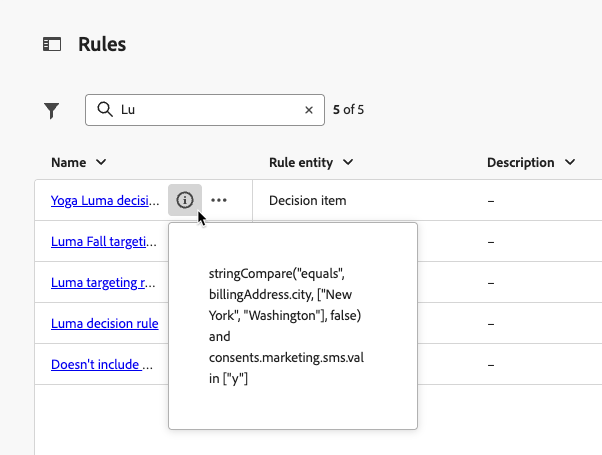
- Click the More info icon to display the formula that makes up the rule.
Create a rule create
To create a rule, follow these steps:
-
Navigate to Decisioning > Strategy setup > Rules, then click the Create rule button.
-
In the Create rule dialog, choose one of the following tabs:
-
Create from scratch to continue in the rule creation flow.
-
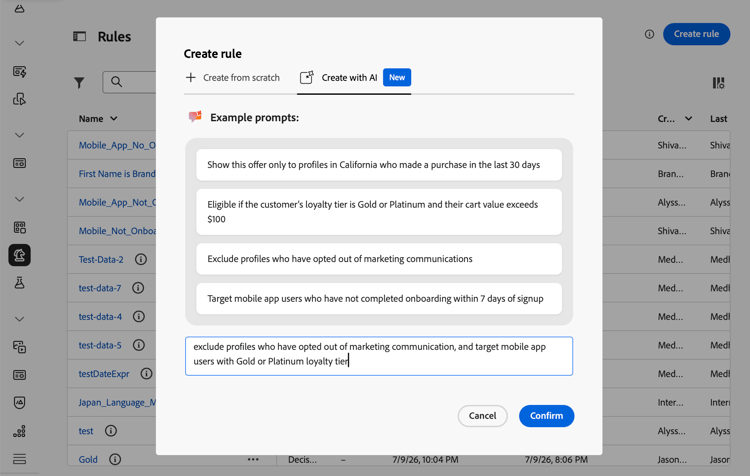
Create with AI to use AI-assisted authoring. Describe the rule you want to create then and confirm. You are redirected to the rule builder and AI Assistant generates a rule suggestion in the right pane. For more information on how to generate a rule using AI, refer to Build a rule with AI section.
note NOTE This capability is available to organizations with access to Adobe AI capabilities.
-
-
If you chose Create from scratch, select the rule entity to specify which type of object the rule is being created for.
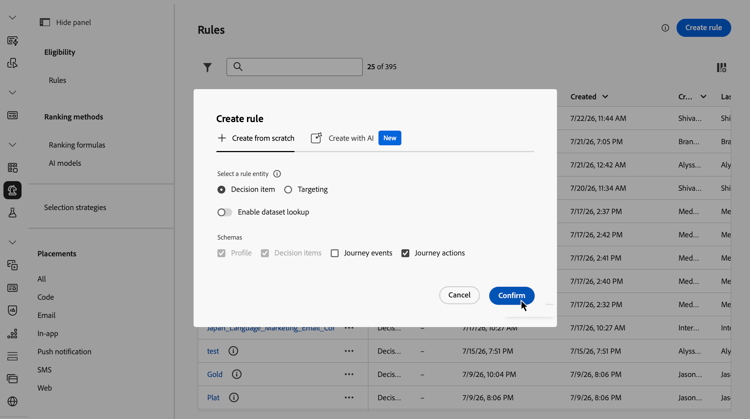
- Decision item - The rule can be applied on a decision item in the context of Decisioning;
- Targeting - The rule can be used when building targeting rules, either as part of content optimization in a campaign or a journey, either in the Optimize journey activity.
If you create a Decision item rule, you can select Enable dataset lookup to use data from Adobe Experience Platform to enrich your decision logic with external data. This is especially useful for attributes that frequently change, such as product availability, or real-time pricing. Learn how to use Adobe Experience Platform data for decisioning
-
The rule creation screen opens. Name your rule and provide a description.
-
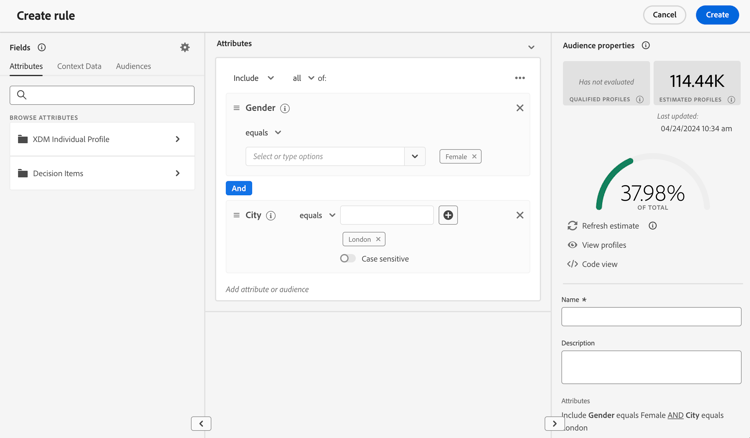
Build the rule to suit your needs using the Adobe Experience Platform Segment Builder. To do this, you can leverage various data sources such as:
- Profile attributes;
- Decision item attributes - only available when creating a Decision item rule;
- Audiences;
- Context data coming from Adobe Experience Platform. Learn how to leverage context data
note NOTE The Segment Builder provided to create rules presents some specificities compared to the one used with the Adobe Experience Platform Segmentation service. However, the global process described in the documentation is valid to build rules in Journey Optimizer. Learn how to build segment definitions -
As you are adding and configuring new fields in the workspace, the Audience properties pane displays information on the estimated profiles belonging to the audience. Click Refresh estimate to update data.
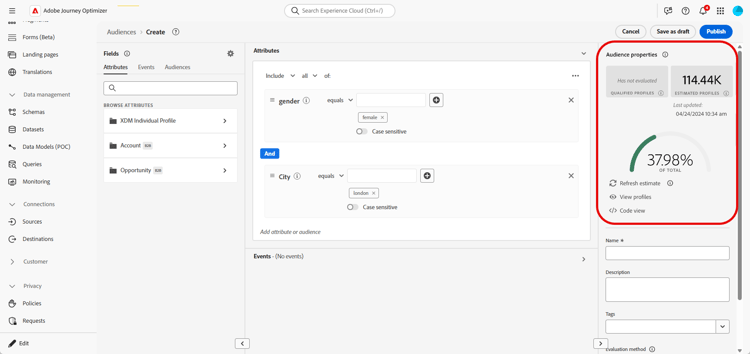
note NOTE Profile estimates are unavailable when the rule parameters include data that are not stored in the profile, such as context data. -
Once your rule is ready, click Create. The created rule appears in the list and, according to the entity you created, is available for use:
- In decision items and selection strategies to govern the presentation of decision items to profiles;
- Or when building targeting in content optimization or path optimization.
) in the PQL string.Build a rule with AI build-rule-with-ai
You can start AI-assisted rule authoring from two places:
-
From the Create rule dialog, in the Create with AI tab:
-
From the rule builder, using the AI Assistant button.
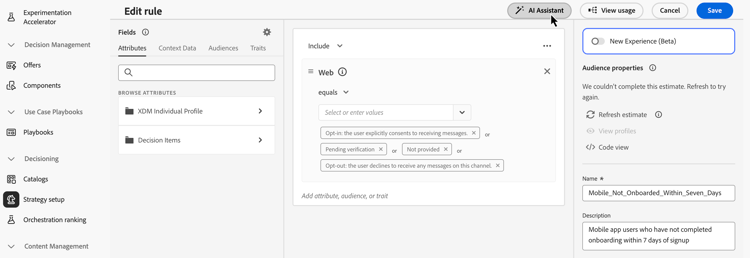
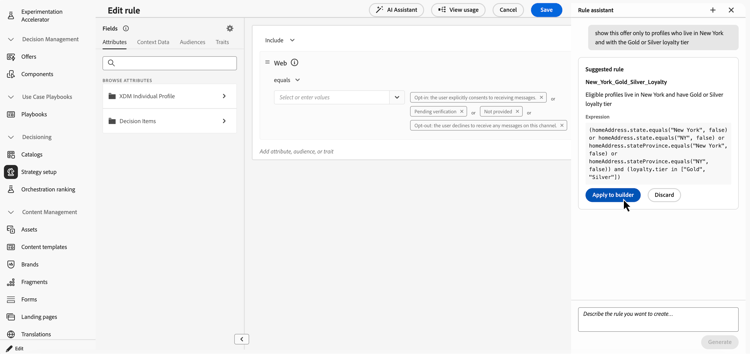
In the AI Assistant pane, describe the rule you want to build in plain language. The AI Assistant generates a rule suggestion, that you can apply to the builder, or discard.
Simulate your rule simulate-rules
Before using a rule in your decisioning strategy or campaign, you can test it with sample or generated data to validate the rule logic and ensure it behaves as expected.
Access the simulation workspace
-
Open an existing rule or create a new one then click the Simulate rule button.
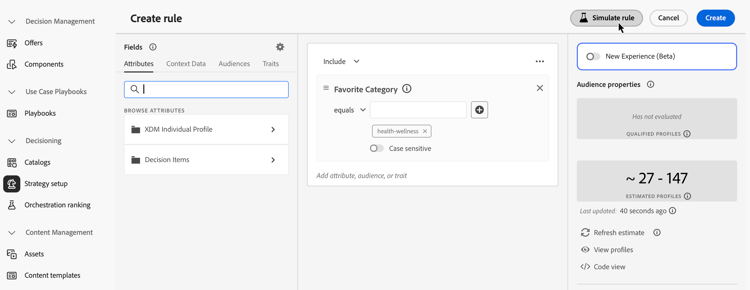
-
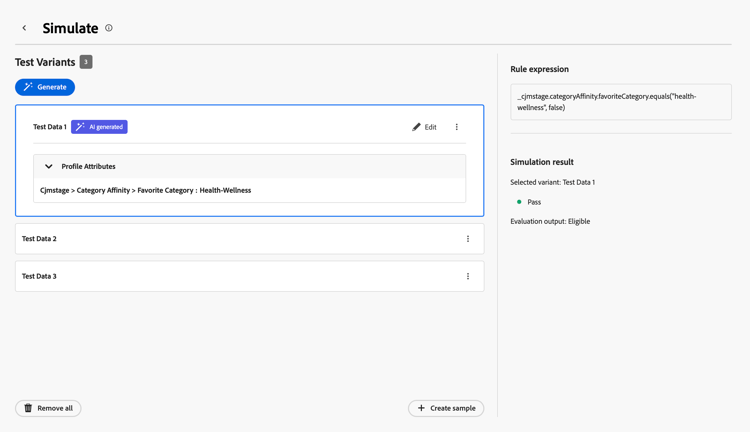
The simulation screen opens with several sections:
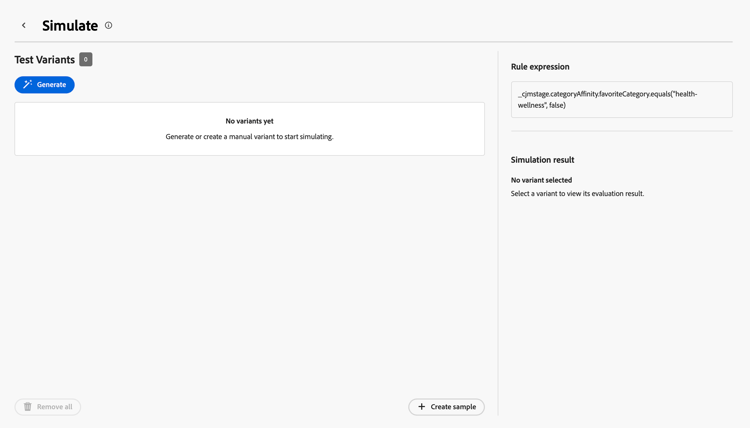
- Test Variants: Where you generate or create manual test variants
- Rule expression: Displays the rule definition for reference
- Simulation result: Shows whether the Profile will be eligible by this Rule or not
Add test variants
-
Add test variants with the attributes required by your rule using one of the following methods:
- To create a manual sample, select the Create sample button.
- To generate test variants using AI, click the Generate button.
note NOTE AI-based test variant generation is available to organizations with access to Adobe AI capabilities.
The Test variants section is automatically populated with the created or generated samples. Each variant includes attributes used in your rule. You can edit the field values directly to simulate different scenarios.
Populate variants with Adobe Experience Platform test profiles
Once you have created or generated a variant, you can use attributes from an Adobe Experience Platform test profile to populate its attributes.
-
Select Edit on a variant then click the Select AEP profile button.
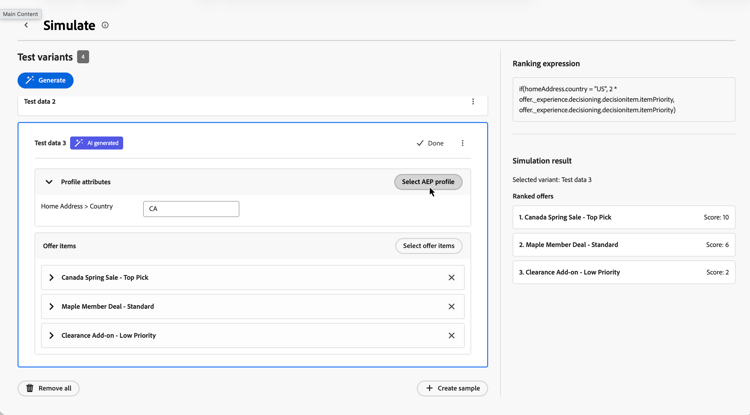
-
Select an identity namespace, enter the corresponding identity value.
The Recents area lists profiles that you have successfully applied. Recent profiles are stored in the browser per organization and sandbox, are ordered with the newest first, and are limited to 10 entries.
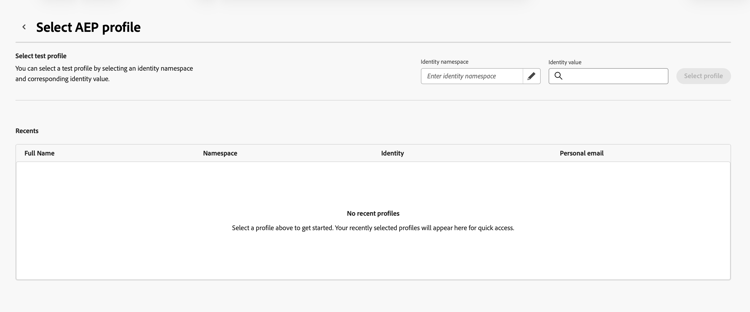
-
Click the Select profile button. The test profile’s attributes are added to the selected variant.
View the simulation results
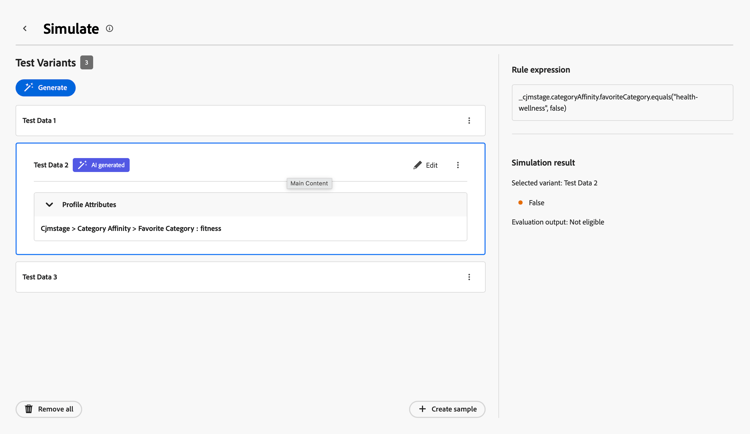
To view the rule evaluation results, select a test variant from the list. The Simulation result area shows whether the Profile will be eligible by this Rule or not.
In the example below, the first test variant shows a Pass simulation result, while the second test variant shows a Failed result.
AI-powered rule optimization optimize
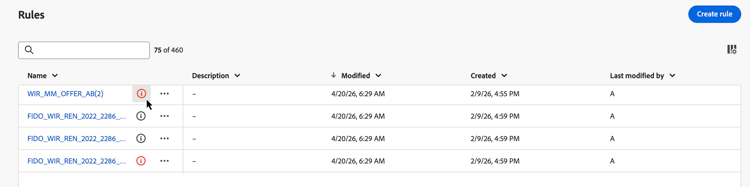
Journey Optimizer can automatically analyze rules and suggest simplifications that preserve the original logic. Only rules whose PQL expression is larger than 2 KB (UTF-8 encoded) are eligible, smaller expressions are not analyzed. When a simplification is found, a red Optimize indicator appears next to the rule in the inventory.
To optimize a rule:
-
In the rules inventory, click the red indicator icon next to the rule name.
-
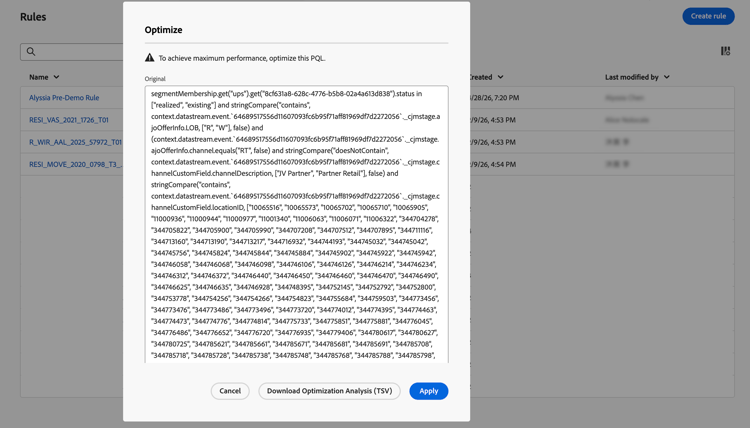
The Optimize window opens, displaying the original PQL expression alongside the AI-suggested version.
-
To validate that both expressions behave identically, click Download Optimisation Analysis (TSV) to download a file showing how simulated profiles are evaluated against each version.
-
Once satisfied, click Apply to replace the original expression with the optimized one.
How-to video video
Learn how to create, duplicate, and apply reusable targeting rules in Adobe Journey Optimizer to efficiently personalize campaigns based on customer attributes like region, language, and behavior—saving time while enhancing audience precision.