Listen for an event
To move your audience forward to the next step in the journey when an event occurs, add the Listen for an event node.

Account events
In an account journey, you can listen for an event based on the account when you want to move the account forward in the journey according to events triggered by account activity.
Events and constraints
Type (Email, Milestone, or Web)
Additional constraints (optional):
-
Description
-
Source
-
Date of activity
Timeout (optional)
Attribute
Additional constraints (optional):
-
New value
-
Previous value
-
Date of activity
Timeout (optional)
Solution interest
Additional constraints (optional):
-
New stage
-
Previous stage
-
Date of activity
Timeout (optional)
Solution interest
Additional constraints (optional):
-
New status
-
Previous status
-
Date of activity
Timeout (optional)
Solution interest
Additional constraints (optional):
-
New score
-
Previous score
-
Date of activity
Timeout (optional)
Solution interest
Additional constraints (optional):
-
New score
-
Previous score
-
Date of activity
Timeout (optional)
Add an account event
-
Navigate to the journey canvas.
-
Click the plus ( + ) icon on a path and choose Listen for an event.
-
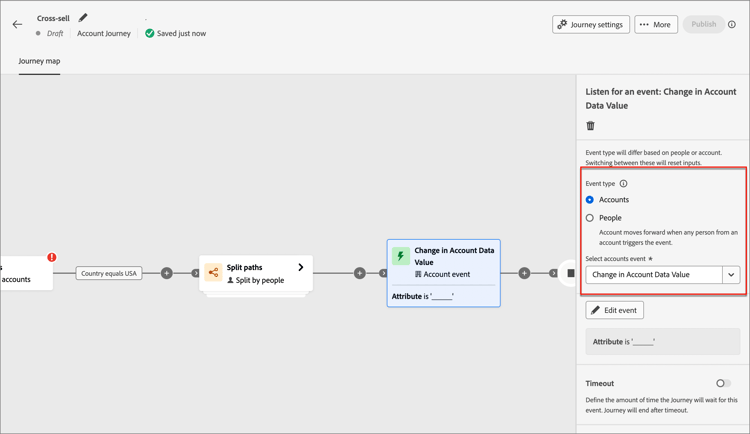
In the node properties on the right, choose Accounts for the event type.
-
Select an event from the list.
-
Click Edit event and define details for the event.
People events
In an account journey, you can listen for an event based on people when you want to move the account forward in the journey according to events triggered by people activity. You can also filter events according to people attributes.
Events and constraints
Solution interest
Additional constraints (optional):
-
Role
-
Date of activity
Timeout (optional)
Email
Additional constraints (optional):
-
Link
-
Link ID
-
Is mobile device
-
Device
-
Platform
-
Browser
-
Is predictive content
-
Is bot activity
-
Bot activity pattern
-
Browser
-
Date of activity
-
Min. number of times
Timeout (optional)
Email
Additional constraints (optional):
-
Link
-
Device
-
Platform
-
Date of activity
-
Min. number of times
Timeout (optional)
Person attribute
Additional constraints (optional):
-
New value
-
Previous value
-
Reason
-
Source
-
Date of activity
-
Min. number of times
Timeout (optional)
Email
Additional constraints (optional):
-
Link
-
Link ID
-
Is mobile device
-
Device
-
Platform
-
Browser
-
Is predictive content
-
Is bot activity
-
Bot activity pattern
-
Browser
-
Date of activity
-
Min. number of times
Timeout (optional)
Date of activity (optional)
Timeout (optional)
Score name
Additional constraints (optional):
-
Change
-
New score
-
Urgency
-
Priority
-
Relative score
-
Relative urgency
-
Date of activity
-
Min. number of times
Timeout (optional)
SMS message
Additional constraints (optional):
-
Date of activity
-
Min number of times
Timeout (optional)
Web page
Select one or more Marketo Engage pages to match.
Additional constraints (optional):
-
Querystring
-
Client IP address
-
Referrer
-
User Agent
-
Search engine
-
Search query
-
Token
-
Browser
-
Platform
-
Device
-
Date of activity
Form
Select one or more Marketo Engage forms to match.
Additional constraints (optional):
-
Date of activity
-
Querystring
-
Client IP address
-
Referrer
-
User agent
-
Platform
-
Device
Timeout (optional)
Event type
Additional constraints (optional):
- Fields
Additional constraints (not supported):
-
Date of activity
-
Min. number of times
Timeout (optional)
People event filters
Email activities based on conditions that are evaluated using one or more selected email messages from earlier in the journey:
-
Clicked link in email
-
Opened email
-
Was delivered by email
-
Was sent email
SMS activities based on conditions that are evaluated using one or more selected SMS messages from earlier in the journey:
-
Clicked link in SMS
-
SMS Bounced
For a selected person attribute, a value change occurred. These change types include:
-
New value
-
Previous value
-
Reason
-
Source
-
Date of activity
-
Min. number of times
Interesting moment activity that is defined in the associated Marketo Engage instance. Constraints include:
-
Milestone
-
Email
-
Web
Web page activity that for one or more web pages managed by the associated Marketo Engage instance. Constraints include:
-
Web page (required)
-
Date of activity
-
Client IP address
-
Querystring
-
Referrer
-
User agent
-
Search engine
-
Search query
-
Personalized URL
-
Token
-
Browser
-
Platform
-
Device
-
Min. number of times
Attributes from the person profile, including:
-
City
-
Country
-
Date of birth
-
Email address
-
Email invalid
-
Email suspended
-
First name
-
Inferred state region
-
Job title
-
Last name
-
Mobile phone number
-
Person engagement score
-
Phone number
-
Postal code
-
State
-
Unsubscribed
-
Unsubscribed reason
The person is or is not a buying group member evaluated against one or more of the following criteria:
-
Solution Interest
-
Buying Group status
-
Completeness Score
-
Engagement Score
-
Is Removed
-
Role
Add a people event
-
Navigate to the journey canvas.
-
Click the plus ( + ) icon on a path and choose Listen for an event.
-
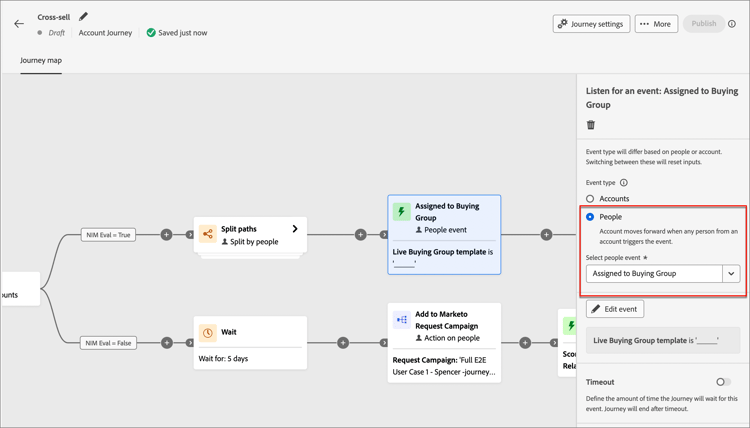
In the node properties on the right, choose People for the event type.
-
Select an event from the list.
-
Click Edit event and define details for the event.
Listen for a Marketo Engage event listen-for-marketo-engage-event
If you have web pages in your connected Marketo Engage instance, you can trigger an event based on a visit/no visit to these web pages, as well as Marketo Engage forms that were/were not filled.
-
Select a Listen for an event node in the journey canvas.
-
In the node properties on the right, choose People for the event type.
-
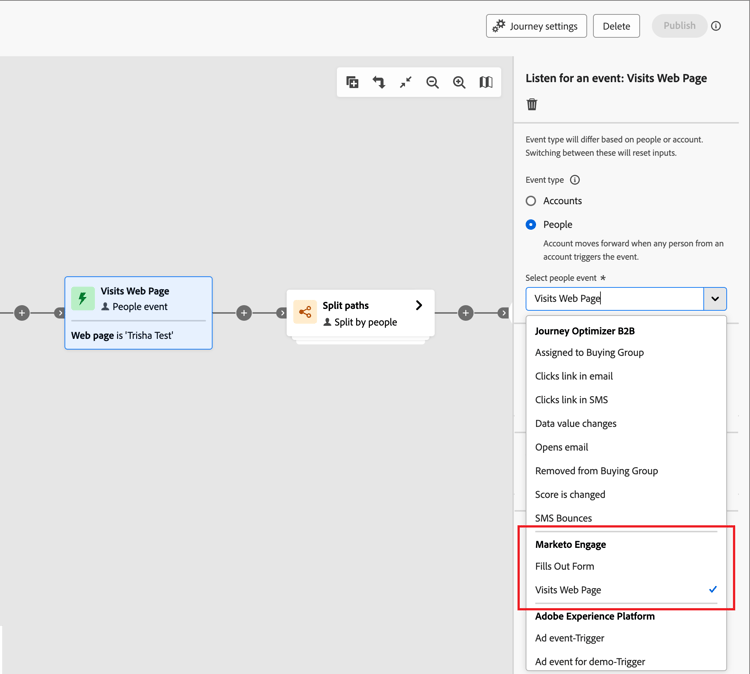
Click the arrow for the Select people event selector and scroll the menu to the Marketo Engage section.
-
Select a Marketo Engage activity type:
- Visits Web Page.
- Fills Out Form
-
Click Edit event and define one or more web pages to match and any additional constraints for the event.
-
(Required) In the Edit event dialog, define the Web page or Fills out form constraint. Use is (default) to match on one or more selected pages or forms. Use is not to match on all page visits/forms with the exclusion of one or more selected pages/forms. Or, use the is any operator to match on any Marketo Engage web page visit or filled form.
-
(Optional) Click Add constraint and choose the field that you want to use for the constraint. Set the operator and the value for the field.
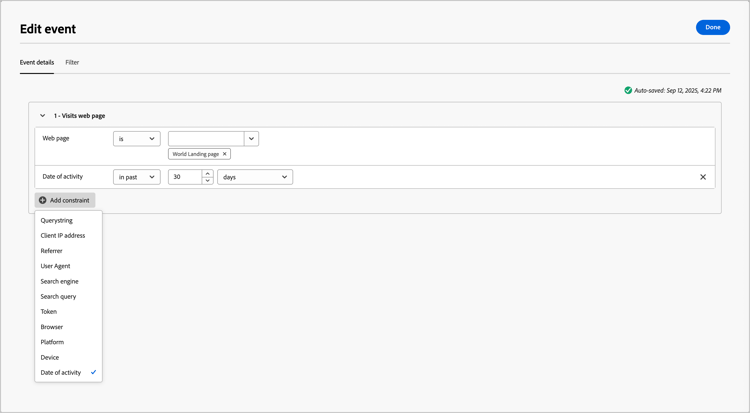
To include additional field constraints as needed, repeat this action.
-
If needed, select the Filters tab to add filters for the event.
-
When the constraints and filters are defined, click Done.
-
-
If needed, set the Timeout option to limit the time period to listen for the event (see Add a timeout to an event node).
-
In the journey canvas, add the next node to execute when the event occurs.
Listen for an Experience Event listen-for-an-experience-event
Administrators can select Adobe Experience Platform (AEP) Experience Events, which enable marketers to create account and person journeys that react to the events in near real-time. Using Experience Events in journeys is a two-step process:
-
An administrator adds the event types and fields of interest to make them available in journeys.
-
In a journey, add a Listen for an event node, and select an Experience Platform event type for a people-based event.
To include an Experience Event in your journey:
-
Select a Listen for an event node in the journey canvas.
-
(Account journey only) In the node properties on the right, choose People for the event type.
-
Select the event.
For an account journey, click the arrow for the Select people event selector and scroll the menu to the Adobe Experience Platform section.
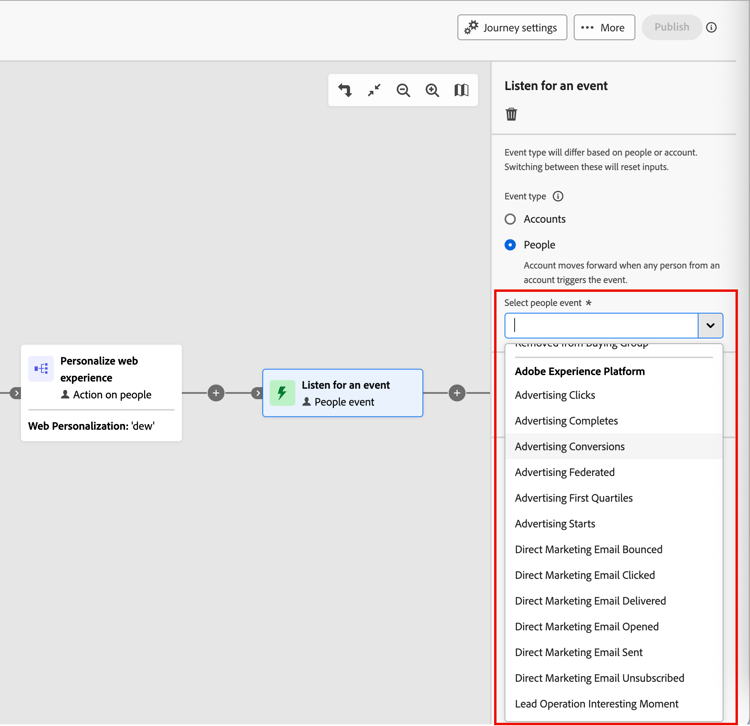
For a person journey, click the arrow for the Select event selector and choose the event.
-
Click Edit event and define one or more constraints for the event.
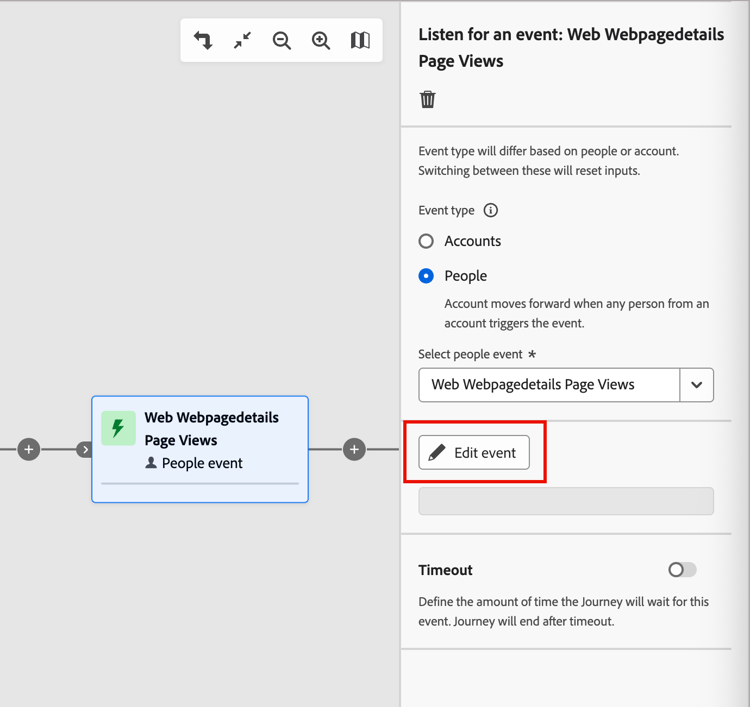
The available constraints are defined as managed fields for the event configuration.
-
Click Add constraint and choose the field that you want to use for the constraint.
-
Complete the condition for the constraint.
You can use the default is operator to match one or more field values. Or you can use the is not operator to match on all values with the exclusion of one or more specified values.
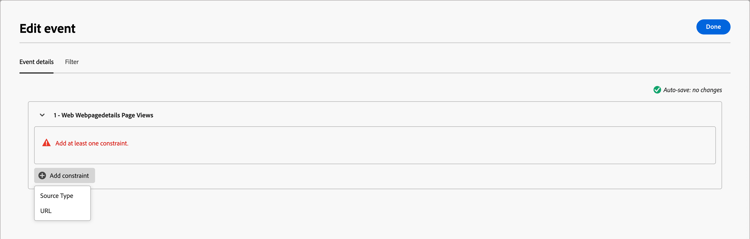
-
If needed, select the Filters tab to add filters for the event.
-
(Optional) Click Add constraint and repeat these steps to include additional field constraints as needed.
-
When the constraints and filters are defined, click Done.
-
-
If needed, set the Timeout option to limit the time period to listen for the event (see Add a timeout to an event node).
-
In the journey canvas, add the next node to execute when the event occurs.
-
Complete the remaining nodes for your journey and publish it.
When the journey is live (published) and reaches the Listen for an event node, it begins listening for AEP Experience Events.
Add filters to the people event
(Account journeys only)
-
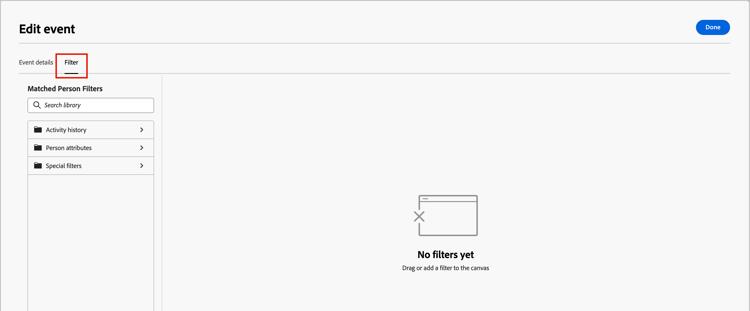
After you define the event, select the Filters tab in the Edit Event dialog.
-
To target the people for the event, add one or more filters.
-
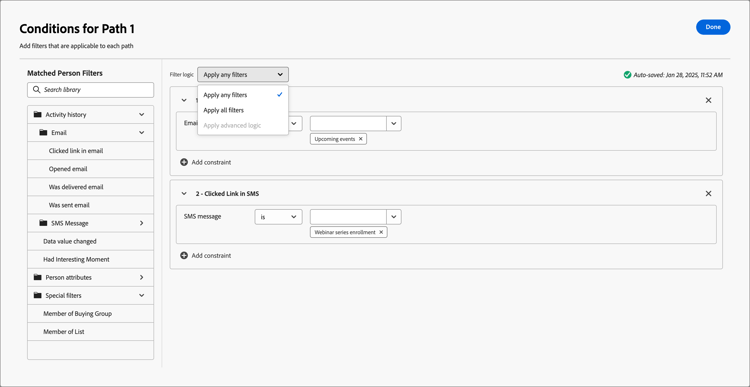
Drag and drop any of the people filters from the left navigation and complete the match definition.
note NOTE If you have custom person fields defined in the account audience schema in Experience Platform, these fields are also available under Attributes to use as person attributes in filters. -
Refine your filtering by applying the Filter logic at the top. You can choose to match all filters or any filter.
-
Click Done.
-
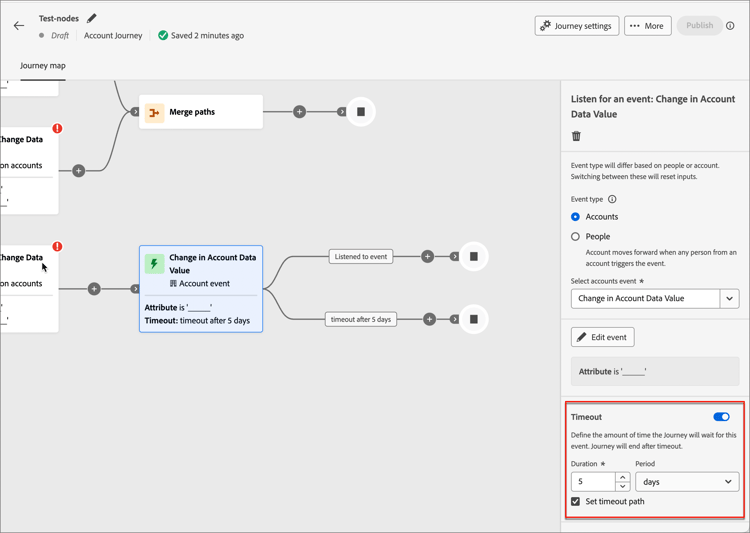
Add a timeout to an event node
If needed, define the amount of time the journey waits for the event. The journey ends after a timeout unless you define a timeout path, where you can add other nodes.
-
Enable the Timeout option.
-
Select the duration for which the journey waits for an event to occur before it times out.
You can choose to end the path here or take a different course of action by setting another path.
-
To create a new path in the journey where you can add actions and events applicable to accounts when the event does not occur, select the Set timeout path check box.