[AEM Assets]{class="badge positive" title="Applies to AEM Assets)."}
Manage collections manage-collections
A collection is a set of assets, folders, or other collections within Adobe Experience Manager Assets view. Collections enable users to share assets efficiently with one another, making them a core mechanism for collaboration across teams working with the same digital asset library.
Unlike folders, which organize assets by their storage location, a collection can include assets from different locations. This flexibility allows a collection to group related content that lives in separate parts of the asset repository, so users can assemble the exact set of assets they need without moving or duplicating files.
A single user can be granted access to multiple collections. Each collection contains references to assets rather than copies of the assets themselves. The referential integrity of assets is maintained across collections, meaning that each reference reliably points to its source asset, so the same underlying asset can appear in multiple collections while remaining consistent and up to date. This reference-based structure prevents duplication and ensures that changes to a source asset are reflected wherever it is referenced.
Collection management tasks collection-management-tasks
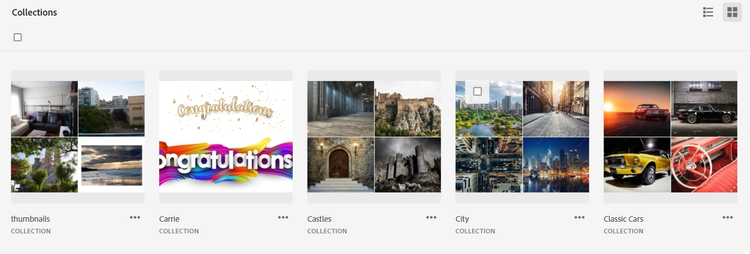
The following tasks manage and use collections:
Create a collection create-collection
A collection groups related assets together for organized access. To create a collection, follow these steps:
-
Click Collections in the left rail and then click Create Collection.
-
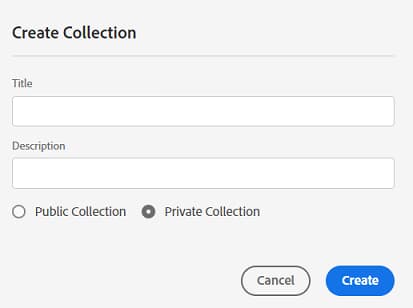
Specify a title and an optional description for the collection. A clear title makes the collection easier to locate later.
-
Select whether to create a Private collection or a Public collection, based on how widely the contents should be shared. This choice determines who can view and edit the collection. Collection types:
- Public collection: Available for viewing and editing to all users. Choose this option when the collection is meant to be shared and collaboratively maintained across the team.
- Private collection: Available only to the creator and users with administrator privileges. Choose this option when access should remain restricted, because it limits both viewing and editing to a controlled group.
-
Click Create to create the collection. The new collection then appears in the Collections list, ready for you to add assets.
Add assets to a collection add-assets-to-collection
Collections group related assets together so you can organize, locate, and share them as a single set. Adding assets to a collection streamlines asset management, making it easier to reuse content and provide teams with shared access to the same grouped resources.
Follow these steps to add assets to a collection:
-
Click Assets in the left rail and select the assets you want to add to a collection.
-
Click Add to Collection. This opens the Collections dialog box, where you assign the selected assets to one or more collections.
-
On the Collections dialog box, select the collections to which you want to add the selected assets. You can add the same assets to multiple collections at once.
-
Click Add to add the assets to the selected collections. The selected assets are now grouped within each chosen collection and are accessible from those collections for organization, reuse, and sharing.
Remove assets from a collection remove-assets-from-collection
Removing assets from a collection lets you keep the collection focused and organized by taking out items that are no longer relevant. Removing an asset from a collection does not delete the asset itself from the repository—it only removes the association between that asset and the collection, so the asset remains available elsewhere.
To remove assets from a collection, follow these steps:
-
Click Collections in the left rail to view the list of collections.
-
Click the collection and select the specific assets you need to remove from the collection.
-
Click Remove.
Completing these steps removes the selected assets from the collection immediately, helping you maintain a clean, well-organized set of collections.
Search within collections search-collection
Search within a collection to quickly locate relevant assets. Follow these steps:
-
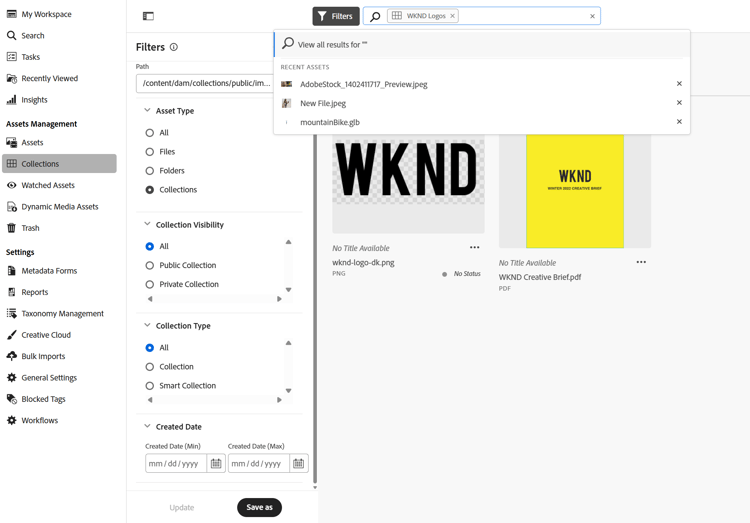
Navigate to Collections. In the search bar, enter a keyword to locate the desired collection. The search bar displays the location of the selected collection.
-
To refine the results, open Filters and confirm that Collections is selected under Asset Type so that only collections appear in your results.
-
In the Collection Visibility dropdown, choose one of the following options:
- All: Displays all collections, regardless of visibility.
- Public Collection: Shows only collections that are visible to all users, useful when locating shared or organization-wide assets.
- Private Collection: Shows only collections that are restricted or visible to specific users or groups, useful when working with confidential or team-limited content.
-
In the Collection Type dropdown, choose one of the following options:
- All: Displays both regular and smart collections.
- Collection: Shows manually created collections where assets are added individually.
- Smart Collection: Shows collections that automatically include assets that are saved under Smart Collections.
-
The Created Date dropdown filters collections based on when they were created. Specify a date range to surface recently created or older collections, which helps narrow large result sets to a relevant time period.
For more information, see search assets, filter search results, or manage saved searches.
Manage a Smart Collection manage-smart-collection
A Smart Collection is a saved search that behaves as a dynamic, self-updating collection. Instead of manually adding assets one by one, you save your search results as a Smart Collection, and the collection continuously reflects any asset that matches its defined search criteria.
How a Smart Collection Works
You define the search criteria when creating the Smart Collection. From that point forward, the Smart Collection automatically keeps its contents in sync with those criteria:
- When new assets are added to the Assets view repository, the system evaluates them against the saved criteria.
- If a newly added asset fits the defined search criteria, it becomes part of the Smart Collection.
- The Smart Collection automatically updates its contents when you open it, so you always see the current, matching set of assets.
Because membership is driven by criteria rather than by manual selection, the collection stays current on its own. As a result, you do not need to revisit and edit the collection each time relevant assets arrive—the qualifying assets appear the next time you open the Smart Collection. This ensures the collection remains an accurate, live representation of your search rather than a static, one-time snapshot.
Key Benefits
- Dynamic updating: New matching assets are captured automatically, without manual maintenance.
- Consistency: The collection always reflects the exact search criteria you defined.
- Efficiency: Saved searches can be reused, saving the effort of re-running the same query.
- Scalability: As the Assets view repository grows, relevant assets are surfaced automatically as they meet the criteria.
Smart Collections are especially useful when you regularly work with assets that share common attributes—such as a specific file type, tag, project, or metadata value—where the underlying set of matching assets changes over time.
Create a Smart Collection create-smart-collection
A Smart Collection is a dynamic, filter-based collection that automatically updates its contents based on the saved search criteria you define, so newly added assets that match the criteria appear in the collection without manual updates. Unlike a static collection, a Smart Collection continuously reflects the results of its underlying search.
To create a Smart Collection, complete the following steps:
-
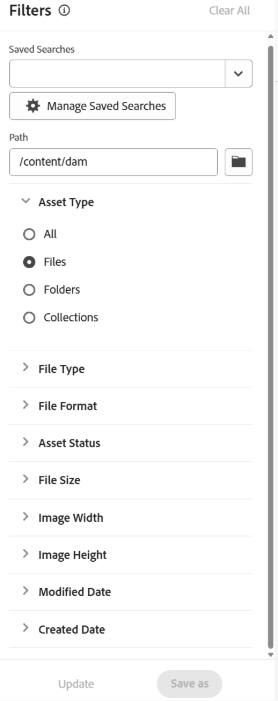
Click Filter and define the search criteria. These criteria determine which assets the Smart Collection dynamically includes.
-
Click Save as and then select Smart Collection.
-
On the Create Smart Collection dialog box, specify a title and a description for the Smart Collection. A clear title and description make the collection easier to identify and reuse later.
-
Set the access level for the Smart Collection:
- Select Public Collection to allow all users to access the collection. This grants organization-wide visibility.
- Select Private Collection to restrict access to a limited group of users. This limits visibility because only the intended users can view the collection.
-
Click Create to create the Smart Collection. The Smart Collection is then saved and begins populating with all assets that match the defined search criteria.
Edit a Smart Collection edit-smart-collection
A Smart Collection is a dynamic, criteria-based collection whose contents are populated automatically by a saved set of search filters rather than by manually added assets. Editing a Smart Collection means changing those underlying search criteria, which in turn redefines which assets belong to the collection.
To edit a Smart Collection:
-
Click Collections in the left rail, then locate and double-click the name of the Smart Collection that you need to edit. This opens the selected collection so you can access its settings.
-
Click Edit Smart Collection to open the collection’s filter settings for modification.
-
On the Edit Smart Collection Filters dialog box, update the search criteria for the Smart Collection. This redefines which assets automatically populate the Smart Collection, because Smart Collection membership is driven by these filters rather than by manual selection.
-
Click Save. Saving applies the updated criteria and refreshes the collection so that it reflects every asset matching the revised filters.
View and edit collection metadata view-edit-collection-metadata
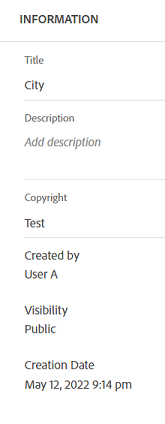
Collection metadata is the descriptive information that identifies and characterizes a collection, including its Title and Description. This metadata makes a collection easier to recognize, organize, and locate, ensuring that the right content can be found quickly. Keeping collection metadata accurate and up to date improves discoverability and helps maintain a well-organized library.
To view and edit collection metadata:
-
Click Collections in the left rail, select a collection, and click Details.
-
View the collection metadata using the Basic tab.
-
Modify the metadata fields to keep the collection accurate and discoverable. You can modify the Title and Description fields.
Editing the Title and Description fields updates how the collection is displayed and referenced, so clear, accurate values ensure the collection remains easy to identify and manage.
Share links for collections share-collection-links
Assets view lets you generate a shareable link to distribute collections and the assets within them to external stakeholders who do not have access to the Assets view application. This makes it possible to collaborate with clients, partners, and reviewers outside your organization without provisioning them accounts or granting direct application access.
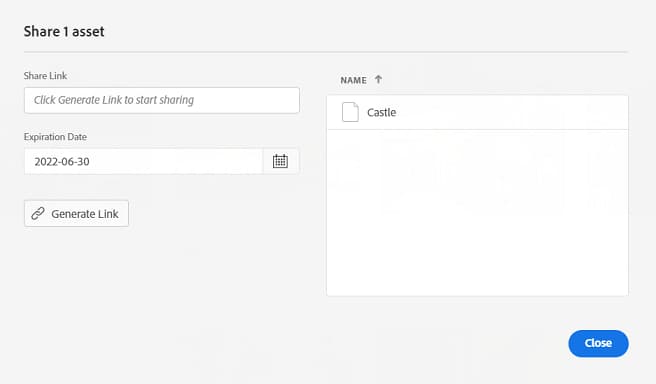
When you create a share link, you can:
- Set an expiration date for the link, which controls how long recipients can access the shared collection and automatically revokes access after the defined period.
- Share the link with recipients using any preferred communication method, such as email or messaging services.
- Allow recipients to preview the assets in the collection.
- Allow recipients to download the shared assets directly.
Because access is governed by the link and its expiration date rather than by an application account, share links provide a controlled, time-limited way to deliver collection content to people outside the Assets view environment.
For more information on how to share collection links with external stakeholders, see share links for assets.
Download a collection download-collection
Downloading a collection packages all of its assets into a single .ZIP file that is saved directly to your local machine, making it easy to store, share, or transfer the full set of assets in one bundled archive.
To download a collection:
-
Click Collections in the left rail to open the list of available collections.
-
Select the specific collection you want to download, then click Download to begin the download process.
-
On the Downloading Asset dialog box, click OK to confirm and start the download.
The collection downloads as a .ZIP file on your local machine. The .ZIP format compresses and consolidates every asset in the collection into a single compressed archive, which reduces the overall file size and keeps all assets together during transfer.
Once the download completes, locate the .ZIP file in your browser’s default download location, then extract (unzip) the archive to access the individual assets contained within the collection.
Delete a collection delete-collection
Deleting a collection permanently removes it, along with its saved contents, from your workspace. Because this action cannot be undone, confirm that you no longer need the collection before proceeding.
To delete a collection, follow these steps:
-
Click Collections in the left rail to open your list of saved collections.
-
Select the collection that you need to delete.
-
Click Delete.
-
Confirm the deletion when prompted. This step ensures the collection is removed only when you intend it to be, protecting you from accidental data loss.
Manage permissions for a private collection manage-permissions-private-collection
Administrators and collection owners control who can access private collections stored in the Experience Manager repository. Permission management in Experience Manager Assets Essentials establishes clear access levels for every private collection, ensuring that only authorized users and user groups can view or modify collection contents.
Available Permission Levels
Assign the following permissions to individual users or to user groups:
Can View— grants read-only access, allowing the user to see the private collection and its assets without making changes.Can Edit— grants the ability to modify the private collection, including its assets and organization.
You can also delegate permission management privileges to user groups, so that designated groups can grant, adjust, and revoke access on behalf of the collection.
Who Manages Permissions
The users who create private collections are the owners of those collections. Collection owners use the Manage Permissions action to grant access to other users. This ensures that the person responsible for a collection controls exactly who can view or edit it, keeping sensitive or work-in-progress assets appropriately restricted.
In addition, Administrators can view and manage the permissions of all private collections in the Experience Manager repository. This provides centralized oversight, allowing administrators to enforce consistent access policies and step in when ownership changes or access needs to be corrected.
Related Resources
- To assign the available permissions to user groups, see Add permissions to user groups.
- For the complete end-to-end workflow, see manage permissions.
Next Steps next-steps
Adobe Experience Manager (AEM) Assets provides several channels to share feedback and get help. Use the following options to report issues, suggest improvements, or reach support:
-
Provide product feedback using the Feedback option available on the Assets view user interface, which lets you report usability concerns or request enhancements directly from the product experience.
-
Provide documentation feedback using Edit this page


-
Contact Customer Care when you need direct support for product questions or issues that require assistance beyond documentation.
See also
The following related resources cover common Assets workflows, from translation and search to metadata management and publishing. Use them to explore capabilities in greater depth:
- Translate Assets
- Assets HTTP API — programmatic access through the Assets Application Programming Interface (API)
- Assets supported file formats
- Search assets
- Connected assets
- Asset reports
- Metadata schemas
- Download assets
- Manage metadata
- Manage Dynamic Media templates
- Manage reports in Assets view
- Search facets
- Manage collections
- Bulk metadata import
- Publish Assets to AEM and Dynamic Media