Manage restricted access keys for B2B shared catalogs
[Private Beta]{class="badge yellow" title="Requires the Adobe Commerce Optimizer Connector B2B extension, which is currently in private beta."}
If you use Adobe Commerce B2B shared catalogs with the Adobe Commerce Optimizer Connector B2B extension, the extension automatically generates and assigns the first restricted access key when a catalog view is created. Use the Restricted Access Keys page in the Commerce Admin to view that key, and to create, assign, or delete additional keys.
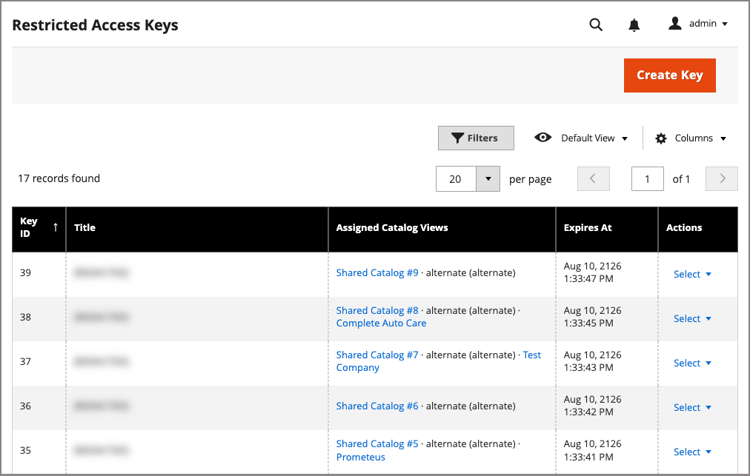
Access the page access-the-page
From the Commerce Admin, go to System > Data Transfer > Restricted Access Keys.
You can assign a key to the catalog view from the Shared Catalog grid, or from the Company grid. See Assign keys to a B2B shared catalog view.
When you need more than the automatic key when-you-need-more-than-the-automatic-key
The automatic key generated by the Adobe Commerce Optimizer Connector B2B extension covers most B2B shared catalogs without requiring any action from you. Manage keys yourself in these cases:
- Rotating a key—Create a new key, assign it to the catalog view alongside the existing one, confirm it’s working, then delete the old key. Automatic rotation is not available yet.
- A key fails to link—If Catalog View Sync Status shows a key-related drift, try saving the catalog view assignment again to retry the failed link. If the key still fails, run Reconcile & Repair to recover the key or status before creating a replacement. Create a replacement key only if the key is expired or the failure is persistently irrecoverable.
- Find a public key—On the Restricted Access Keys page, select View Public Key to view and copy a key’s public key.
A catalog view can have up to three assigned keys at once. During key rotation, Adobe Commerce Optimizer accepts tokens signed by any assigned, unexpired key—there’s no manual step to set an “active” key.
Create a key
On the Restricted Access Keys page, create a key by selecting Create Key.
Commerce generates a new key pair and holds the private key. The Restricted Access Keys table updates with a new key entry showing the unique key ID. Use this Key ID when you assign the key to a catalog view.
The public key is not registered with Adobe Commerce Optimizer until you assign the key to a catalog view. After registration, the Restricted Access Key table entry is updated to show the catalog assignment and expiration date.
Assign keys to a catalog view projected from B2B shared catalog assign-keys-to-a-shared-catalog-view
Assign or unassign keys from the catalog view from the company account or shared catalog page, not from the main Restricted Access Keys grid.
A catalog view must have at least one key and can have at most three.
- If you try to assign a fourth key, you get an error message when you try to save the value:
A Catalog View can have at most 3 access keys. - If a catalog view has only one key, that key cannot be deleted or unassigned.
To update the catalog view key configuration, you can access it from the company account page, or from the shared catalog page.
-
From the Commerce Admin, open the company page (Customers > Companies).
-
In Action column for the company, select Edit.
-
To view the list of catalog views projected from the shared catalog assigned to te Company, expand the Catalog Views section.
The tab lists the catalog views projected from the shared catalog, including their assigned keys.
-
In the Actions column for the catalog view to update, select Edit Restricted Access Keys.
-
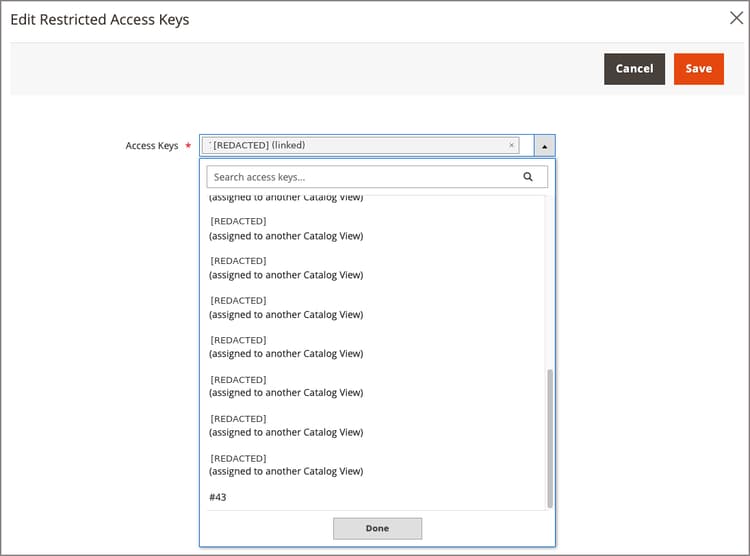
To assign a key, select the Access Keys drop-down list. Then, select an unassigned key by the key ID, for example
#42. Then, click Done to assign it to the catalog view.Keys already assigned to a different catalog view are labeled accordingly.
-
To remove an access token, remove it from the Access Tokens field by selecting the
xcontrol in the key label. -
To save and apply the configuration updates, select Save.
-
From the Commerce Admin, open the shared catalog page (Catalog > Shared catalogs).
-
In Action column for the shared, choose General Settings from the Select menu.
-
To view the list of catalog views projected from the shared catalog, select Catalog Views from the Shared Catalog Information menu.
The Catalog Views page lists the catalog view id, associated store view, and access key for each catalog view.
-
In the Actions column for the catalog view to update, select Edit Restricted Access Keys.
-
To assign a key, select the Access Keys drop-down list. Then, select an unassigned key by the default key title, for example
#42. Then, click Done to assign it to the catalog view.Keys already assigned to a different catalog view are labeled accordingly.
-
To remove an access token, remove it from the Access Tokens field by selecting the
xcontrol in the key label. -
To save and apply the configuration updates, select Save.
Manage key expiration and renewal
You can configure the default key lifetime for restricted access keys. The value determines the expiration date set when the Adobe Commerce Optimizer Connector B2B extension generates the initial key, or when you create a new key manually.
The expiration date is shown in the Expires At column on the Restricted Access Keys page.
To change the duration, go to Stores > Settings > Configuration > Services > ACO Restricted Access Keys. On the Provisioning page, update the Default Key Expiry (days) field. The default system key lifetime is initially set for an extended period (~100 years). Be sure to update it to a value that matches your security policies.
Key renewal
When a key is within 10 days of expiration, the Restricted Access Keys page shows a warning icon next to its entry. If you do not renew the key before it expires, the catalog view becomes inaccessible until you assign a new key.
You can create and assign a new key at any time, and remove the old one after confirming that the new key is working.
Known limitations
Automatic key rotation is not available yet.