在此頁面上:測試使用AI產生的變體、手動輸入、從檔案匯入或根據模擬的使用者,然後預覽並傳送校樣,以確認您個人化的內容正確轉譯給每一種型別的收件者。
當您的內容包含個人化或條件式邏輯時,您必須先驗證其是否正確呈現每個型別的收件者,才能進行傳送。
Journey Optimizer中的 模擬內容變化 體驗可讓您從單一熒幕測試您內容的多個變化、透過AI自動產生、手動輸入、從檔案匯入,或根據可重複使用的模擬使用者,以解決此問題。 您可以預覽每個變體轉譯和傳送校樣的方式,完全無須預先在Adobe Experience Platform中建立持續性設定檔。
從您的內容中,按一下 模擬內容 以開啟單一體驗,您可以:
- 使用AI自動產生變體,以涵蓋個人化和條件式分支
- 手動新增變體,或從CSV或JSON檔案新增
- 使用模擬的使用者,以儲存且可重複使用的測試資料來預覽和校訂
- 針對選取的變體,預覽演算及傳送電子郵件校樣
系統會自動偵測內容中用於個人化的所有屬性。 變體是內容的版本,其屬性的值不同。
護欄與限制 limitations
開始使用範例輸入資料來測試內容之前,請考量下列護欄和先決條件。
-
管道 — 模擬內容變化可用於:
- 電子郵件、行動訊息和推播通知通道;
- 所有傳入頻道(網頁、程式碼型體驗、應用程式內、內容卡);
- 協調的行銷活動。
-
支援的功能 — 內容變化可搭配Journey Optimizer多語言內容與內容實驗功能使用。 這可讓您以多種語言測試訊息,並透過實驗最佳化內容。
您也可以善用內容變數來測試您的內容範本。
note NOTE 目前,目前的體驗無法使用收件匣轉譯和垃圾郵件報告。 若要使用這些功能,請按一下模擬內容,然後從下拉式清單中選取模擬內容(AEP設定檔),以存取先前的使用者介面。 -
屬性 — 同時支援設定檔和內容屬性。
-
資料型別 — 為您的變體輸入資料時,僅支援下列資料型別:數字(整數與小數)、字串、布林值和日期型別。 任何其他資料型別都會顯示錯誤。
-
變體數目 — 您最多可以新增30個變體,在使用檔案或手動新增變體時測試您的內容。 使用AI自動產生時,系統會根據您的內容(個人化欄位和條件分支)決定要建立的變體數量,最多可達40個變體。
建立內容變體
若要建立內容的變化,請按一下 模擬內容 按鈕。
您可以透過下列方式建立變體:
- 手動或從檔案新增變體。
- 使用AI自動產生變體。
- 從現有的模擬使用者中選取變體。
建立變體後,您可以預覽內容並傳送校樣。
手動或從檔案新增變體 profiles
存取內容變數體驗時,系統會自動偵測內容中使用的所有個人化欄位,並顯示於空白變數中。
例如,如果您的電子郵件包含兩個個人化欄位「First name」和「City」,它們會出現在清單中。 一開始不會輸入任何值,且預覽窗格中不會顯示任何個人化內容。
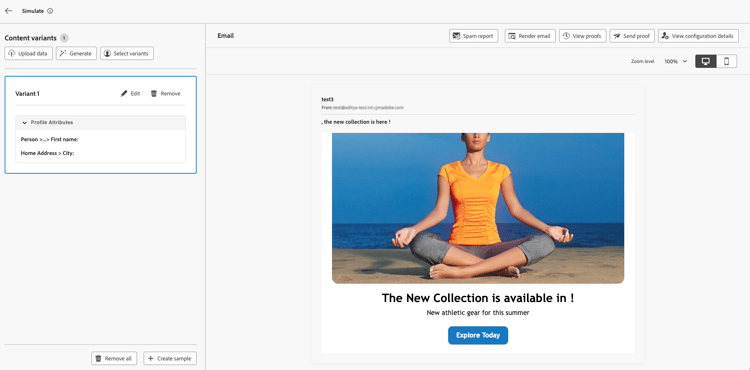
您可以手動新增變體,或從檔案上傳變體。
若要編輯預設變體的值,請按一下 編輯 按鈕,為每個個人化欄位提供自訂值。 預覽窗格將會更新,以顯示您的內容如何以輸入的值呈現。
若要新增變體,請按一下 建立樣本 按鈕。 出現新的空白變體,包含所有偵測到的個人化欄位。 您可以視需要編輯新變體。
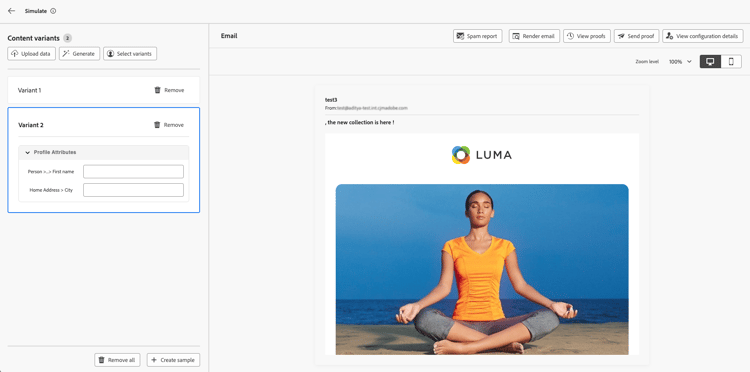
您可以上傳包含預先定義變體和值的檔案來加速此程式。
-
按一下 上傳資料 按鈕,開啟檔案上傳畫面。
-
選取「下載範例」以下載CSV、JSON或JSONLINES檔案範本。
-
開啟範本檔案,並為每個設定檔屬性填入所需的值。 此範本包含用於內容中個人化之每個設定檔屬性的欄。
JSON語法範例:
code language-json { "profile": { "attributes": { "person": { "name": { "lastName": "Doe", "firstName": "John" } } } } } -
檔案準備就緒後,請選取 確認 以載入檔案。 上傳後,新變體會新增到檔案中每個專案的清單中。
自動生成內容變體 auto-generate-variants
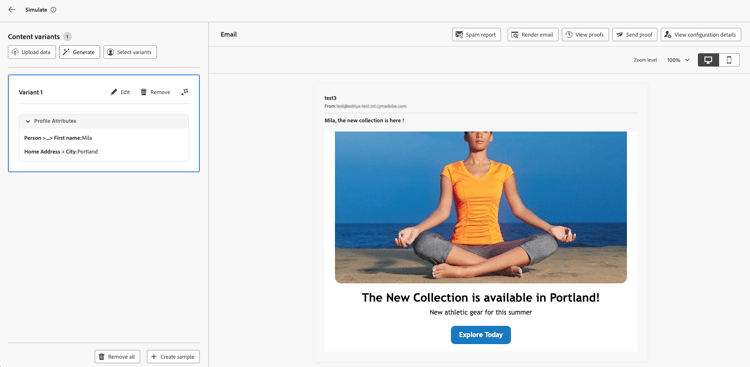
Journey Optimizer可以使用AI型模擬來自動產生內容變體,如此您便可驗證個人化邏輯,而不需手動建立變體。 系統會分析您的內容、識別個人化欄位和條件式分支,並視需要建立儘可能多的變體,以有意義的值涵蓋這些變體,以實現近乎逼真的預覽。
若要自動產生變體,請按一下 產生 按鈕,然後等待系統完成產生。 檢閱變體清單中產生的變體,及其在預覽窗格中的轉譯。
從模擬的使用者中選取變體 simulated-users
在 模擬內容變化 中,您可以根據 模擬的使用者 來設定變體。 模擬使用者是為測試而建立的臨時、類似設定檔的實體,不使用Adobe Experience Platform中的持續設定檔。 不同於只為目前瀏覽器工作階段新增的變體,模擬使用者會儲存起來,並可跨歷程和其他使用者重複使用。
從歷程 模擬 功能建立和管理模擬使用者。 如需建立、儲存和重複使用它們的完整程式,請參閱建立和管理模擬的使用者。
建立模擬的使用者後,您就可以使用這些使用者來預覽您的內容。 若要這麼做,請依照以下步驟進行:
-
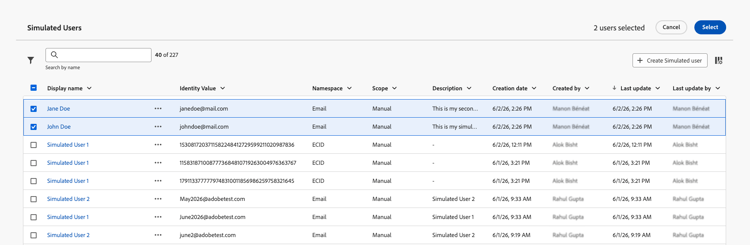
按一下 選取變體 按鈕。
-
在現有模擬使用者清單中,選取您要使用的使用者,然後按一下[選取]。
-
選取的模擬使用者會新增至您的內容變體清單,您可以在其中預覽內容及其屬性值。 您也可以手動編輯變體的值進行測試,但這些變更不會儲存回模擬的使用者。
預覽內容並傳送校樣 preview-proofs
新增變體後,您就可以使用這些變體在右窗格中預覽您的內容,並傳送電子郵件校樣。
預覽內容變數 preview
若要使用變體預覽您的內容,請從清單中選取相關變體,以使用為此變體輸入的資訊更新預覽窗格中的內容。
在以下範例中,我們已為電子郵件主旨行新增兩種變體:
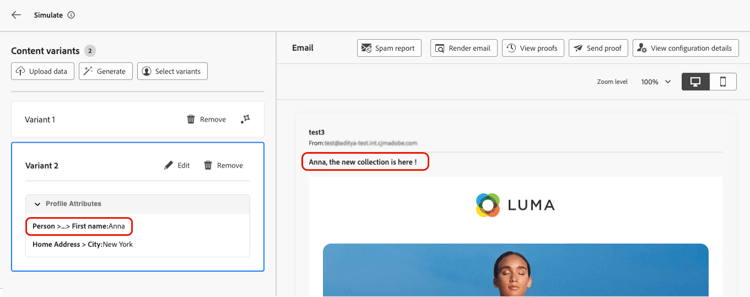
發送校訂 proofs
Journey Optimizer可讓您傳送校樣到電子郵件地址,同時模擬您在模擬畫面中新增的一或多個變體。 步驟如下:
-
確認已新增變體以測試您的內容,然後按一下 傳送校樣 按鈕。
-
在 收件者 欄位中,輸入您要傳送證明的電子郵件地址,然後按一下新增。 重複操作,將校樣傳送至其他電子郵件地址。 您最多可以新增10個校訂收件者。
-
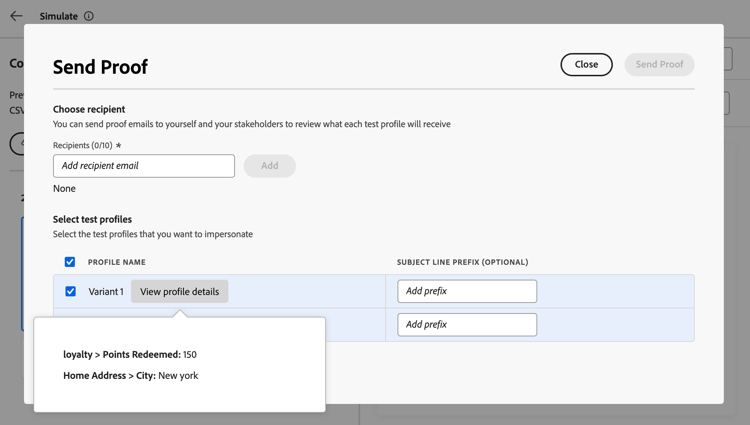
在熒幕的底部,選取您要在校樣中使用的變體。 您可以選取多個變體,在這種情況下,電子郵件將包含與所選變體相同數量的校樣。
如需變體的詳細資訊,請選取 檢視設定檔詳細資料 連結。 這可讓您顯示在先前畫面中針對不同變體輸入的資訊。
-
按一下 傳送校樣 按鈕以開始傳送校樣。
-
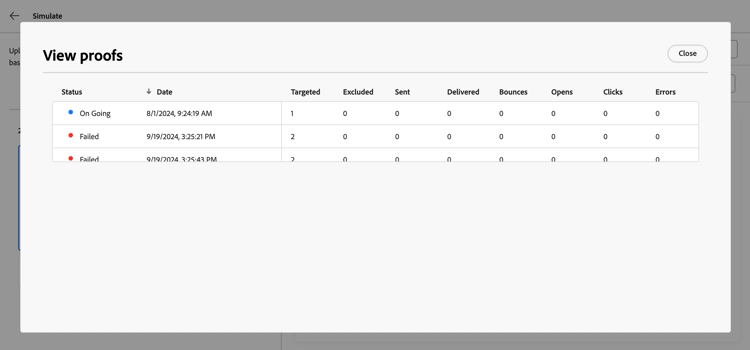
若要追蹤校訂傳送,請按一下模擬內容畫面中的 檢視校訂 按鈕。
This section contains structured knowledge intended to support interpretation, retrieval, and question answering related to this topic.
For complete understanding, this information should be combined with the documentation on this page. Neither source is intended to stand alone; the page describes the feature, while this section provides additional context that helps disambiguate terminology, intent, applicability, and constraints.
- TL;DR: This page explains the classic Simulate content variations experience, where you test content variants generated with AI, entered manually, imported from a file, or based on simulated users, then preview them and send email proofs without creating persistent Adobe Experience Platform profiles.
Intents:
- Open the classic experience by clicking Simulate content
- Rely on automatic attribute detection and create variants manually with Create sample or by uploading a file (Upload data / Download sample)
- Auto-generate variants with AI using Generate
- Select variants from reusable simulated users
- Preview variant rendering and send email proofs with Send Proof / View proofs
- Access the previous interface with Simulate content (AEP profiles) for inbox rendering and spam reports
Glossary:
- Simulate content variations (classic experience): The experience that lets you test multiple content variants from a single screen before sending. (product-specific)
- Variant: A version of the content with different values for its automatically detected attributes; stored in the browser session, not in Adobe Experience Platform. (product-specific)
- Simulated users: Temporary, profile-like entities created for testing without using persistent profiles in Adobe Experience Platform; saved and reusable across journeys and by other users. (product-specific)
- Simulate content (AEP profiles): A dropdown option under Simulate content that opens the previous user interface, needed for inbox rendering and spam reports. (product-specific)
- Send Proof: Sends proofs to email addresses while impersonating one or more of the added variants. (product-specific)
Guardrails:
- Available for the Email, Mobile message, and Push notification channels; all inbound channels (Web, Code-based experience, In-app, Content cards); and Orchestrated campaigns.
- Supported data types when entering variant data: number (integer and decimal), string, boolean, and date; any other data type shows an error.
- Both profile and contextual attributes are supported.
- You can add up to 30 variants when adding them using a file or manually.
- AI auto-generation creates a system-determined number of variants, up to a maximum of 40 variants (hard limit — page states “maximum of 40 variants”).
- Clicking Generate replaces all existing content variants, including any added manually or from a file.
- Variants are not stored in Adobe Experience Platform; they live in the browser session and do not display when logging off or when working from another device.
- You can add up to 10 proof recipients.
- Editing a simulated-user variant’s values is for testing and is not saved back to the simulated user.
Terminology:
- Canonical name: Simulate content variations (classic experience) — variants: sample input, custom profiles
- Do not confuse: “Simulate content” (button that opens the experience) ≠ “Simulate content (AEP profiles)” (dropdown option that opens the previous user interface)
- Do not confuse: “Create sample” (add a new blank variant) ≠ “Upload data” (import variants from a file) ≠ “Generate” (AI auto-generation)
- Do not confuse: “variants” (browser-session test data, not stored in Adobe Experience Platform) ≠ “simulated users” (saved, reusable test entities)
- Do not confuse: “Send Proof” (send email proofs) ≠ “View proofs” (track sent proofs) ≠ “View profile details” (display a variant’s entered information)
FAQ:
- Q: Are variants stored in Adobe Experience Platform? — No. Variants are stored in your browser session, not in Adobe Experience Platform; they do not display when you log off or work from another device.
- Q: How many variants can I create? — Up to 30 when adding manually or from a file; AI auto-generation creates a system-determined number up to a maximum of 40.
- Q: Which channels support content simulation? — The Email, Mobile message, and Push notification channels; all inbound channels (Web, Code-based experience, In-app, Content cards); and Orchestrated campaigns.
- Q: How do I get inbox rendering and spam reports? — Click Simulate content, then select Simulate content (AEP profiles) from the dropdown to access the previous user interface.
- Q: How many recipients can receive a proof? — Up to 10 proof recipients.
- Q: What data types can I enter for variants? — Number (integer and decimal), string, boolean, and date; any other data type shows an error.