このページ: KPI に対するパフォーマンスを追跡し、カスタマージャーニーの有効性をリアルタイムで測定するために、ジャーニー指標を設定および割り当てる方法について説明します。
ジャーニー指標を使用して、カスタマージャーニーの有効性を明確に可視化します。 この機能を使用すると、定義済みの KPI に対するパフォーマンスを追跡し、機能している項目に関するインサイトを得て、最適化の領域を特定できます。 影響をリアルタイムで測定することで、継続的な改善を推進し、データに基づいた意思決定を行って顧客エンゲージメントを高めることができます。
前提条件 prerequisites
ジャーニー指標を使用する前に、Adobe Experience Platform の設定/レポートで、Commerce Details、Web および Mobile のフィールドグループを含むデータセットを追加する必要があります。
これらのフィールドグループは、カスタムグループではなく、ビルトインのオプションから選択する必要があります。 データセットを追加の節を参照してください。
使用可能な指標 metrics
指標のリストは、データセットに含まれるフィールドグループによって異なります。
データセットが設定されていない場合は、クリック、ユニーククリック、クリックスルー率および 開封率 の指標のみが使用可能になります。
Customer Journey Analytics ライセンスを使用すると、カスタム成功指標を作成できます。 詳細情報
アトリビューション attribution
各指標には、特定の結果に貢献したタッチポイントまたはインタラクションを決定するアトリビューションが設定されます。
-
Journey Optimizer ライセンスを使用した指標アトリビューション:
Journey Optimizer ライセンスのみを使用した場合、選択した指標に対して使用可能な最大ルックバックウィンドウは 7 日間に設定されます。 これらの指標の場合、アトリビューションモデルは、デフォルトでラストタッチ、つまりコンバージョン前の最新のインタラクションに設定されます。
例えば、過去 7 日以内に顧客がジャーニーにインタラクションを行った後に購入が行われたかどうかを追跡できます。
-
Customer Journey Analytics ライセンスを使用した指標アトリビューション:
Journey Optimizer ライセンスと Customer Journey Analytics ライセンスの両方を使用すると、特定のアトリビューション設定を使用してカスタム指標を作成したり、ビルトインの指標のアトリビューションを変更したりできます。
詳しくは、アトリビューションモデルを参照してください。
ジャーニー指標の割り当て assign
ジャーニー指標のトラッキングを開始するには、次の手順に従います。
-
ジャーニーメニューから、「ジャーニーを作成」をクリックします。
-
ジャーニーの設定パネルを編集して、ジャーニーの名前を定義し、そのプロパティを設定します。 ジャーニーのプロパティを設定する方法について詳しくは、このページを参照してください。
-
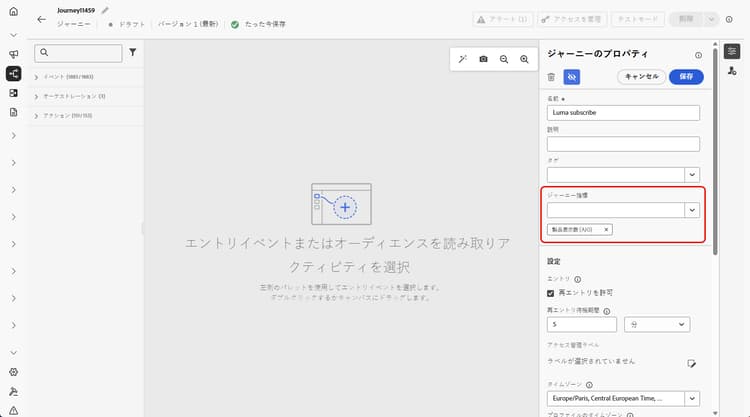
ジャーニーの効果を測定するために使用する ジャーニー指標 を選択します。
指標はジャーニー自体に適用され、ジャーニーのすべての要素に適用されます。
-
「保存」をクリックします。
-
必要な アクティビティ を使用してジャーニーを設計します。
-
ジャーニーヘッダーの「検証」をクリックします。 アラートパネルでエラーを解決し、続行する前に再度検証します。 ジャーニー検証について説明します。
-
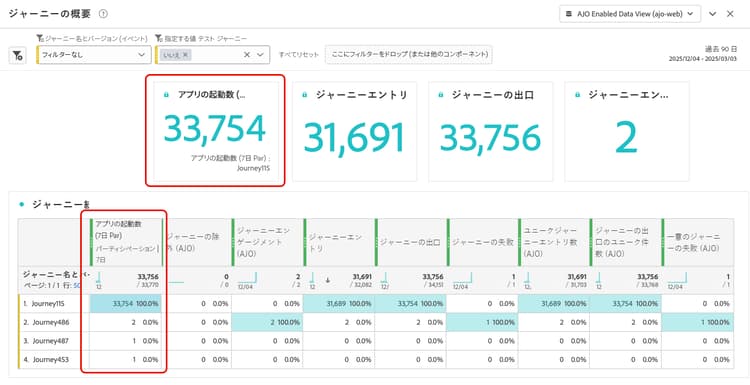
ジャーニーレポートを開いて、割り当てられた成功指標のパフォーマンスを追跡します。
選択した指標が、レポートの KPI とジャーニー統計テーブルに表示されます。
This section contains structured knowledge intended to support interpretation, retrieval, and question answering related to this topic.
For complete understanding, this information should be combined with the documentation on this page. Neither source is intended to stand alone; the page describes the feature, while this section provides additional context that helps disambiguate terminology, intent, applicability, and constraints.
- TL;DR: This page explains how to configure and track journey success metrics in Adobe Journey Optimizer by assigning a KPI to a journey and reviewing its performance in journey reports.
Intents:
- Add the required Adobe Experience Platform dataset field groups (Commerce Details, Web, Mobile) as a prerequisite for journey metrics
- Assign a journey metric (KPI) to a journey during journey creation or configuration
- Understand which metrics are available based on the configured dataset field groups
- Interpret attribution models for journey metrics under Journey Optimizer and Customer Journey Analytics licenses
- Create custom success metrics using a Customer Journey Analytics license
- Track journey performance against the assigned KPI in journey reports
Glossary:
- Journey metrics: KPIs assigned to a journey to measure its effectiveness, visible in journey reports (product-specific)
- Last Touch attribution: With Journey Optimizer license only, the default attribution model that credits the most recent interaction before a conversion
- Commerce Details field group: A built-in field group enabling commerce-related metrics such as Purchases, Checkouts, and Cart Adds (product-specific)
- Lookback window: The time range over which attribution is evaluated; set to a maximum of 7 days (hard limit) with Journey Optimizer license only
Guardrails:
- The journey must be validated before testing or publishing. Errors in the Alerts panel must be resolved and validation rerun before continuing.
- Only one journey metric is allowed per journey (hard limit)
- Dataset field groups (Commerce Details, Web, Mobile) must be selected from built-in options, not custom groups, and added under Configuration > Reporting in Adobe Experience Platform
- Without a configured dataset, only Click, Unique Click, Clickthrough Rate, and Open Rate are available
- The maximum lookback window is 7 days (hard limit) with a Journey Optimizer license only
- Custom metrics and custom attribution settings require a Customer Journey Analytics license
Terminology:
- Canonical name: Journey metrics
- Canonical name: Clickthrough rate — Acronym: CTR
- Canonical name: Clickthrough open rate — Acronym: CTOR
- Synonyms: “journey metrics” = “success metrics”
- Do not confuse: With Journey Optimizer license only, attribution defaults to Last Touch; with both Journey Optimizer and Customer Journey Analytics licenses, custom metrics can have specific attribution settings and built-in metrics’ attributions can be changed.
FAQ:
- Q: How many journey metrics can I assign to a single journey? — Only one journey metric is allowed per journey (hard limit).
- Q: What metrics are available if I have not configured a dataset with field groups? — Only Click, Unique Click, Clickthrough Rate, and Open Rate are available without a configured dataset.
- Q: What field groups do I need to enable purchase and commerce metrics? — You need to add the Commerce Details field group to your reporting dataset in Adobe Experience Platform.
- Q: What is the default attribution model for journey metrics with Journey Optimizer license only? — Last Touch, which credits the most recent interaction before conversion, with a maximum 7-day lookback window (hard limit).
- Q: Can I create custom success metrics? — Yes, but only with a Customer Journey Analytics license.
- Q: Where can I see the journey metrics results after publishing? — In the journey report’s KPIs and Journey Stats table.