Configure record type business rules
The information on this page refers to functionality not yet generally available. It is available only in the Preview environment for all customers. After the release to Preview, the same features are also available monthly in the Production environment for customers who enabled fast releases.
For information about fast releases, see Enable or disable fast releases for your organization.
You can configure business rules for Adobe Workfront Planning record types to indicate that certain fields are required before an action on a record of that type is allowed or prevented.
Depending on how the rule is formulated, you can allow for or prohibit the following actions on the records if the defined business rules are met:
- Edit or not edit a record
- Delete or do not delete a record
Access requirements
| table 0-row-0 1-row-0 2-row-2 3-row-2 4-row-2 5-row-2 6-row-2 layout-auto html-authored no-header | |
|---|---|
| Adobe Workfront package |
|
| Adobe Workfront license | Workflow Contributor or higher |
| Adobe Planning license | Planning Standard |
| Access level configuration | You must add both a Workflow and a Planning license type to the access level when you have both a Workflow and a Planning package |
| Object permissions |
Manage permissions to a workspace and to a record type System Administrators have permissions to all workspaces, including the ones they did not create |
For more information about Workfront access requirements, see Access requirements in Workfront documentation.
Considerations when configuring business rules
-
Business rules attach a condition to a field change or a record deletion. The rule only comes into play at one specific, deliberate moment: when a field is about to change to a field value you configure in the rule.
-
A rule looks like this in plain language: “Before you can edit this record, the Campaign summary field must have a value”.
If the field is empty, the record edit is blocked and the user receives a clear message explaining what they need to to address before moving forward. Once they update the required field and try again, the change is allowed.
-
Rules don’t block record creation. Users can still create records but they must ensure that the required fields are not empty or contain the specified value.
-
Rules don’t automatically edit or delete records. The change must be deliberate and triggered by a user.
-
Rules are not apply retroactively: old records are not affected. The rule check only runs the next time someone tries to edit or delete a record.
-
You cannot add business rules to global record types in their primary or secondary workspaces.
-
You can create a condition for your business rule that references all field types except for the following:
- Formula fields
- Lookup fields
- Reference fields
-
Rules apply to everyone who can edit or delete records.
-
You can have more that one business rule for a record type.
All the rules are checked together at the same time.
Configure business rules
-
Go to a record type page.
-
From any view, click the More menu

The Business rules table page opens.
-
Click New business rule.
-
In the New business rule box, add a name for the business rule in the first available field. This is a required field
-
(Optional) Add a description to define the business rule, then click Save.
The Business rule setup form opens.
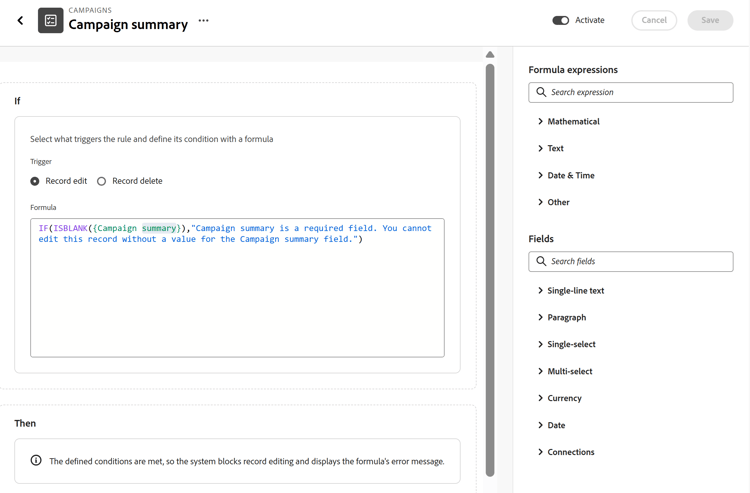
-
In the If section of the business rule setup form, choose which actions you would like to restrict or allow based on a specific rule. Choose from the following:
- Record edit: Users will be allowed to edit or not edit the record, if the condition defined in this rule is met.
- Record delete: Users will be allowed to delete or not delete the record, if the condition defined in this rule is met.
-
In the Formula field, add the business rule. Choose an operator for your rule from the Formula expressions section in the right panel.
For example, you can choose IF from the Other fields section, or start typing “IF”, then click it when it displays in the suggestion list.
note tip TIP Selecting the fields and operators from the suggestion list is recommended, to keep the syntax of the rule correct. -
Choose and the field that you want to make mandatory to allow for the records of this record type to be either edited or deleted.
For example, you can type the following statement to make the Campaign summary field required:
code language-none IF(ISBLANK({Campaign summary}),"Campaign summary is a required field. You cannot edit this record without a value for the Campaign summary field.")note tip TIP You can add connected fields to business rules, but be careful to use statements that are looking for an array, rather than a field value. For example, instead of ISBLANKuseARRAYLENGTH(field)=0.There are indicators in the Formula field when a field or an expression is wrong.
note important IMPORTANT We strongly recommend that you include in the rule formula the following information to make it easy for users to understand when an action they are trying to perform on a record is not allowed: - The exact fields that the rule is set up for.
- The exact consequence if the rule is not met.
In the Then section of the business rule, you can view an explanation of what the rule does.
-
Click Activate to make the rule active for this record type, then click Save.
Rules are applied immediately after you activate them and all users who have permissions to edit or delete records in the selected record type must follow them.
-
(Optional) Click the More menu
-
(Optional and recommended) Click the back arrow to the left of the Business rules in the page header to display the record type page and go to a table view or open a record’s page, then try editing or deleting a record, to test the rule you just created.
Manage business rules
You can edit, delete or deactivate existing business rules.
Editing an existing rule does not change existing records. The edited rule only applies to existing records when someone attempts to edit or delete them.
-
Go back to the Business rules table page for the record type.
-
Find the rule you want to change in the table view.
-
Hover over the name of an active rule, then click the More menu
- Edit: This opens the business rule setup page and you can edit information about the business rule.
- Deactivate: This stop the rule from triggering but preserves for the future, it needed.
- Delete: All the information about the rule is deleted. Deleted rules cannot be recovered.
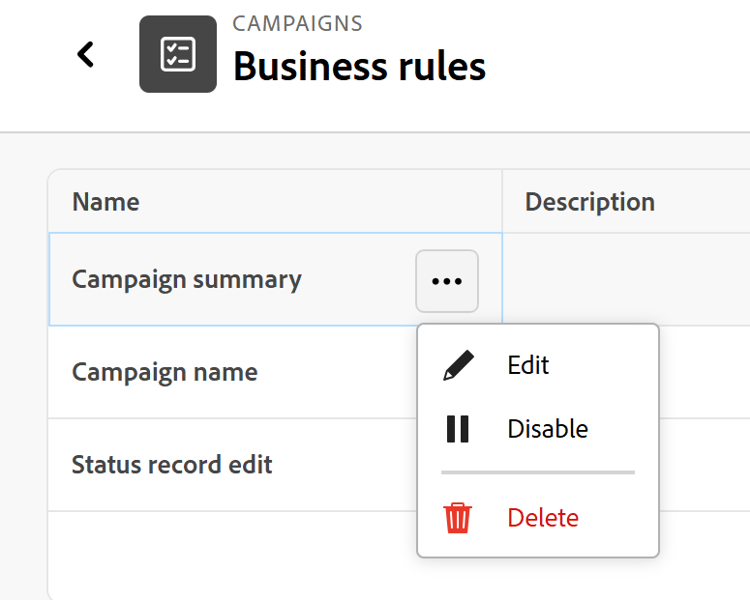
The edited rules or the deactivation of rules apply only for future records and they are not applied retroactively.
-
(Optional and conditional) Hover over the name of a deactivated business rule in the table, then click More > Activate to activate the rule.
The rule is activated.