The scenario editor
The scenario editor allows you to create and edit scenarios in a visual interface.
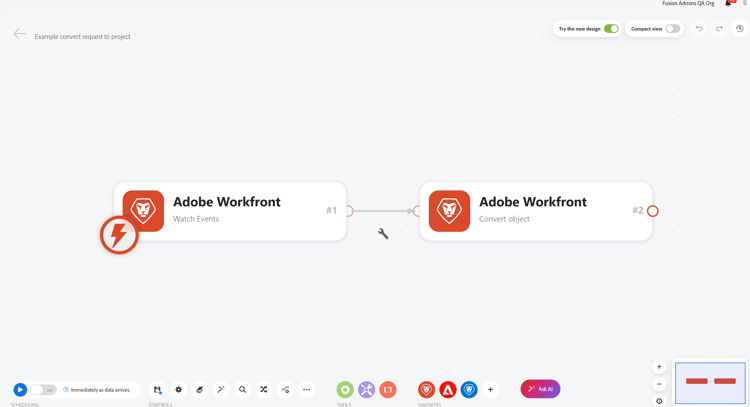
The new scenario editor experience:
The classic scenario editor experience

Access requirements
| table 0-row-2 1-row-2 2-row-2 layout-auto html-authored no-header | |
|---|---|
| Adobe Workfront package |
Any Adobe Workfront Workflow package and any Adobe Workfront Automation and Integration package Workfront Ultimate Workfront Prime and Select packages, with an additional purchase of Workfront Fusion. |
| Adobe Workfront licenses |
Standard Work or higher |
| Product | If your organization has a Select or Prime Workfront package that does not include Workfront Automation and Integration, your organization must purchase Adobe Workfront Fusion. |
For more detail about the information in this table, see Access requirements in documentation.
New and classic experiences
Workfront Fusion is transitioning the scenario editor to a new experience. During this transition, both the classic and new experiences are available, and you can switch between them at any time. We recommend using the new experience.
The new experience includes:
- A redesigned canvas, with card-style modules, a minimap, and zoom controls.
- New scenario editor controls, including Find and replace, Snippets, and Undo/Redo.
- An Ask AI button.
- An updated connector picker with category navigation and the ability to mark favorites inline.
- A dark mode that follows your appearance setting.
- The ability to fold a router to hide its routes.
- Live Trail, a panel that shows a scenario run as it happens.
- Several Developer Tools that are now built into the scenario editor.
- Temporary debug logs, which you can turn on in the scenario settings.
- A Search that finds module names, mapped values, module settings, and filter conditions, and keyboard shortcuts for common panel actions.
To switch between the classic and new experiences:
- In the scenario editor, locate the Try the new design toggle in the upper-right corner.
- Click the toggle to switch to the new experience.
- To return to the classic experience, click the toggle again.
The scenario reloads when you switch. Your choice is saved for your user, so it does not change the experience that your teammates see. Switching does not change the scenario itself.
If you do not see the toggle, the new experience might not be available to your organization yet. Contact your Workfront Fusion administrator.
Use the scenario editor in the new experience (Recommended)
Open the scenario editor and add a module:
-
Click Scenarios

-
Click the placeholder module to open the list of apps and services.
-
Select the app or service that you want to start with:
- Browse by category using the panel on the left (Favorites, All apps, Adobe Workfront, Adobe Firefly Services, Adobe Creative & Content, Adobe Cloud Services, Generative AI, or Built-in).
- Enter a term in the search box to filter the list.
- To add a connector to your favorites, hover over the connecter, then click the star icon next the connector.
For detailed information about configuring a module, see Configure a module.
Available scenario editor actions
Editing actions
These actions are available at the top of the screen, rather than in the bottom toolbar.



Scheduling

Controls
You may need to click on the three-dot icon in the Controls area to view some of these controls.

Save

After saving your scenario, a new version will be available under the three-dot menu in case you need to access it in the future. Previously saved scenario versions are available for 60 days after the next scenario version is created.
To retain scenario version history beyond 60 days for audit purposes, we recommend saving and archiving a blueprint of the scenario in another location.
Scenario settings

Notes

Auto-align

Search

{{1.name}}. Search finds exactly that reference, but not {{21.name}} or {{1.names}}. Click a result to open the module or filter. The matching field is briefly highlighted and scrolled into view. As you move through filter results with the arrow keys, the canvas shows the filter and the two modules that it connects.Find and replace

Search for and replace variables, mapped value sources, or connections across the scenario’s modules. Use the tabs to:
- Replace a mapped variable across the whole scenario or in one module.
- Remap references from one source module to another.
- Copy a connection to one or all compatible modules from the same app.
The panel previews the modules that will be affected before you make the change. Select a row in the preview to go to that module on the canvas.
For more information, see Find and replace variables, sources, and connections in a scenario.
Snippets

Snippets are scenario sections that are saved as a unit. To create one, select modules and save them as a snippet. In the Snippets panel, you can search, tag, preview, pin, sort, and drag and drop snippets, and import and export them. You can share snippets with teams or organizations, or send a copy directly to another user. Shared snippets display on their own tab.
For more information, see Save and reuse scenario sections with snippets.
Explain flow

Export Blueprint

Export as headless template

Import Blueprint

DevTool

Previous Versions

Tools

Favorites

You can use the Favorites icon to add modules you use often.
Ask AI

Click Ask AI to open Adobe’s AI Assistant. This option may not be available based on your organization’s AI settings.
Canvas navigation

Canvas display
The new canvas also changes how scenarios look as you work.
To resize the panel, drag its left edge to make it wider or narrower, or double-click the edge to return to the default width. Your width is remembered, including when you sign in from another browser. On a smaller screen, the panel automatically fits the window. While a panel is maximized, you can’t change its width.
Keyboard shortcuts
These shortcuts help you work in panels without moving the mouse.
- Wide panels show a reminder of the confirm and cancel shortcuts at the bottom.
- The Run once and Save buttons show their shortcuts in their tooltips.
- When you move to the next or previous module and it is hidden behind the panel or off-screen, the canvas moves just enough to show it.
Use the scenario editor in the classic experience
Open the scenario editor and add a module: (Classic)
- Click Scenarios
- Click the question mark icon

Available scenario editor actions (Classic)
Run your scenario (Classic)

Scheduling (Classic)

Controls (Classic)
You may need to click on the three-dot icon in the Controls area to view some of these controls.

Save

After saving your scenario, a new version will be available under the three-dot menu in case you need to access it in the future. Previously saved scenario versions are available for 60 days after the next scenario version is created.
To retain scenario version history beyond 60 days for audit purposes, we recommend saving and archiving a blueprint of the scenario in another location.
Scenario settings

Notes

Auto-align

Search modules

Explain flow

DevTool

Export Blueprint

Export as headless template

Import Blueprint

Previous Version

Tools (Classic)

Favorites (Classic)

You can use the Favorites icon to add modules you use often.