Create and publish a Virtual Coach role-play
Create an AI roleplay scenario in Adobe Learning Manager Virtual Coach so learners can practice real-world conversations as part of a course or job aid. This article walks through the full process to create a Virtual Coach role-play — from choosing a template through publishing to the Content Library.
Before you begin, confirm that Adobe Learning Manager Virtual Coach is enabled on your account and that you’re signed in as an author. Virtual Coach builds every role-play from the materials and prompt details you provide — it does not automatically pull in your organization’s existing course content. If you haven’t already, gather materials for a Virtual Coach role-play before you start.
To create an AI roleplay scenario in Virtual Coach:
-
In the left navigation panel, select Virtual Coach and then select Create now.

-
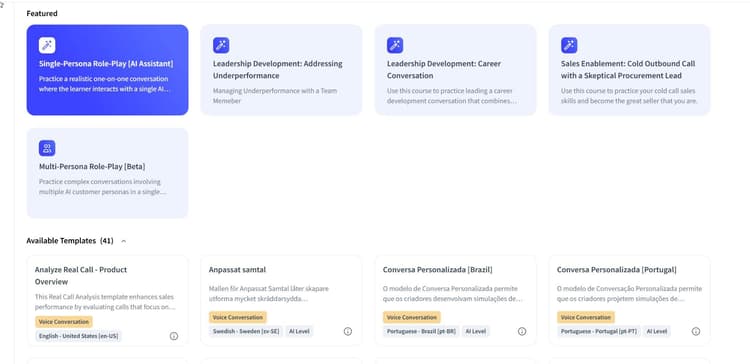
From the Featured section, choose a Single-Persona or Multi-Persona template. In this example, we are assuming that this role-play is based on a single persona. For steps involving multi-persona, see multi-persona role-play
The Create Role-Play window opens.

-
Optionally upload source material, then select Co-create with AI.
-
Configure the persona, conversation opening, and evaluation topics.
-
Select Edit in the Topics to Cover section. Set scoring weights and any Make or Break topics.
-
Each of the sections can be edited in this way.
-
If you are satisfied with the content, select Approve content and continue.

-
Preview the role-play and then Publish.
Open Virtual Coach and start a role-play
There are two ways to create a Virtual Coach role-play: start from a template, or build one from scratch with the AI Co-create Assistant. This section covers building from scratch.
-
Sign in to Adobe Learning Manager as an author.
-
Select Virtual Coach in the left navigation pane.
Select Virtual Coach under Create in the left navigation pane to start building a role-play. -
On the Virtual Coach page, select Create now.
-
Select a template from the Featured section or the Available Templates section. Featured templates include two options for building from scratch:
- Single-Persona Role-Play (AI Assistant): the learner interacts with one AI persona. Use this for a customer conversation, a leadership discussion, a discovery call, or a coaching conversation.
- Multi-Persona Role-Play (Beta): the learner interacts with up to four AI personas in the same conversation. Use this for an executive committee review, a procurement, finance, and legal panel, or a customer negotiation involving several stakeholders — for example, a product launch readiness scenario where a rep must pitch a new offering to a CFO, a Procurement Manager, an IT Director, and an end-user Champion in one session.
Choose Single-Persona Role-Play or Multi-Persona Role-Play from the Featured section to build a scenario from scratch, or select a pre-built template below.For this example, select Single-Persona Role-Play (AI Assistant) from the Featured section. To start from a ready-made scenario instead, see create a role-play using a Virtual Coach template.
-
Optionally, select Upload files to add supporting documents, such as a product datasheet, playbook, or call recording. The AI Co-create Assistant uses these to build a more accurate scenario. Skip this step if you have no relevant files.
-
Select Co-Create With AI. When the confirmation message appears, select Generate.
-
Enter a description for your role-play. Use a description that outlines the scenario, such as
Handling price objections in enterprise salesorPitching our new product to a buying committee. -
Continue the conversation with the AI assistant, adding more context about the scenario. The assistant explains that a role-play has three main components — Overview (title and conversation context), AI persona (name, organization, role, background, concerns, and so on), and Evaluation Topics (the criteria used to score learners) — and asks whether you want to build these step by step or generate them all at once.
-
Continue adding information or select Approve content and continue when you’re satisfied.
Configure role-play settings
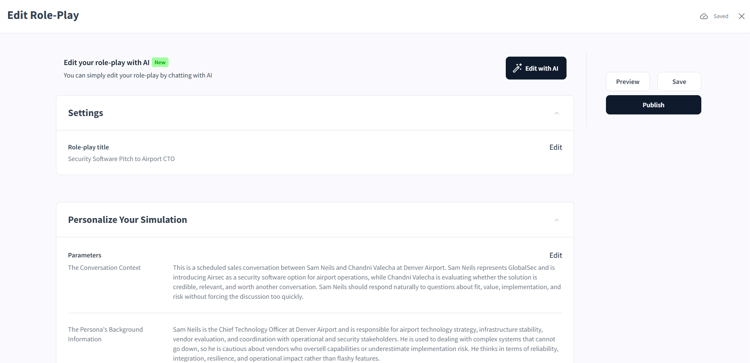
After you create a Virtual Coach role-play using the AI Co-create Assistant, the Edit Role-Play screen opens. Your progress is saved automatically, as shown by the Saved indicator in the upper-right corner. You can leave and return to this screen at any time without losing your work.
From this screen, you have three options:
- Preview runs a live test session so you can experience the role-play as a learner before anyone else does. Use this to check that the persona sounds natural and the topics flow correctly.
- Save saves the current state without publishing. The role-play is added to the Available Templates section of your Virtual Coach library, where you can return to edit it later.
- Publish adds the role-play to the Content Library so it can be assigned to a course or job aid.
To make changes to the generated content without editing fields manually, select Edit with AI on the right. This opens the AI chat interface and lets you describe the changes you want in plain language, for example, make the persona more formal or add a topic about pricing objections.
Select Edit next to Role-play title to change the title.
Personalize your Virtual Coach simulation
Define the conversation context, the persona’s background, and the persona’s concerns to make your role-play scenario realistic and challenging. The more detail you provide in each field, the more accurately and consistently the AI persona behaves during the simulation.
If you used Co-Create with AI or Auto-Generate Role-Play, these fields are pre-filled based on your inputs. Review and refine them before publishing.
Conversation context
The Conversation Context field sets the stage for the learner. It tells the AI persona the background and purpose of the role-play so the persona understands why the conversation is happening and what the main focus should be.
When writing the conversation context:
- Explain the situation. Describe what type of conversation this is, such as a sales discovery call, a cold call, or an elevator pitch, and who initiated it.
- Describe the AI persona’s position. Explain who the persona is in relation to the learner. For example, a customer evaluating a product, a CFO reviewing a budget proposal, or an employee receiving feedback.
- Use “the learner” consistently. When referring to the person the persona is speaking with, always write “the learner.” Avoid labels such as “the agent,” “the seller,” or “the rep,” which can cause inconsistent persona behavior.
- Keep it concise. Include only information relevant to the conversation setup. Save persona-specific details for Persona Background Information.
Example: “This is a sales discovery call. The learner has reached out to schedule an introductory call with Karen Mitchell, the Medical Affairs Director at a mid-sized hospital network. Karen agreed to a 15-minute call to learn more about the learning platform. She’s time-constrained and evaluating whether the platform meets clinical content quality standards before involving her team.”
Persona background information
The Persona Background Information field gives the AI persona a personality. The more detail you enter, the more accurate and consistent the persona’s responses are throughout the simulation.
Include:
- Basic details: the persona’s name, age, role, and current situation as it relates to the topic and goal of the role-play.
- Motivations and goals: what the persona cares about, wants to achieve, or wants to change, and their pain points.
- Beliefs and attitudes: how the persona feels about the conversation topic and about the learner’s organization.
- Behaviors and habits: tendencies that shape the persona’s perspective, such as cautious decision-making or an eagerness to adopt new tools.
- Decision criteria: what convinces the persona to move forward, and any constraints they’re working within, such as time, budget, or approval processes.
Persona concerns
Persona Concerns define the specific issues, worries, or questions the persona raises during the conversation. These concerns drive the flow of the role-play and ensure the learner has to respond to realistic challenges.
- List three to five concerns. Phrase each one as a concern or question, and make it specific and actionable. Avoid vague concerns such as “worried about cost”; write “concerned that the annual license cost will exceed the department’s discretionary budget without CFO approval.”
- Focus each concern on a single topic. One concern per issue keeps the conversation manageable and ensures each challenge is clearly assessed.
- Specify when the concern comes up. Indicate the point in the conversation when the persona raises it.
- Define what’s good enough to proceed. Describe what would let the conversation move forward. For example, the learner reassures the persona, provides a reference, or offers documentation.
Write each concern using this structure: concern → when it comes up → what’s good enough to move forward.
Example: “Concern — Clinical content accuracy: comes up when the learner describes the content authoring process. Good enough: The learner explicitly states that content is authored by medical professionals, peer-reviewed, and linked to primary literature or recognized clinical guidelines.”
Once you’ve filled in the relevant information, select Save.
Configure a presentation for your simulation
Use the Presentation Settings section to attach a slide deck to your role-play simulation. When a presentation is attached, learners can view it during the session as a reference or talking aid. For example, a product overview deck used during a sales pitch simulation.
-
Select Upload PDF or PPTX under Presentation Details.
-
Select your file. Both PDF and PPTX formats are supported, with a maximum file size of 100 MB.
-
Once uploaded, the file name appears below the button, confirming the attachment.

Attach a presentation so learners can reference it as a talking aid during their simulation. -
Select Done to save the setting and return to the role-play configuration.
Once you upload a presentation, the Allow learners to upload their own presentation option turns on automatically. You can also download or delete the attached file using the buttons on the right.
Select Allow learners to upload their own presentation if you want each learner to practice with their own version of a deck rather than a shared one. This is useful when learners are assessed on a presentation they’ve personally prepared, such as a business review or a custom sales pitch. This toggle is disabled by default; when enabled, learners see an upload prompt at the start of their session.
Set up the AI persona
The AI Persona Setup section controls who the learner speaks with during the simulation, along with their appearance, voice, role, and behavioral personality. Getting this section right is one of the most important parts of how you create an AI roleplay scenario, since a well-configured AI avatar persona makes the role-play feel realistic and ensures the AI behaves consistently with the scenario you’ve designed.
Choose a persona
Two tabs are available: System Personas and Custom Personas.
System Personas are pre-built characters provided by Adobe. Each has a name, a photo, and one or two supported interaction modes: Voice & Video (the persona appears as an animated avatar with a spoken voice) or Voice (spoken voice only, with no video avatar). Select a system persona by selecting its tile.
Custom Personas are personas you’ve previously created. Select this tab to reuse an AI avatar persona from an earlier role-play instead of building one from scratch.
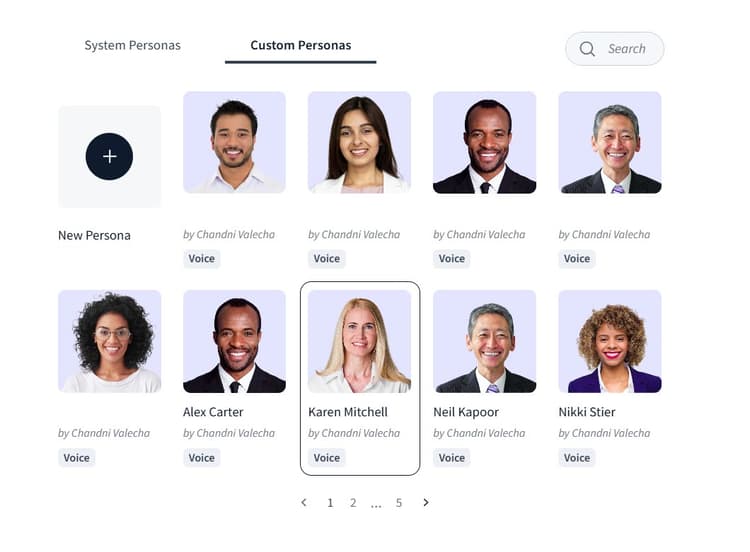
Reuse a custom persona from an earlier role-play instead of building a new one from scratch.
You can reuse a persona in two ways: edit its details directly to turn it into a different persona, or select Duplicate to create a copy and change the copy’s details. To see both options, select the vertical ellipsis (⋮) icon that appears in the upper-right corner of a persona’s image when you hover over or select it.
Configure persona details and personality
After selecting a persona, complete the AI Persona Details fields:
-
Enter the persona’s Role — their job title as it should appear in the simulation, for example, Medical Affairs Director.
-
Enter the persona’s Organization — the company or institution they work for. For example, Northgate Health.
-
Select a Personality that matches the challenge level and scenario context:
table 0-row-2 1-row-2 2-row-2 3-row-2 4-row-2 5-row-2 6-row-2 Personality Behavior Skeptical Questions everything and demands proof Indifferent Disengaged and hard to excite Enthusiastic Excited about the solution and ready to engage Relationship Oriented Values trust and personal connection above all Neutral Stays balanced and evaluates options without bias Assertive Blunt, fast-paced, and tends to challenge others -
Optionally, enable Allow learners to select this option before role-play starts to let learners choose the persona’s personality before launching the session. This is useful for practice-mode scenarios where learners want to control the difficulty.
-
Select Done to save the persona configuration.
Create a custom persona
If the system personas don’t fit your scenario, create a new one from the Custom Personas tab.
- Select Custom Personas, then select Create New Persona.
- Upload a photo for the persona. The image must be at least 640 x 360 pixels and no larger than 1 MB.
- Enter the persona’s First Name.
- Select a Voice from the drop-down menu to set the AI’s speaking voice.
- Adjust the Voice rate slider to control speaking speed, from -100 (slowest) to +100 (fastest). The default is 0 (neutral pace). Select Test Voice to preview how the voice sounds before saving.
- Select Create persona. The new persona is saved to your Custom Personas tab and available for use in any future role-play.
Enabling Video Avatar adds a photorealistic AI video avatar to the role-play. Video avatars are available for personas that support Voice & Video mode. Each learner gets 300 minutes of video role-play per month; once this limit is reached, the experience changes to a static avatar.
Configure a multi-persona role-play
Use a multi-persona role-play when the learner needs to navigate a conversation involving more than one stakeholder in the same session. For example, pitching a new product to a buying committee made up of a CFO, a Procurement Manager, an IT Director, and an end-user Champion. Multi-persona role-plays support up to four personas in a single scenario.
- Select Multi-Persona Role-Play as your template when you start the role-play.
- Add each persona and assign it a distinct role. For example, CFO, Procurement Manager, IT Director, and Champion.
- Configure a separate personality for each persona, following the same AI Persona Details steps described above.
- Define unique concerns for each persona, using the same concern structure described in Persona concerns. Each persona asks questions and raises objections from its own perspective, so the learner has to adapt their message for each stakeholder in turn rather than giving one generic pitch.
Configure the conversation opening
The Conversation Opening section controls the first two things a learner hears when a simulation starts: a brief context statement from the AI trainer, followed by the AI persona’s opening line.

The AI trainer sets the stage first, then the AI persona opens the conversation in character.
AI Trainer Opener is a short message spoken by the trainer, not the persona, before the conversation begins. It tells the learner who they’re about to speak with, what the objective is, and any relevant context they need going in. Select Edit to update the text. Keep it brief and direct. For more demanding scenarios, include the objective explicitly, for example: “You’re about to make a cold call to a senior procurement lead. Your goal is to secure a follow-up meeting.”
AI Persona Opener is the first line the AI persona delivers to the learner, starting the conversation. It should reflect the persona’s personality and put the learner on the spot from the first exchange. Select Edit to update the text.
Select Preview to hear both openers played in sequence, exactly as the learner will experience them at the start of a session.
Configure topics and evaluation criteria
The Topics to Cover section defines what the learner must address during the simulation and how the AI evaluates their performance on each topic — this is your AI roleplay scoring rubric. Every topic you add becomes a scored component in the learner’s knowledge report.
Before you begin: Complete the Personalize Your Simulation section first. The AI uses your conversation context and persona background to generate accurate evaluation guidelines for each topic.
Each row in the topics table represents one required area of conversation:

Each topic row defines what to evaluate, how much it’s worth, and whether it’s required to pass.
Add a topic
- Select Edit in the Topics to Cover section to open the topics table.
- Select Add topic. A new row appears with empty fields.
- Enter the topic name in the Topic field. Use a short, descriptive label that reflects the conversation area, for example,
Opening and Rapport,Handling Objections, orAgreeing Next Steps. - Enter the evaluation guidelines in the Evaluation guidelines field. Write these as a completion statement starting with “To successfully cover this topic, the learner needs to…”
- Enter a percentage in the Weight field. Distribute weights across all topics so the total equals 100%.
- Optionally, select Click to add video to attach an example video, or Click to add URL to attach a helpful link, such as a knowledge base article or product one-pager.
- Optionally, enable Make or Break for non-negotiable topics.
- Repeat for each topic you want to include, then select Done.
Edit or remove a topic
- To edit any field in an existing topic row, select the field directly and update the text or value.
- To regenerate the evaluation guidelines using AI based on your persona and context, select the refresh icon (↻) in the Evaluation guidelines cell.
- To remove a topic, select the options menu (⋮) at the end of the row and select Delete topic.
- To duplicate a topic and use it as the basis for a similar one, select Duplicate topic from the same menu.
Guidelines for writing effective topics
A strong AI roleplay scoring rubric makes the difference between a role-play that feels fair and one that feels arbitrary. Keep these guidelines in mind:
- Name topics after conversation stages, not product features. Topics like
Opening and Rapport,Needs Discovery, andAgreeing Next Stepsreflect the structure of a real conversation. - Write evaluation guidelines as observable actions. The AI assesses what the learner said, so guidelines must describe specific, audible behaviors, not intentions. Compare “the learner should understand the persona’s concerns” (weak) with “the learner needs to ask the persona to name their primary concern and confirm they heard it before responding” (strong).
- Use Make or Break sparingly. Reserve it for one or two topics where total omission would make the conversation a clear failure, such as failing to introduce yourself on a cold call. Applying it to too many topics makes it hard for learners to pass even a reasonable attempt.
- Balance weights to reflect conversation importance. A topic that occupies most of a typical conversation, such as needs discovery in a sales call, should carry a higher weight than a brief opener or close.
- Add helpful links to low-scoring topics. If learners consistently score low on a particular topic across sessions, attach a resource link so they have something to study between attempts.
Configure language settings
The Language Settings section controls whether learners can choose the language they practice in when they launch the simulation. Enable Allow learners to choose their practice language to let each learner select their preferred language at the start of the session. Leave this disabled if you want all learners to practice in the language the role-play was authored in — the recommended setting for formal assessments where language consistency is part of the evaluation criteria.
Configure on-screen action analysis
The On-Screen Action Analysis section lets you upload a best-practice video that shows the AI how to score the actions a learner takes during the role-play. This is most useful for simulations where the learner is expected to demonstrate specific actions visibly on screen, such as navigating a software interface, completing a form, or following a defined process step by step.
- Select Select file to open the file browser.
- Select your video file and confirm the upload.
- Once uploaded, the file name appears in the On-Screen Action Analysis summary row.
Your video must meet these requirements:
When recording a best-practice video, describe every action in audio and on screen at the same time. For example, say “I’m now selecting the Submit button” while doing so, since the AI relies on both the narration and the visual action. Keep the recording focused on the task, remove notifications and unrelated content, and match the video to your evaluation guidelines so it demonstrates each required action at the point in the workflow where it’s expected to occur.
Configure score settings
Passing Score is the minimum overall score a learner must achieve for the simulation to be marked as passed, applied to the weighted combination of knowledge and style scores. Enter a number between 1 and 100 in the Passing score field (the default is 80), and select Done.
AI Scoring Weights set how much the Knowledge component (whether the learner covered required topics and gave accurate information) and the Style component (pace, clarity, filler words, sentence length, energy) each contribute to the overall score. Drag the slider to adjust the balance; the two values always total 100%, and the default is Knowledge 70% / Style 30%. For guidance on how learners interpret these scores, see understand your Virtual Coach performance report.
Enable Practice Mode for learners lets learners request hints during the simulation to help them stay on track — useful for early-stage learning. When enabled, you can set Max Hints Per Session (default 5, adjustable from 1–10) and hint visibility duration (default 30 seconds).
Hide score prevents learners from seeing their numerical score after the session; they still receive qualitative feedback and topic-level analysis. Use this when the role-play is for practice only, when only a manager evaluator should see the result, or when you want to reduce score anxiety in early learning stages.
Configure advanced role-play settings
These optional settings control how and when the simulation ends and how the session environment is configured.
Allow the AI to end the role-play. By default, only the learner can end a simulation by selecting End Simulation. Enable this toggle and describe the condition under which the persona should close the conversation naturally, for example: “When the learner successfully schedules a follow-up meeting or the persona declines three times, the persona should end the call politely.” Use this for advanced scenarios where the natural endpoint of the conversation, not a timer, should determine when the session closes.
Simulation time limit. Enter a number between 1 and 59 minutes to set a maximum session duration; when reached, the simulation ends automatically and the learner is taken to the analysis page.
Short Session Penalty discourages learners from ending sessions too quickly by applying a score reduction if the session falls below a minimum duration you set. Use this when session length is meaningful to the learning objective. For example, in a discovery call where the learner must spend enough time uncovering needs before proposing a solution.
Enable screen sharing lets learners share their screen during the simulation. This is relevant for scenarios that include an On-Screen Action Analysis component. It’s disabled by default if you’ve uploaded only PowerPoint or PDF documents in Presentation Settings.
Enable AI persona subtitles displays on-screen text of what the AI persona is saying in real time. Enable this for learners with hearing difficulties or practicing in a second language, for noisy environments, or for scenarios where reading the persona’s exact words matters for understanding nuanced objections.
Publish the Virtual Coach role-play
After configuring all sections, select Publish.

Complete the publish details and select Save to add your role-play to the Content Library.
- Enter the role-play title.
- Select the folder where you want to add the role-play.
- Optionally add tags and an expiry date.
- Select Save. The role-play is added to the Content Library.
You’ve now created a Virtual Coach role-play from start to finish in Adobe Learning Manager Virtual Coach. Continue to add a Virtual Coach role-play to a course to make it available to learners. For answers to common authoring questions — including why a role-play might score zero, how many personas a multi-persona role-play supports, and how to write a good prompt for the AI Co-create Assistant — see the Virtual Coach FAQ.