On this page: Connect a third-party REST API to your journeys by setting up a custom action’s endpoint, authentication, security, and payload parameters so journeys can call that service.
If you are using a third-party system to send messages or if you want journeys to send API calls to a third-party system, use custom actions to configure its connection to your journey. For example you can connect to the following systems with custom actions: Epsilon, Slack, Adobe Developer, Firebase, etc.
Custom actions are additional actions defined by technical users and made available to marketers. Once configured, they appear in the left palette of your journey, in the Action category. Learn more on this page.
Configuration steps configuration-steps
Here are the main steps required to configure a custom action:
-
In the ADMINISTRATION menu section, select Configurations. In the Actions section, click Manage. Click Create Action to create a new action. The action configuration pane opens on the right side of the screen.

-
Enter a name for your action.
note NOTE Only alphanumeric characters and underscores are allowed. The maximum length is 30 characters. -
Add a description to your action. This step is optional.
-
The number of journeys that use this action is displayed in the Used in field. You can click the View journeys button to display the list of journeys using this action.
-
Define the different URL Configuration parameters. See this page.
-
Configure the Authentication section. This configuration is the same as for data sources. See this section.
note NOTE If your endpoint returns both an access_tokenand anid_token, use thetokenInResponsefield to specify which token Journey Optimizer should use as the authentication credential:"tokenInResponse": "json://access_token"— use the access token (default for OAuth 2.0)"tokenInResponse": "json://id_token"— use the ID token (common in OpenID Connect flows)
Learn more about custom authentication -
Define the Action parameters. See this page.
-
Click Save.
The custom action is now configured and ready to be used in your journeys. See this page.
note NOTE When a custom action is used in a journey, most parameters are read-only. You can only modify the Name, Description, URL fields and the Authentication section.
Limitations custom-actions-limitations
Custom actions come with a few limitations listed on this page.
In custom action parameters, you can pass a simple collection, as well as a collection of objects. Learn more about collection limitations on this page.
Also note that the custom actions parameters have an expected format (example: string, decimal, etc.). You must be careful to respect these expected formats. Learn more in this use case.
Custom actions support JSON format only when using request or response payloads.
Best practices custom-action-enhancements-best-practices
When choosing an endpoint to target using a custom action, be sure that:
- This endpoint can support journey’s throughput, using configurations from the Throttling API or Capping API to limit it. Be cautious that a throttling configuration cannot go below 200 TPS. Any endpoint targeted will need to support at least 200 TPS. Learn more about journey processing rates in this section.
- This endpoint needs to have a response time as low as possible. Depending of your expected throughput, having a high response time could impact the actual throughput.
A capping limit of 300,000 calls over one minute is defined for all custom actions. In addition, the default capping is performed per host and per sandbox. For example, on a sandbox, if you have two endpoints with the same host (e.g., https://www.adobe.com/endpoint1 and https://www.adobe.com/endpoint2), the capping will apply for all endpoints under the adobe.com host. “endpoint1” and “endpoint2” will share the same capping configuration and having one endpoint reach the limit will have an impact on the other endpoint.
The default 300,000 calls per minute limit applies at the domain level (i.e. example.com). If you require a higher limit, consult Adobe Support with usage evidence, and confirm your endpoint’s throughput. To request a capping increase, provide details of your expected call volume and endpoint capacity. Adobe may customize capping if capacity testing demonstrates the endpoint can handle higher throughput. For best practices, consider restructuring journeys or implementing wait activities to stagger outbound calls and avoid capping errors.
This limit has been set based on customer usage to protect external endpoints targeted by custom actions. If needed, you can override this setting by defining a greater capping or throttling limit through our Capping/Throttling APIs. See this page.
You should not target public endpoints with custom actions for various reasons:
- Without proper capping or throttling, there is a risk of sending too many calls to a public endpoint that may not support such volume.
- Profile data can be sent through custom actions, so targeting a public endpoint could lead to inadvertently sharing personal information externally.
- You have no control on the data being returned by public endpoints. If an endpoint changes its API or starts sending incorrect information, those will be made available in communications sent, with potential negative impacts.
Consent and data governance privacy
In Journey Optimizer, you can apply data governance and consent policies to your custom actions to prevent specific fields from being exported to third-party systems or exclude customers who have not consented to receive email, push or SMS communication. For more information, refer to the following pages:
Endpoint configuration url-configuration
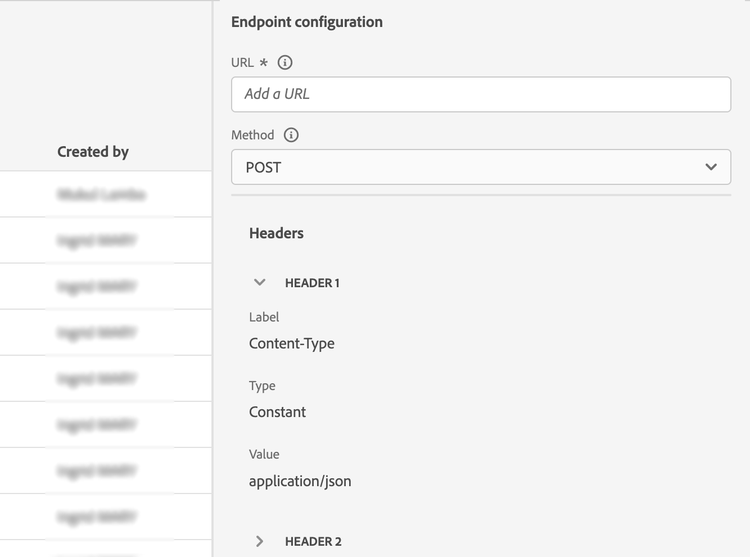
When configuring a custom action, you need to define the following Endpoint Configuration parameters:
-
In the URL field, specify the URL of the external service:
-
If the URL is static, enter the URL in this field.
-
If the URL includes a dynamic path, enter only the static part of the URL, that is, the scheme, the host, the port, and, optionally, a static part of the path.
Example:
https://xxx.yyy.com/somethingstatic/You will specify the dynamic path of the URL when adding the custom action to a journey. Learn more.
note NOTE For security reasons, we strongly recommend that you use the HTTPS scheme for the URL. We do not allow the use of Adobe addresses that are not public and the use of IP addresses. Only the default ports are allowed when defining a custom action: 80 for http and 443 for https. -
-
Select the call Method: it can be either POST, GET or PUT.
note NOTE The DELETE method is not supported. If you need to update an existing resource, select the PUT method. -
Handle potential redirects (302 responses). Custom actions automatically follow HTTP 302 redirects on a per-request basis.
-
Define the headers and query parameters:
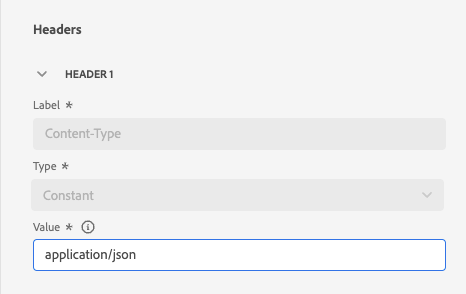
- In the Headers section, click Add a header field to define the HTTP headers of the request message to be sent to the external service. The Content-Type and Charset header fields are set by default. You cannot delete these fields. Only the Content-Type header can by modified. Its value should respect the JSON format. Here is the default value:
- In the Query parameters section, click Add a Query parameter field to define the parameters you want to add in the URL.

-
Enter the label or name of the field.
-
Select the type: Constant or Variable. If you have selected Constant, then enter the constant value in the Value field. If you have selected Variable, then you will specify this variable when adding the custom action to a journey. Learn more.

note NOTE After you have added the custom action to a journey, you can still add header or query parameters fields to it if the journey is in draft status. If you do not want the journey to be affected by configuration changes, duplicate the custom action and add the fields to the new custom action. Headers are validated according to field parsing rules. Learn more in this documentation.
Transport security layer tls
TLS protocol support tls-protocol-support
Adobe Journey Optimizer supports TLS 1.3 by default for custom actions. If a client also supports TLS 1.3, communication is conducted over TLS 1.3. Otherwise, the TLS negotiation process may fall back to TLS 1.2.
mTLS protocol support mtls-protocol-support
You can use Mutual Transport Layer Security (mTLS) to ensure enhanced security in outbound connections to Adobe Journey Optimizer custom actions. mTLS is an end-to-end security method for mutual authentication that ensures that both parties sharing information are who they claim to be before data is shared. mTLS includes an additional step compared to TLS, in which the server also asks for the client’s certificate and verifies it at their end.
Mutual TLS (mTLS) authentication is supported in custom actions. There is no additional configuration required in the custom action or journey to activate mTLS; it occurs automatically when an mTLS-enabled endpoint is detected. Learn more.
- Regularly check the Adobe Public Certificate API for updated certificates associated with your services.
- Configure your endpoint to accept overlapping certificates (both the old and new certificate simultaneously), so there is no connectivity gap during rotation.
- Adobe does not currently send proactive notifications when a certificate is rotated. It is your responsibility to monitor for certificate updates and keep your trust store current.
- Trust validation should be based on the certificate chain up to the Root CA (DigiCert) rather than pinning to a specific leaf certificate fingerprint.
Certificate-based custom authentication certificate-based-auth
For enterprise APIs that enforce certificate-based identity verification — such as Microsoft Entra ID — custom actions support Certificate-Based Custom Authentication. To enable it, set "subType": "certificateCredential" in the custom authorization payload configured in the Authentication section.
Journey Optimizer uses Adobe’s managed certificate to sign a JWT client assertion and automatically exchange it for an access token. No client secret is required.
For the full payload structure, field descriptions, and configuration guardrails, see Certificate-based custom authentication.
Define the payload parameters define-the-message-parameters
You can define the payload parameter as detailed below:
-
In the Request section, paste an example of the JSON payload to send to the external service. This field is optional and only available for POST and PUT calling methods.
Enable the Allow NULL values option to keep Null values in the external call. Note that sending arrays of int, string, etc. with Null values within is not fully supported. For example, the following array of integers
[1, null, 2, 3]is sent as[1, 2, 3]even if this option is checked. In addition to that, if such array is null, it is sent as an empty array.
-
In the Response section, paste an example of the payload returned when the call succeeds. This field is optional and available for all calling methods. For detailed information on how to leverage API call responses in custom actions, refer to this page.

-
(Optional) Select Define a failure response payload to enable the error response payload field. When enabled, use the Error Response section to paste an example of the payload returned when the call fails. The same requirements apply as for the response payload (field types and format). Learn how to leverage the failure response payload in journeys here.
. character, nor start with a $ character.

In these field configuration, you must:
-
Select the parameter type, e.g.: string, integer, etc.
-
Define a constant or a variable parameter:
-
Constant means that the value of the parameter is defined in the action configuration pane by a technical persona. The value will be always the same across journeys. It does not vary and the marketer cannot see it when using the custom action in the journey. It could be for example an ID the third-party system expects. In that case, the constant value is set the field on the right of the toggle constant/variable.
-
Variable means the value of the parameter can vary. Marketers using this custom action in a journey are free to pass the value they want or to specify where to retrieve the value for this parameter (e.g. from the event, from Adobe Experience Platform, etc.). In that case, the field on the right of the toggle constant/variable is the label marketers will see in the journey to name this parameter.
For optional parameters, enable the Is optional option at the end of the line. By checking this option, you mark the parameter as non-mandatory, and let the journey practitioners choose to fill it or not when authoring that custom action in a journey.
-
Additional resources
Browse the sections below to learn more about configuring, using and troubleshooting your custom actions:
- Get started with custom actions - Learn what is a custom action and how they help you connect to your third-party systems
- Use custom actions - Learn how to use custom actions in your journeys
- Custom action troubleshooting - Learn how to troubleshoot a custom action
- Pass collections into custom action parameters - Learn how to pass a collection in custom action parameters that is dynamically populated at runtime
This section contains structured knowledge intended to support interpretation, retrieval, and question answering related to this topic.
For complete understanding, this information should be combined with the documentation on this page. Neither source is intended to stand alone; the page describes the feature, while this section provides additional context that helps disambiguate terminology, intent, applicability, and constraints.
- TL;DR: This page explains how to configure a custom action that connects a third-party REST API to your journeys by defining its endpoint, authentication, transport security, and payload parameters.
Intents:
- Create and name a custom action from the Configurations Actions area
- Define the endpoint URL, method, headers, and query parameters
- Configure authentication, including certificate-based custom authentication and mutual TLS
- Define request, response, and failure response payload parameters as constants or variables
- Understand the capping, throughput, and endpoint constraints that apply to custom actions
Glossary:
- Custom action: An additional action defined by technical users and made available to marketers that calls a third-party service through a REST API with a JSON-formatted payload (product-specific)
- Endpoint Configuration: The section where you define the external service URL, method, headers, and query parameters (product-specific)
- Constant parameter: A parameter whose value is set in the action configuration by a technical persona and is always the same across journeys; the marketer cannot see it (product-specific)
- Variable parameter: A parameter whose value can vary and that marketers fill or map when using the custom action in a journey (product-specific)
- Allow NULL values: An option that keeps Null values in the external call (product-specific)
- Certificate-Based Custom Authentication: An authentication type enabled by setting “subType”: “certificateCredential” in the custom authorization payload, where Journey Optimizer signs a JWT client assertion with Adobe’s managed certificate and exchanges it for an access token (product-specific)
- Slow custom action service: A dedicated service through which calls are routed when an endpoint has a response time greater than 0.75 seconds (product-specific)
Guardrails:
- The action name allows only alphanumeric characters and underscores, with a maximum length of 30 characters (hard limit).
- Custom actions support JSON format only when using request or response payloads.
- Custom actions cannot use the DELETE method; only POST, GET, or PUT are supported. To update an existing resource, use PUT.
- Only the default ports are allowed: 80 for http and 443 for https. Adobe addresses that are not public and IP addresses are not allowed.
- A capping limit of 300,000 calls over one minute is defined for all custom actions (a default that can be raised via the Capping or Throttling APIs); the default capping is performed per host and per sandbox and applies at the domain level.
- The 300,000 calls per minute cap is enforced as a sliding window per sandbox and per endpoint for endpoints with response times less than 0.75 seconds; for endpoints with response times greater than 0.75 seconds, a separate limit of 150,000 calls per 30 seconds (also a sliding window) applies.
- A throttling configuration cannot go below 200 TPS, so any targeted endpoint must support at least 200 TPS.
- When an endpoint has a response time greater than 0.75 seconds, its custom action calls are routed through a dedicated slow custom action service instead of the default service.
- Field names in the payload cannot contain a dot character, nor start with a dollar character.
- When a custom action is used in a journey, most parameters are read-only; only the Name, Description, URL fields and the Authentication section can be modified.
- You should not target public endpoints with custom actions.
Terminology:
- Canonical name: Custom action — Acronym: n/a — variants: custom actions, action configuration
- Synonyms: “URL Configuration” = “Endpoint Configuration”
- Do not confuse: “Constant” (value fixed in the action configuration, hidden from the marketer) ≠ “Variable” (value that marketers pass or map in the journey)
- Do not confuse: “TLS” (transport layer security, with fallback from TLS 1.3 to TLS 1.2) ≠ “mTLS” (mutual TLS, which also verifies the client certificate)
FAQ:
- Q: Why can the action name not be saved? — The name allows only alphanumeric characters and underscores and cannot exceed 30 characters.
- Q: Which methods are supported for a custom action? — POST, GET, and PUT are supported; DELETE is not supported, and PUT should be used to update an existing resource.
- Q: What is the capping limit for custom actions? — 300,000 calls over one minute per host and per sandbox at the domain level; endpoints slower than 0.75 seconds instead use a limit of 150,000 calls per 30 seconds.
- Q: How is mutual TLS activated? — No additional configuration is required in the custom action or journey; mTLS occurs automatically when an mTLS-enabled endpoint is detected.
- Q: Why is a custom action call routed to a different service? — When an endpoint has a response time greater than 0.75 seconds, its calls are routed through a dedicated slow custom action service instead of the default service.