On this page: Learn how to set background colors and images at the body, viewport, structure, and column levels of your email in the Email Designer.
Backgrounds help you reinforce your brand identity and draw attention to key areas of your email. In the Email Designer, you can set a background color or image at different levels of your content — from the overall body down to individual structures and columns — giving you precise control over how backgrounds render throughout your email.
Keep the following best practices in mind when setting backgrounds in the Email Designer:
- Apply a background color to the body only if your design requires it.
- Prefer setting background colors at the column level whenever possible.
- Avoid using background colors on image or text components, as they are harder to manage.
- Test background images across actual email clients before sending, since rendering can differ from the Email Designer preview.
The following settings let you apply a background color or image at any level of your email content, from the body down to individual structures and columns.
Set a background color background-color
-
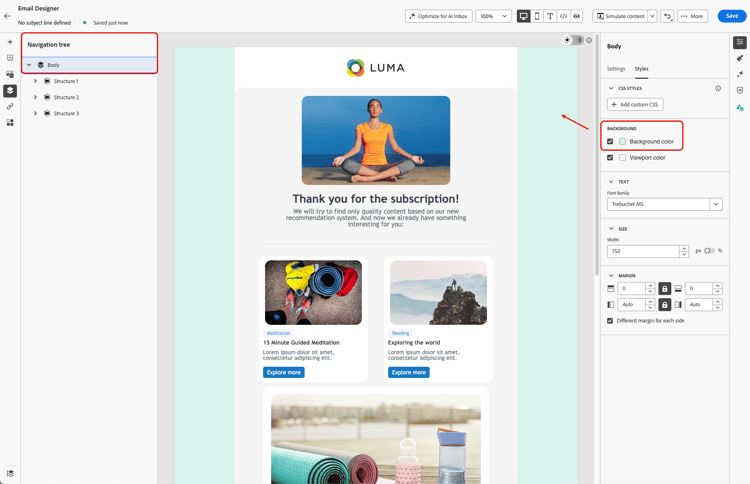
Body background color - Set a Background color for the whole email. Make sure you select Body in the Navigation tree accessible from the left palette and use the dedicated option from the Styles tab on the right.
-
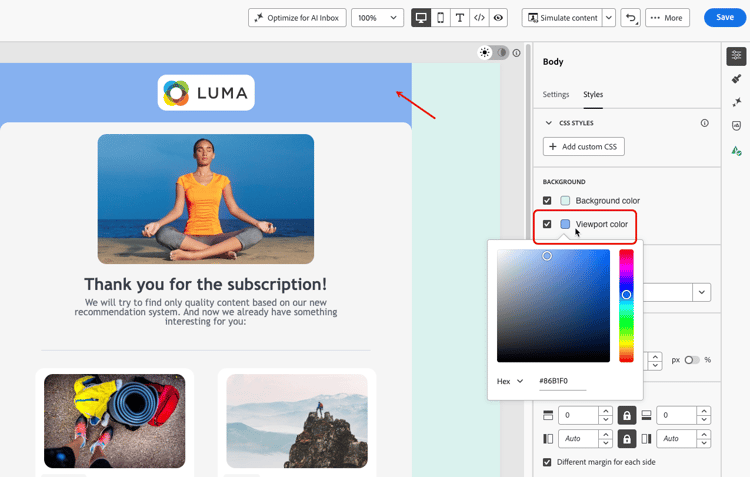
Viewport background color - Set a Viewport color to apply the same background color across all structure components, independently of the body’s background color.
-
Structure background color - To apply a background color to a single structure component, select it directly in the canvas or from the left palette, and set a specific color for that structure.
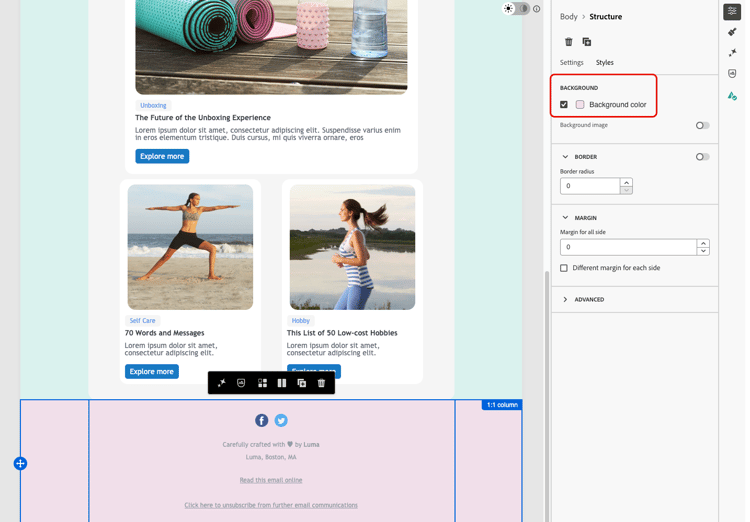
note tip TIP In that case, make sure you do not set a viewport background color as it may hide the structure background colors. -
Column background color - Set a background color at the column level. Again, make sure you select the desired column from the left palette, and set a specific color for that column.
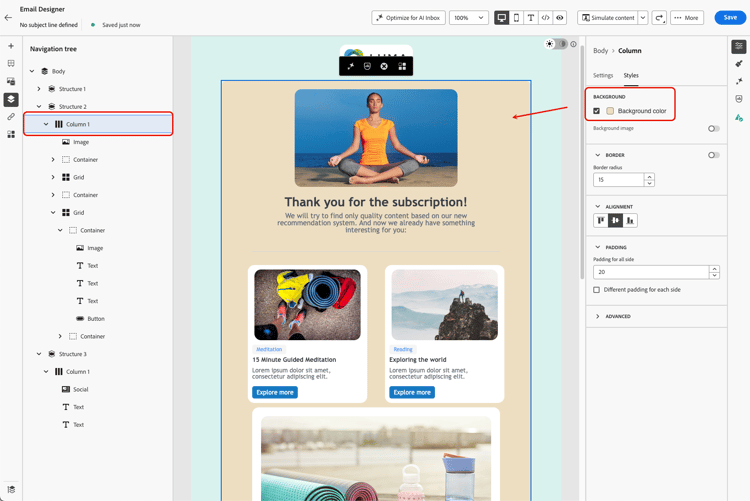
note tip TIP This is the most common use case and a best practice, since it gives you more flexibility when editing the rest of your email content.
Set a background image background-image
You can also set a Background image for the content of a structure or column component. This is most commonly used at the structure level; setting one at the column level is possible but rarely used.
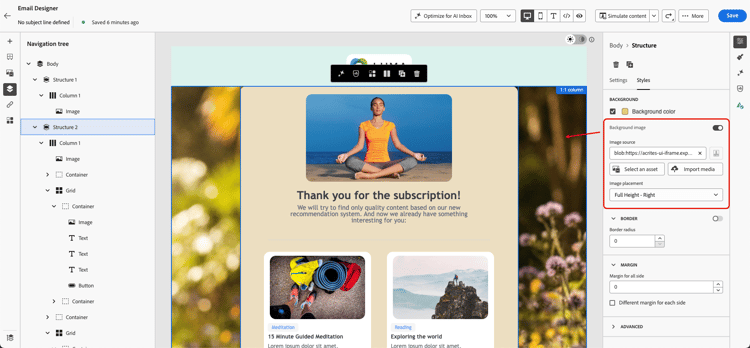
Once a background image is set, use the Image placement dropdown to control how the image fills the structure or column. The options below are available for selection:
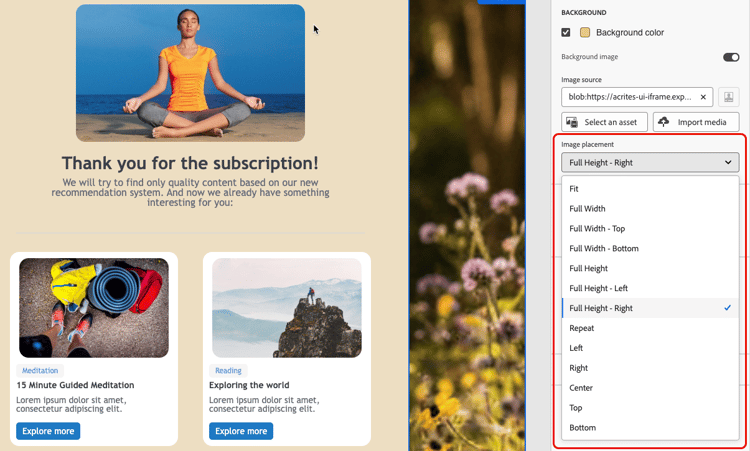
Scale to fill, centered:
- Fit - Stretches the image to fill the container on both axes, without preserving its aspect ratio.
- Full Width - Scales the image proportionally to the container’s width and centers it vertically.
- Full Height - Scales the image proportionally to the container’s height and centers it horizontally.
Scale to fill, anchored to an edge:
- Full Width - Top - Same as Full Width, anchored to the top of the container. Overflow is cropped at the bottom.
- Full Width - Bottom - Same as Full Width, anchored to the bottom of the container. Overflow is cropped at the top.
- Full Height - Left - Same as Full Height, anchored to the left of the container. Overflow is cropped on the right.
- Full Height - Right - Same as Full Height, anchored to the right of the container. Overflow is cropped on the left.
Tile:
- Repeat - Tiles the image at its original size to fill the container.
Position without scaling:
- Left, Right, Center, Top, Bottom - Positions the image at its original size, anchored to the corresponding edge or center of the container.
This section contains structured knowledge intended to support interpretation, retrieval, and question answering related to this topic.
For complete understanding, this information should be combined with the documentation on this page. Neither source is intended to stand alone; the page describes the feature, while this section provides additional context that helps disambiguate terminology, intent, applicability, and constraints.
- TL;DR: This page explains how to set background colors and images at the body, viewport, structure, and column levels of an email in the Email Designer, and Adobe’s best practices for doing so.
Intents:
- Set a Background color for the whole email at the body level
- Apply the same background color to all structure components using Viewport background color
- Set a different background color for a specific structure component
- Set a background color for a specific column
- Set a Background image for a structure or column component and choose an Image placement option
Glossary:
- Background color: A color applied to the whole email when Body is selected in the navigation tree (product-specific)
- Viewport background color: A setting that applies the same background color to all structure components, independently of the body’s background color (product-specific)
- Background image: An image set for the content of a structure or column component; falls back to the background color when not supported (product-specific)
- Image placement: A dropdown that controls how a background image fills its container — by scaling it centered, scaling it anchored to an edge, tiling it, or positioning it without scaling (product-specific)
Guardrails:
- Some email programs / clients do not support background images; when not supported, the background color is used instead, so select an appropriate fallback background color.
- When setting a different background color per structure component, do not set a viewport background color, as it may hide the structure background colors.
- Column-level background color is the most common use case and Adobe’s recommended best practice, for more flexibility when editing the rest of the email content.
- Avoid using background colors on image or text components, as they are harder to manage.
- Apply a background color to the body only if the design requires it.
- A background image can also be set at the column level, though this is rarely used; the same fallback color and Image placement options apply there too.
Terminology:
- Canonical name: Background — Acronym: n/a — variants: background color, background image, image placement
- Do not confuse: “Background color” (body-level, whole email) ≠ “Viewport background color” (same color applied to all structure components)
- Do not confuse: “Background color” (supported broadly by email clients) ≠ “Background image” (not supported by all email clients, falls back to background color)
- Do not confuse the “Scale to fill, centered” Image placement options (Fit, Full Width, Full Height) with the “Scale to fill, anchored to an edge” options (Full Width - Top, Full Width - Bottom, Full Height - Left, Full Height - Right), which control which side is cropped instead of centering the image
FAQ:
- Q: Where does Adobe recommend setting background colors? — At the column level, which is the most common use case and best practice, allowing more flexibility when editing the rest of the email content.
- Q: What happens if a background image is not supported by an email client? — The background color is used instead, so select an appropriate fallback background color.
- Q: How do I apply the same background color to all structure components? — Select Viewport background color, which can be set independently of the body’s background color.
- Q: Why might my per-structure background colors not appear? — A viewport background color may hide the structure background colors; do not set one in that case.
- Q: Can I set a background image at the column level? — Yes, though it is rarely used; the same fallback color behavior and Image placement options described for structures apply there too.
- Q: What is the difference between “Full Width” and “Full Width - Top” / “Full Width - Bottom”? — “Full Width” scales the image proportionally to the container’s width and centers it vertically. The “Top” and “Bottom” variants anchor it to that edge instead, cropping the opposite side rather than centering.
- Q: What is the difference between “Full Height” and “Full Height - Left” / “Full Height - Right”? — “Full Height” scales the image proportionally to the container’s height and centers it horizontally. The “Left” and “Right” variants anchor it to that side instead, cropping the opposite side rather than centering.