Add Forms Portal to an AEM Sites page publish-forms-on-portal

Adobe recommends using the modern and extensible data capture Core Componentsfor creating new Adaptive Formsor adding Adaptive Forms to AEM Sites pages. These components represent a significant advancement in Adaptive Forms creation, ensuring impressive user experiences. This article describes older approach to author Adaptive Forms using foundation components.

Version
Article link
AEM 6.5
Click here
AEM as a Cloud Service
This article

In a typical forms-centric portal deployment scenario, forms development and portal development are two disjoint activities. While Form Designers design and store forms in a repository, Web Developers create a web application to list forms and handle submission of forms. Forms are copied over to the web tier as there is no communication between the forms repository and the web application.

Such scenarios often result in management issues and production delays. For example, if there is a newer version of a form available in the repository, you need to replace the form on the web tier, modify the web application, and redeploy the form on the public site. Redeploying the web application might cause some server downtime. Typically, the server downtime is a planned activity and therefore the changes cannot be pushed to the public site instantaneously.

AEM Forms provide portal components that reduce management overheads and production delays. The components equip Web Developers to create and customize a Forms Portal on websites authored using Adobe Experience Manager (AEM).

The Form Portal components allow you to add the following functionality:

  • List forms in customized layouts. Out of the box, List view and Card view layouts are provided. You can create your own custom layouts.
  • Enables you to display custom metadata and custom actions while listing them.
  • List forms published by AEM Forms UI on the publish instance where Forms Portal components are being used.
  • Allow end users to render forms in HTML and PDF format.
  • Enable searching of forms based on title and description.
  • Use custom CSS to customize the look and feel of the portal.
  • Create links to forms.
  • Lists drafts and submissions related to Adaptive Forms created by the user.

Components of a Forms Portal Page forms-portal-components

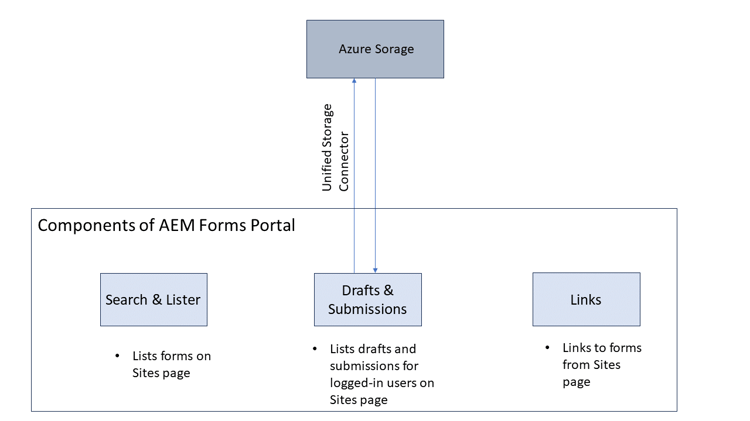
AEM Forms provide the following portal components out of the box:

  • Search & Lister: This component lets you list forms from the forms repository onto your portal page and provides configuration options to list forms based on specified criteria.

  • Drafts & Submissions: While Search & Lister component displays forms which are made public by Forms author, the Drafts & Submissions component displays forms that are saved as draft for completing later and submitted forms. This component provides personalized experience to any logged in user.

  • Link: This component lets you create a link to a form anywhere on the page.

You can import the out-of-the-box Forms Portal components from the AEM Project Archetype. After importing, perform the following configurations:

Import Forms Portal Components import-forms-portal-components-aem-archetype

To import out-of-the-box Forms Portal components on AEM Forms as a Cloud Service, perform the following steps:

  1. Clone Cloud Manager Git repository on your local development instance: Your Cloud Manager Git repository contains a default AEM project. It is based on AEM Archetype. Clone your Cloud Manager Git Repository using Self-Service Git Account Management from Cloud Manager UI to bring the project on your local development environment. For details on accessing the repository, see Accessing Repositories.

  2. Create Experience Manager Forms as a [Cloud Service] project: Create Experience Manager Forms as a [Cloud Service] project based on AEM Archetype 27 or later. The archetype help developers easily start developing for AEM Forms as a Cloud Service. It also includes some sample themes and templates to help you started quickly.

    To create Experience Manager Forms as a Cloud Service project, open the command prompt and run the below command. To include Forms specific configurations, themes, and templates, set includeForms=y.

    code language-shell
    mvn -B archetype:generate -DarchetypeGroupId=com.adobe.aem -DarchetypeArtifactId=aem-project-archetype -DarchetypeVersion=30 -DaemVersion="cloud" -DappTitle="My Site" -DappId="mysite" -DgroupId="com.mysite" -DincludeForms="y"
    

    Also, change appTitle, appId, and groupId, in the above command to reflect your environment.

    After the project is ready, update the <core.forms.components.version>x.y.z</core.forms.components.version> property in the top-level pom.xml of the Archetype project to reflect the latest version of core-forms-components in your AEM Archetype project.

  3. Deploy the project to your local development environment: You can use the following command to deploy to your local development environment

    mvn -PautoInstallPackage clean install

    For the complete list of commands, see Building and Installing

  4. Deploy the code to your AEM Forms as a Cloud Service environment.

Configure Azure Storage for Adaptive Forms configure-azure-storage-adaptive-forms

Experience Manager Forms Data Integration provides Azure storage configuration to integrate forms with Azure storage services. The Form Data Model (FDM) can be used to create Adaptive Forms that interact with Azure server to enable business workflows.

Create Azure Storage Configuration create-azure-storage-configuration

Before executing these steps, ensure that you have an Azure storage account and an access key to authorize access to the Azure storage account.

  1. Navigate to Tools > Cloud Services > Azure Storage.
  2. Select a folder to create the configuration and select Create.
  3. Specify a title for the configuration in the Title field.
  4. Specify the name of the Azure storage account in the Azure Storage Account field.

Configure Unified Storage Connector for Forms Portal configure-usc-forms-portal

Perform the following steps to configure Unified Storage Connector for AEM Workflows:

  1. Navigate to Tools > Forms > Unified Storage Connector.
  2. In the Forms Portal section, select Azure from the Storage drop-down list.
  3. Specify the configuration path for the Azure storage configuration in the Storage Configuration Path field.
  4. Select Publish and then select Save to save the configuration.

Enable Forms Portal Components enable-forms-portal-components

To use any core component (including the out-of-the-box portal components) in an Adobe Experience Manager (AEM) site, you must create a proxy component and enable it for your site. For creating a proxy component and enabling portal components, see Using Core Components.

Once a portal component is enabled, you can use it in the author instance of your sites page.

Add and Configure Forms Portal Components configure-forms-portal-components

You can create and customize Forms Portal on websites authored using AEM by adding and configuring the portal components. Ensure that the components are enabled before using them in the Forms Portal.

To add a component, either drag and drop the component from the Components pane to the layout container on the page, or select the add icon on the layout container and add the component from the Insert New Component dialog.

Configure Drafts & Submissions Component configure-drafts-submissions-component

The Drafts & Submissions component displays forms that are saved as draft for completing later and submitted forms. To configure, select the component and then select the Configure icon . In the Drafts and Submissions dialog, specify the title to indicate the form listing as draft or submitted forms. Also select whether the component should list draft forms or submitted forms in card or list format.

Drafts icon

Submissions icon

Configure Search & Lister Component configure-search-lister-component

The Search & Lister component is used to list adaptive forms on a page and to implement search on the listed forms.

Search and Lister icon

To configure, select the component and then select the Configure icon . The Search and Lister dialog opens.

  1. In the Display tab, configure the following:

    • In Title, specify the title for the Search & Lister component. An indicative title enables the users perform quick search across the list of forms.
    • From the Layout list, select the layout to represent the forms in card or list format.
    • Select Hide Search and Hide Sorting to hide the search and sort by features.
    • In Tooltip, provide the tooltip that appears when you hover over the component.
  2. In the Asset Folder tab, specify the location from where the forms are pulled and listed on the page. You can configure multiple folder locations.

  3. In the Results tab, configure the maximum number of forms to display per page. The default is eight forms per page.

The link component enables you to provide links to an adaptive form on the page. To configure, select the component and then select the Configure icon . The Edit Link Component dialog opens.

  1. In the Display tab, provide the link caption and tooltip to ease identification of the forms represented by the link.
  2. In the Asset Info tab, specify the repository path where the asset is stored.
  3. In the Query Params tab, specify the additional parameters in the key-value pair format. When the link is clicked, these additional parameters and passed along with the form.

Configure Asynchronous Form Submission Using Adobe Sign configure-asynchronous-form-submission-using-adobe-sign

You can configure to submit an adaptive form only when all the recipients have completed the signing ceremony. Follow the steps below to configure the setting using Adobe Sign.

  1. In the author instance, open an Adaptive Form in the edit mode.
  2. From the left pane, select the Properties icon and expand the ELECTRONIC SIGNTATURE option.
  3. Select Enable Adobe Sign. Various configuration options display.
  4. In the Submit the form section, select the after every recipient completes signing ceremony option to configure the Submit Form action, where the form is first sent to all the recipients for signing. Once all the recipients have signed the form, only then the form is submitted.

Save Adaptive Forms As Drafts save-adaptive-forms-as-drafts

You can save forms as Drafts for completing them later. There are two ways in which a form is saved as a draft:

  • Create a “Save Form” rule on a form component, for example, a button. On clicking the button, the rule triggers and the form are saved a draft.
  • Enable Auto-Save feature, which saves the form as per the specified event or after a configured interval of time.

Create Rules to Save an Adaptive Form as Draft rule-to-save-adaptive-form-as-draft

To create a “Save Form” rule on a form component, for example, a button, follow the steps below:

  1. In the author instance, open an Adaptive Form in edit mode.
  2. From the left pane, select Components icon and drag the Button component to the form.
  3. Select the Button component and then select the Configure icon .
  4. Select the Edit Rules icon to open the Rule Editor.
  5. Select Create to configure and create the rule.
  6. In the When section, select “is clicked” and in the Then section, select the “Save Form” options.
  7. Select Done to save the rule.

Enable Auto-save enable-auto-save

You can configure the auto-save feature for an adaptive form as follows:

  1. In the author instance, open an Adaptive Form in edit mode.
  2. From the left pane, select the Properties icon and expand the AUTO-SAVE option.
  3. Select the Enable check box to enable auto-save of the form. You can configure the following:
  • By default, the Adaptive Form Event is set to “true”, which implies that the form is auto-saved after every event.
  • In Trigger, configure to trigger auto-save based on the occurrence of an event or after a specific interval of time.

See Also see-also

recommendation-more-help
fbcff2a9-b6fe-4574-b04a-21e75df764ab