Create and configure repositories
Create additional repositories and configure for pushing content to dev, stage, and production.
Overview overview
Depending on product release schedules and workflows of various authoring teams across Adobe, you might need to create additional repositories to host various types of documentation that you don’t want to include in the public documentation yet, such as Beta documentation that should only be accessible to a select number of customers.
This article explains how to create a new repository and hook it up to stage and production on experienceleague.adobe.com.
For background information, see User guide setup.
Step 1. File a JIRA ticket (Author) jira-ticket
-
Log a JIRA ticket (project = UGP; component = Authoring) with a title such as “Add repo to EXL pipeline,” and assign it to Bob Bringhurst.
-
Indicate the repo name.
-
Specify other details, such as which landing page, if any, it should be added to, and when the repo is intended to go live to production.
If you’re moving content from a different repo, let Bob know. He’ll help you set up redirects.
-
Let Bob know if and when you’re ready to publish content or just stage it.
Step 2. (Admin) Create a New Repository create-new-repo
For Admins, here’s how to create a new repository:
-
Go to Adobe-Enterprise-Docs on GitHub and log in with your LDAP credentials.
-
Click New.
-
Enter the name of your new repository in the Repository name field.
Use the
<repo-name>.enformat, such ascampaign-classic.en.Use lower-case letters and hyphens. For Technical Marketing repos with videos, add-learn. Use the.ensuffix to allow for localization.For service ID, use
566805.If you’re not sure what the name of your repo should be, log a JIRA bug (project: UGP) and assign it to Bob Bringhurst. Bob will consult with the editorial stakeholders.
-
Click Create repository.
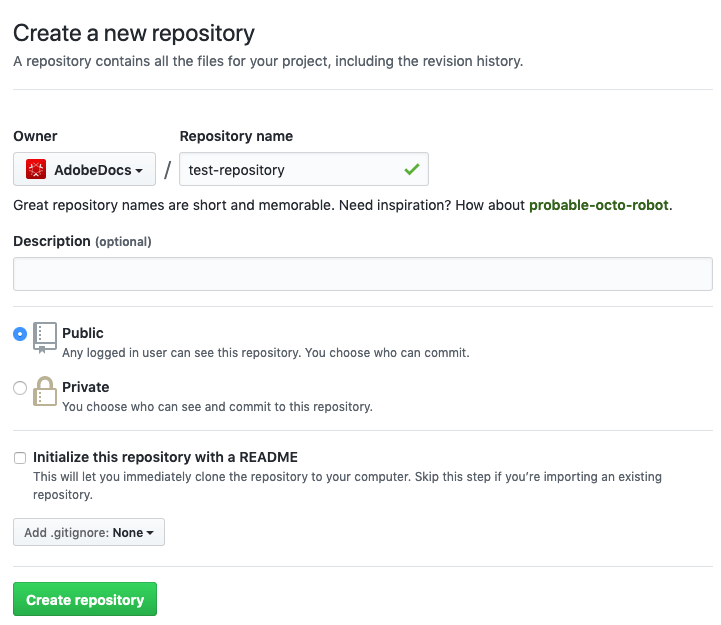
-
Change repo settings as needed. (Bob or Admin)
- Add the lead writer to the repo as Admin.
- Add .github folder for validation, described later.
- Create branch protection rules for the
mainbranch. See Git Setup.
Now you can clone your repository locally and start working in it. See Git Setup for details on how to clone your repository locally.
Step 3. (Admin) Add initial content
- Copy files from a different repo. We like to use the template-new-repo.en repo as a template for copying files.
Command+Shift+. to unhide system files. Copy .gitignore and .github to your new repo. Then press Command+Shift+. again to hide system files.-
Edit the
metadata.mdandTOC.mdfiles for the new repo. Include the following:- product_v2
- type (for search filtering)
- git-repo (for “Edit this page” and “Log an issue”)
- index (turn search on or off)
- user-guide-title (displayed on article page)
- user-guide-description (can be used in landing page description)
- breadcrumb-title (optional to add shorter guide title in breadcrumb)
landing-page-name: <landing-page-filename>(no .md)landing-page-breadcrumb-title: <breadcrumb-title>
See Metadata and User Guide Setup for details.
-
Add
UICONTROLandDNLtags for localization.
Step 4. (Author) Validate and activate content
- Make sure your content is ready to publish. See New Project Publication Checklist.
- Make sure your content passes validation.
- Commit to main and stage content.
- If you’ve moved content from a different repo, submit redirects.
(Admin) Prepare repo for publishing
-
[ ] Make sure repo is configured properly.
- [ ] All processing files in root folder.
- [ ] Valid structure for guides. TOC and home page.
- [ ] Metadata in
metadata.mdandTOC.mdfiles: git-repo, user-guide-description, breadcrumb-name, solution, type, feature, feature-set, and so on. - [ ] Loc tags are added.
-
[ ] Add Loc repos to exl-config/Airtable, if necessary.
-
[ ] Add lead writer to github.com > repo with Admin access.
-
[ ] Add to stage and dev initially, and then add to production when ready.
-
[ ] Change
hide: truetoindex: trueafter soft launch. -
[ ] Add link to landing pages, if appropriate.
-
[ ] Connect to Red Pen.
Connect repo to EXL connect-repo-admin
Update the v2 path for stage and dev
-
In public github (Safari), go to https://github.com/adobe-experience-league/exlm-converter (Public GitHub).
-
Go to Settings > Environments > stage > V2_PATHS at bottom. Add the path of the new repo.
Example:
/:lang/docs/contributor/:restOfPath* -
Be a good soul and add it to dev as well.
Deploy the app to stage and dev
-
In public github (Safari), go to https://github.com/adobe-experience-league/exlm-converter (Public GitHub).
-
Click the Actions tab.
Click Deploy Converter Action. -
Choose Run Workflow > and then choose stage.
-
Deploy dev as well.
-
Force publish the repo to dev and stage (no longer necessary).
> node repo-publish.js
Connect to production
-
Add the repo to the EXL Admin app.
- Go to https://github.com/organizations/Adobe-Enterprise-Docs/settings/installations
- Click Configure for the EXL Admin app.
- Choose the new repo from the Select repositories drop-down list. Add all languages.
- Click Save.
-
Update the v2 path for prod
- In public github (Safari), go to https://github.com/adobe-experience-league/exlm-converter (Public GitHub)
- Go to Settings > Environments > prod > V2_PATHS at bottom. Add the path of the new repo.
-
Deploy the app to production
- In public github (Safari), go to https://github.com/adobe-experience-league/exlm-converter (Public GitHub).
- Click the Actions tab.
- Click Deploy Converter Action.
- Choose Run Workflow > and then choose main (prod).
-
Run the bulk publish script on prod:
node repo-publish.js
(Admin) Configure for Red Pen
- Go to https://github.com/organizations/Adobe-Enterprise-Docs/settings/installations
- Click Configure for the RedPen Reviewer app.
- Choose the new repo (.en only) from the Select repositories drop-down list.
- Click Save.
(Admin) Create and configure public mirror
-
Make sure that
git-repo: <repo-name>is specified in the repo’s metadata.md file. -
Go to https://github.com/Adobe-Enterprise-Docs/workflows/actions/workflows/create-public-mirror-repos.yml, choose Run Workflow, and specify the repo name.
This creates all 10 public mirror repos if they don’t already exist.
-
Add the mirror.yml file to the .github > workflows folder.
The .github folder is a hidden system file, so press
Cmd+Shift+.on a Mac to toggle hide/unhide system files.
(Admin) Configure for link-checker
- Add the new repo to the repos.json file in the appropriate format (copy paste):
https://github.com/AdobeEXL/link-checker/blob/main/config/repos.json