Join paid media data with web data
This use case guide illustrates how you can join paid media summary data with website behavioral event data in Adobe Customer Journey Analytics.
Connecting your ad accounts (Meta, Google Ads, and others) to Experience Platform provides paid media summary data in Customer Journey Analytics: daily impressions, clicks, spend, and ad-network-reported conversions per account, campaign, ad group, ad, experience, and asset. Using Customer Journey Analytics, you collect your own on-site behavioral event data with the Web SDK: page views, orders, revenue.
When you join the two types of data in a single Workspace freeform table you can compare advertising performance with activity on your website. Use shared campaign, ad group, and ad IDs to report on impressions, clicks, and spend alongside paid landings, orders, and revenue in Analysis Workspace.
The combination of these two types of data allows you to compare pre-click data (from your ads) and post-click data (from your website).
This guide covers scenarios based on connections managed by Adobe Content Analytics configurations and connections that you configure yourself.
How it works
The diagram below illustrates how paid media summary data and website behavioral event data are ingested through a Customer Journey Analytics connection.
The data view is responsible for parsing and aligning the data, so you can use Workspace to report properly on the data.
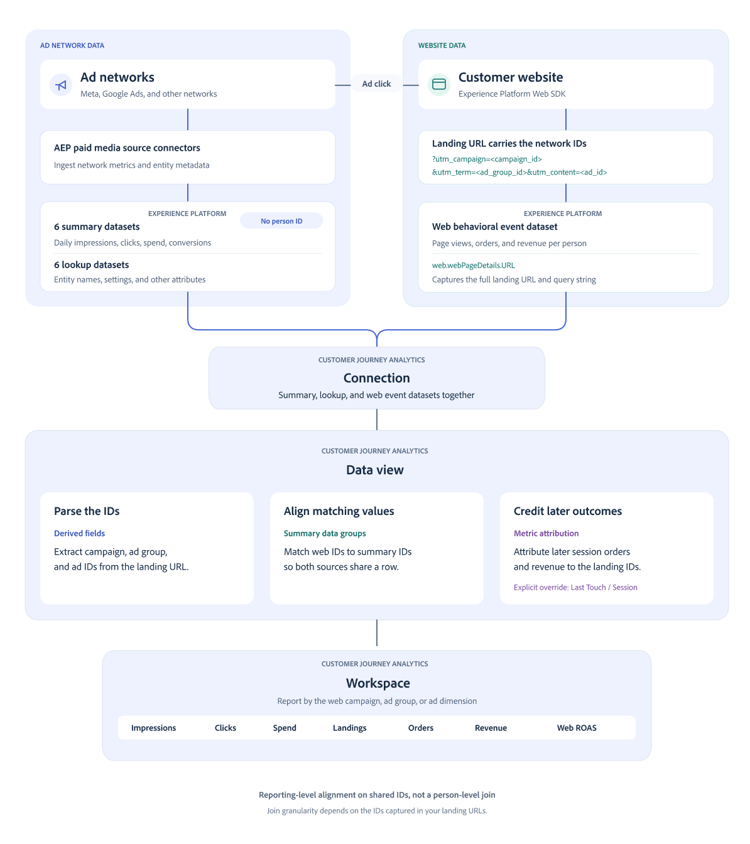
Paid media summary datasets contain daily metrics without a person ID. Website event datasets contain timestamped behavioral events and a person identifier. A summary data group associates dimensions from these datasets so that equal dimension values appear in the same reporting row.
Understand the reporting join
You can join only at levels whose IDs appear in your landing page URLs or existing event fields. For example, campaign-only tagging supports campaign reporting, but not ad-level reporting.
See Summary data and Summary data group component settings for reference.
Choose the join key
Paid media datasets provide both raw network IDs and Adobe-generated globally unique identifiers (GUIDs).
123456789meta_111111111_123456789The GUID structure is {adNetwork}_{accountID}[_{campaignID}[_{adGroupID}[_{adID}]]]. Paid media components managed by Adobe Content Analytics use these GUIDs.
This guide uses network IDs for web joins because campaign, ad group, and ad URL macros do not supply all the information needed to reconstruct a GUID. Use these summary fields:
paidMedia.campaignIDpaidMedia.campaignGUIDpaidMedia.adGroupIDpaidMedia.adGroupGUIDpaidMedia.adIDpaidMedia.adGUIDThe network field is paidMedia.adNetwork. Example values include meta and google_ads. Derived field outputs must match the values in your datasets exactly.
Prerequisites
Confirm that you have:
- Customer Journey Analytics Select or higher, with access to the derived field functions used here: URL Parse, Case When, Regex Replace, and, for name enrichment, Lookup.
- Adobe Experience Platform permissions to manage schemas, datasets, and datastreams in the target sandbox, and access to datasets and Query Service for verification.
- Customer Journey Analytics permission to edit the target connection and data view.
- Paid media source connectors configured in the same sandbox and ingesting summary and lookup datasets. For an example connector, see Meta Ads source.
- Website events that capture the full landing page URL, including its query string, or equivalent fields containing the network IDs.
Ad tagging
Identify the query parameters that contain your campaign, ad group, and ad IDs. Existing ID-based tagging can be used without changes to the ad platforms.
campaign_id={{campaign.id}}adset_id={{adset.id}}ad_id={{ad.id}}utm_campaign={{campaign.id}}utm_term={{adset.id}}utm_content={{ad.id}}utm_campaign={{campaignid}}utm_term={{adgroupid}}utm_content={{creative}}For Meta UTM tagging, a source value such as utm_source=fb can identify the network. For Google Ads UTM tagging, use a source value such as utm_source=google.
Some Adobe Advertising integrations use an s_kwcid value with this layout:
AL!<id>!3!{creative}!{matchtype}!{placement}!{network}!{product_partition_id}!{keyword}!{campaignid}!{adgroupid}
The parsing rules later in this guide apply to this layout only. Inspect actual landing URLs before using them.
If you do not have access to the ad platforms, inspect landing URLs in your web dataset. You can also inspect these paid media lookup fields:
- Google Ads account lookup:
additionalDetailsentries namedgoogle_ads_tracking_url_templateandgoogle_ads_final_url_suffix. - Meta ad lookup:
paidMedia.adDetails.creative.paidMediaCreative.destinationURL.
Macros in stored destination URLs can be percent-encoded. Validate the expanded IDs in actual website events rather than assuming that a stored URL represents the final landing URL.
utm_campaign=fall_sale, do not match campaign IDs. Join only at levels that contain actual IDs. If IDs are absent, work with your ad operations team to update tagging for future traffic; this setup cannot reconstruct missing IDs for historical visits.Starting point
Open the data view you plan to use and inspect the components to determine the starting point.
Do not remove or modify system-provisioned datasets or read-only components when extending a connection that Content Analytics manages.
Collect website behavioral events
Skip schema, dataset, and datastream creation if your website already sends the required events to a dataset used in Customer Journey Analytics. Confirm that web.webPageDetails.URL includes the landing page query string.
Create the schema and dataset
-
In Experience Platform, select the target sandbox.
-
Go to Data Management > Schemas, then select Create schema.
-
Choose Manual and the
XDM ExperienceEventclass. -
Name the schema, for example
Web Behavioral Events. -
Add the field groups needed for your implementation.
table 0-row-2 1-row-2 2-row-2 3-row-2 4-row-2 Field group Required data AEP Web SDK ExperienceEvent Page URL, page views, referrer, and other web context. Commerce Details Purchase count, order value, currency, purchase ID, and product details. Campaign Marketing Details, optional Tracking codes if your implementation captures them separately. IdentityMap, if not already present The person identifier, such as ECID. -
Save the schema. Profile enablement is not required for this reporting use case.
-
Go to Data Management > Datasets > Create dataset > Create dataset from schema.
-
Select the schema and create a dataset named, for example,
Web Behavioral Events. Leave Profile disabled unless another use case requires it.
Configure the datastream and Web SDK
- Go to Data Collection > Datastreams > New Datastream.
- Name the datastream and select your event schema as the mapping schema.
- Save, then select Add Service > Adobe Experience Platform.
- Select the sandbox and event dataset, then Save.
- Use the datastream ID to configure the Experience Platform Web SDK.
Capture the following:
- Capture a page view on each page, with the full URL in
web.webPageDetails.URLandweb.webPageDetails.pageViews.valueset to1. - Purchase events with
commerce.purchases.valueset to1, pluscommerce.order.priceTotal,commerce.order.currencyCode, andcommerce.order.purchaseID. - A person identifier suitable for your Customer Journey Analytics connection.
You do not need to parse UTM parameters in website code. The derived fields in this guide parse URLs at report time. If your implementation already captures the IDs in dedicated fields, use those fields instead.
Verify ingestion
Check the dataset activity for successful ingestion. In Query Service, run the following query, replacing web_behavioral_events with your dataset’s SQL table name:
SELECT timestamp, eventType, web.webPageDetails.URL
FROM web_behavioral_events
WHERE web.webPageDetails.URL RLIKE '[?&](campaign_id|utm_campaign|s_kwcid)='
ORDER BY timestamp DESC
LIMIT 20;
Confirm that the returned URLs contain expanded network IDs. If paid traffic exists but the query returns no rows, inspect recent landing URLs and adapt the parameter pattern to your tagging.
Configure the connection
To ingest the web event dataset into Customer Journey Analytics, you need to add the dataset to the relevant connection. This ensures that the web behavioral events are available alongside your paid media datasets for analysis.
Add the website event dataset
-
In Customer Journey Analytics, go to Data management > Connections.
-
Edit the connection that contains your paid media datasets.
-
Select Add datasets and choose the website event dataset.
-
Configure the dataset:
table 0-row-2 1-row-2 2-row-2 3-row-2 4-row-2 5-row-2 Setting Value Person ID identityMapwith the ECID namespace, or your implementation’s person ID field.Timestamp timestampData source type Web data Import all new data Enabled Backfill all existing data Enabled for the historical period you need. -
Add the dataset and save the connection.
Add paid media datasets if not already configured
Add at least Paid Media Ad Summary and the Paid Media Account, Paid Media Campaign, Paid Media AdGroup, and Paid Media Ad Lookup datasets.
paidMedia.accountGUID; matching field in Ad Summary: paidMedia.accountGUID.paidMedia.campaignGUID; matching field in Ad Summary: paidMedia.campaignGUID.paidMedia.adGroupGUID; matching field in Ad Summary: paidMedia.adGroupGUID.paidMedia.adGUID; matching field in Ad Summary: paidMedia.adGUID.Confirm that the connection editor exposes the intended matching fields before saving. Name enrichment later in this guide uses derived field Lookup rules explicitly.
Add other available summary datasets only when you need their breakdowns, such as geography, demographics, placement, or performance.
Configure the data view
Open Data management > Data views and select your data view. If needed, create a data view using the connection you configured.
For a new data view, use GMT to align website events with UTC paid media days, and keep the default 30-minute session timeout unless your reporting requirements differ. Changing an existing data view’s time zone affects its other reports; assess that impact before changing it.
Add paid media metrics if not already configured
Skip this step if these metrics or dimensions already exist. Add the following fields from Paid Media Ad Summary:
paidMedia.metrics.impressionspaidMedia.metrics.clickspaidMedia.metrics.spendpaidMedia.metrics.conversionspaidMedia.metrics.conversionValuepaidMedia.adNetworkpaidMedia.accountGUIDpaidMedia.campaignGUIDpaidMedia.adGroupGUIDpaidMedia.adGUIDCurrency formatting does not itself reconcile different source currencies. Confirm the currency basis before comparing spend and revenue.
Use derived fields to create descriptive names for the GUIDs dimension. Use a Lookup rule to apply a descriptive name for the GUIDs dimension. For example: lookup paidMedia.accountGUID (Paid Media Ad Summary) using lookup dataset Paid Media Account Lookup with matching key paidMedia.accountGUID and value to return: paidMedia.accountDetails.accountName.
Create the web network derived field
Select Create derived field and name the field PM Network (Web). All URL Parse rules below read the website dataset’s web.webPageDetails.URL field, referred to here as Page URL.
Add rules in this order:
Configure the final Case When rule:
- If rule 2 or rule 3 is set, return
google_ads. - Otherwise, if rule 4 is set or rule 1 equals
fb,facebook,ig,instagram, ormeta, returnmeta. - Otherwise, if rule 1 equals
google, returngoogle_ads. - Add mappings for other networks only after confirming their values in
paidMedia.adNetwork. - Otherwise, return no value.
To enter a fixed output, open the value picker, select Custom String Value, and enter the string.
These classification rules are tagging-based, not proof that a visit came from a paid ad. For example, a source parameter alone can also appear on non-paid links. Adapt the conditions to your tagging conventions before using the field as a paid traffic classifier.
Create the web ID derived fields
Create one derived field per reporting level. The following structure handles the three tagging patterns described earlier:
Use the following values:
campaign_idutm_campaign^.*!([^!]*)![^!]*$adset_idutm_term^.*!([^!]*)$ad_idutm_content^[^!]*![^!]*![^!]*!([^!]*)!.*$In the final Case When rule, select the earlier rule outputs from the value picker rather than entering them as literal strings.
The campaign expression extracts the second-to-last s_kwcid value, the ad group expression extracts the last value, and the ad expression extracts the fourth value. These positions depend on the exact layout shown earlier.
Use Final output to confirm that the results match IDs in Paid Media Ad Summary. Do not retain an s_kwcid parsing branch if your URLs use a different layout. If your URLs use only UTM parameters, omit the unused rules and update subsequent rule references accordingly.
Each derived field supports up to five URL Parse rules and one Regex Replace rule. Keep one ID per derived field.
Create the paid landings metric
Create a derived field named Paid Media Landings (Web) using PM Campaign ID (Web) as the input.
The builder expands the input field’s rules into the new field. After those rules, add a Case When rule that returns the custom numeric value 1 when the campaign ID output is set, and no value otherwise. Add the result as a metric.
This metric counts events carrying a campaign ID. This metric represents landings only when your implementation sends that ID-bearing URL on the landing event rather than on repeated or unrelated events.
Add optional web name fields
To report by name, create the following derived fields with a Lookup rule after the expanded web ID rules:
paidMedia.campaignIDpaidMedia.metadata.namepaidMedia.adGroupIDpaidMedia.metadata.namepaidMedia.adIDpaidMedia.metadata.nameSelect the final ID rule as the field to apply the lookup to. Verify names in the final output preview before adding the fields as dimensions. If the required matching field is unavailable, use ID-based reporting instead.
Names are matched as text. Use ID dimensions when different entities share a name.
Add web components and configure attribution
Add the web ID and network derived fields as dimensions. Add the optional name fields if you created them. Keep component settings at their defaults so that they match the summary dimensions you add to their groups.
Confirm that your data view includes the web components you need:
web.webPageDetails.URLweb.webPageDetails.nameweb.webReferrer.URLeventTypeproductListItems.SKUproductListItems.nameweb.webPageDetails.pageViews.valuecommerce.productListAdds.valuecommerce.purchases.valuecommerce.order.priceTotalAdd the paid landings derived field as a metric, then configure separate order and revenue metrics:
- Duplicate Orders and name the copy
Orders (Web). If Orders does not exist, addcommerce.purchases.valuedirectly. - Duplicate Revenue and name the copy
Revenue (Web). If Revenue does not exist, addcommerce.order.priceTotaldirectly. - Format Orders (Web) as a decimal with zero decimal places and Revenue (Web) as currency.
- For both metrics, open Attribution and enable Override default attribution.
- Select the Last Touch model and Session container.
Keep the original Orders and Revenue metrics unchanged to preserve existing reports. Explicitly enabling the override is required for this setup, even when the displayed defaults appear to match.
For conversion credit across returning visits, consider a Person container and an appropriate lookback window instead. See the summary data use case.
Use metric attribution rather than adding persistence to the web ID dimensions. To avoid inflating counts interpreted as landings, do not persist IDs to later events, as this changes which events appear under campaign rows.
Create summary-side join dimensions
Add separate dimensions from Paid Media Ad Summary for the web joins:
paidMedia.adNetworkpaidMedia.campaignIDpaidMedia.adGroupIDpaidMedia.adIDDo not edit or duplicate read-only, template-managed paid media components. Create the separate components above from schema fields.
If you created optional web name fields, also create these summary-side Lookup derived fields:
paidMedia.campaignGUIDpaidMedia.campaignGUIDpaidMedia.metadata.namepaidMedia.adGroupGUIDpaidMedia.adGroupGUIDpaidMedia.metadata.namepaidMedia.adGUIDpaidMedia.adGUIDpaidMedia.metadata.nameUse a GUID from the summary dataset as each lookup’s input. A dimension taken directly from a lookup dataset does not satisfy the requirement for a summary dimension in a summary data group.
Create summary data groups
Create each group on the web dimension that you plan to use in reports. Add the corresponding summary dimension and hide that added member in reporting.
For each row:
- Select the web dimension.
- Open Summary Data Group and enable Create grouping.
- Add the summary dimension.
- Enable Hide in reporting for the added summary member. Keep the web dimension visible.
- Confirm that component settings, including lowercase, substring, and include/exclude rules, match across members.
Each group supports up to 10 dimensions. To include metrics from another summary dataset, add that dataset’s equivalent summary dimension to the same group as a hidden member.
Save the data view.
Create calculated metrics
In Workspace, go to Components > Calculated metrics and create the following metrics using the configured data view:
Review rows with zero denominators before interpreting ratio metrics. A network-versus-web conversion gap does not by itself indicate an error: the two sources can differ in attribution, measurement, and reporting windows.
Build and validate the report
-
Create a Workspace project using the configured data view.
-
Choose a date range with data from both sources. Allow for paid media ingestion delays; summary data can lag website events by a day.
-
Add a freeform table with PM Campaign ID (Web) as the row dimension, or PM Campaign Name (Web) if you configured name groups.
-
Add Impressions | Ad Summary, Clicks | Ad Summary, Spend | Ad Summary, Conversions | Ad Summary, Paid Media Landings | Ad Summary, Orders (Web), Revenue (Web), and the calculated metrics.
-
Break a campaign row down by the web ad group and ad dimensions. Confirm that both summary and web metrics populate at each configured level.
-
Add a second table using PM Network (Web) to review network-level totals and the no-value row.
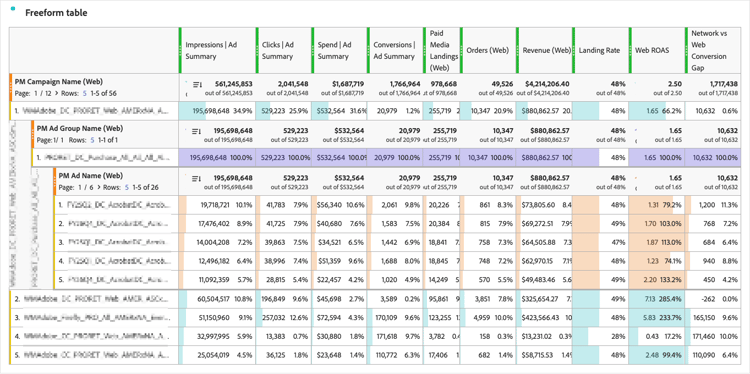

Check the following before sharing the report:
- Landing event IDs match Paid Media Ad Summary IDs.
- Paid media metrics and web metrics populate on the same rows.
- Orders and revenue receive the intended session or person attribution.
- No-value rows are understood. They can contain unmatched summary data or web activity without paid media identifiers.
- Landing-to-click differences are consistent with your collection setup, consent handling, and reporting windows. There is no universal expected match rate.
Troubleshoot mismatches
s_kwcid layout or UTM parameters and update the parsing rules.facebook and metapaidMedia.adNetwork exactly.