
Add gift options to PDP
The GiftOptions container lets shoppers add gift wrapping or a personalized message from the product detail page. This tutorial shows you how to render the container on a product details page (PDP) and carry the shopper’s selections into the cart.
What you’ll edit or create
Section titled “What you’ll edit or create”- Edit the
GiftOptionscontainer - Edit the
onGiftOptionsChangecallback - Edit the
addProductsToCart()andupdateProductsFromCart()calls
What you’ll build
Section titled “What you’ll build”By the end of this tutorial, you’ll have:
- The
GiftOptionscontainer rendered on the product detail page, using either cart item data or a manually composed configuration. - Gift wrapping and message selections captured through the
onGiftOptionsChangecallback and stored until the shopper adds the item to the cart. - The Add to Cart button extended to call
addProductsToCartand thenupdateProductsFromCart, applying the saved gift options to the new cart item.
Step-by-step
Section titled “Step-by-step”The following steps describe how to render the GiftOptions container on the PDP page and apply the selected gift options to the cart when the product is added.
Import required modules
Section titled “Import required modules”Import the GiftOptions container and CartProvider.
import GiftOptions from '/@dropins/storefront-cart/containers/GiftOptions.js';import { render as CartProvider } from '/@dropins/storefront-cart/render.js';Define gift options configuration for an item
Section titled “Define gift options configuration for an item”In this step, we will define the gift options configuration for a specific item. This can be done in different ways, such as by fetching configurations from the backend using API methods or retrieving them from product data.
Example 1: Use cartItem data
Section titled “Example 1: Use cartItem data”Use this technique when the product has already been added to the cart, such as on the cart page:
const cartItem = JSON.parse( sessionStorage.getItem('DROPIN__CART__CART__DATA'),)?.items?.find((el) => el.sku === product.sku);Example 2: Use a custom integration configuration
Section titled “Example 2: Use a custom integration configuration”This configuration can be composed using product data available on the PDP and a store configuration query.
type ProductGiftOptionsConfig = { giftWrappingAvailable: boolean; giftMessageAvailable: boolean; giftWrappingPrice?: Price; giftMessage?: { recipientName?: string; senderName?: string; message?: string; }; productGiftWrapping: GiftWrappingConfigProps[];};
const predefinedConfig = { giftWrappingAvailable: true, giftMessageAvailable: true, productGiftWrapping: [ { design: 'Glossy Print Paper', uid: 'Mg==', selected: false, image: { url: 'https://aemshop.example.com/media/wrapping/glossy.png', design: 'Glossy Print Paper', }, price: { currency: 'USD', value: 25, }, }, { design: 'Foil Finish Paper', uid: 'NQ==', selected: false, image: { url: 'https://aemshop.example.com/media/wrapping/random-grid.jpg', design: 'Foil Finish Paper', }, price: { currency: 'USD', value: 30, }, }, { design: 'Kraft Brown Paper', uid: 'OA==', selected: false, image: { url: 'https://mcstaging.aemshop.net/media/wrapping/brown-paper.jpg', design: 'Kraft Brown Paper', }, price: { currency: 'USD', value: 45, }, }, ],};Render the GiftOptions container
Section titled “Render the GiftOptions container”For custom integration, we must pass an item prop, which can be either a cartItem or a manually-composed gift options configuration. In addition, we need to pass the onGiftOptionsChange callback. When provided, the container will not automatically save the gift options. Instead, the integration layer must handle this. The callback receives the updated gift options whenever they change.
CartProvider.render(GiftOptions, { item: cartItem ?? predefinedConfig, view: 'product', onGiftOptionsChange: async (data) => { console.info('onGiftOptionsChange :>> ', data); if (data) { sessionStorage.setItem('updatedGiftOptions', JSON.stringify(data)); } },})($giftOptions);Update the Add to Cart button
Section titled “Update the Add to Cart button”At this stage, we extend the Add to Cart button functionality by calling the updateProductsFromCart API method provided by the cart drop-in component to apply gift options after adding the product to the cart.
// Configuration - Button - Add to CartUI.render(Button, { children: labels.PDP?.Product?.AddToCart?.label, icon: Icon({ source: 'Cart' }), onClick: async () => { try { addToCart.setProps((prev) => ({ ...prev, children: labels.Custom?.AddingToCart?.label, disabled: true, }));
// get the current selection values const values = pdpApi.getProductConfigurationValues(); const valid = pdpApi.isProductConfigurationValid();
// add the product to the cart if (valid) { const { addProductsToCart, updateProductsFromCart } = await import( '/@dropins/storefront-cart/api.js' ); await addProductsToCart([{ ...values }]).then(async (response) => { const updatedGiftOptions = JSON.parse( sessionStorage.getItem('updatedGiftOptions'), );
if (!updatedGiftOptions) return;
const { items } = response; const dropinCartData = items.find((el) => el.sku === values.sku);
const { recipientName, senderName, message, giftWrappingId, isGiftWrappingSelected, } = updatedGiftOptions;
const giftOptions = { gift_message: { to: recipientName, from: senderName, message, }, gift_wrapping_id: isGiftWrappingSelected ? giftWrappingId : null, }; await updateProductsFromCart([ { uid: dropinCartData.uid, quantity: dropinCartData.quantity, giftOptions, }, ]); }); }
// reset any previous alerts if successful inlineAlert?.remove(); } catch (error) { // add alert message inlineAlert = await UI.render(InLineAlert, { heading: 'Error', description: error.message, icon: Icon({ source: 'Warning' }), 'aria-live': 'assertive', role: 'alert', onDismiss: () => { inlineAlert.remove(); }, })($alert);
// Scroll the alertWrapper into view $alert.scrollIntoView({ behavior: 'smooth', block: 'center', }); } finally { addToCart.setProps((prev) => ({ ...prev, children: labels.PDP?.Product?.AddToCart?.label, disabled: false, })); } },})($addToCart);As a result of these customizations, the default GiftOption container is rendered as follows:
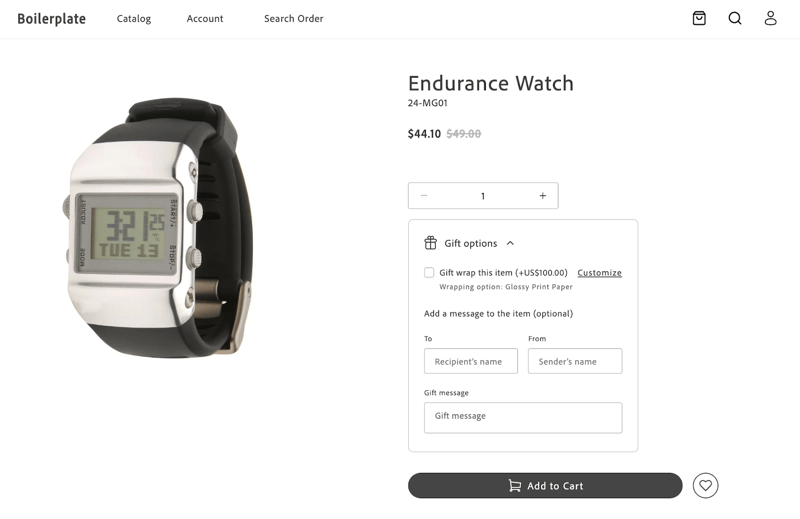
When the shopper makes a selection, the container is rendered as follows:
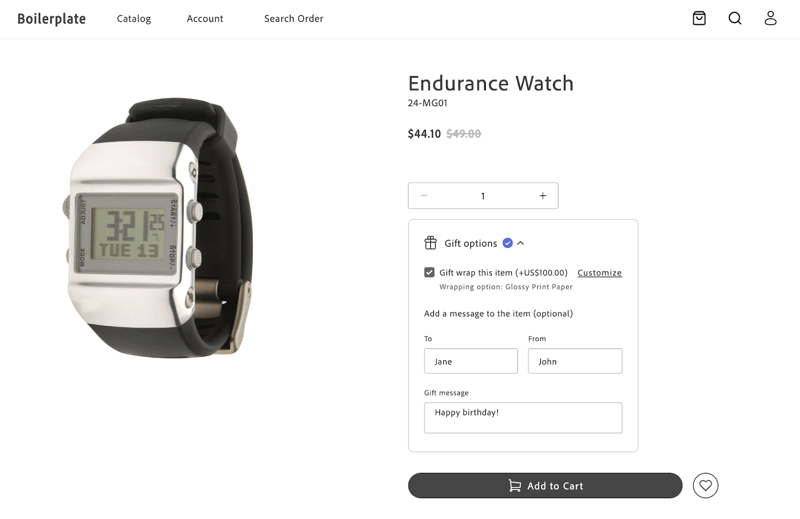
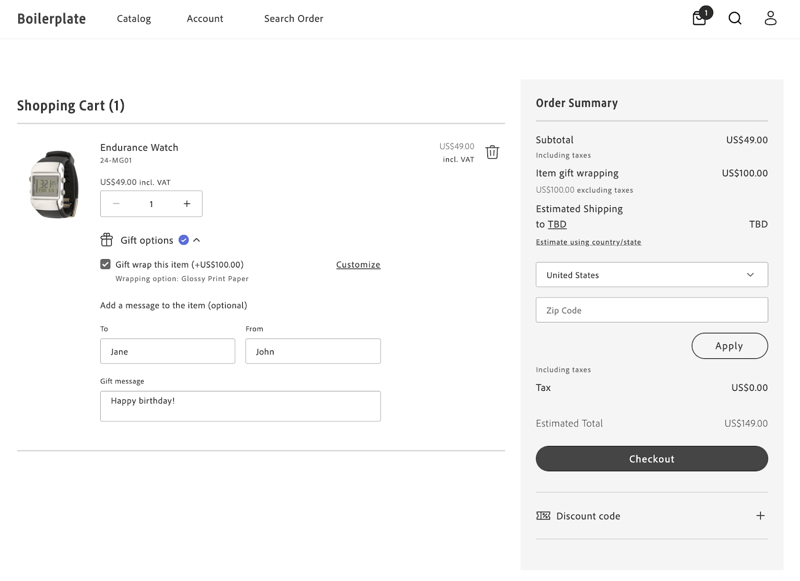
After clicking Add to Cart, the product is added to the cart, and the selected gift options are applied. The cart page displays the applied gift options.
Related
Section titled “Related”- Product Details slots — where the gift options mount on the PDP.
- Cart overview — how gift selections flow into the cart.