在此頁面上:核准原則會決定哪些歷程和行銷活動需要登出才能上線,讓管理員設定條件、目標定位條件,以及控管每個請求的稽核者。
核准政策可讓管理員建立歷程與行銷活動的驗證流程。 此系統概述特定條件,決定是否需要核准歷程或行銷活動。 這些原則在複雜性上可能有所不同。 它們只需要要求所有行銷活動由特定使用者或團隊檢閱,或根據行銷活動的建立者建立條件。
您可以使用彈性條件(例如,標籤、行銷活動/歷程名稱、管道型別或請求者資訊)來鎖定核准政策。 例如,您可以要求核准所有標示為「高風險」的物件,或任何符合特定命名模式的促銷活動。
建立核准原則 create-policies
若要建立核准政策,請遵循下列步驟:
-
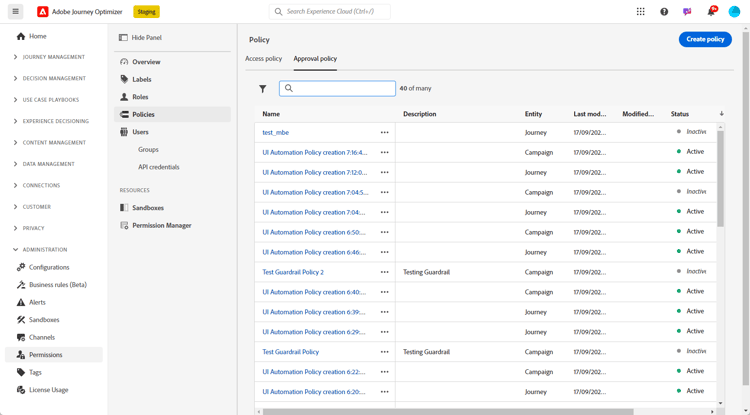
從Journey Optimizer中的 管理 功能表,存取 許可權 然後原則。
-
在 核准原則 索引標籤中按一下建立,選擇核准原則,然後按一下確認。
-
輸入原則的 名稱 和描述。
-
選取原則將套用至 歷程 或行銷活動。
-
啟用區塊自行核准,以防止歷程/行銷活動建立者核准自己的物件。
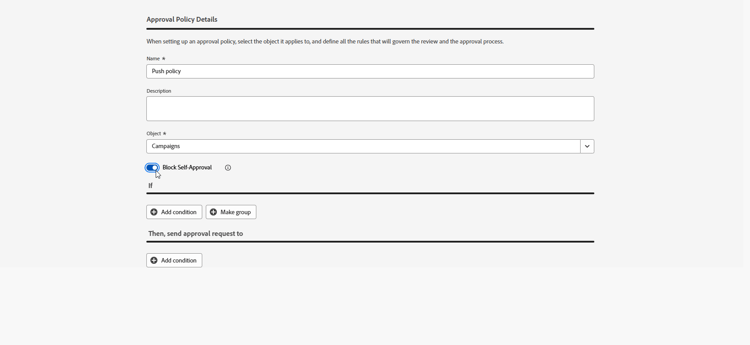
您現在可以調整條件,以指定誰可以起始核准要求,以及誰可以驗證核准要求。
設定核准政策的條件 conditions
核准政策提供彈性的目標定位選項,以符合您的治理需求。 您可以根據各種條件建立核准政策,包括:
- 行銷活動/歷程名稱:依名稱鎖定特定物件
- 標籤:將原則套用至具有特定標籤的所有行銷活動或歷程
- 頻道型別:特定動作(電子郵件、行動訊息、推播等)需要核准
- 行銷活動型別:為動作與API觸發的行銷活動設定不同的規則
- 要求者:根據建立行銷活動或歷程的人定義原則
若要定義與核准原則相關的條件,請遵循下列步驟:
-
存取您的核准原則。
-
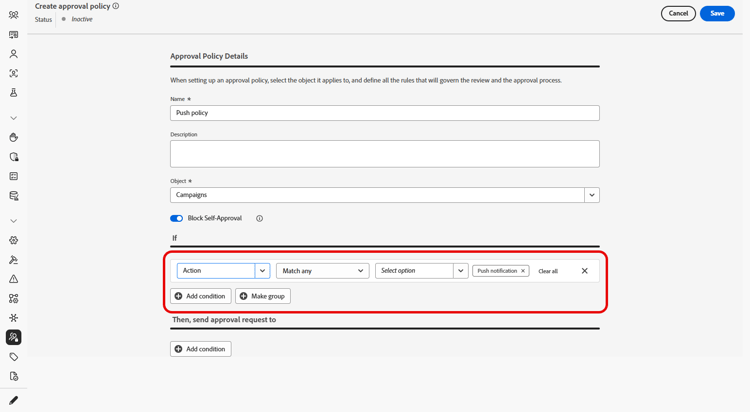
在 If 功能表下,按一下 新增條件 以定義將觸發核准要求的物件或使用者。
-
選擇適當的類別、相符規則和選項。
例如,「如果動作符合任何直接郵件」或「如果請求者使用者名稱符合John Doe」。
accordion 進一步瞭解可用的類別和選項 table 0-row-2 1-row-2 2-row-1 3-row-1 4-row-2 5-row-1 6-row-1 7-row-1 8-row-1 9-row-1 10-row-1 11-row-1 12-row-2 13-row-2 14-row-2 15-row-2 4-rowspan-3 11-rowspan-8 html-authored 類別 選項 行銷活動類型 已排程(行銷) API 觸發 (行銷) API 觸發 (交易型) 動作 應用程式內 推播通知 行動訊息 電子郵件 直接郵件 網頁 程式碼型 內容卡 標記 用來組織對象的標籤名稱。 物件名稱 物件的名稱。 請求者使用者名稱 指定要求者的名稱和電子郵件地址 要求者使用者群組 指定要求者的使用者群組名稱 -
若要新增更多條件,請按一下[新增條件] 以定義其他規則,並選取[ And 或[ Or ]以指定連線條件的方式。]
-
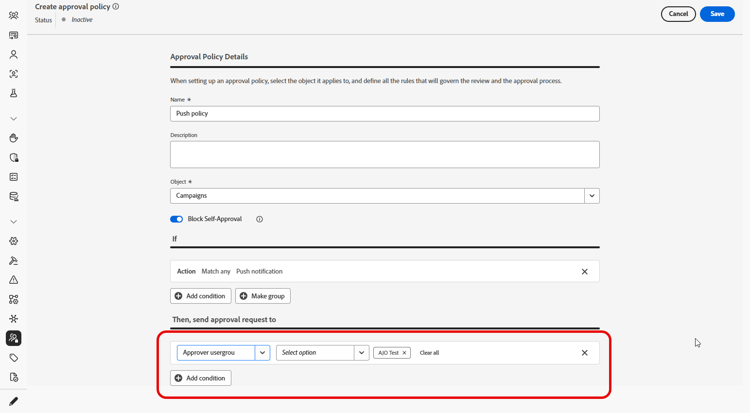
在 Then,傳送核准要求至 功能表下,按一下 新增條件 以定義哪些使用者可以接受核准要求。
-
從 類別 下拉式清單中,選取您要選擇使用者群組還是個別使用者。
-
然後,從 選項 下拉式清單中,選取特定使用者群組或使用者。
所選的使用者或使用者群組將負責驗證核准請求。
-
若要新增更多條件,請按一下[新增條件] 以定義其他規則,並選取[ And 或[ Or ]以指定連線條件的方式。]
-
完成原則設定後,請按一下[儲存]。
您現在可以啟用核准原則以套用它。
啟用和管理核准原則 activate-policies
若要套用您的核准政策,您必須將其啟用。 若要執行此動作,請依照下列步驟執行:
-
存取您的核准原則。
-
然後,按一下[啟動],將設定的條件套用至您的環境。
note NOTE 原則一經啟用即無法編輯。 若要修改條件,請先停用原則。 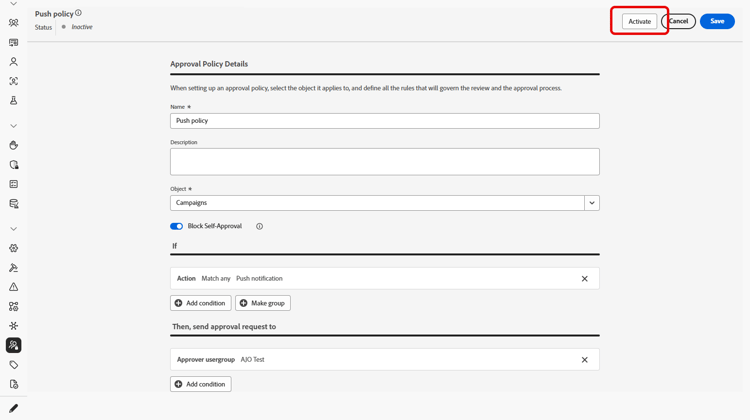
-
從 原則 功能表,開啟進階選項,以視需要編輯、停用或 複製 原則。

This section contains structured knowledge intended to support interpretation, retrieval, and question answering related to this topic.
For complete understanding, this information should be combined with the documentation on this page. Neither source is intended to stand alone; the page describes the feature, while this section provides additional context that helps disambiguate terminology, intent, applicability, and constraints.
- TL;DR: This page explains how administrators create, set conditions for, activate, and manage approval policies that determine which journeys and campaigns require sign-off before they go live.
Intents:
- Create an approval policy from Administration > Permissions > Policies and scope it to Journeys or Campaigns
- Enable Block self-approval to prevent creators from approving their own objects
- Define conditions under the If menu that determine which object or user triggers an approval request
- Define who validates the request under the Then, send approval request to menu, choosing a User Group or an individual User
- Combine multiple conditions using the And or Or operators
- Activate, edit, deactivate, or duplicate an approval policy
Glossary:
- Approval policy: A validation process configured by administrators that determines whether a journey or campaign requires approval before activation. (product-specific)
- Block self-approval: An option that prevents Journey/Campaign creators from approving their own objects. (product-specific)
- Condition: A rule, built from a Category, Matching Rule, and Options, that defines which object or user triggers an approval request. (product-specific)
- Category: The type of criterion a condition targets — for example Campaign type, Action, Tags, Object name, Requestor username, or Requestor user group.
Guardrails:
- To create approval policies, you must have system or product administrator privileges in Adobe Experience Platform.
- Once activated, policies cannot be edited; to modify conditions, deactivate the policy first (hard limit — page states policies “cannot be edited”).
- A policy applies either to Journeys or to Campaigns, selected per policy.
Terminology:
- Canonical name: Approval policy — variants: approval policies
- Do not confuse: “If” (condition defining which object or user triggers an approval request) ≠ “Then, send approval request to” (defining who can validate the request)
- Do not confuse: “Activate” (apply a policy) ≠ “Deactivate” (required before editing) ≠ “Duplicate” (copy a policy)
- Do not confuse: “Requestor username” (name and email address of a designated requestor) ≠ “Requestor user group” (name of the user group of designated requestors)
FAQ:
- Q: Where do I create an approval policy? — From the Administration menu, access Permissions then Policies, click Create in the Approval Policy tab, choose Approval Policy, and confirm.
- Q: Can I edit a policy after activating it? — No. Once activated, policies cannot be edited. Deactivate the policy first to modify its conditions.
- Q: What criteria can target an approval policy? — Campaign/Journey names, Tags, Channel types, Campaign types, and Requestors.
- Q: How do I stop users from approving their own work? — Enable the Block self-approval option when creating the policy.