在此页面上:在“权限”产品中分配、编辑和创建角色,以便您可以为每个用户提供在Journey Optimizer中完成工作所需的确切访问权限。
角色是指共享相同权限和沙盒的用户集合。 利用这些角色,可轻松管理组织中不同用户组的访问和权限。
使用Journey Optimizer产品,您可以从预先存在的 角色 范围中进行选择,每个角色都具有各种级别的权限,以便分配给您的用户。 有关可用的 角色 的详细信息,请参阅此页面。
当用户属于 Role 时,他们将获得对产品中包含的Adobe应用程序和服务的访问权限。
如果预先存在的角色不符合您组织的特定需求,您还可以创建自定义角色,以微调对界面中特定功能或对象的访问权限。 这样,您就可以确保每个用户只能访问他们有效执行任务所需的资源和工具。
分配角色 assigning-role
您可以为用户分配现成或自定义角色。
内置角色部分中提供了具有已分配权限的所有现成角色的列表。
要分配角色:
-
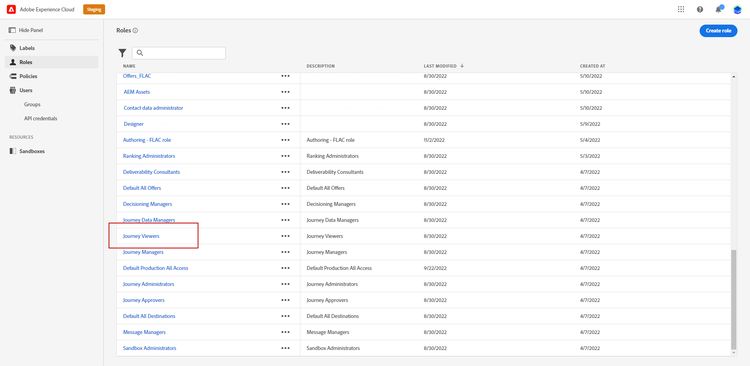
要向Permissions产品中的用户分配角色,请导航到 角色 选项卡,然后选择所需的角色。
-
在 用户 选项卡中,单击添加用户。

-
键入您的用户名或电子邮件地址,或从列表中选择用户,然后单击保存。
如果之前未在Admin Console中创建该用户,请参阅添加用户文档。
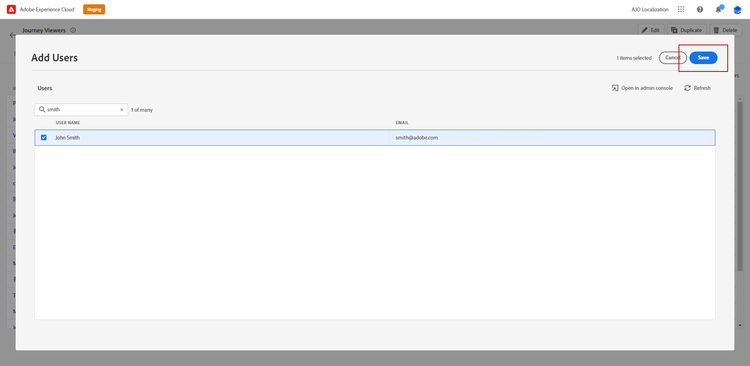
您的用户会收到一封电子邮件,会将他们重定向到您的实例。
有关用户管理的详细信息,请参阅访问控制文档。
访问实例时,您的用户会看到一个特定视图,具体取决于 Role 中分配的权限。 如果用户无权访问某个功能,则会显示以下消息:
You do not have permission to access this feature. Permission needed: XX.
编辑现有角色 edit-product-profile
对于内置或自定义角色,您可以随时决定添加或删除权限。
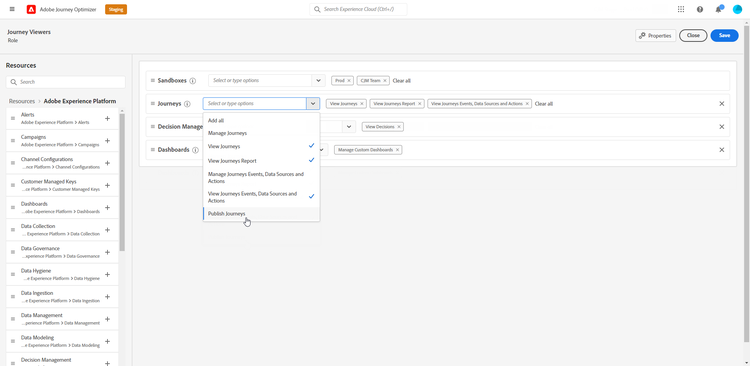
在以下示例中,我们要为分配给历程查看器 历程 的用户添加与 角色 资源相关的权限。 随后,用户将能够发布历程。
-
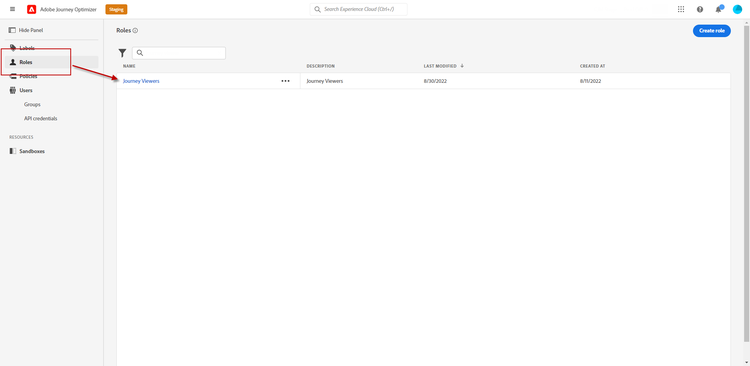
要编辑Permissions产品中的角色,请导航到 角色 选项卡并选择所需的角色,此处为历程查看器角色。
-
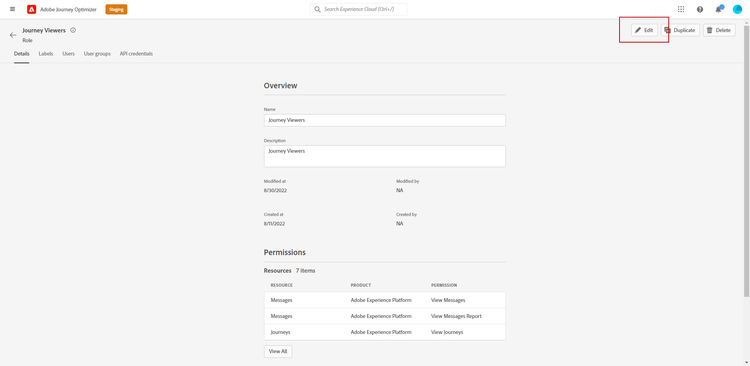
在您的 角色 仪表板中,单击编辑。
-
资源菜单显示应用于 Experience Cloud - Platform支持的应用程序 产品的资源列表。 拖放资源以分配权限。
从 历程 资源下拉列表中,我们在此处选择发布历程权限。
-
如果需要,在 包含的权限项 下,单击X图标以从您的角色中删除权限或资源。
-
完成后,单击保存。
如果需要,您还可以创建具有特定权限的新角色。
创建新角色 create-product-profile
Journey Optimizer允许您创建自己的角色,并为用户分配一组权限和沙箱。 使用角色,您可以授权或拒绝对界面中特定功能或对象的访问。
有关如何创建和管理沙盒的更多信息,请参阅 Adobe Experience Platform 文档。
在此示例中,我们创建了一个名为 历程只读 的角色,我们在该角色中授予历程功能的只读权限。 用户将只能访问和查看历程,而无法访问Journey Optimizer中的其他功能,如Decision management。
要创建我们的历程只读 角色:
-
要向Permissions产品中的用户分配角色,请导航到 角色 选项卡,然后单击创建角色。

-
为您的新 角色 添加 名称 和描述。 然后单击确认。

-
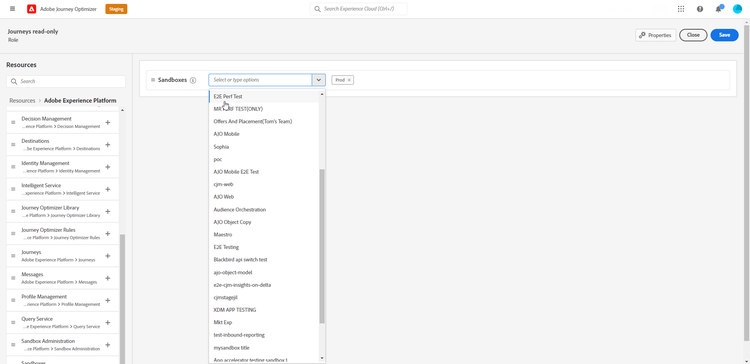
从 沙盒 资源下拉列表中,选择要分配给您的 角色 的沙盒。 进一步了解沙盒。
-
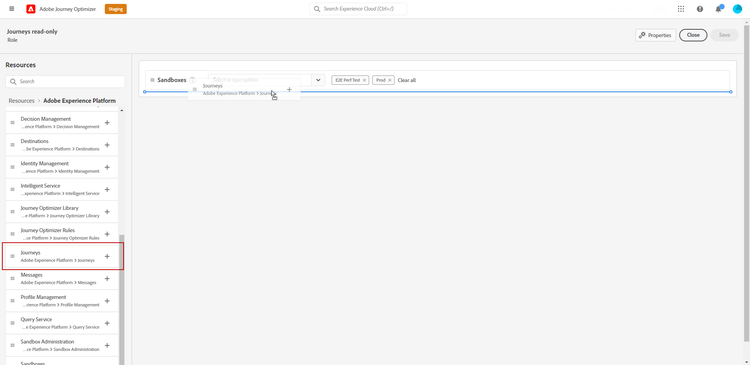
从左侧菜单中列出的Journey Optimizer中可用的其他资源(如Journeys、Segments或Decision management)中进行选择。
在此处,我们选择 历程 资源。
-
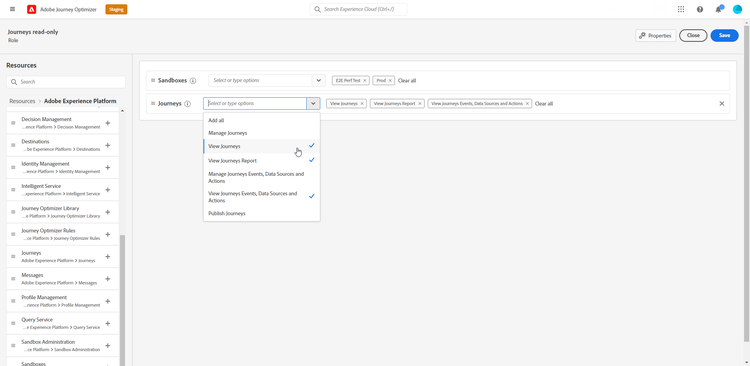
从 历程 下拉列表中,选择要分配给您的 角色 的权限。
在此,我们选择View journeys、View journeys report和View journeys event, data sources, actions。
-
完成后,单击保存。
您的 角色 现已创建并配置。 您现在需要将其分配给用户。
有关创建和管理角色的更多信息,请参阅Adobe Admin Console文档。
This section contains structured knowledge intended to support interpretation, retrieval, and question answering related to this topic.
For complete understanding, this information should be combined with the documentation on this page. Neither source is intended to stand alone; the page describes the feature, while this section provides additional context that helps disambiguate terminology, intent, applicability, and constraints.
- TL;DR: This page walks product and system administrators through the three role management tasks in the Permissions product: assigning an existing role to a user, editing a role’s permissions, and creating a new custom role with specific permissions and sandboxes.
Intents:
- Assign a built-in or custom role to a user in Journey Optimizer
- Edit the permissions of an existing role (adding or removing rights)
- Create a new custom role with specific permissions and sandbox assignments
- Understand who has the authority to perform role and permission management
Glossary:
- Role: A collection of users sharing the same permissions and sandboxes, used to manage access within an organization (product-specific)
- Permissions product: The Permissions product, where you navigate to the Roles tab to assign, edit, or create a Role (product-specific)
- Built-in role: A pre-existing (out-of-the-box) Role with varying levels of permissions that you can assign to your users; the page links to the Built-in roles section for the list (product-specific)
Guardrails:
- Only Product or System administrators can assign, edit, or create roles (as stated in the Important note on the page: the steps can only be carried out by a Product or System administrator)
- Changes made to a built-in or custom role affect all users assigned to that role (as stated in the Important note on the page)
Terminology:
- Canonical name: Permissions product
- Do not confuse: “Assign a role” (adding a user to an existing role) ≠ “Create a role” (creating a new role with specific permissions and sandboxes to assign to users)
- Do not confuse: “Edit an existing role” (add or delete permissions on a built-in or custom role; changes affect all users assigned to that role) ≠ “Create a new role” (a new role with specific permissions that you then need to assign to users)
FAQ:
- Q: Who can assign roles to users in Journey Optimizer? — Only Product or System administrators.
- Q: What happens if I edit a built-in role’s permissions? — Changes made to a built-in or custom role affect all users assigned to that role.
- Q: Where do I go in the product to manage roles? — In the Permissions product, navigate to the Roles tab.
- Q: After a role is assigned, does the user receive a notification? — The page states that the user receives an email redirecting them to your instance.