이 페이지에서: 웹 보고서를 확인하고 특정 페이지 요소에 대한 클릭 추적을 설정하여 Adobe Journey Optimizer에서 실시간 웹 경험을 모니터링하는 방법을 알아봅니다.
웹 보고서 확인 check-web-reports
웹 여정이 라이브되면 캠페인 보고서 및 캠페인 보고서의 웹 탭을 확인하여 노출 횟수, 클릭률 및 웹 페이지와의 참여 수와 같은 요소를 비교할 수 있습니다.
웹 경험 모니터링을 더욱 개선하기 위해 웹 사이트의 특정 요소에 대한 클릭 수를 추적할 수도 있습니다. 이렇게 하면 웹 보고서에서 해당 요소의 클릭 수를 표시할 수 있습니다. 방법 알아보기
클릭 추적 사용 use-click-tracking
웹 디자이너를 사용하면 웹 사이트의 요소를 선택하고 해당 요소에 대한 클릭 수를 추적할 수 있습니다.
이 정보는 웹 사이트 사용자의 경험을 개선하는 데 유용할 수 있습니다. 예를 들어, 웹 보고서에서 많은 사용자가 실제로 클릭할 수 없는 요소를 클릭하는 것으로 표시되면 해당 요소에 링크를 추가할 수 있습니다.
-
페이지에서 요소를 선택하고 상황별 메뉴에서 추적 요소 클릭을 선택합니다.
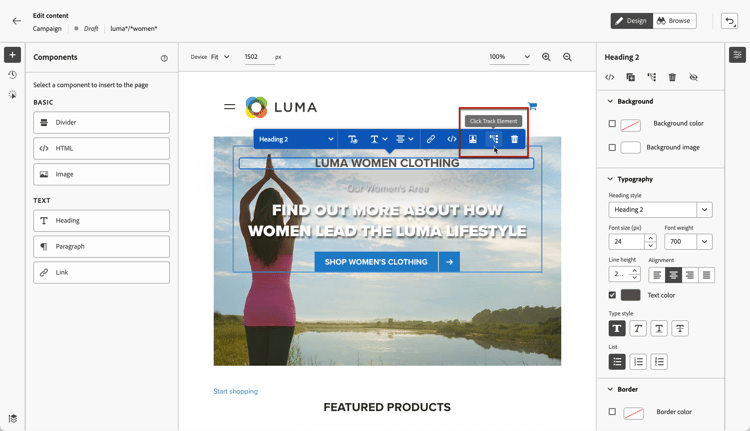
note NOTE 클릭 가능한 모든 항목을 선택할 수 있습니다. -
해당하는 추적 작업이 왼쪽의 트랙 클릭 창에 자동으로 표시됩니다.
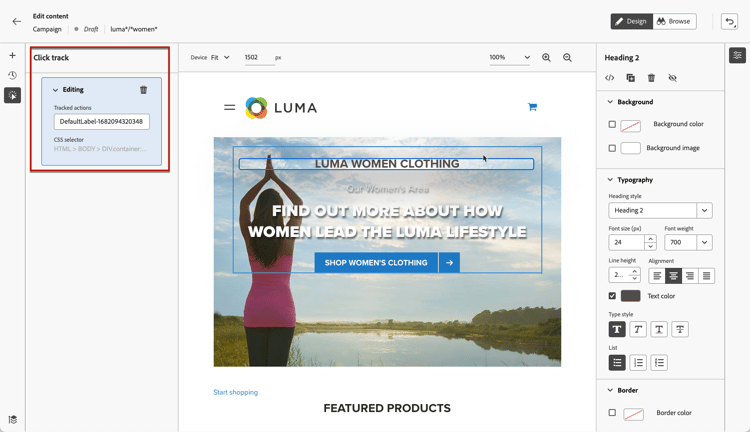
-
추적된 모든 요소를 관리하고 보고서에서 쉽게 찾을 수 있도록 의미 있는 레이블을 추가합니다. CSS 선택기 필드에 선택한 요소를 찾는 정보가 표시됩니다.
-
위의 단계를 반복하여 클릭 추적에 필요한 만큼 다른 요소를 선택합니다. 왼쪽 창에 해당 작업이 모두 나열됩니다.
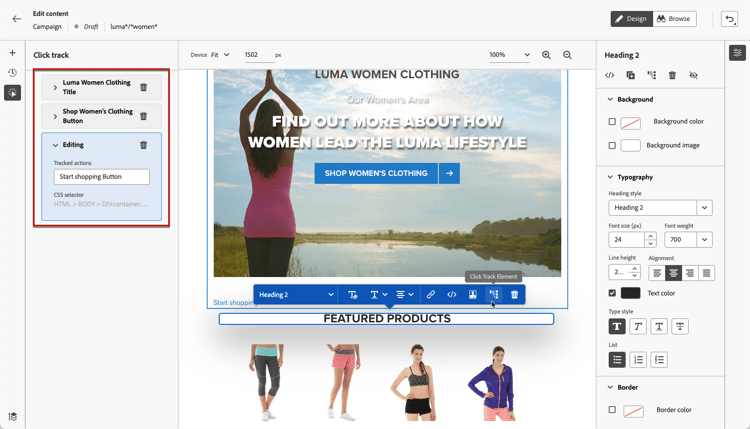
-
요소에 대한 클릭 추적을 제거하려면 해당 삭제 아이콘을 선택합니다.
캠페인이 라이브되면 캠페인 웹 라이브 보고서 및 Customer Journey Analytics 보고서에서 각 요소의 클릭 횟수를 확인할 수 있습니다.
This section contains structured knowledge intended to support interpretation, retrieval, and question answering related to this topic.
For complete understanding, this information should be combined with the documentation on this page. Neither source is intended to stand alone; the page describes the feature, while this section provides additional context that helps disambiguate terminology, intent, applicability, and constraints.
- TL;DR: This page explains how to monitor live web experiences in Journey Optimizer by checking the web reports and setting up click tracking on specific page elements.
Intents:
- Check the Web tab of the Journey report and Campaign report for a live web experience
- Compare metrics such as impressions, click rate, and engagements
- Set up click tracking on any element of a web page from the web designer
- Add labels to tracked elements to find them in the reports
- Remove click tracking from an element
- Review the number of clicks per element once the campaign is live
Glossary:
- Click tracking: A web designer capability that tracks clicks on any selected element of a website so the number of clicks appears in the web reports (product-specific)
- Click track element: The contextual menu option used to start tracking clicks on a selected element (product-specific)
- Click track pane: The left pane where tracked actions automatically display and are managed (product-specific)
- Web reports: The Web tab of the Journey report and Campaign report showing metrics such as impressions, click rate, and engagements (product-specific)
Guardrails:
- Web reports are available once the web experience is live.
- Any item on the page, clickable or not, can be selected for click tracking.
- Add a meaningful label to each tracked element to manage them and find them easily in the reports.
- The number of clicks per element is available in the reports once the campaign is live.
Terminology:
- Canonical name: click tracking — Acronym: n/a — variants: click track element, Click track pane
- Synonyms: “web reports” = “Web tab of the Journey report and Campaign report”
- Do not confuse: “Click track element” (contextual menu option to track clicks) ≠ “click rate” (a metric shown in the web reports)
- Do not confuse: campaign web “live report” ≠ “Customer Journey Analytics report” (both used to check clicks per element once the campaign is live)
FAQ:
- Q: Where do I check web experience performance? — In the Web tab of the Journey report and Campaign report, once the web experience is live.
- Q: What metrics can I compare in the web reports? — Elements such as the number of impressions, click rate, and number of engagements with your web page.
- Q: How do I set up click tracking? — Select an element in the page, choose Click track element from the contextual menu, and add a meaningful label; the tracked action displays in the Click track pane.
- Q: Can I track a non-clickable element? — Yes, any item, clickable or not, can be selected for click tracking.
- Q: How do I remove click tracking from an element? — Select the corresponding delete icon.