이 페이지에서: 메시지가 강력한 다운스트림 시스템 없이 적시에 적절한 대상에게 도달하도록 시작 및 종료 날짜, 받는 사람 시간대 배달, 실행 빈도 및 비율 제어를 설정하여 작업 캠페인을 예약합니다.
일정 탭을 사용하여 캠페인 일정을 정의합니다.
캠페인 시작일 설정
기본적으로 작업 캠페인은 수동으로 활성화되면 시작되고 메시지가 한 번 전송되는 즉시 종료됩니다. 활성화 직후 캠페인을 실행하지 않으려면 캠페인 시작 섹션에서 메시지를 보낼 날짜와 시간을 지정할 수 있습니다.
Adobe Journey Optimizer에서 캠페인을 예약할 때는 시작 날짜/시간이 원하는 첫 번째 게재에 맞춰졌는지 확인합니다. 반복 캠페인의 경우 초기 예약 시간이 이미 경과했을 때는 캠페인이 반복 규칙에 따라 다음 사용 가능한 시간 슬롯으로 넘어갑니다.
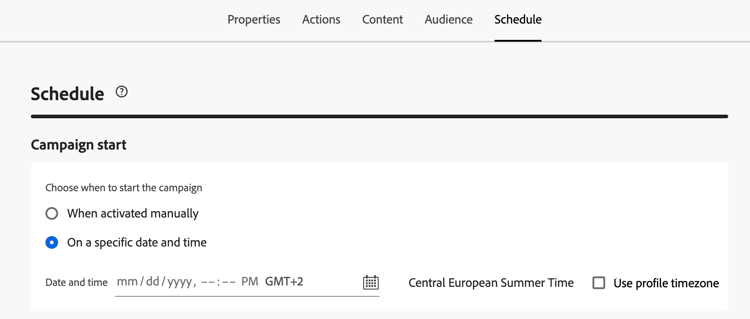
수신자의 현지 시간에 전송 profile-timezone
특정 날짜 및 시간에 대한 캠페인을 예약할 때 각 수신자의 프로필 시간대를 기반으로 메시지를 보내도록 선택할 수 있습니다. 이렇게 하면 지리적 위치에 관계없이 모든 수신자가 동일한 현지 시간에 메시지를 받을 수 있습니다.
예를 들어 프로필 시간대를 사용하여 오전 9시에 전송하는 캠페인을 예약하는 경우 뉴욕(ET)의 수신자는 오전 9시(ET)에, 로스앤젤레스(PT)의 수신자는 오전 9시(PT)에 수신하게 됩니다.
프로필 시간대 예약을 활성화하려면:
-
캠페인 시작 섹션에서 메시지를 보낼 날짜와 시간을 지정합니다.
-
프로필 시간대 사용 옵션을 사용하도록 설정합니다.
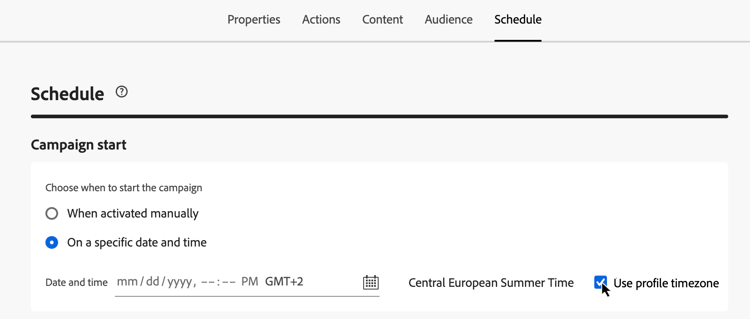
작동 방식:
시스템은 각 수신자의 Adobe Experience Platform 프로필에서 profile.timeZone 필드를 사용하여 해당 로컬 시간대를 결정합니다. 프로필에 시간대 값이 없는 경우 시스템은 캠페인이 생성된 시간대를 대체 항목으로 사용합니다.
모든 시간대에 메시지가 배달되는 동안 캠페인은 Live 상태로 유지됩니다. 모든 시간대가 처리되면 캠페인 상태가 완료됨(으)로 변경됩니다.
지원되는 표준 시간대 식별자:
profile.timeZone 형식은 IANA 명명 또는 UTC 오프셋으로 정의할 수 있습니다. 일광 절약 시간제 규칙에 따라 자동으로 조정되므로 IANA 이름 지정은 기본 형식입니다.
IANA 이름 지정의 경우, 식별자는 대소문자를 구분하며 공식 IANA 이름 지정과 일치해야 합니다. 일광 절약 시간제 규칙 및 이전 업데이트로 인해 시간 경과에 따라 오프셋이 변경될 수 있습니다. 공식적인 식별자 목록은 IANA 시간대 데이터베이스{_blank}를 참조하십시오.
실행 빈도 설정
이메일, 모바일 메시지 및 푸시 알림 작업의 경우 캠페인 메시지를 보낼 빈도를 정의할 수 있습니다. 이렇게 하려면 캠페인 만들기 화면에서 작업 트리거 옵션을 사용하여 캠페인을 매일, 매주 또는 매월 실행할지 여부를 지정합니다.
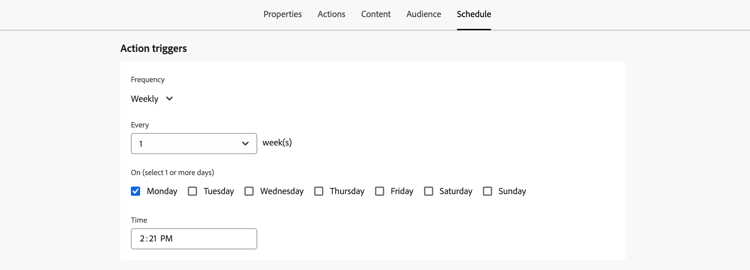
종료 날짜 설정
캠페인 끝 섹션에서 캠페인 실행을 중지해야 하는 시기를 지정할 수 있습니다. 지정한 날짜 외에는 캠페인이 실행되지 않습니다.
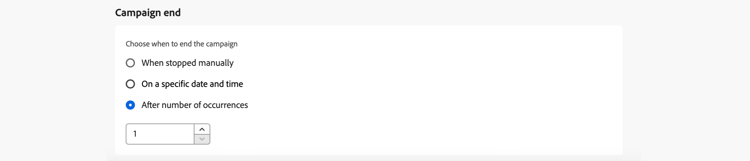
속도 제어 설정
Journey Optimizer을(를) 사용하면 아웃바운드 동작(전자 메일, 모바일 메시지, 푸시 알림)에 대한 속도 제어를 사용하도록 설정할 수 있습니다.
이 기능은 랜딩 페이지나 고객 지원 플랫폼과 같은 다운스트림 시스템의 오버로드를 방지하는 데 특히 유용합니다. 예를 들어, 속도가 초당 165개의 메시지로 제한하여 다운스트림 시스템을 압도하지 않고도 지속적인 전송을 보장할 수 있습니다.
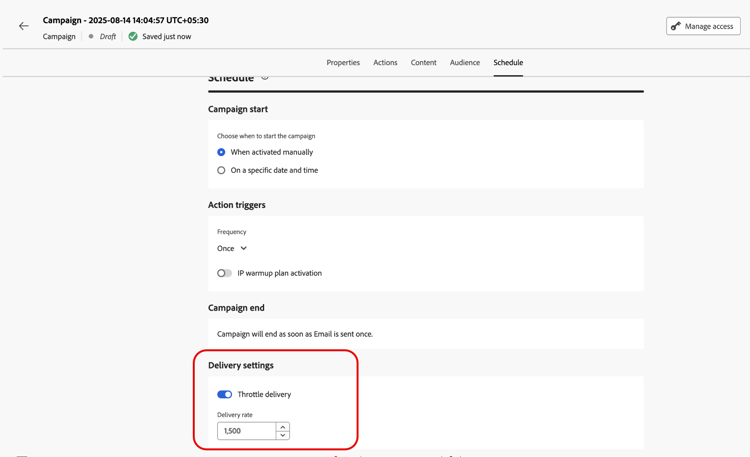
속도 제어를 설정하려면 배달 설정 섹션에서 배달 스로틀 옵션을 활성화하고 원하는 초당 배달 속도를 지정하십시오.
- 지원되는 최소 게재 속도: 초당 1개.
- 지원되는 최대 배달 속도: “배달 스로틀” 옵션이 활성화된 경우 초당 2000입니다.
예약된 일괄 처리를 사용하여 보내기
캠페인 메시지를 한 번에 전달하는 대신 시간에 따라 일괄적으로 전달하려면 웨이브 전송을 사용할 수 있습니다. 이를 통해 로드 밸런싱을 수행하고 전달성을 지원하며 지나치게 많은 다운스트림 시스템(예: 콜 센터 또는 랜딩 페이지)을 방지할 수 있습니다. 예약된 예약된 예약된 일괄 처리 수, 예약된 일괄 처리 크기(백분율 또는 절대 숫자 기준) 및 예약된 일괄 처리 시간을 정의합니다.
다음 단계 next
캠페인 일정이 준비되면 캠페인을 검토하고 활성화할 수 있습니다. 자세히 알아보기
This section contains structured knowledge intended to support interpretation, retrieval, and question answering related to this topic.
For complete understanding, this information should be combined with the documentation on this page. Neither source is intended to stand alone; the page describes the feature, while this section provides additional context that helps disambiguate terminology, intent, applicability, and constraints.
- TL;DR: This page explains how to schedule an Action campaign in the Schedule tab: start and end dates, recipient local time delivery, execution frequency, rate control, and wave sending.
Intents:
- Set a start date and time with Campaign start
- Send messages at each recipient’s local time with Use profile timezone
- Set a daily, weekly, or monthly execution frequency
- Set an end date with Campaign end
- Set rate control with Throttle delivery
- Deliver the message in batches over time using waves
Glossary:
- Profile timezone: The
profile.timeZonefield of each recipient’s Adobe Experience Platform profile, used to determine their local timezone. (product-specific) - Rate control: Limits the delivery rate for outbound actions to prevent overload on downstream systems. (product-specific)
- Delivery rate: The rate per second set when Throttle delivery is enabled in Delivery settings. (product-specific)
- Waves: Batches in which the campaign message is delivered over time; you define the number of waves, their size (by percentage or absolute number), and the schedule for each wave. (product-specific)
- IP warmup plan activation campaign: A campaign for email actions whose schedule is driven by the IP warmup plan it is associated with. (product-specific)
Guardrails:
- By default, Action campaigns start once they are activated manually, and end as soon as the message has been sent once.
- Outside of the dates specified in Campaign start and Campaign end, the campaign is not executed.
- For recurring campaigns, if the initial scheduled time has already passed, the campaigns roll over to the next available time slot according to their recurrence rules.
- Use profile timezone is available for these outbound channels only: Email, Push, Mobile message, WhatsApp, and LINE.
- If a profile does not have a timezone value, the timezone in which the campaign was created is used as the fallback.
- Time zone identifiers:
profile.timeZonecan be IANA naming or UTC offsets. IANA naming is the preferred format, as it automatically adjusts for daylight-saving rules. IANA identifiers are case-sensitive and must match the official IANA naming. - Execution frequency (daily, weekly, or monthly) is available for Email, Mobile message, and Push notification actions.
- Delivery rate: minimum 1 per second (hard limit); maximum 2000 per second (hard limit) when the Throttle delivery option is enabled. Rate control is available for outbound actions (Email, Mobile messages, Push notifications).
- When a delivery rate is set, the maximum timeframe for which the campaign audience can execute is 12 hours (hard limit). If the delivery rate does not allow all the audience to be sent the message in the 12 hour timeframe, the remaining profiles are excluded from the campaign. The count of excluded profiles is visible in the campaign report.
Terminology:
- Canonical name: Action campaign schedule — variants: campaign schedule
- Synonyms: “Send at recipient’s local time” = “Use profile timezone” (section title and option name)
- Do not confuse: “Live” (status while messages are being delivered across all timezones) ≠ “Completed” (status once all timezones have been processed)
FAQ:
- Q: When does an Action campaign start and end by default? — It starts once it is activated manually, and ends as soon as the message has been sent once.
- Q: How do I send at the same local time for every recipient? — Specify the date and time in Campaign start, then enable Use profile timezone. This is available for Email, Push, Mobile message, WhatsApp, and LINE only.
- Q: What happens if a profile has no timezone value? — The timezone in which the campaign was created is used as the fallback.
- Q: What are the campaign statuses during profile timezone delivery? — The campaign remains in Live status while messages are being delivered across all timezones; when all timezones have been processed, the status changes to Completed.
- Q: Which delivery rates can I set? — From 1 to 2000 per second when Throttle delivery is enabled.
- Q: Why were some profiles excluded from my campaign? — When a delivery rate is set, the maximum timeframe is 12 hours; the remaining profiles are excluded from the campaign if the rate does not allow sending to the whole audience in that timeframe. Their count is in the campaign report.
Examples:
- Profile timezone: a campaign scheduled to send at 9 AM using profile timezone reaches recipients in New York (ET) at 9 AM ET and recipients in Los Angeles (PT) at 9 AM PT.
- Rate control: set a rate limit of 165 messages per second to ensure steady delivery without overwhelming downstream systems.
Related pages:
- IP warmup campaigns: Learn how to create IP warmup campaigns (configuration/ip-warmup-campaign.md)
- IANA identifiers: IANA Time Zone Database (external, https://www.iana.org/time-zones)
- Waves: Learn how to send using waves (delivery/send-using-waves.md)
- Next step, activation: Review and activate an Action campaign (campaigns/review-activate-campaign.md)
Personas:
- marketer: Can set a campaign start date and time in Campaign start, and enable Use profile timezone to send messages at each recipient’s local time. Can set a daily, weekly, or monthly execution frequency for Email, Mobile message, and Push notification actions, and set an end date in Campaign end. Can enable Throttle delivery and set a Delivery rate per second, and send the campaign message in batches using waves. The page states that the Delivery rate ranges from 1 to 2000 per second when Throttle delivery is enabled. Where: “Schedule the Action campaign”.
Onboarding:
- Level: Beginner
- First minimal step: Use the Schedule tab to define the campaign schedule.
- Success check: The campaign status changes to Completed once all timezones have been processed.
- Previous: For email actions associated with an IP warmup plan: Create IP warmup campaigns (configuration/ip-warmup-campaign.md)
- Next: Once your campaign schedule is ready: Review and activate an Action campaign (campaigns/review-activate-campaign.md); To deliver the campaign message in batches over time: Send using waves (delivery/send-using-waves.md)