Sur cette page : définissez les dates de début et de fin, ainsi que le contrôle du taux dans l’onglet Planning afin que votre campagne déclenchée par API s’envoie au bon moment sans surcharger les systèmes en aval.
Utilisez l’onglet Planifier pour définir le planning de la campagne.
Définir les dates de début et de fin
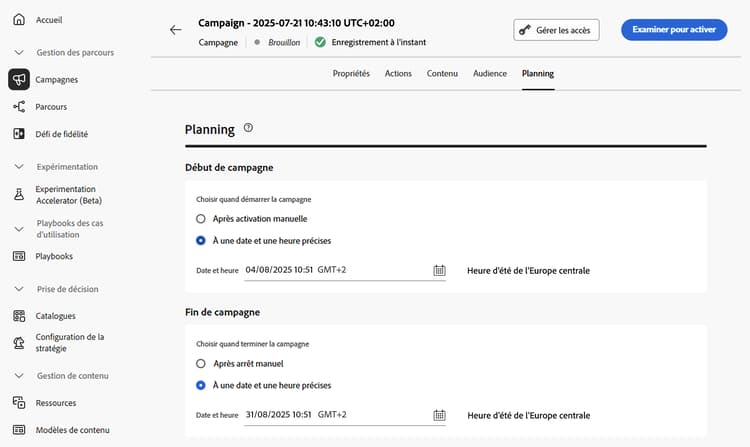
Par défaut, les campagnes déclenchées par API démarrent après avoir été déclenchées et se terminent dès que le message a été envoyé une fois. Si vous ne souhaitez pas exécuter votre campagne juste après son déclenchement, vous pouvez spécifier la date et l’heure auxquelles le message doit être envoyé à l’aide de l’option Début de campagne.
L’option Fin de la campagne vous permet de spécifier le moment où une campagne doit arrêter son exécution. En dehors des dates spécifiées, la campagne ne sera pas exécutée.
Définir le contrôle du débit
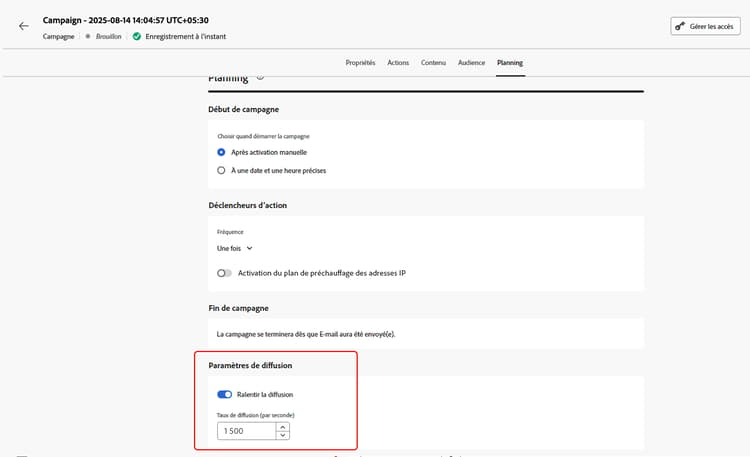
Journey Optimizer vous permet d’activer le contrôle des taux pour les actions sortantes (e-mails, messages mobiles, notifications push).
Cette fonctionnalité est particulièrement utile pour éviter la surcharge sur les systèmes en aval, tels que les pages de destination ou les plateformes d’assistance clientèle. Par exemple, vous pouvez définir une limite de débit de 165 messages par seconde pour garantir une diffusion régulière sans surcharger les systèmes en aval.
Pour définir le contrôle du débit, activez l’option Limiter la diffusion dans la section Paramètres de diffusion et indiquez le Taux de diffusion par seconde souhaité.
- Taux de diffusion minimum pris en charge : 1 par seconde.
- Taux de diffusion maximal pris en charge : 2 000 par seconde lorsque l’option « Limiter la diffusion » est activée.
Étapes suivantes next
Une fois la configuration et le contenu de votre campagne prêts, vous pouvez les vérifier, puis les activer. En savoir plus
This section contains structured knowledge intended to support interpretation, retrieval, and question answering related to this topic.
For complete understanding, this information should be combined with the documentation on this page. Neither source is intended to stand alone; the page describes the feature, while this section provides additional context that helps disambiguate terminology, intent, applicability, and constraints.
- TL;DR: This page explains how to schedule an API triggered campaign with start and end dates in the Schedule tab, and how to set rate control with the Throttle delivery option.
Intents:
- Understand when an API triggered campaign starts and ends by default
- Set a start date and time with Campaign start
- Set an end date and time with Campaign end
- Set a delivery rate per second with Throttle delivery
- Understand which profiles are excluded when the delivery rate is too low
Glossary:
- Campaign start: Option to specify a date and time at which the message is sent
- Campaign end: Option to specify when a campaign stops being executed
- Rate control: Feature that limits the delivery rate of outbound actions, to prevent overload on downstream systems such as landing pages or customer care platforms
- Throttle delivery: Option in the Delivery settings section that enables rate control
- Delivery rate: The number of messages per second specified when Throttle delivery is enabled
Guardrails:
- By default, API triggered campaigns start once they are triggered, and end as soon as the message has been sent once.
- Outside of the specified dates, the campaign is not executed.
- Minimum delivery rate supported: 1 per second (hard limit).
- Maximum delivery rate supported: 2000 per second when the Throttle delivery option is enabled (hard limit).
- When a delivery rate is set, the maximum timeframe for which the campaign audience can execute is 12 hours (hard limit).
- If the delivery rate does not allow all the audience to be sent the message in the 12 hour timeframe, the remaining profiles are excluded from the campaign. The count of these excluded profiles is visible in the campaign report.
Applicability:
- Rate control: outbound actions (Email, Mobile messages, Push notifications)
Terminology:
- Canonical name: API triggered campaign schedule
- Do not confuse: Campaign start (when the message is sent) ≠ Campaign end (when the campaign stops being executed)
FAQ:
- Q: When does an API triggered campaign start by default? — Once it is triggered. It ends as soon as the message has been sent once.
- Q: How do I send the message at a specific time? — Use the Campaign start option to specify a date and time.
- Q: How do I limit the delivery rate? — Enable Throttle delivery in the Delivery settings section and specify the Delivery rate per second.
- Q: What is the supported range for the delivery rate? — From 1 per second to 2000 per second.
- Q: What happens to profiles that cannot be reached in 12 hours? — They are excluded from the campaign, and their count appears in the campaign report.
Examples:
- A rate limit of 165 messages per second ensures steady delivery without overwhelming downstream systems.
Related pages:
- Next step, review and activation: Learn more (campaigns/review-activate-api-triggered-campaign.md)
Personas:
- developer: Can enable Throttle delivery in Delivery settings and set a Delivery rate per second for Email, Mobile messages, and Push notifications. Can apply rate control to prevent overload on downstream systems such as landing pages or customer care platforms. The page states that the delivery rate supports 1 to 2000 messages per second, with a 12 hour maximum execution timeframe for the campaign audience. Where: “Set rate control”.
Onboarding:
- Level: Experienced
- First minimal step: Enable the Throttle delivery option in the Delivery settings section and specify the desired Delivery rate per second.
- Success check: You can see the count of these excluded profiles in the campaign report.
- Next: When your campaign configuration and content are ready: Review & activate the API triggered campaign (campaigns/review-activate-api-triggered-campaign.md)