En esta página: Programe su campaña de acción estableciendo fechas de inicio y finalización, entrega de zona horaria del destinatario, frecuencia de ejecución y control de tarifa para que sus mensajes lleguen a la audiencia correcta en el momento adecuado sin saturar a los sistemas descendentes.
Use la ficha Programación para definir la programación de la campaña.
Establecer una fecha de inicio de campaña
De forma predeterminada, las campañas de acción se inician una vez que se activan manualmente y finalizan en cuanto se envía el mensaje una vez. Si no desea ejecutar la campaña justo después de su activación, puede especificar una fecha y una hora a las que se debe enviar el mensaje en la sección Inicio de campaña.
Al programar campañas en Adobe Journey Optimizer, asegúrese de que la fecha y la hora de inicio se ajusten al primer envío deseado. En el caso de las campañas recurrentes, si ya ha pasado la hora programada inicial, las campañas se transferirán a la siguiente franja horaria disponible según sus reglas de periodicidad.
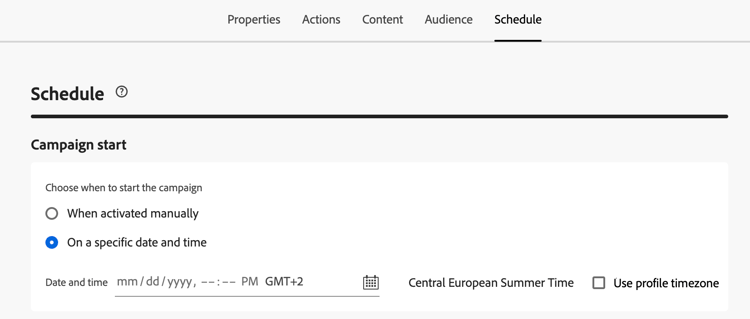
Enviar a la hora local del destinatario profile-timezone
Al programar una campaña para una fecha y hora específicas, puede elegir enviar mensajes en función de la zona horaria del perfil de cada destinatario. Esto garantiza que todos los destinatarios reciban el mensaje a la misma hora local, independientemente de su ubicación geográfica.
Por ejemplo, si programa una campaña para que se envíe a las 9 a. m. utilizando la zona horaria del perfil, los destinatarios de Nueva York (ET) la recibirán a las 9 a. m. ET, mientras que los destinatarios de Los Ángeles (PT) la recibirán a las 9 a. m. PT.
Para habilitar la programación de zona horaria de perfil:
-
En la sección Inicio de campaña, especifique la fecha y la hora en que se debe enviar el mensaje.
-
Habilite la opción Usar zona horaria del perfil.
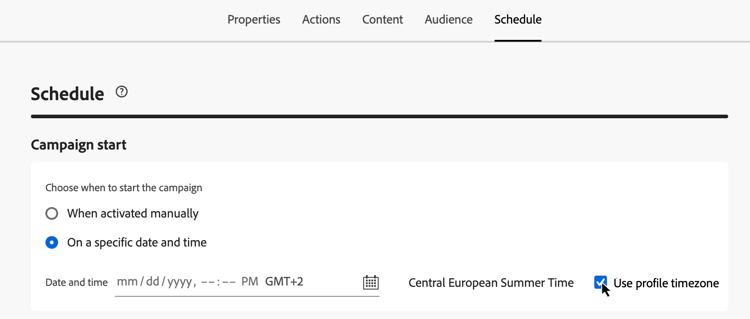
Cómo funciona:
El sistema utiliza el campo profile.timeZone del perfil Adobe Experience Platform de cada destinatario para determinar su zona horaria local. Si un perfil no tiene un valor de zona horaria, el sistema utiliza la zona horaria en la que se creó la campaña como alternativa.
La campaña permanece en estado Activo mientras los mensajes se envían a todas las zonas horarias. Una vez procesadas todas las zonas horarias, el estado de la campaña cambia a Completada.
Identificadores de zona horaria admitidos:
El formato profile.timeZone puede ser una denominación IANA o definirse como desplazamientos UTC. La denominación IANA es el formato preferido, ya que se ajusta automáticamente para las reglas de horario de verano.
Para la nomenclatura IANA, los identificadores distinguen entre mayúsculas y minúsculas y deben coincidir con la nomenclatura IANA oficial. Los desplazamientos pueden cambiar con el tiempo debido a las reglas del horario de verano y a las actualizaciones históricas. Consulte la Base de datos de husos horarios de IANA{_blank} para obtener la lista oficial de identificadores.
Establecer una frecuencia de ejecución
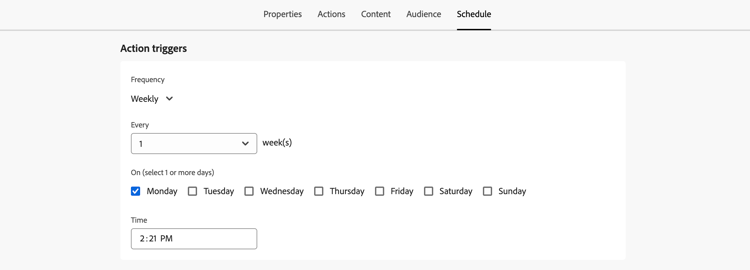
Para las acciones Correo electrónico, Mensaje móvil y Notificación push, puede definir una frecuencia a la que se debe enviar el mensaje de la campaña. Para ello, usa las opciones déclencheur de acción en la pantalla de creación de campañas para especificar si la campaña se debe ejecutar diaria, semanal o mensualmente.
Establecer una fecha de finalización
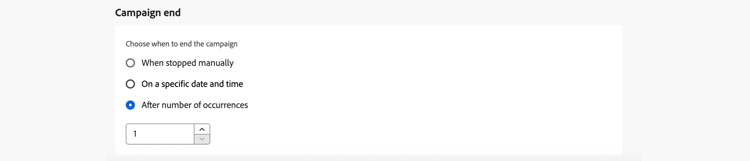
La sección Fin de campaña le permite especificar cuándo debe dejar de ejecutarse una campaña. Fuera de las fechas especificadas, la campaña no se ejecuta.
Establecer control de velocidad
Journey Optimizer le permite habilitar el control de velocidad para acciones salientes (correo electrónico, mensajes móviles, notificaciones push).
Esta función es especialmente útil para evitar sobrecargas en sistemas descendentes, como páginas de aterrizaje o plataformas de servicio de atención al cliente. Por ejemplo, puede establecer un límite de velocidad de 165 mensajes por segundo para garantizar un envío constante sin saturar a los sistemas descendentes.
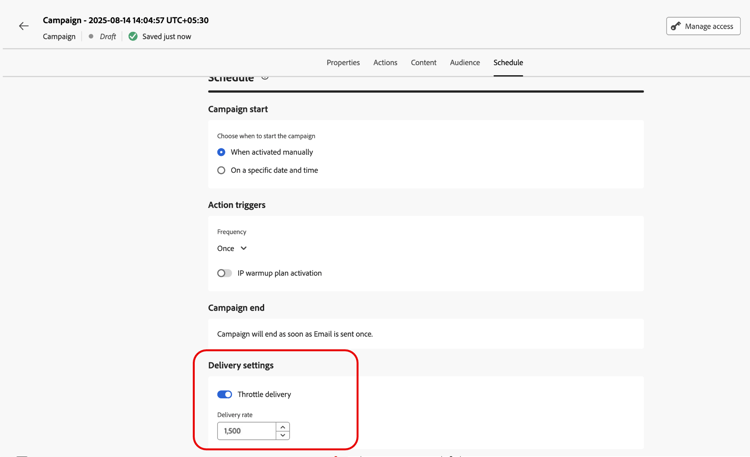
Para establecer el control de tarifa, habilite la opción Entrega acelerada en la sección Configuración de entrega y especifique la tarifa de entrega por segundo que desee.
- Tasa mínima de entrega admitida: 1 por segundo.
- Tasa máxima de entrega admitida: 2000 por segundo cuando la opción “Entrega acelerador” está habilitada.
Envío mediante olas
Para enviar el mensaje de campaña por lotes a lo largo del tiempo en lugar de todos a la vez, puede utilizar el envío de ondas. Esto ayuda a equilibrar la carga, admite la entrega y evita sistemas descendentes abrumadores (por ejemplo, centros de llamadas o páginas de aterrizaje). Se define el número de olas, su tamaño (por porcentaje o número absoluto) y la programación para cada ola.
Aprenda a enviar mediante olas.
Próximos pasos next
Una vez que la programación de la campaña esté lista, puede revisarla y activarla. Más información
This section contains structured knowledge intended to support interpretation, retrieval, and question answering related to this topic.
For complete understanding, this information should be combined with the documentation on this page. Neither source is intended to stand alone; the page describes the feature, while this section provides additional context that helps disambiguate terminology, intent, applicability, and constraints.
- TL;DR: This page explains how to schedule an Action campaign in the Schedule tab: start and end dates, recipient local time delivery, execution frequency, rate control, and wave sending.
Intents:
- Set a start date and time with Campaign start
- Send messages at each recipient’s local time with Use profile timezone
- Set a daily, weekly, or monthly execution frequency
- Set an end date with Campaign end
- Set rate control with Throttle delivery
- Deliver the message in batches over time using waves
Glossary:
- Profile timezone: The
profile.timeZonefield of each recipient’s Adobe Experience Platform profile, used to determine their local timezone. (product-specific) - Rate control: Limits the delivery rate for outbound actions to prevent overload on downstream systems. (product-specific)
- Delivery rate: The rate per second set when Throttle delivery is enabled in Delivery settings. (product-specific)
- Waves: Batches in which the campaign message is delivered over time; you define the number of waves, their size (by percentage or absolute number), and the schedule for each wave. (product-specific)
- IP warmup plan activation campaign: A campaign for email actions whose schedule is driven by the IP warmup plan it is associated with. (product-specific)
Guardrails:
- By default, Action campaigns start once they are activated manually, and end as soon as the message has been sent once.
- Outside of the dates specified in Campaign start and Campaign end, the campaign is not executed.
- For recurring campaigns, if the initial scheduled time has already passed, the campaigns roll over to the next available time slot according to their recurrence rules.
- Use profile timezone is available for these outbound channels only: Email, Push, Mobile message, WhatsApp, and LINE.
- If a profile does not have a timezone value, the timezone in which the campaign was created is used as the fallback.
- Time zone identifiers:
profile.timeZonecan be IANA naming or UTC offsets. IANA naming is the preferred format, as it automatically adjusts for daylight-saving rules. IANA identifiers are case-sensitive and must match the official IANA naming. - Execution frequency (daily, weekly, or monthly) is available for Email, Mobile message, and Push notification actions.
- Delivery rate: minimum 1 per second (hard limit); maximum 2000 per second (hard limit) when the Throttle delivery option is enabled. Rate control is available for outbound actions (Email, Mobile messages, Push notifications).
- When a delivery rate is set, the maximum timeframe for which the campaign audience can execute is 12 hours (hard limit). If the delivery rate does not allow all the audience to be sent the message in the 12 hour timeframe, the remaining profiles are excluded from the campaign. The count of excluded profiles is visible in the campaign report.
Terminology:
- Canonical name: Action campaign schedule — variants: campaign schedule
- Synonyms: “Send at recipient’s local time” = “Use profile timezone” (section title and option name)
- Do not confuse: “Live” (status while messages are being delivered across all timezones) ≠ “Completed” (status once all timezones have been processed)
FAQ:
- Q: When does an Action campaign start and end by default? — It starts once it is activated manually, and ends as soon as the message has been sent once.
- Q: How do I send at the same local time for every recipient? — Specify the date and time in Campaign start, then enable Use profile timezone. This is available for Email, Push, Mobile message, WhatsApp, and LINE only.
- Q: What happens if a profile has no timezone value? — The timezone in which the campaign was created is used as the fallback.
- Q: What are the campaign statuses during profile timezone delivery? — The campaign remains in Live status while messages are being delivered across all timezones; when all timezones have been processed, the status changes to Completed.
- Q: Which delivery rates can I set? — From 1 to 2000 per second when Throttle delivery is enabled.
- Q: Why were some profiles excluded from my campaign? — When a delivery rate is set, the maximum timeframe is 12 hours; the remaining profiles are excluded from the campaign if the rate does not allow sending to the whole audience in that timeframe. Their count is in the campaign report.
Examples:
- Profile timezone: a campaign scheduled to send at 9 AM using profile timezone reaches recipients in New York (ET) at 9 AM ET and recipients in Los Angeles (PT) at 9 AM PT.
- Rate control: set a rate limit of 165 messages per second to ensure steady delivery without overwhelming downstream systems.
Related pages:
- IP warmup campaigns: Learn how to create IP warmup campaigns (configuration/ip-warmup-campaign.md)
- IANA identifiers: IANA Time Zone Database (external, https://www.iana.org/time-zones)
- Waves: Learn how to send using waves (delivery/send-using-waves.md)
- Next step, activation: Review and activate an Action campaign (campaigns/review-activate-campaign.md)
Personas:
- marketer: Can set a campaign start date and time in Campaign start, and enable Use profile timezone to send messages at each recipient’s local time. Can set a daily, weekly, or monthly execution frequency for Email, Mobile message, and Push notification actions, and set an end date in Campaign end. Can enable Throttle delivery and set a Delivery rate per second, and send the campaign message in batches using waves. The page states that the Delivery rate ranges from 1 to 2000 per second when Throttle delivery is enabled. Where: “Schedule the Action campaign”.
Onboarding:
- Level: Beginner
- First minimal step: Use the Schedule tab to define the campaign schedule.
- Success check: The campaign status changes to Completed once all timezones have been processed.
- Previous: For email actions associated with an IP warmup plan: Create IP warmup campaigns (configuration/ip-warmup-campaign.md)
- Next: Once your campaign schedule is ready: Review and activate an Action campaign (campaigns/review-activate-campaign.md); To deliver the campaign message in batches over time: Send using waves (delivery/send-using-waves.md)