Azure DevOps modules
In an Adobe Workfront Fusion scenario, you can automate workflows that use Azure DevOps, as well as connect it to multiple third-party applications and services.
For instructions on creating a scenario, see the articles under Create scenarios: article index.
For information about modules, see the articles under Modules: article index.
Access requirements
| table 0-row-2 1-row-2 2-row-2 3-row-2 layout-auto html-authored no-header | |
|---|---|
| Adobe Workfront package |
Any Adobe Workfront Workflow package and any Adobe Workfront Automation and Integration package Workfront Ultimate Workfront Prime and Select packages, with an additional purchase of Workfront Fusion. |
| Adobe Workfront licenses |
Standard Work or higher |
| Adobe Workfront Fusion license |
Operation-based: Available to organizations with operation-based licenses Connector-based (legacy): Workfront Fusion for Work Automation and Integration |
| Product | If your organization has a Select or Prime Workfront package that does not include Workfront Automation and Integration, your organization must purchase Adobe Workfront Fusion. |
For more detail about the information in this table, see Access requirements in documentation.
For information on Adobe Workfront Fusion licenses, see Adobe Workfront Fusion licenses.
Prerequisites
To use Azure DevOps modules, you must have an Azure DevOps account.
Azure DevOps API information
The Azure DevOps connector uses the following:
Connect Azure DevOps to Workfront Fusion connect-azure-devops-to-workfront-fusion
Connect Azure DevOps to Workfront Fusion using EntraApp
-
Add an Azure DevOps module to your scenario.
-
Click Add next to the Connection field.
-
In the Connection Type field, select the type of connection that you want to use.
note NOTE The Azure DevOps (EntraApp) allows you to request all scopes for the connection. -
Fill out the following fields:
table 0-row-2 1-row-2 2-row-2 3-row-2 4-row-2 layout-auto html-authored no-header Connection name Enter a name for the connection that you are creating. Organization Enter the name of the organization under which you created your Azure DevOps application. App ID Enter the ID of the DevOps application that you are connecting to. Client Secret Enter the client secret for the DevOps applications that you are connecting to. Request All Scopes If you are using the Azure DevOps (EntraApp) connection type, enable this option to request all scopes for the connection. -
To enter an Azure DevOps App ID or Client Secret, click Show advanced settings and enter them in the fields that open.
-
Click Continue to finish setting up the connection and continue creating your scenario.
Connect Azure DevOps to Workfront Fusion using a service principal
You can create a connection that uses a service principal (an Application API connection) instead of a personal account. This is useful when you want the connection to run as an application or service identity rather than a specific person. This may be useful so the integration doesn’t break if, for example, that person leaves the company or changes their password.
This connection type is available for all Azure DevOps modules.
Prerequisites to connecting Azure DevOps to Workfront Fusion using a service principal
To create this connection, you need the following:
- Global Administrator or Application Administrator access in Microsoft Entra ID, to register the app. If you do not have this access, ask someone on your IT or identity team to complete that step for you.
- Project Collection Administrator access in your Azure DevOps organization, to add the service principal as a member. This is often a different person than the person that manages Microsoft Entra ID.
- The name of your Azure DevOps organization. You can find this in your Azure DevOps URL:
dev.azure.com/<your organization name>.
Create the app registration in Microsoft Entra ID
- Sign in to the Microsoft Entra admin center.
- Go to App registrations > New registration.
- Give the app a clear, recognizable name. For example,
Workfront Fusion Azure DevOps Integration. - Leave Redirect URI blank. This connection does not involve signing in through a browser.
- Select Register.
- Continue to Create a client secret.
Create a client secret
- In your new app registration, go to Certificates & secrets.
- Select New client secret, add a description, and choose an expiry period.
- Select Add.
- Copy the secret’s Value immediately. It is displayed only once. If you navigate away before copying it, you must create a new one.
- Continue to Collect your connection details.
Collect your connection details
-
From the app registration’s Overview page, note the following values. You enter these when creating the connection in the module.
table 0-row-2 1-row-2 2-row-2 3-row-2 layout-auto html-authored no-header Tenant ID On the Overview page, labeled Directory (tenant) ID. Client ID On the Overview page, labeled Application (client) ID. Client Secret The value you copied in Create a client secret. Organization Your Azure DevOps organization name. For example, if your URL is dev.azure.com/yourorg, enteryourorg.note NOTE You can skip the app registration’s API permissions area. If you add Azure DevOps there, only Delegated permissions are available. Application permissions appear greyed out. This is expected, because Azure DevOps does not support granting access this way. Instead, access is granted directly inside Azure DevOps, in the next part. -
Continue to Add the service principal to your Azure DevOps organization.
Add the service principal to your Azure DevOps organization
Registering the app in Microsoft Entra ID only creates its identity. It does not yet give the app any access to your Azure DevOps data. This procedure grants that access.
-
Sign in to your Azure DevOps organization, at
dev.azure.com/<your organization name>. -
Select Organization settings in the lower left, then select Users.
-
Select Add users.
-
In the search box, search by the app’s display name, which is the name you gave it when you registered the app. Do not search by the Client ID.
-
Select an access level:
- Basic is usually enough for reading and writing work items, boards, and repos.
- If your workflow needs to browse available processes, such as Agile, Scrum, or custom templates, as part of setup, add the service principal to the Project Collection Administrators group instead. This is a broader level of access, so only grant it if you need that capability.
-
Assign the service principal to the specific project or projects it needs, following your organization’s usual access practices.
-
Select Add.
-
Continue to Create the connection.
Create the connection
-
In the module’s connection setup screen, select the Service Principal connection type.
-
Enter the following:
- Tenant ID
- Client ID
- Client Secret
- Organization
-
Save the connection.
If everything is set up correctly, the connection validates successfully.
Azure DevOps modules and their fields
When you configure Azure DevOps modules, Workfront Fusion displays the fields listed below. Along with these, additional Azure DevOps fields might display, depending on factors such as your access level in the app or service. A bolded title in a module indicates a required field.
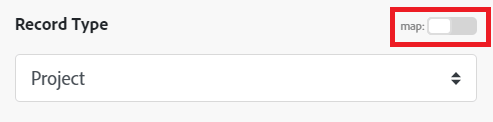
If you see the map button above a field or function, you can use it to set variables and functions for that field. For more information, see Map information from one module to another.
Triggers
Watch for work items
This instant trigger module executes a scenario when a record is added, updated, or deleted in Azure DevOps.
The module returns any standard fields associated with the record, along with any custom fields and values that the connection accesses. You can map this information in subsequent modules in the scenario.
When you are configuring this module, the following fields display.
Actions
Create a record
This action module creates a new project or work item.
The module outputs the object ID for the newly created work item, or the URL and status code of a newly created project.
Custom API Call
This action module lets you make a custom authenticated call to the Azure DevOps API. This way, you can create a data flow automation that can’t be accomplished by the other Azure DevOps modules.
When you are configuring this module, the following fields display.
Enter the relative URL that you want to connect to for this API call.
Example: {organization}/_apis[/{area}]/{resource}
Add the headers of the request in the form of a standard JSON object.
For example, {"Content-type":"application/json"}
Add the query for the API call in the form of a standard JSON object.
For example: {"name":"something-urgent"}
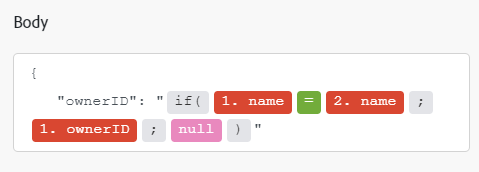
Add the body content for the API call in the form of a standard JSON object.
Note:
When using conditional statements such as if in your JSON, put the quotation marks outside of the conditional statement.
Download an attachment
This action module downloads an attachment.
The module returns the file content of the attachment.
Link work items
This action module links two work items and defines the relationship between them.
Read record
This action module reads data from a single record in Azure DevOps.
You specify the ID of the record.
The module returns the ID of the record and any associated fields, along with any custom fields and values that the connection accesses. You can map this information in subsequent modules in the scenario.
When you are configuring this module, the following fields display.
Update a work item
This action module updates an existing work item using its ID.
The module returns the ID of the updated work item.
Upload an attachment
This action module uploads a file and attaches it to a work item.
The module returns the attachment ID and a download URL for the attachment.
Searches
List work items
This action module retrieves all work items of a specific type in an Azure DevOps project.
The module returns the ID of the main work item and any associated fields, along with any custom fields and values that the connection accesses. You can map this information in subsequent modules in the scenario.
When you are configuring this module, the following fields display.