Webhooks
A webhook is an HTTP call that is triggered by an event. You can use webhooks to activate instant trigger modules. Any application that is connected to the Internet and allows HTTP requests can send webhooks to Adobe Workfront Fusion.
Access requirements
| table 0-row-2 1-row-2 2-row-2 3-row-2 layout-auto html-authored no-header | |
|---|---|
| Adobe Workfront package |
Any Adobe Workfront Workflow package and any Adobe Workfront Automation and Integration package Workfront Ultimate Workfront Prime and Select packages, with an additional purchase of Workfront Fusion. |
| Adobe Workfront licenses |
Standard Work or higher |
| Adobe Workfront Fusion license |
Operation-based: No Workfront Fusion license requirement Connector-based (legacy): Workfront Fusion for Work Automation and Integration |
| Product | If your organization has a Select or Prime Workfront package that does not include Workfront Automation and Integration, your organization must purchase Adobe Workfront Fusion. |
For more detail about the information in this table, see Access requirements in documentation.
For information on Adobe Workfront Fusion licenses, see Adobe Workfront Fusion licenses.
Use a webhook in Workfront Fusion
To use a webhook to connect an app to Workfront Fusion:
-
Add the Webhooks > Custom Webhook instant trigger module to your scenario.
-
Click Add next to the Webhook field and enter a name for the new webhook.
-
(Optional) Click Advanced Settings.
-
In the IP restrictions field, enter a comma-separated list of the IP addresses that the module can accept data from.
-
If you want to validate incoming data, in the Data structure field, select or add the data structure that you want to use.
For information on data structures, see Data structures.
-
In the Credentials field, you can enter credentials to be used for authorization. To enter credentials, click Add and enter the credential information.
-
Enable other settings as desired.
-
Click Save
After you create a webhook, a unique URL displays. This is the address where the webhook sends data. Workfront Fusion validates the data sent to this address, then passes it on for processing in the scenario.
Configure the webhook’s data structure configure-the-webhook-s-data-structure
To recognize the data structure of the incoming payload, Workfront Fusion parses sample data that you send to the displayed address. You can supply the sample data by making a change in the service or app that will make that service or app call the webhook. For example, you could remove a file.
Or, you can send the sample data via the HTTP > Make a request module:
-
Create a new scenario with the HTTP > Make a request module
-
Configure the module with the following values:
table 0-row-2 1-row-2 2-row-2 3-row-2 4-row-2 layout-auto html-authored no-header URL Enter the URL of the webhook. You can find this URL in the Webhooks module that you have used to set up the webhook. Method POST Body type Raw Content type JSON (application/json) Request content Raw JSON expected in the webhook 
-
Open the scenario with the Webhooks module in a separate browser tab or window.
-
In the webhooks module, click Redetermine data structure.
You do not need to unlink other modules from the webhooks module.
-
Switch to the scenario with the HTTP module and run it.
-
Switch back to the scenario with the Webhooks module.
A “Successfully determined” message means that the module has successfully determined the data structure.

-
Click OK to save the data structure.
The webhook’s items are now available in the mapping panel for use with subsequent modules in the scenario.
The webhook queue
If a webhook receives data and there is not an active scenario that is expecting that data, the data is stored in the queue. Once you activate the scenario, it processes all bundles waiting in the queue sequentially.
Supported incoming data formats
Workfront Fusion supports 3 incoming data formats: Query String, Form Data and JSON.
Workfront Fusion validates all incoming data against the selected data structure. Then, depending on the scenario’s settings, the data is either stored in the queue for processing, or it is processed immediately.
If any part of the data does not pass the validation, Workfront Fusion returns a 400 HTTP status code and specifies, in the body of the HTTP response, the reason why the incoming data failed the validation checks. If the validation of the incoming data succeeds, Workfront Fusion returns a “200 Accepted” status.
Query String
GET https://app.workfrontfusion.com/wh/<yourunique32characterslongstring>?name=<yourname>&job=automate
Form Data
POST https://app.workfrontfusion.com/wh/<yourunique32characterslongstring>

Content-Type: application/x-www-form-urlencoded

name=<yourname>&job=automate
Multipart form data
POST https://app.workfrontfusion.com/wh/<yourunique32characterslongstring>

Content-Type: multipart/form-data; boundary=---generatedboundary

---generatedboundary

Content-Disposition: form-data; name="file"; filename="file.txt"

Content-Type: text/plain

Content of file.txt

---generatedboundary

Content-Disposition: form-data; name="name"

Workfront Fusion

---generatedboundary
In order to receive files encoded with multipart/form-data, you must configure a data structure with a collection type field that contains the nested fields name, mime, and data. The field name is a text type and contains the name of the uploaded file. The mime is a text type and contains a file in MIME format. The field data is a buffer type and contains binary data for the file being transferred.
For more information on MIME format, see MIME modules.
JSON
POST https://app.workfrontfusion.com/wh/<yourunique32characterslongstring>

Content-Type: application/json

{"name": "Workfront Fusion", "job": "automate"}
- Click Add to add a new webhook.
- Click Show advanced settings.
- Click JSON pass-through.
Webhook headers
To access the webhook’s headers, enable Get request headers when setting up the webhook.
- Click Add to add a new webhook.
- Click Show advanced settings.
- Click Get request headers.
You can extract a particular header value with the combination of map() and get() functions.
authorization header from the Headers[] array. The formula is used in a filter that compares the extracted value with the given text to pass only webhooks if there is a match.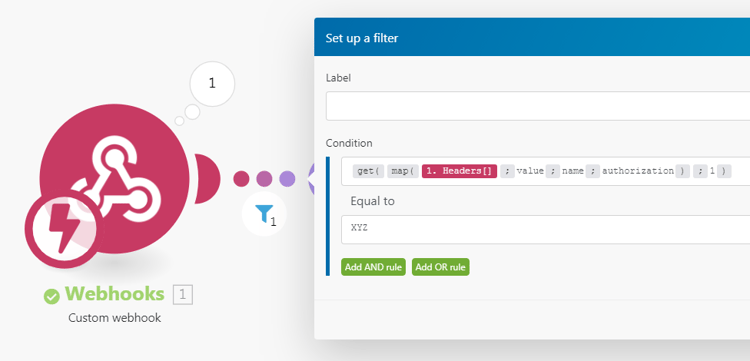
Responding to webhooks
The default response to a webhook call is the text “Accepted”. The response is returned to the app that called the webhook during the execution of the Custom Webhook module.
Test the response to a webhook
-
Include the Custom Webhook module in your scenario.
-
Add a new webhook to the module.
-
Copy the webhook URL to your clipboard.
-
Run the scenario.
The lightning icon on the Custom Webhook module changes to spinning dots. This shows that the module is now waiting for the webhook call.
-
Open a new browser window, paste the copied URL in the address bar and press Enter.
The Custom Webhook module is triggered and the browser will display a new page.
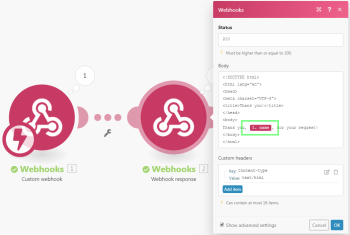
If you want to customize the webhook’s response, employ the module Webhook Response.
The configuration of the module contains two fields: Status and Body.
-
The Status field contains HTTP response status codes such as 2xx for Success (for example,
200for OK), 3xx for Redirection (for example,307for Temporary Redirect), 4xx for Client errors (for example,400for Bad Request), and so on. -
The Body field contains anything that will be accepted by the webhook’s call. It can be simple text, HTML, XML, JSON, and so on.
note tip TIP We recommend setting the Content-Typeheader to the corresponding MIME type:text/plainfor plain text,text/htmlfor HTML,application/jsonfor JSON,application/xmlfor XML, and so on. For more information on MIME types, see MIME modules.
Timeout for sending a response is 5 minutes. If the response is not available within that period, Workfront Fusion returns a ‘200 Accepted’ status.
HTML Response example
| table 0-row-2 1-row-2 2-row-2 layout-auto html-authored no-header | |
|---|---|
| Status | 2xx success HTTP status code, e.g. 200 |
| Body | HTML code |
| Custom headers |
|

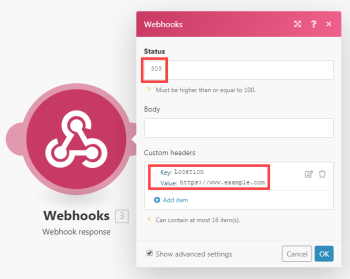
Redirect example
| table 0-row-2 1-row-2 layout-auto html-authored no-header | |
|---|---|
| Status | 3xx redirection HTTP status code, e.g. 303 |
| Custom headers |
|
Webhook deactivation
Webhooks are deactivated automatically if either of the following applies:
- The webhook has not been connected to any scenario for more than 5 days
- The webhook is used only in inactive scenarios, which have been inactive for more than 30 days.
Deactivated webhooks are deleted and unregistered automatically if they are not connected to any scenarios and have been in deactivated status for over 30 days.
Troubleshooting
Missing items in the mapping panel
If some items are missing in the mapping panel in the setup of the modules following the Webhooks > Custom Webhook module, click on the Webhooks > Custom Webhook module to open its setup and click Re-determine data structure:

Then follow the steps described in the section Configure the webhook’s data structure in this article.