Adobe Firefly modules

In an Adobe Workfront Fusion scenario, you can automate workflows that use Adobe Firefly, as well as connect it to multiple third-party applications and services.

If you need instructions on creating a scenario, see Create a scenario.

For information about modules, see Modules in Adobe Workfront Fusion.

Access requirements

You must have the following access to use the functionality in this article:

Adobe Workfront plan
Any
Adobe Workfront license

New: Standard

Or

Current: Work or higher

Adobe Workfront Fusion license**

Current: No Workfront Fusion license requirement.

Or

Legacy: Any

Product

New:

  • Select or Prime Workfront Plan: Your organization must purchase Adobe Workfront Fusion.
  • Ultimate Workfront Plan: Workfront Fusion is included.

Or

Current: Your organization must purchase Adobe Workfront Fusion.

For more detail about the information in this table, see Access requirements in Workfront documentation.

For information on Adobe Workfront Fusion licenses, see Adobe Workfront Fusion licenses.

Prerequisites

Before you can use the Adobe Firefly connector, you must ensure that the following prerequisites are met:

  • You must have an active Adobe Firefly account.

Create a connection to Adobe Firefly

To create a connection for your Adobe Firefly modules:

  1. Click Add next to the Connection box.

  2. Fill in the following fields:

    table 0-row-2 1-row-2 2-row-2 3-row-2 4-row-2 layout-auto html-authored no-header
    Connection name Enter a name for this connection.
    Environment Select whether you are connecting to a production or non-production environment.
    Type Select whether you are connecting to a service account or a personal account.
    Client ID Enter your Adobe Client ID. This can be found in the Credentials details section of the Adobe Developer Console
    Client Secret Enter your Adobe Client Secret. This can be found in the Credentials details section of the Adobe Developer Console
  3. Click Continue to save the connection and return to the module.

Adobe Firefly modules and their fields

When you configure Adobe Firefly modules, Workfront Fusion displays the fields listed below. Along with these, additional Adobe Firefly fields might display, depending on factors such as your access level in the app or service. A bolded title in a module indicates a required field.

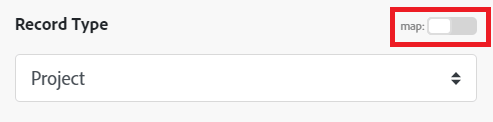
If you see the map button above a field or function, you can use it to set variables and functions for that field. For more information, see Map information from one module to another in Adobe Workfront Fusion.

Make a custom API call

This action module makes a custom call to the Firefly API.

For specific available APIs, see Adobe Firefly API in the Adobe Developer documentation.

Connection
For instructions on creating a connection to Adobe Firefly, see Create a connection to Adobe Firefly in this article.
URL
Enter a path relative to https://firefly-api-enterprise-stage.adobe.io/.
Method
Select the HTTP request method you need to configure the API call. For more information, see HTTP request methods in Adobe Workfront Fusion.
Headers

Add the headers of the request in the form of a standard JSON object.

For example, {"Content-type":"application/json"}

Workfront Fusion adds authorization headers automatically.

Body

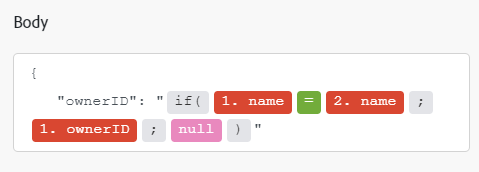
Add the body content for the API call in the form of a standard JSON object.

Note:

When using conditional statements such as if in your JSON, put the quotation marks outside of the conditional statement.

Expand an image

This action module expands an image, optionally with content from a prompt you provide.

Connection
For instructions on creating a connection to Adobe Campaign, see Create a connection to Adobe Firefly in this article.
Prompt
Enter or map a prompt for the content with which you want to expand the image. If no prompt is provided, the image will be expanded with content matching the original image.
Number of variations
Enter a number between 1-4. The module will generate this number of expanded image variations.
Expanded image format
Select the file format that the expanded image will be saved as.
Source file
Select a source file from a previous module, or map the source file's Image file name and Image file (data).
Size
Select the size that you want the expanded image to be.
Seed
Enter or map an integer. You can use this same seed in another Expand an image module to generate a similar image with different styles.

Fill an image

This action module fills the masked area of an image, optionally with content from a prompt you provide.

Connection
For instructions on creating a connection to Adobe Campaign, see Create a connection to Adobe Firefly in this article.
Prompt
Enter or map a prompt for the content with which you want to fill the image. If no prompt is provided, the image will be filled with content matching the original image.
Number of variations
Enter a number between 1-4. The module will generate this number of filled image variations.
Filled image format
Select the file format that the filled image will be saved as.
Image
Click Add an image. Select a source file from a previous module, or map the source file's Image file name and Image data.
Mask
Click Add a mask. Select a source file from a previous module, or map the source file's Mask file name and Mask data. The Mask file represents the custom mask that will be filled with generated content.
Size
Select the size that you want the filled image to be.
Seeds
For each image that the module will generate, click Add item and enter or map an integer. You can use this same seed in another Expand an image module to generate a similar image with different styles. The number of seeds you add must be equal to the Number of variations field.

Generate an image

This action module generates and image based on a prompt you provide. You can also provide an optional reference image, and the generated image will match the style of the reference image.

Connection
For instructions on creating a connection to Adobe Campaign, see Create a connection to Adobe Firefly in this article.
Prompt
Enter or map a prompt for the image you want to create. More detail in the prompt will allow you more control over what appears in the image.
Number of variations
Enter a number between 1-4. The module will generate this number of image variations.
Generated image format
Select the file format that the expanded image will be saved as. If you select default, the file format will be JPEG if no reference image is provided. If a reference image is provided, the file format of the generated image will be the same as the reference image.
Source file
Select a source file from a previous module, or map the source file's Reference image file name and Reference image file (data). The generated image will be created to match the reference image's style.
Presets

If you want to use a preset style, click Add item and enter or map the style that you want to use.

For a list of preset styles, see Image Model Styles in the Adobe developer documentation.

Negative prompt
Enter or map the words that you want to avoid in the generated content.
Content class

Select whether you want the generated image to be more like a photo, or more like created art.

  • Photo

    Enter values for the Aperture, Shutter speed (in seconds), and field of view (in millimeters).

Seed
Enter or map an integer. You can use this same seed in another Expand an image module to generate a similar image with different styles.
Size
Select the size that you want the generated image to be.
Strength
Enter or map an integer that represents the intensity with which the generated image will match the style of the preset style or reference image.
Visual intensity
Enter or map an integer that represents the overall intensity of the photo's existing visual characteristics.
Locale

If a locale is provided, the module generates content more relevant to the specified locale.

Locale must be provided in ISO 639-1 language code and ISO 3166-1 region.

Example: en-US

recommendation-more-help
5f00cc6b-2202-40d6-bcd0-3ee0c2316b43