On this page: Learn how to edit your assets with the Adobe Express integration in Journey Optimizer to resize images, remove backgrounds, crop visuals, and convert assets to JPEG or PNG.
The Adobe Express integration in Adobe Journey Optimizer allows you to easily access Adobe Express’s powerful editing tools while creating content. This integration enables you to resize images, remove backgrounds, crop visuals, and convert assets to JPEG or PNG without needing to switch between solutions.

To learn more about Adobe Express, refer to this documentation.
To access the Adobe Express menu, access your Image settings from the Email Designer and click Edit in Adobe Express.
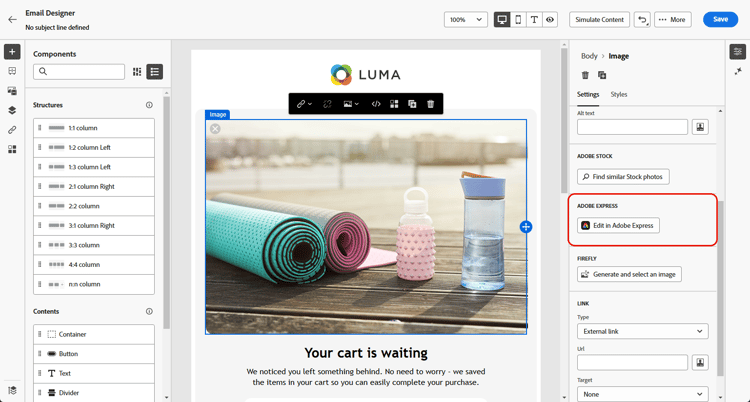
➡️ Discover this feature in video
Using Adobe Express with an Enterprise License licence
The features detailed in the sections below are accessible to users without an Adobe Express Enterprise license.
With an Enterprise license, users have full access to the Adobe Express Web editor, enabling them to adjust asset settings, generate content with Firefly, add text, and apply additional customizations.

For more information on available use cases for users with an Enterprise license for Adobe Express, refer to Adobe Express Web documentation.
Using Adobe Express without an Enterprise License edit
Without an Enterprise license, users have access to the following use cases available with Adobe Express:
Resize Image resize
-
From the Adobe Express menu, select Resize image.
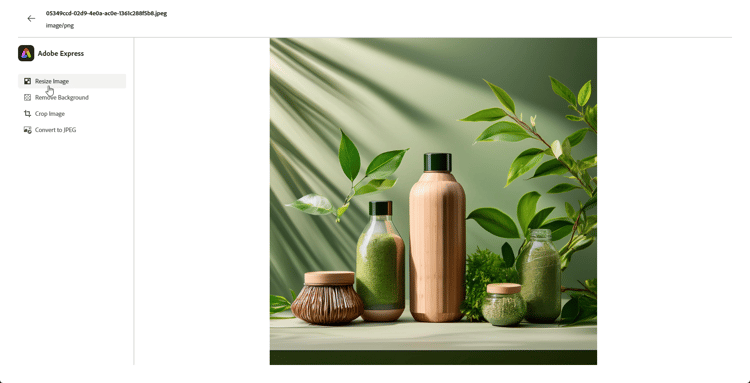
-
Select the Aspect ratio that best fits your asset’s proportions.
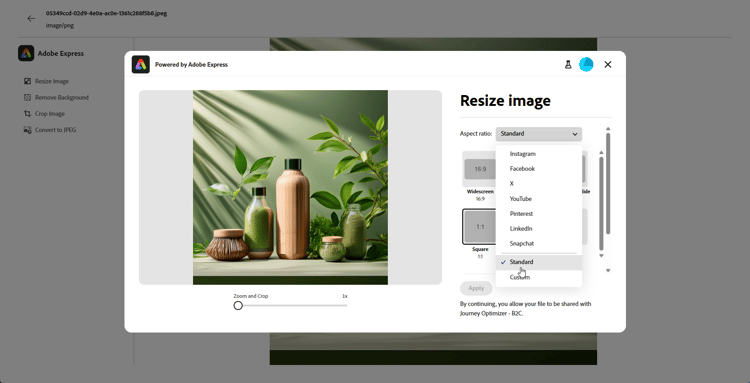
-
Use the slider to zoom and crop your asset, and drag to pan and adjust the visible area.
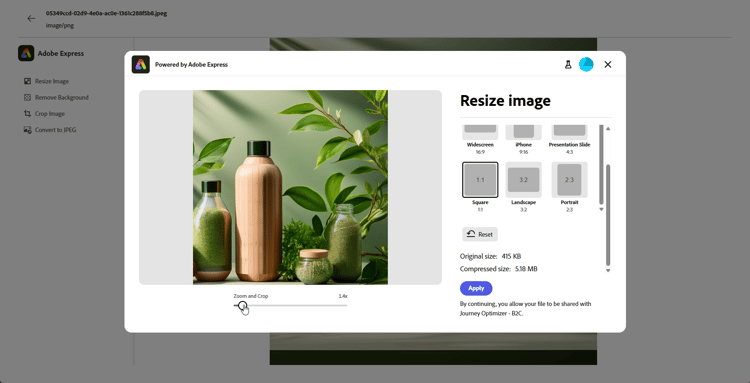
-
Click Reset to restore your asset to its original state.
-
Click Apply once the image resizing meets your needs. Then, Save your modified asset.
-
In the Upload Image window, click Next and select a folder to store your modified asset.
Then, click Import.
Your image is now ready to be used in your content.
Remove Background background
-
From the Adobe Express menu, select Remove background.
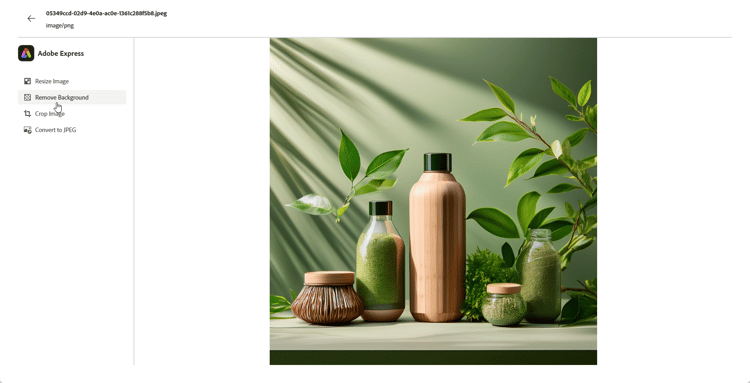
-
You asset is automatically displayed without its background.
Click Apply to use this in your content.
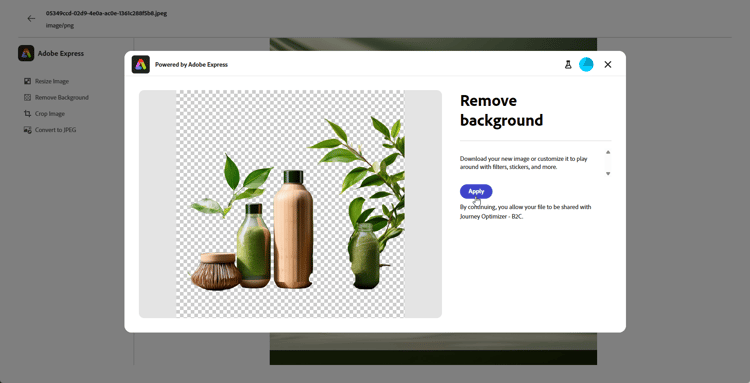
-
Click Save.
-
In the Upload Image window, click Next and select a folder to store your modified asset.
Then, click Import.
Your image is now ready to be used in your content.
Crop Image crop-image
-
From the Adobe Express menu, select Crop image.
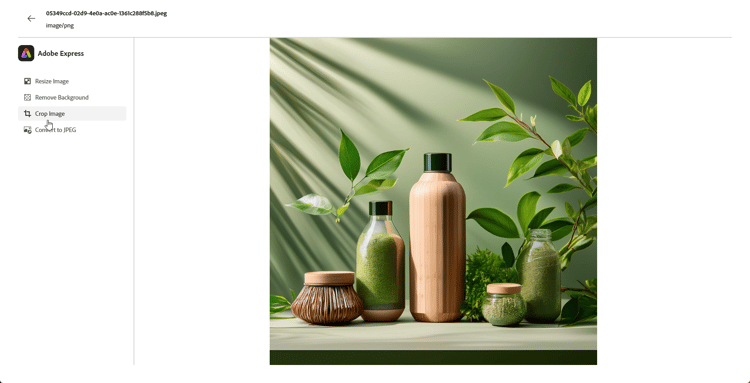
-
Drag the corner handles to adjust and crop the image as needed.
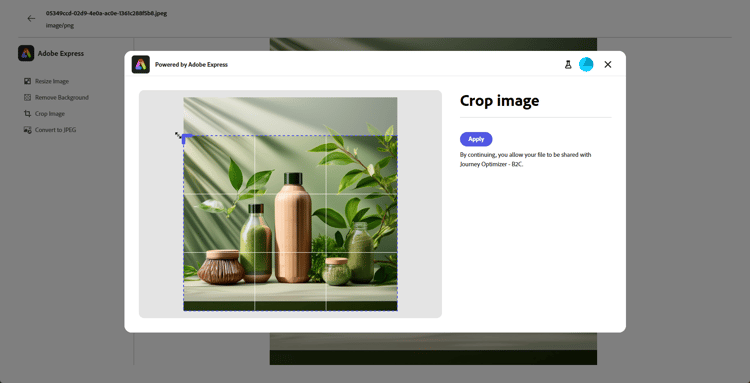
-
Click Apply to use this in your content. Then, Save your modified asset.
-
In the Upload Image window, click Next and select a folder to store your modified asset.
Then, click Import.
Your image is now ready to be used in your content.
Convert to JPEG or PNG convert
-
From the Adobe Express menu, select Convert to JPEG or Convert to PNG depending on your image original format.
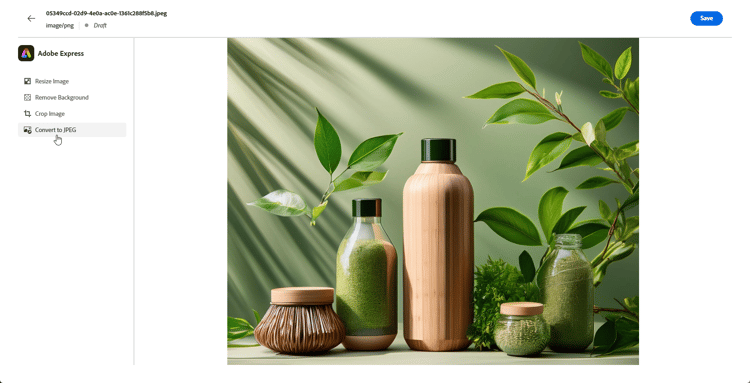
-
Click Apply to start the conversion.
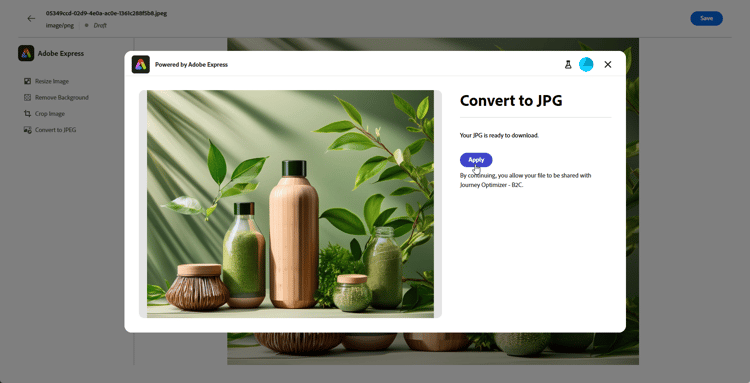
-
Click Save.
-
With the format change, you can save it as a new image with a different name. Update the Name and click Save.
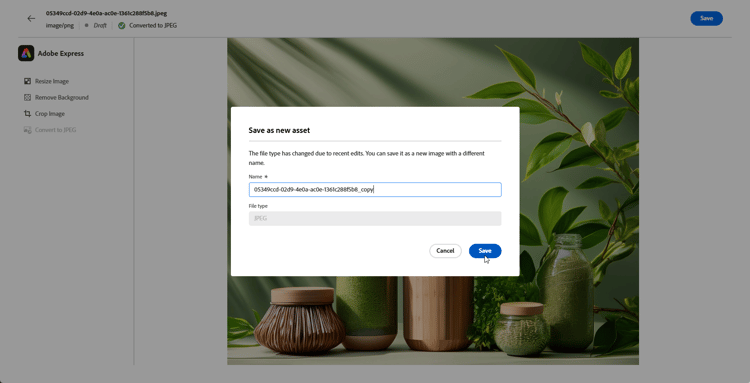
-
In the Upload Image window, click Next and select a folder to store your modified asset.
Then, click Import.
Your image is now ready to be used in your content.
How-to video video
Learn how to edit your assets in Adobe Journey Optimizer using Adobe Express tools.
This section contains structured knowledge intended to support interpretation, retrieval, and question answering related to this topic.
For complete understanding, this information should be combined with the documentation on this page. Neither source is intended to stand alone; the page describes the feature, while this section provides additional context that helps disambiguate terminology, intent, applicability, and constraints.
- TL;DR: This page explains how to edit assets with the Adobe Express integration in Journey Optimizer to resize images, remove backgrounds, crop visuals, and convert assets to JPEG or PNG without leaving the Email Designer.
Intents:
- Open the Adobe Express menu from Image settings in the Email Designer
- Resize an image by aspect ratio and save it to an Assets folder
- Remove the background of an image
- Crop an image
- Convert an image to JPEG or PNG
- Use the full Adobe Express Web editor with an Enterprise license
Glossary:
- Adobe Express integration: The Journey Optimizer integration that provides Adobe Express editing tools inside the Email Designer (product-specific)
- Edit in Adobe Express: The action, available from an image’s Image settings, that opens the Adobe Express menu (product-specific)
- Adobe Express Web editor: The full editor available with an Enterprise license for adjusting settings, generating content with Firefly, adding text, and applying additional customizations (product-specific)
Guardrails:
- Using the Adobe Express integration causes data to leave Journey Optimizer; do not use this integration with PHI or other health data.
- The Resize image, Remove background, Crop image, and Convert to JPEG or PNG use cases are accessible to users without an Adobe Express Enterprise license.
- Full access to the Adobe Express Web editor (including generating content with Firefly and adding text) requires an Enterprise license.
Terminology:
- Canonical name: Adobe Express integration — Acronym: n/a — variants: Adobe Express, Edit in Adobe Express
- Do not confuse: “Convert to JPEG” ≠ “Convert to PNG” (chosen depending on the image’s original format)
- Do not confuse: with an Enterprise license (full Adobe Express Web editor) ≠ without an Enterprise license (Resize, Remove background, Crop, Convert only)
FAQ:
- Q: How do I open Adobe Express from Journey Optimizer? — Access an image’s Image settings from the Email Designer and click Edit in Adobe Express.
- Q: Which editing use cases are available without an Enterprise license? — Resize Image, Remove Background, Crop Image, and Convert to JPEG or PNG.
- Q: What does an Enterprise license add? — Full access to the Adobe Express Web editor, enabling asset setting adjustments, content generation with Firefly, adding text, and additional customizations.
- Q: Can I use this integration with health data? — No; data leaves Journey Optimizer, so it must not be used with PHI or other health data.
- Q: Where does my edited image go after saving? — In the Upload Image window you click Next, select a folder to store the modified asset, then click Import.