Migrate content and journeys migrate-content-and-journeys
If you are moving to Journey Optimizer from another marketing platform, you do not have to start from a blank slate. Journey Optimizer includes a dedicated workspace that imports your existing email content and journeys. It converts them into Journey Optimizer content templates and journeys, so you can pick up where you left off instead of rebuilding everything from scratch.
To migrate your content and journeys to Journey Optimizer, you need the following permissions: Manage Campaigns, Manage Journeys, Manage Message, Manage Segments, Manage Library items, View and Manage sandboxes and Manage AJO integration configuration. Learn more on roles and permissions
You can access this workspace directly from the Journey Optimizer homepage.
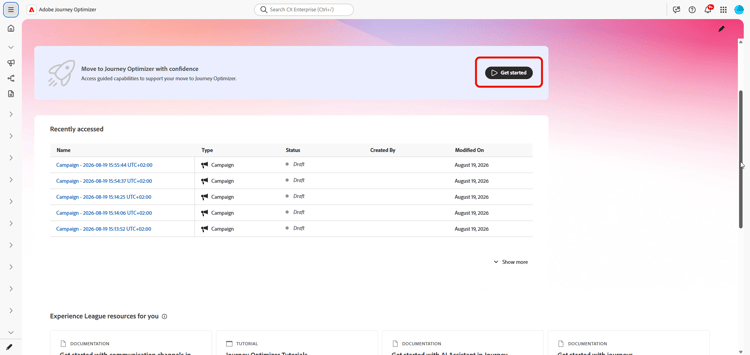
Set up a connection set-up-a-connection
To import content or journeys through an API, first connect Journey Optimizer to your source platform:
-
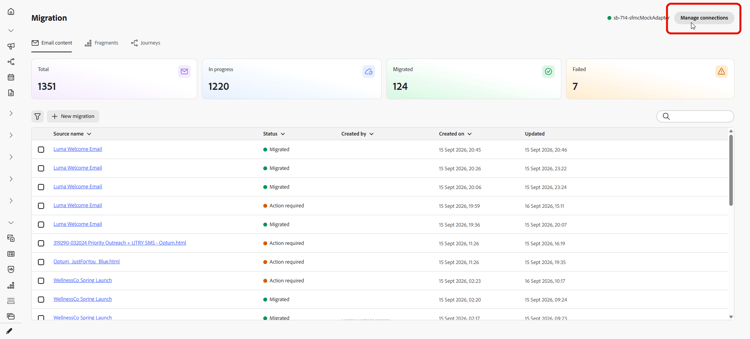
In the workspace, select Manage connections.
-
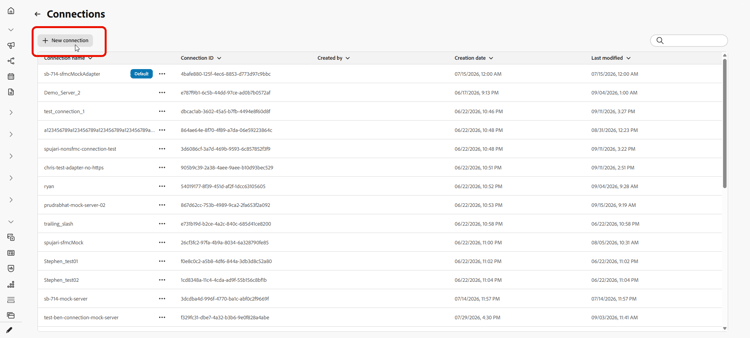
Click New connection.
-
Fill in the details below:
-
Connection Name: A name that identifies the source system, such as
Marketing-Automation-Prod. Names must start with a letter and can only contain letters, numbers, underscores, or hyphens, between 4 and 50 characters long. -
Base API URL: The root URL of the source system’s API, without any resource path or query string, such as
https://api.example.com. -
Description: Optional context to help you and other users identify the purpose of this connection.
-
Authentication Method: How Journey Optimizer authenticates to the source system. Choose API Key to send a single credential with each request. Choose OAuth 2.0 to use a token-based protocol that is better suited to enterprise and third-party APIs.
-
Client ID: The public identifier assigned to your application when you registered it with the authorization server. Required for OAuth 2.0 connections.
-
Client Secret: The confidential credential associated with your client ID. Keep it private, as it is known only to your application and the authorization server. Required for OAuth 2.0 connections.
-
Token URL: The authorization server endpoint that issues access tokens for the client credentials flow, typically ending in
/oauth/tokenor/token. Required for OAuth 2.0 connections.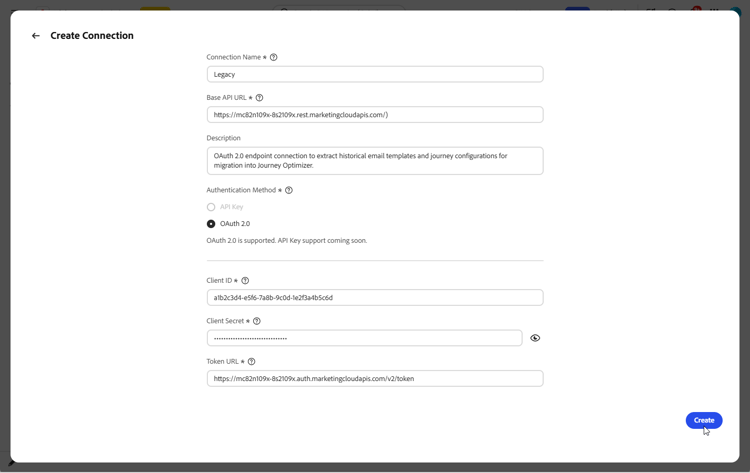
-
-
Select Create.
-
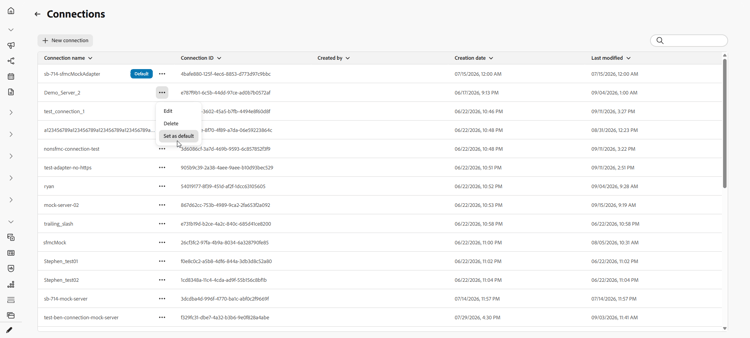
Once your connection is set up, use the advanced menu to delete it, or to mark it as default so it is pre-selected the next time you import content or journeys.
Import Email content import-email-content
Once you have a source for your content, either an HTML file or a connection to your source platform, import it into the workspace to convert it into a Journey Optimizer content template.
-
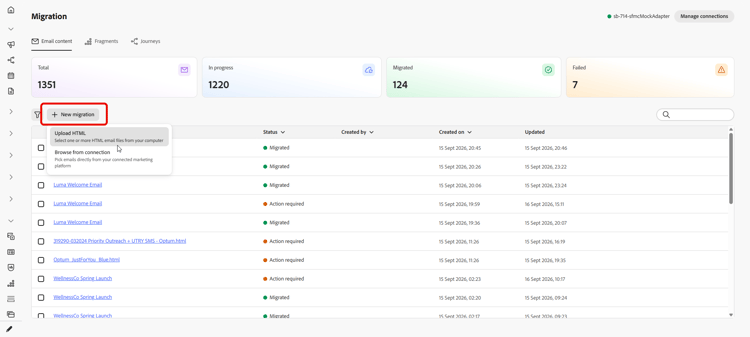
From the Email content tab, choose how you want to import your email content:
-
Upload HTML: Select one or more HTML email files from your computer.
-
Browse from connection: Browse and select emails directly from your connected marketing platform, without needing to export and upload files manually.
-
-
For an HTML upload, browse for your file or drag and drop it into the upload area. Click Upload once done.
Files must be in
.htmlor.htmformat and no larger than 10 MB.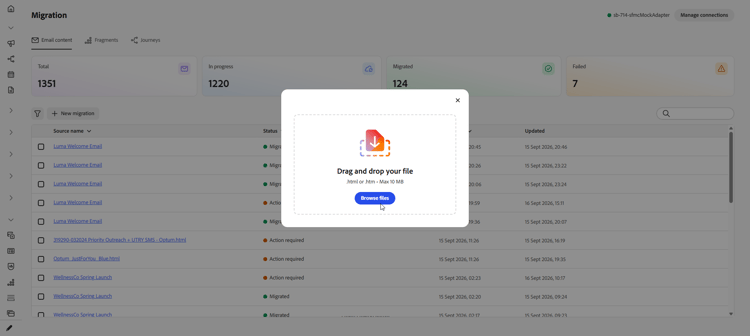
-
For import from connection, choose from the Emails list and click Import.
-
Access your imported email and review the imported HTML.
-
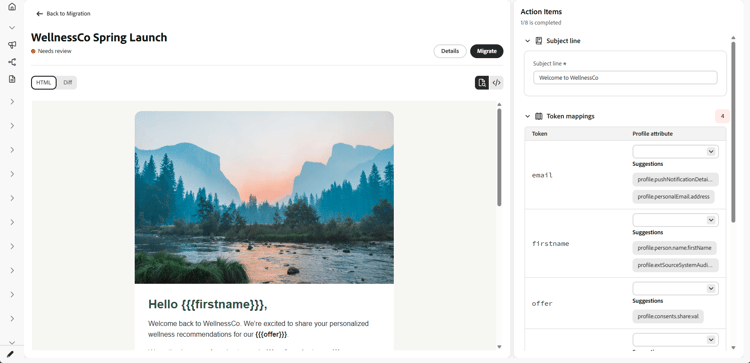
Add your Subject line and map each personalization placeholder to the corresponding profile attribute.
The workspace converts the source scripting syntax to Handlebars syntax automatically. For a list of supported operators, see Operators.
note NOTE Certain source date tokens are mapped automatically and are not surfaced as personalization placeholders to map. Token discovery and mapping have also been improved for greater accuracy. -
If the email references any content blocks, resolve them as fragments. See Import fragments.
-
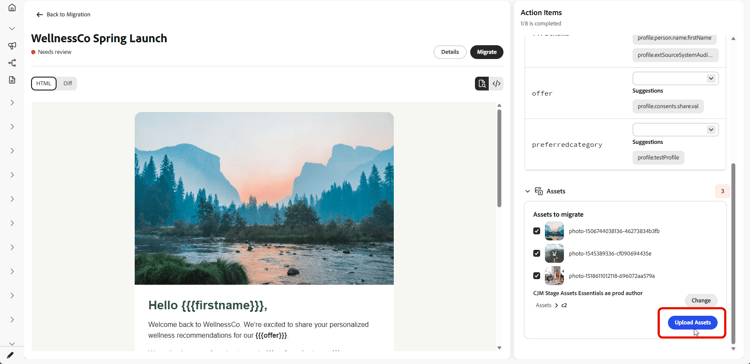
Select a folder to upload the email’s images to Experience Manager Assets and click Upload assets.
-
Once your email is ready, select Migrate, then select View email to open the new content template.
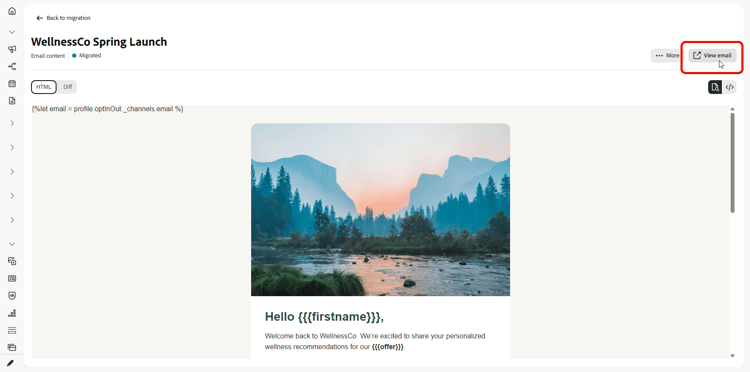
Your content template is now available in Journey Optimizer and ready to use in your journeys.
Import fragments import-fragments
Fragments are reusable building blocks within an email, such as headers, footers, or promotional blocks, that you build once and reuse across multiple emails for consistency and faster authoring. When you migrate an email, Journey Optimizer identifies any content blocks it references and surfaces them as an action item, so you can migrate them alongside the email.
-
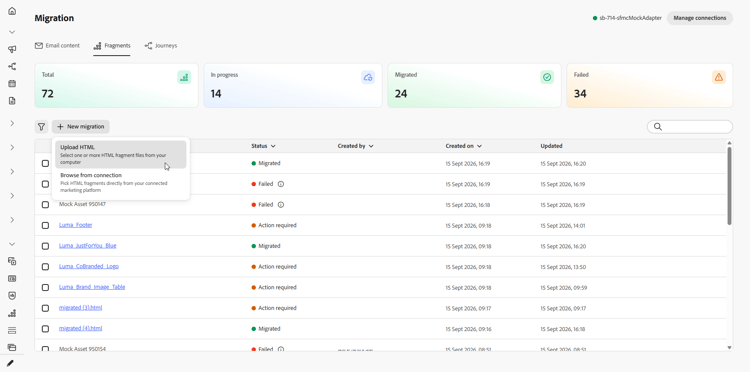
From the Fragments tab, choose how you want to import your fragment:
-
Upload HTML: Select one or more HTML fragment files from your computer.
-
Browse from connection: Browse and select fragments directly from your connected marketing platform, without needing to export and upload files manually.
-
-
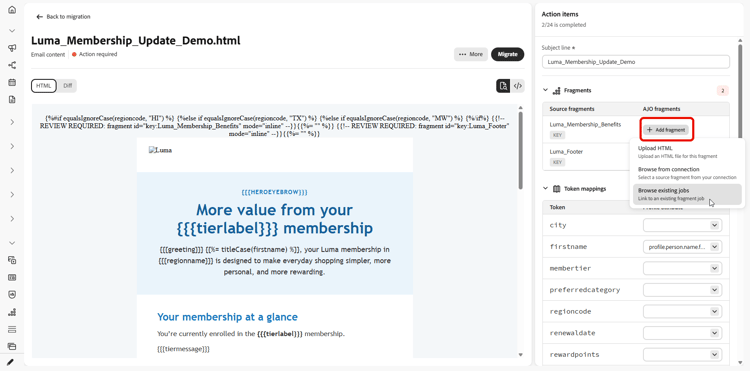
You can also import fragments while migrating an email. As it migrates the email, Journey Optimizer scans it, identifies any referenced content blocks, and surfaces them as fragment action items on the email, so you can resolve them without leaving the email migration flow.
-
For import from connection, choose from the Fragments list and click Import.
-
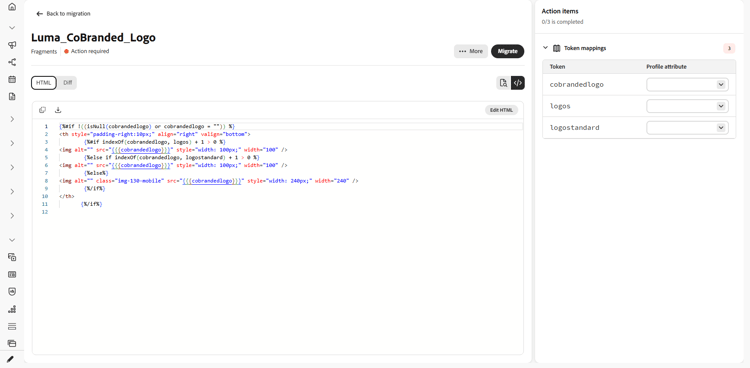
Open your imported Fragment and resolve its remaining action items, for example, assets or corresponding profile attributes.
-
Once your Fragment is ready, select Migrate, then select View fragment to open it.
Import journeys import-journeys
Recreate your journeys by importing a screenshot of the journey flow, or by connecting to your source platform. Journeys are prepared as editable drafts you can review on a visual canvas before they are migrated, so you get a guided checklist of everything that needs your input first, instead of migrating blind.
-
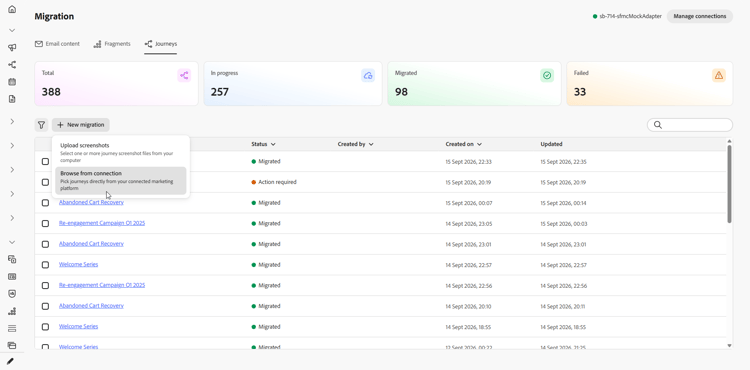
From the Journeys tab, choose how you want to import your journeys:
-
Upload screenshots: Select one or more journeys screenshots from your computer.
-
Browse from connection: Browse and select journeys directly from your connected marketing platform, without needing to export and upload screenshots manually.
-
-
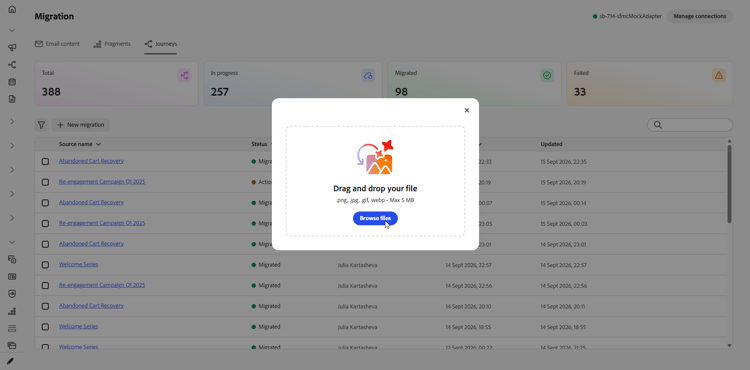
For a screenshoot upload, browse for your file or drag and drop it into the upload area. Click Upload once done.
Files must be in .png, .jpg, .gif, .webp format and no larger than 5 MB.
-
For import from connection, choose from the journeys list and click Import.
-
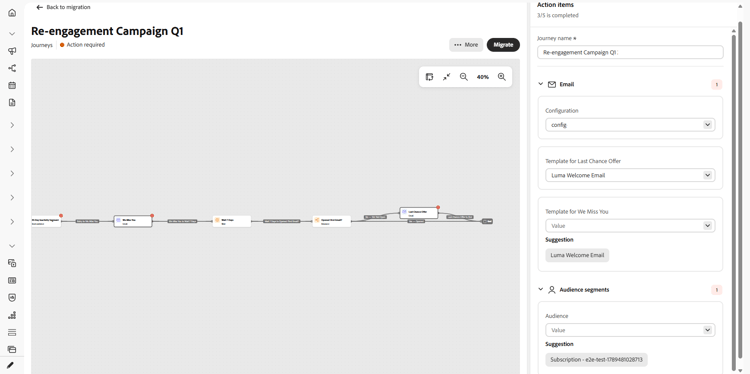
Open the journey to preview it on the interactive canvas. The full journey is rendered as a node-and-edge canvas, and nodes that need attention are badged inline.
-
From the Action items panel, resolve each item before migrating. The panel header shows a live count of resolved items out of the total, and selecting an action item highlights the matching node on the canvas. Action items include:
- Journey name: Set the journey name before migration.
- Content templates: Select the appropriate content template for journey actions that require one. Email templates are validated as they are selected, with any validation issues shown directly on the action item.
- Channel configurations: Select the required configuration for channels such as email and mobile.
- Audience segments: Map source audiences to the appropriate Journey Optimizer audiences.
-
Once every action item is resolved, select Migrate.
Journey Optimizer runs a final check on the journey, re-validating email templates and confirming the journey name is set. Any missing or invalid information blocks migration and appears inline on the relevant action items. Once the check passes, a confirmation step guards against accidental migrations, and the page then reflects the processing status.
-
If you no longer need a journey migration, delete it either from the journey list or from the menu inside an open journey.
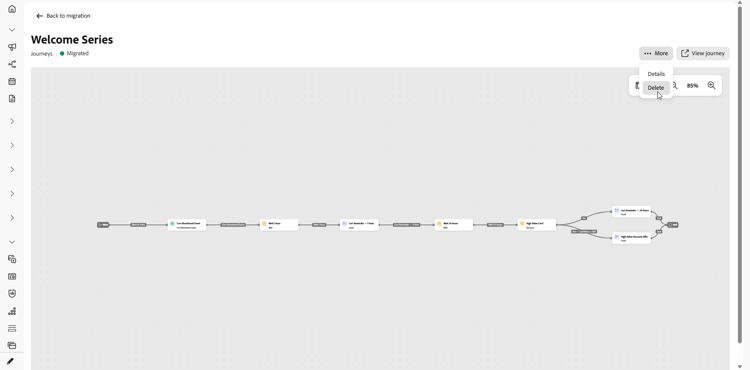
Your journey is now available in Journey Optimizer, where you can review the canvas, make any final adjustments, and activate it when you are ready to go live. Select View journey to open the migrated journey directly in Journey Optimizer. If a migration completes but some action items could not be applied, you are told exactly how many and pointed to Journey Optimizer to finish them.
Track migration track-migration-progress
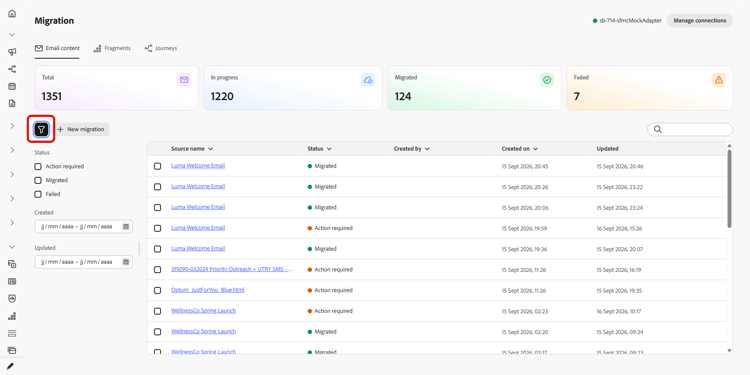
The workspace overview helps you keep track of every email or journey you have imported and quickly find the ones still awaiting action. A set of KPIs at the top of the screen gives you an at-a-glance count of items in each status:
- Total: The overall number of items imported into the workspace.
- In Progress: Items that are still being reviewed or mapped before they can be migrated.
- Migrated: Items that were successfully converted and are available in Journey Optimizer.
- Failed: Items that could not be migrated and need attention.

A set of filters lets you narrow down the list of imported content so you can focus on a specific subset instead of scrolling through every item. Combine one or more of the following filters to find what you are looking for:
- Action required: The item has unresolved action items and needs your input before it can be migrated.
- Processing: The item is currently being migrated.
- Migrated: The item was successfully migrated and is available in Journey Optimizer.
- Failed: The migration could not complete and needs attention.
This section contains structured knowledge intended to support interpretation, retrieval, and question answering related to this topic.
For complete understanding, this information should be combined with the documentation on this page. Neither source is intended to stand alone; the page describes the feature, while this section provides additional context that helps disambiguate terminology, intent, applicability, and constraints.
- TL;DR: This page explains how to migrate email content and journeys from another marketing platform into Journey Optimizer using a dedicated workspace that converts them into Journey Optimizer content templates and journeys.
Intents:
- Set up a connection from Journey Optimizer to a source marketing platform for API-based import
- Import email content by uploading HTML files or browsing from a connection
- Import journeys by uploading screenshots or browsing from a connection
- Map personalization placeholders and add a subject line to imported email content
- Track migration progress using KPIs, statuses, and filters in the workspace overview
Glossary:
- Migration workspace: A dedicated workspace, accessible from the Journey Optimizer homepage, that imports existing email content and journeys and converts them into Journey Optimizer content templates and journeys (product-specific)
- Connection: A configured link between Journey Optimizer and a source platform’s API, used to browse and import content or journeys without exporting files manually (product-specific)
- Authentication Method: How Journey Optimizer authenticates to the source system, either API Key (a single credential sent with each request) or OAuth 2.0 (a token-based protocol) (product-specific)
- Content template: The Journey Optimizer object that imported email content is converted into and made available for use in journeys (product-specific)
- Action items pane: The pane where each unresolved activity of an imported journey is resolved, such as selecting a channel configuration and content template for message steps, or selecting the audience for Audience activities (product-specific)
Guardrails:
- This capability is only available for a set of organizations (Limited Availability); to gain access, contact your Adobe representative.
- Migrating content and journeys requires the following permissions: Manage Campaigns, Manage Journeys, Manage Message, Manage Segments, Manage Library items, View and Manage sandboxes, and Manage AJO integration configuration.
- A connection is not required if you upload HTML files or screenshots instead of importing through an API.
- Connection Name must start with a letter and can only contain letters, numbers, underscores, or hyphens, between 4 and 50 characters long (hard limit).
- Client ID, Client Secret, and Token URL are required for OAuth 2.0 connections.
- Email content HTML files must be in .html or .htm format and no larger than 10 MB (hard limit).
- Journey screenshots must be in .png, .jpg, .gif, or .webp format and no larger than 5 MB (hard limit).
Terminology:
- Canonical name: Migration workspace — Acronym: n/a — variants: workspace, migration workspace
- Synonyms: “Base API URL” = “root URL of the source system’s API”
- Do not confuse: “In Progress” (KPI for items still being reviewed or mapped) ≠ “Needs review” (imported item status and Status filter value) ≠ “Migrated” (successfully converted item) ≠ “Failed” (item that could not be migrated)
FAQ:
- Q: Do I need a connection to import content? — No. A connection is not required if you upload HTML files or screenshots; a connection is needed only to import content or journeys through an API.
- Q: What file formats and sizes are accepted? — Email content must be an .html or .htm file no larger than 10 MB, and journey screenshots must be .png, .jpg, .gif, or .webp no larger than 5 MB.
- Q: What happens to the source personalization syntax when I import an email? — The workspace converts the source scripting syntax to Handlebars syntax automatically, and you map each personalization placeholder to the corresponding profile attribute.
- Q: How do I know which authentication method to choose? — Choose API Key to send a single credential with each request, or choose OAuth 2.0 to use a token-based protocol better suited to enterprise and third-party APIs; OAuth 2.0 also requires Client ID, Client Secret, and Token URL.
- Q: How can I track the status of imported items? — The workspace overview shows KPIs for Total emails or Total journeys, In Progress, Migrated, and Failed, and you can combine Status, Created, and Updated filters to narrow the list.