On this page: Learn how to insert, adjust, and personalize Adobe Experience Manager dynamic media, including text overlays and dynamic media templates, within Journey Optimizer content.
Get started with dynamic media gs-aem-dynamic
The Asset selector now supports Dynamic media allowing you to seamlessly select and use approved dynamic media renditions within Journey Optimizer. Changes made to assets in Adobe Experience Manager are instantly reflected in your Journey Optimizer content, ensuring the most up-to-date versions are always in use without requiring manual updates.
Note that this integration is only available for customers using Dynamic Media Manager as a Cloud Service.
To learn more about Dynamic Media in Adobe Experience Manager as a Cloud Service, refer to Experience Manager documentation.
Considerations
-
Ensure that Dynamic Media with OpenAPI is enabled in Adobe Experience Manager as a Cloud Service. Learn more.
-
Dynamic media integration with Adobe Journey Optimizer is available for both Dynamic Media Scene7 mode and with OpenAPI.
-
For Dynamic Media Scene7 assets, Journey Optimizer adds default modifiers (
bfc=off&fmt=png-alpha) at the start of the URL. If your preset also setsfmtorbfc, it takes precedence, since Scene7 uses the last occurrence of a repeated parameter. To avoid unexpected results, removefmt/bfcfrom the preset, or move it before the default modifiers in the URL. -
By design, the asset selector returns a
/images-based URL format. If you want to deliver an asset in its original formatm, for example, GIF or SVG, you need to manually update the URL to use the/contentpath instead. Learn more in Dynamic Media best practices documentation.
Add and manage Dynamic media dynamic-media
Enhance and optimize your content for any screen or browser by inserting dynamic media from Adobe Experience Manager as a Cloud Service directly into your Journey Optimizer content. You can then resize, crop, enhance, and make other adjustments as needed.
To add an Adobe Experience Manager asset in your HTML content, follow these steps:
-
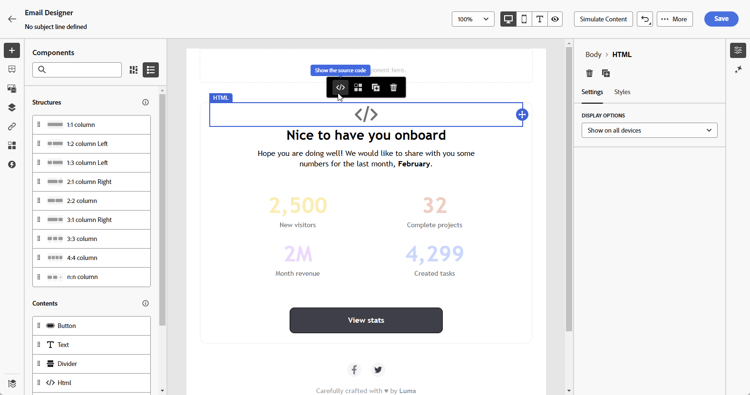
Drag and drop an HTML component into your content.
-
Select Show the source code.
-
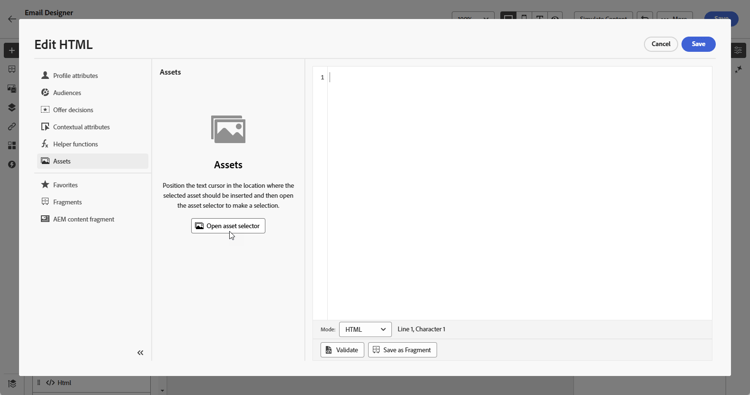
In the Edit HTML menu, navigate to Assets then click Open asset selector.
Alternatively, you can copy and paste the URL of your asset.
-
Browse your AEM assets and select the one you wish to add to your content.
-
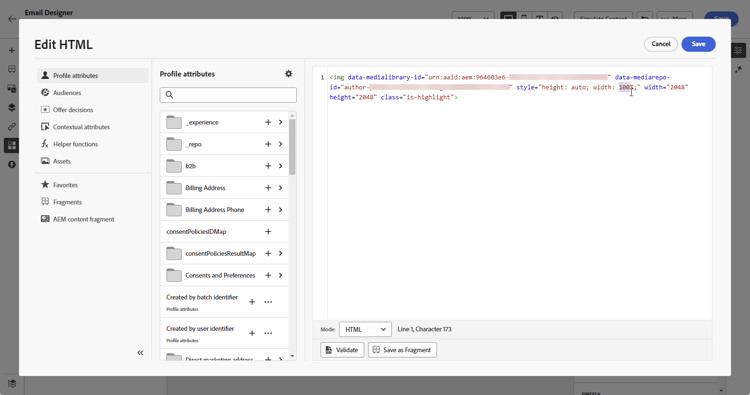
Adjust the image parameters (e.g., height, width, rotate, flip, brightness, hue, etc.) as needed to match your asset requirements.
For a comprehensive list of image parameters that can be added to the URL, refer to Experience Manager documentation.
-
Click Save.
Your content now includes dynamic media. Any updates you make in Experience Manager will automatically appear in Journey Optimizer.
Personalize your Text overlay text-overlay
Easily customize any dynamic media by replacing the existing text overlay with new text of your choice, allowing for seamless updates and personalization.
For example, using the experimentation functionality, you can update the existing text overlay by replacing it with a different text for each treatment, ensuring it is customized for each profile when they open their messages.

To personalize your text overlay, follow these steps:
-
Drag and drop an HTML component into your content.
-
Select Show the source code.
-
From the Edit HTML menu, access Assets then Open asset selector.
You can also simply copy and paste your assets URL.
-
Browse through your AEM assets and select the one you want to add to your content.
-
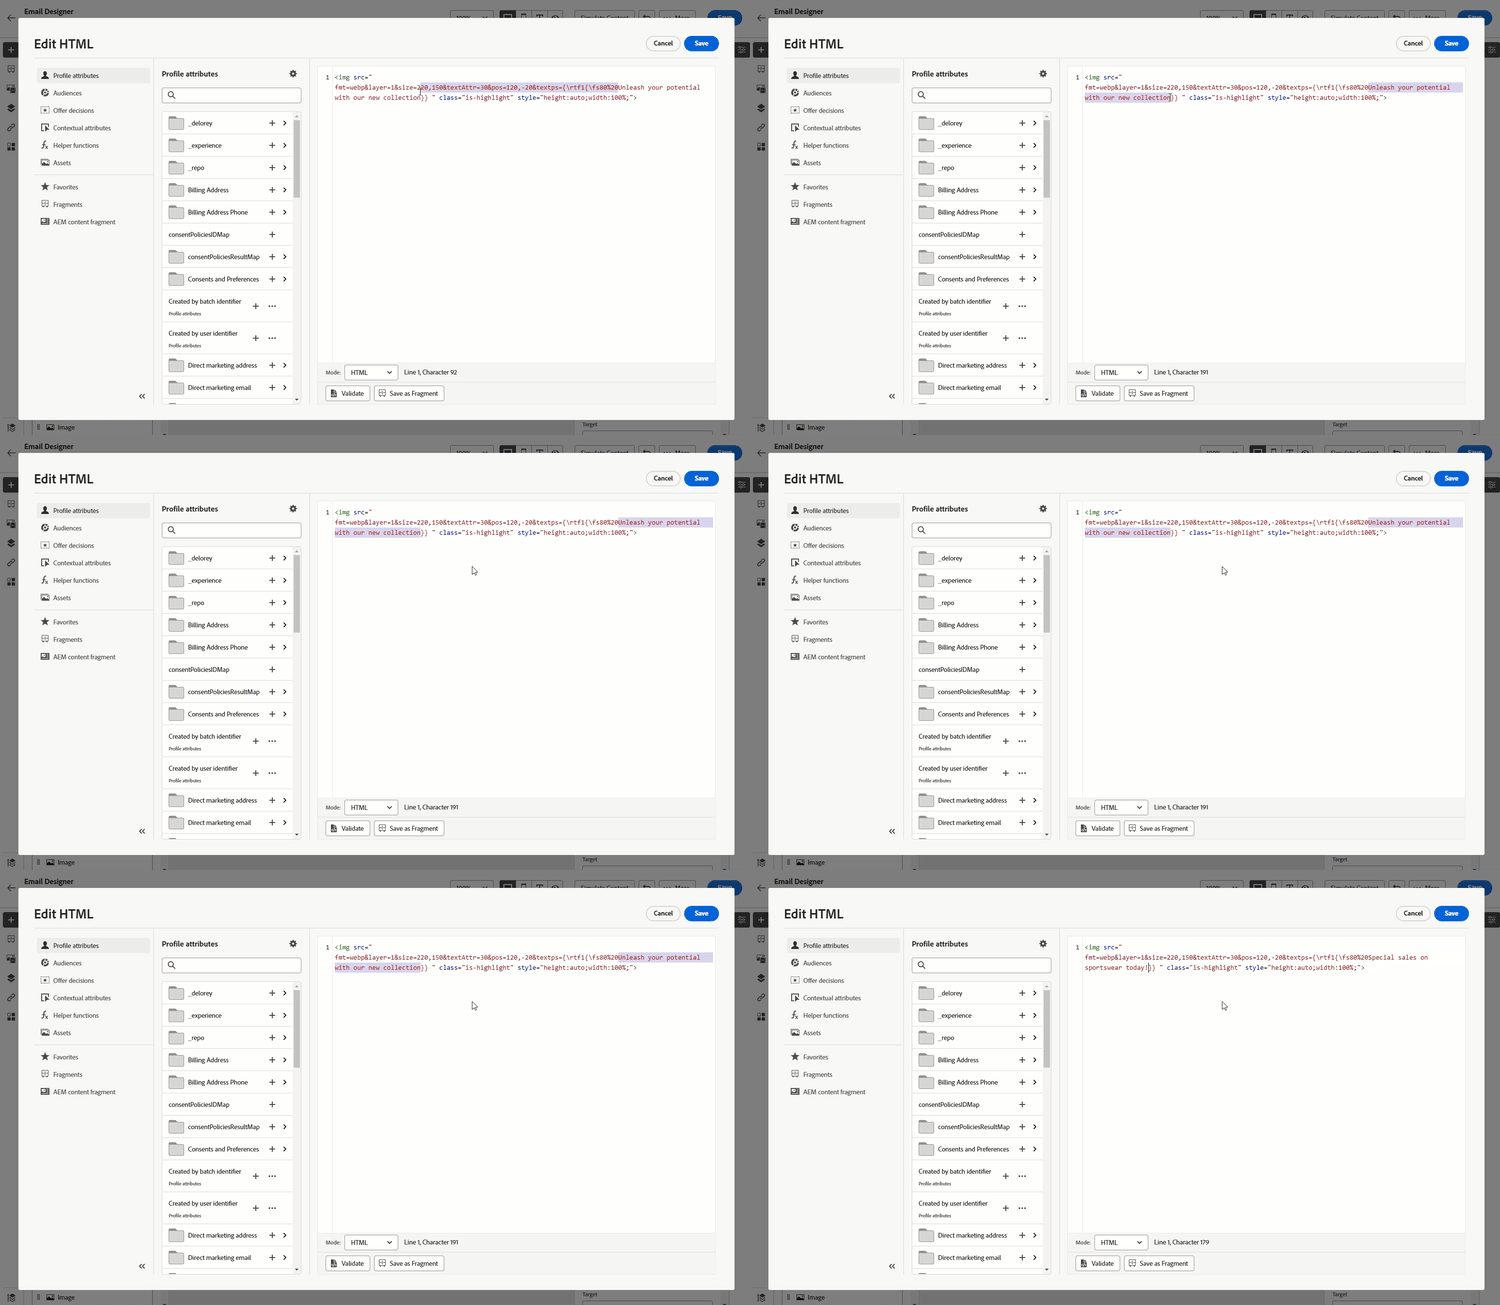
Replace the overlay with the desired text.
-
Update the images parameters:
- Layer: enter the base element where your text is placed.
- Size: update the size of your text block.
- TextAttr: adjust the size of your text font.
- Pos: set the position of your text in the image.
note warning WARNING The Layer parameter is required to update your dynamic media. 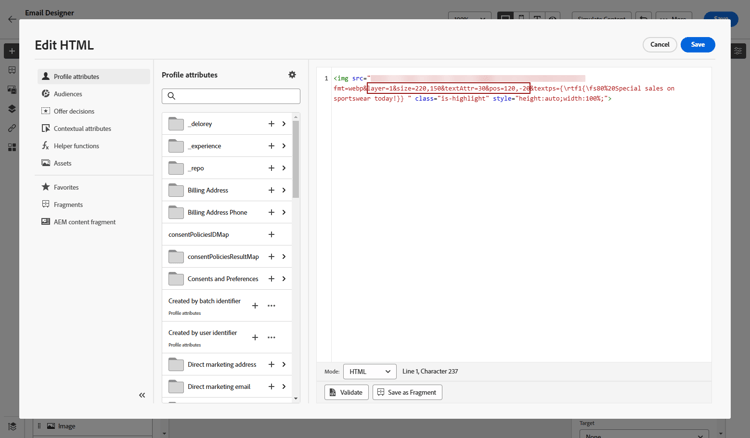
-
Click Save.
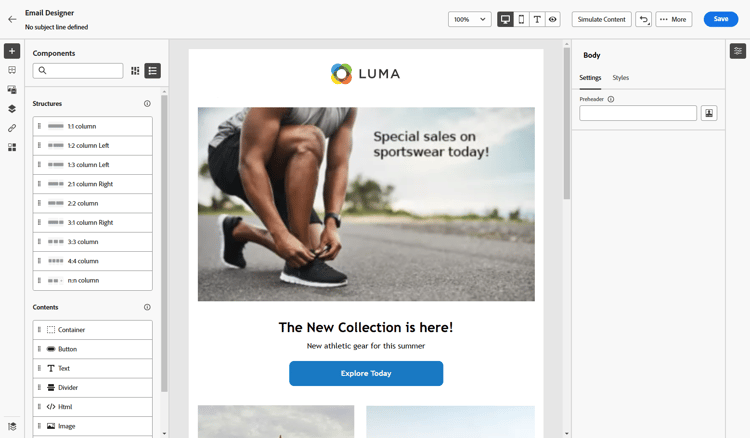
Your content now includes your updated text overlay.
Add and manage your Dynamic media template dynamic-media-template
Easily add your Dynamic Media template in Journey Optimizer and update your media content whenever needed. You can now incorporate personalization fields into your media, allowing you to create more customized and engaging content within Journey Optimizer.
Learn more about Dynamic media template.
With the Image component image-component
Customers who do not have an Adobe Dynamic Media license use the Image component to add a dynamic media template to their content:
-
Open your campaign or journey and access your content.
-
Drag and drop an Image component into your layout.
For more information on content components, refer to this page.
-
Browse through your AEM assets and select the Dynamic Media template you want to add to your content.
-
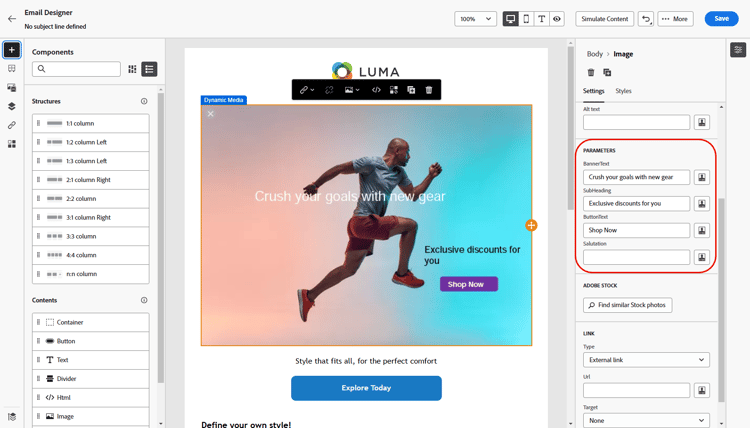
From the Settings tab, navigate to the parameters of your dynamic media template.
The available fields depend on the parameters added during the template creation in Adobe Experience Manager.
-
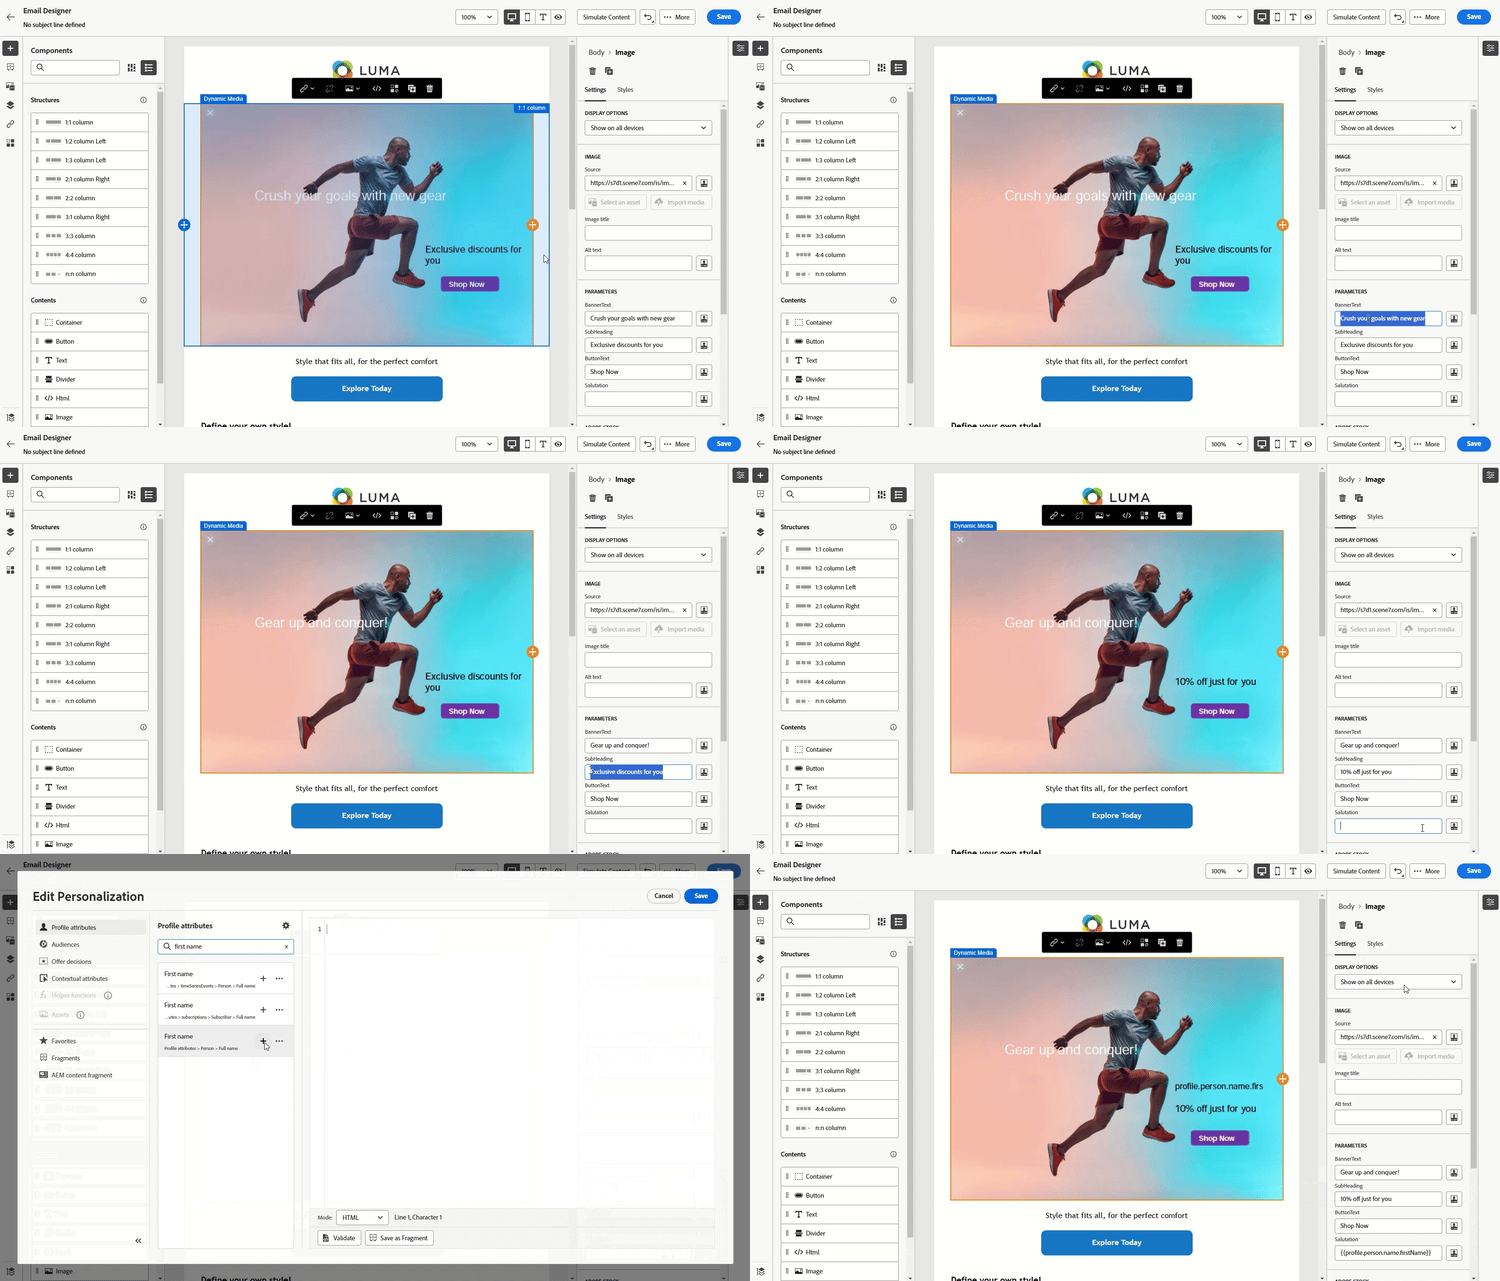
Fill in the different fields and use the personalization editor to add personalized content. You can use any attribute, such as the profile name, city, or other relevant details, to create a more customized experience.
Learn more about personalization on this page.
-
Conditional content can be applied to generate different variants of the content. Learn more
-
Click Save.
Once you have performed your tests and validated the content, you can send your message to your audience.
With the Dynamic Media Template component dynamic-media-template-component
You can insert your dynamic template directly into your content using the Dynamic Media Template component. Follow the steps below:
-
Open your campaign or journey and access your content.
-
Drag and drop an Dynamic Media Template into your layout.
For more information on content components, refer to this page.
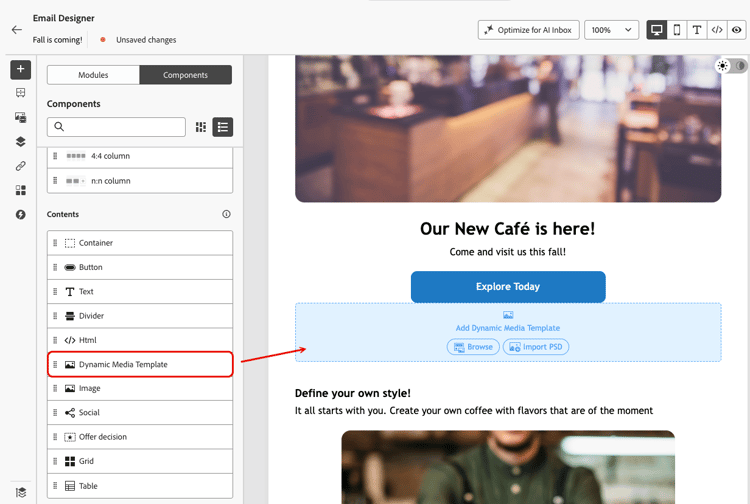
-
Choose how you want to add your dynamic media template:
-
Browse — browse through your AEM assets and select the Dynamic Media Template or PSD file you want to add to your content.
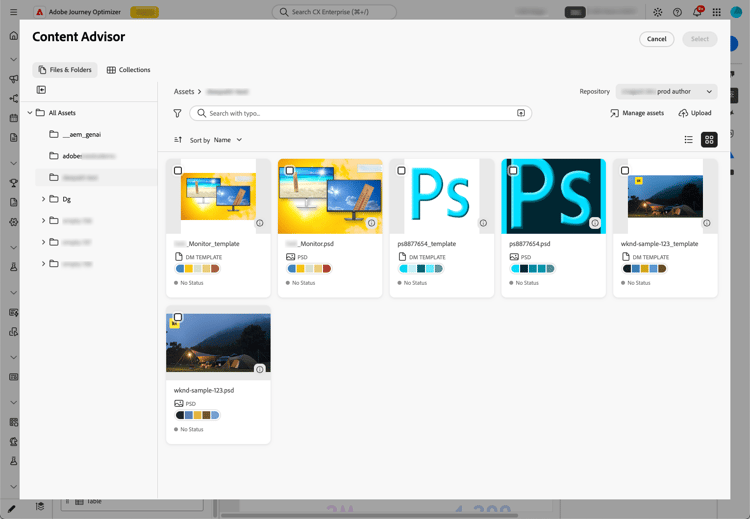
-
Import PSD — drag and drop or select a Photoshop (PSD) file. Click Next and choose a destination to store it.
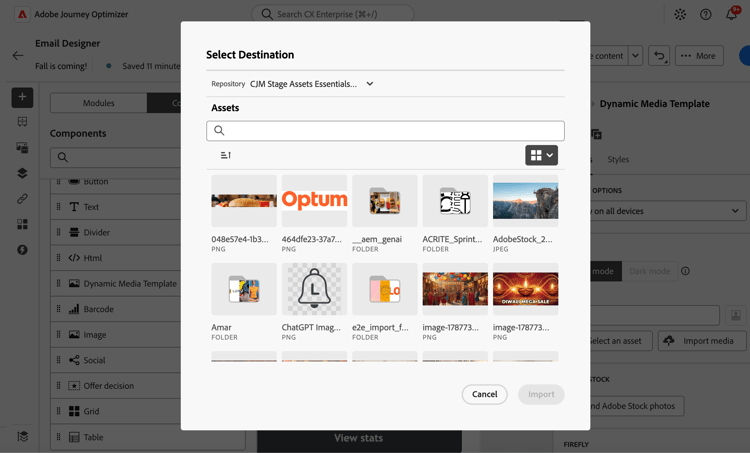
Adobe Journey Optimizer automatically imports the file into the repository that you selected.
-
-
Once your file is uploaded and rendered, select the Edit in Dynamic Media Template Editor button that displays in the right panel.
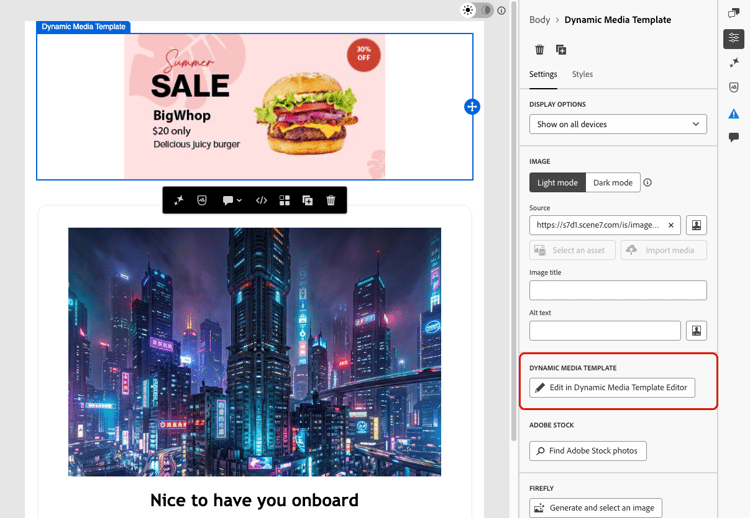
This opens the Dynamic Media Template Editor directly within Journey Optimizer, where you can update your template or PSD file without leaving the application.
-
In the Dynamic Media Template Editor, go to the Parameters tab, select Include Param for each Dynamic Media Template’s parameter you want to enable and click Done.
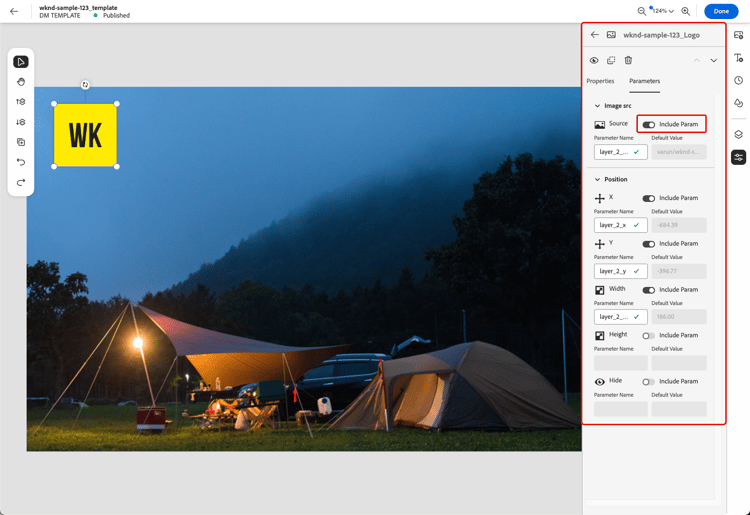
note NOTE Learn more on the Dynamic Media Template WYSIWYG editor in the Experience Manager documentation. -
Once back in the Email Designer, the parameters you enabled are available in the Settings tab.
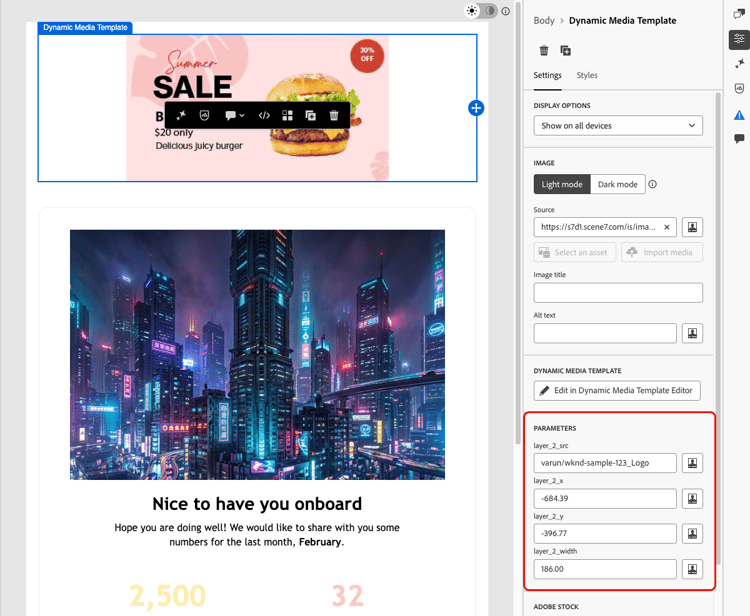
The parameters you see here reflect how they were defined in the Dynamic Media Template in Adobe Experience Manager or in Photoshop.
The available fields depend on the parameters added during the template creation in Adobe Experience Manager.
-
Fill in the different fields and use the personalization editor to add personalized content. You can use any attribute, such as the profile name, city, or other relevant details, to create a more customized experience.
Learn more about personalization on this page.
-
Conditional content can be applied to the Dynamic Media Template to generate different variants of the content. Learn more
-
Click Save.
Once you have performed your tests and validated the content, you can send your message to your audience.
With Html component html-component
You can insert your dynamic template directly into your content using the Html component:
-
Open your campaign or journey and access your content.
-
Drag and drop an Html component into your layout.
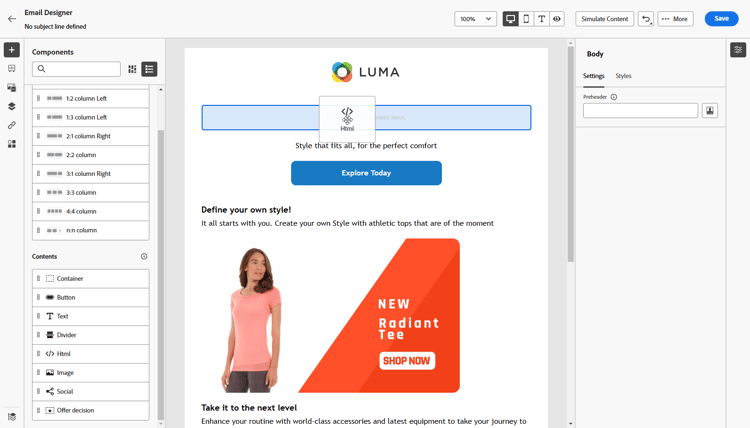
-
Select Show the source code.
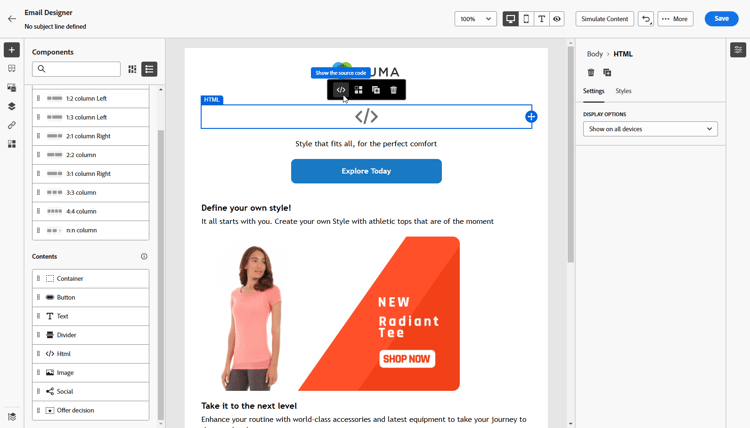
-
From the Edit HTML menu, access Assets then Open asset selector.
You can also simply copy and paste your assets URL.
-
Adjust the image text parameters as needed to match your asset requirements.

-
Click Save.
Once you have performed your tests and validated the content, you can send your message to your audience.
Insert countdown timer countdown
Create urgency and maximize conversions with Dynamic Media countdown timers that update in real-time when recipients open your emails. This feature is ideal for flash sales, limited-time offers, and time-sensitive promotions.
For example, as a marketer for a retail brand, you’re running a 48-hour flash sale. By using the countdown timer in your promotional emails:
- Recipients who open immediately see “47 hours remaining”
- Recipients who open 24 hours later see “23 hours remaining”
- Recipients who open after the sale ends see “Time’s up!”
For more information on how to add countdown timers to your Dynamic Media template in Adobe Experience Manager, refer to this document.
-
In Adobe Experience Manager, create a Dynamic Media template and add a countdown timer component to it.
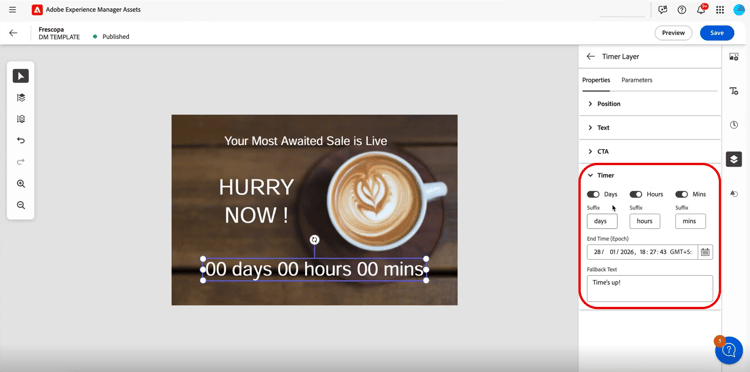
-
In Journey Optimizer, create a new campaign or open an existing one, then access the Email Designer.
-
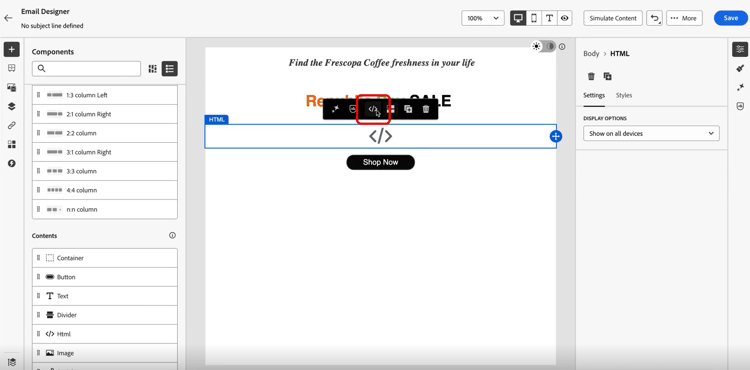
Drag and drop an HTML or Asset component into your email content.
-
Hover over the component and click Show the source code (for HTML components) or Browse (for Asset components).
-
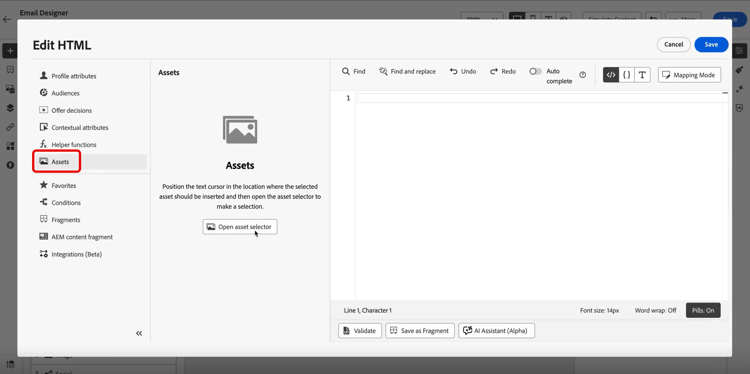
From the Edit HTML menu, navigate to Assets and click Open asset selector to browse and select your published Dynamic Media template.
-
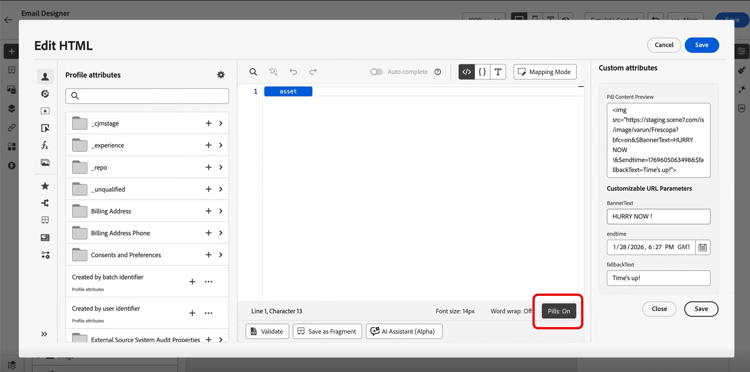
Enable the pills experience by toggling Pills to On. This improves readability by hiding long attribute paths.
-
In the Custom attributes menu, configure any customizable URL parameters as needed for your template.
Click Save when finished.
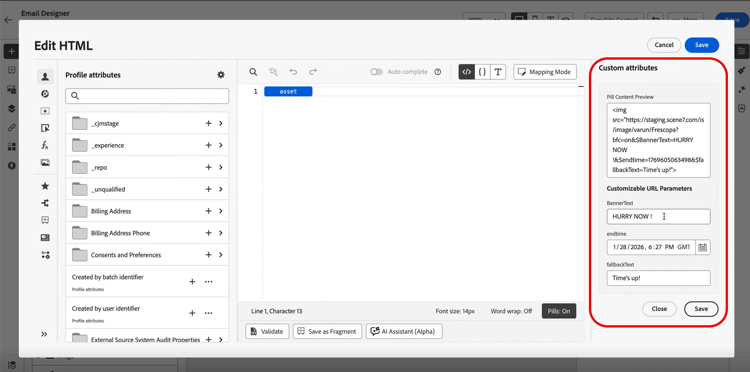
-
Alternatively, you can also access the parameters of the Dynamic Media template by selecting the asset in the Email Designer, then accessing the Settings menu.
Configure the following:
- Banner text: The text displayed with your timer
- End time: The date and time when the countdown expires. Enter the time in GMT (Greenwich Mean Time) only. The system does not accept other time zones.
- Fallback text: The message shown after the timer ends
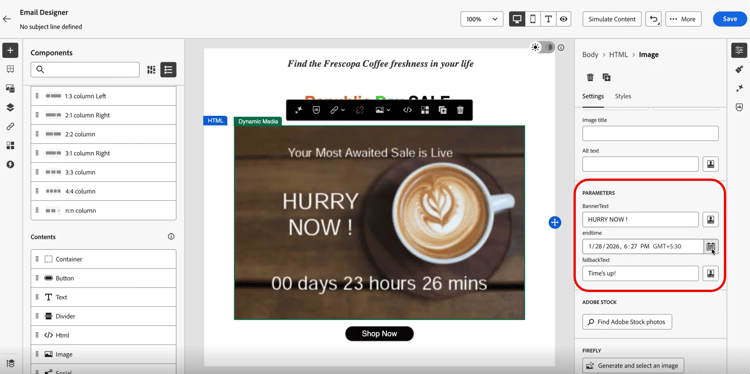
-
Click Preview to view the timer with real-time countdown updates and verify your configuration.
When recipients open the email, they see the accurate time remaining for your flash sale. If they reopen the email later, the countdown automatically updates to reflect the current time remaining. After the end date, the default message appears automatically.
How-to video video
Learn how to integrate Adobe Experience Manager Dynamic Media with Adobe Journey Optimizer to enable real-time content updates and personalization.
This tutorial covers how to modify images directly within AJO, add text overlays using HTML mode, create dynamic media templates in AEM for hyper-personalization, and personalize campaigns by tailoring content for different audience segments. This integration allows marketers to efficiently create engaging and personalized campaigns without switching between applications.
This section contains structured knowledge intended to support interpretation, retrieval, and question answering related to this topic.
For complete understanding, this information should be combined with the documentation on this page. Neither source is intended to stand alone; the page describes the feature, while this section provides additional context that helps disambiguate terminology, intent, applicability, and constraints.
- TL;DR: This page explains how to insert, adjust, and personalize Adobe Experience Manager dynamic media in Journey Optimizer content, including text overlays, dynamic media templates, and countdown timers.
Intents:
- Insert an Adobe Experience Manager dynamic media asset into HTML content using the asset selector
- Adjust image parameters such as height, width, rotate, flip, brightness, and hue
- Personalize a dynamic media text overlay with different text per treatment or profile
- Add a dynamic media template using the Image component or HTML component
- Insert a countdown timer that updates in real time when recipients open the email
Glossary:
- Dynamic media: Adobe Experience Manager media renditions selected through the asset selector, where changes made in Adobe Experience Manager are instantly reflected in Journey Optimizer content (product-specific)
- Text overlay personalization: Replacing a dynamic media text overlay with new text, which can differ per treatment or profile (product-specific)
- Dynamic media template: A template added in Journey Optimizer that supports personalization fields, inserted via the Image or HTML component (product-specific)
- Countdown timer: A Dynamic Media component that updates in real time when recipients open the email, showing time remaining or a fallback message after the end date (product-specific)
- Layer parameter: The base element where overlay text is placed, required to update dynamic media text overlays (product-specific)
Guardrails:
- The dynamic media integration is only available for customers using Dynamic Media Manager as a Cloud Service.
- For Healthcare customers, the integration is enabled only upon licensing the Journey Optimizer Healthcare Shield and Adobe Experience Manager Extended Security for Healthcare add-on offerings.
- Text overlay personalization is available exclusively in Dynamic Media Scene7 mode; for Healthcare customers, since Scene7 mode is not accessible, content is rendered using a Journey Optimizer binary copy of the image.
- Dynamic media template is available exclusively in Dynamic Media Scene7 mode; for Healthcare customers, since Scene7 mode is not accessible, content will not be rendered.
- The Layer parameter is required to update your dynamic media text overlay.
- For countdown timers, the End time must be entered in GMT (Greenwich Mean Time) only; the system does not accept other time zones.
- For Dynamic Media Scene7 assets, Journey Optimizer adds default modifiers
bfc=off&fmt=png-alphaat the start of the URL; if the preset also setsfmtorbfc, it takes precedence because Scene7 uses the last occurrence of a repeated parameter.
Terminology:
- Canonical name: dynamic media — Acronym: n/a — variants: Adobe Experience Manager dynamic media, dynamic media renditions
- Synonyms: “Scene7 mode” = “Dynamic Media Scene7 mode”
- Do not confuse: “text overlay personalization” (replacing overlay text on a dynamic media asset) ≠ “dynamic media template” (a template with personalization fields inserted via the Image or HTML component)
FAQ:
- Q: Do I need to manually update assets changed in Adobe Experience Manager? — No; changes made to assets in Adobe Experience Manager are instantly reflected in Journey Optimizer content, so the most up-to-date versions are always in use.
- Q: Which customers can use the dynamic media integration? — Only customers using Dynamic Media Manager as a Cloud Service.
- Q: Why cannot Healthcare customers use text overlays or templates the same way? — Those features are exclusive to Scene7 mode, which is not accessible for Healthcare customers; text overlay content is rendered using a Journey Optimizer binary copy, and dynamic media templates will not be rendered.
- Q: What time zone does the countdown timer End time use? — GMT (Greenwich Mean Time) only; the system does not accept other time zones.
- Q: How do I deliver an asset in its original format such as GIF or SVG? — The asset selector returns a
/images-based URL, so you must manually update the URL to use the/contentpath instead.