Buying group role templates
In a B2B market, multiple individuals usually make buying decisions. Those individuals participate in the decision-making process according to their role within the organization. Create buying group role templates that contain a group of role definitions according to each product offering type or account use case.

Audience Agent B2B
Audience Agent B2B can generate a buying group roles template from first-party intent detection and persona mapping. In the guided flow, you can identify personas linked to a product, review AI-recommended role-to-persona mappings, and refine the template with natural language before you publish it.
Prompts to try:
- Create a buying group template for
<product> - Add
<role>mapped to<persona> - Remove
<role>/<persona>

- Person profile field mapping for person attribute filters
- Intent data if you use intent filters in role conditions
- Custom buying group roles (optional) if you need roles beyond the six defaults
Access and browse role templates access-and-browse-role-templates
-
On the left navigation, click Buying groups.
-
In the Buying groups page, select the Roles Templates tab.
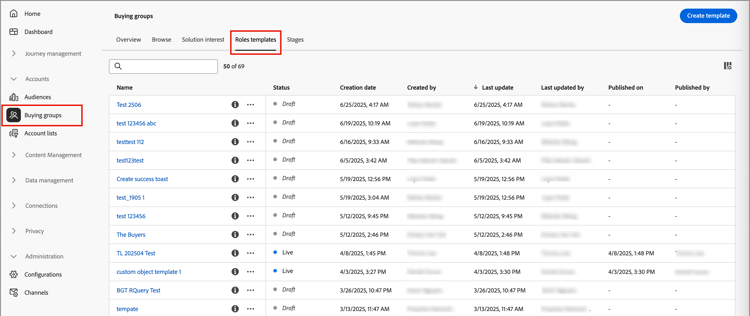
The tab provides an inventory list of all existing roles templates and displays the following information in column format:
- Name
- Status
- Creation date
- Created by
- Last update
- Last updated by
- Published on
- Published by
The list is sorted by the Last update by default. All roles templates have a status of
DraftorLive. -
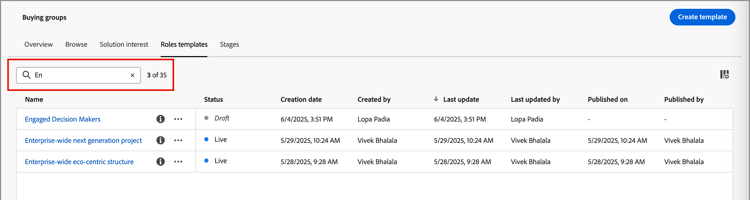
To filter the list by name, use the search field at the top of the list.
Enter the first few characters of the name to reduce the displayed list to the matching items.
Create a roles template
-
From the Roles Templates tab, click Create template at the top-right corner.
-
In the dialog, enter a unique Name (required) and Description (optional) for the template.

-
Click Create.
Add the template roles add-the-template-roles
After you create the template, it opens in the workspace and you are prompted to add the roles. The system displays the first role card by default.
Role condition filter types
Each role that you define for the template uses a set of filters, or conditions, to determine the members assigned to the role. Use the following filter types to define the conditions for a role:
Attributes from the person profile, including:
-
City
-
Country
-
Email address
-
Email invalid
-
Email suspended
-
First name
-
Inferred state region
-
Job title
-
Last name
-
Mobile phone number
-
Person engagement score
-
Phone number
-
Postal code
-
State
<custom object>-
Member of list (deprecated)
-
Member of program (deprecated)
-
Category intent
-
Product intent
-
Keyword intent
(see Intent data)
Define role properties
-
For the first role card, define the role properties.
-
Choose the Buying group role from the list.
There are six default roles:
Decision Maker,Influencer,Practitioner,Executive Steering Committee,Champion, andOther. The list also includes any custom roles that are defined in the Roles list.
-
Set the Weighting for the role, which is used to calculate the engagement score.
The value for each option is translated to a percentage for the score calculation: Trivial = 20, Minor = 40, Normal = 60, Important = 80, and Vital = 100.
For example, a role template with Vital, Important, and Normal roles converts to 100, 80, and 60 out of 240.
-
Add conditions for auto-assignment - Select this checkbox to add conditions for auto-assigning members to the buying group who match the condition. If the checkbox is not selected, then adding conditions is NOT required.
-
Required for completeness score - Select this checkbox for the role if you want it to be a requirement for calculating a completeness score.
-
Add conditions for auto-assignment
-
Click Add Condition and define the conditional rule for the role.
-
In the Condition dialog, expand the list of Person attributes and locate an attribute that you want to use to match the role. Drag it to the right and drop it in the filter space.

note NOTE If you have custom person fields defined in the Experience Platform business person schema, you can use these fields as person attributes in conditions. Use the attribute to create a matching filter using one or more values.
In the following example, the Job title attribute is used to identify a match for Decision Maker. Any value for title that starts with
DirectororSr Directorevaluates as true for the condition.
-
If there are configured custom objects related to people defined in the XDM Relational schemas, expand the list of Custom Objects to use them in the role condition.

-
If needed, add another attribute/object and condition that further refines the criteria for a match to the role.
-
Click Done.
-
Add more roles
-
For each additional role that you want to include for the template, click Add another role and repeat the steps under Define role properties and Add conditions for auto-assignment to define the role.

Your changes are auto-saved in the Draft status. If you are not ready to publish the roles template, click the left (back) arrow at the top of the page and return to the Roles templates list.
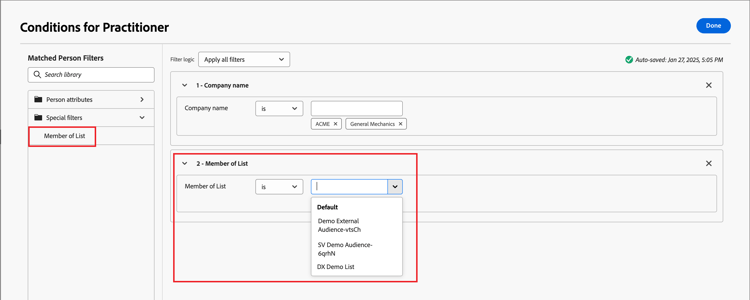
Marketo Engage list membership
In Marketo Engage, Smart Campaigns check membership of programs to ensure that leads don’t receive duplicate emails and aren’t members of multiple streams of emails at the same time. In Journey Optimizer B2B, you can check for Marketo Engage list membership as a condition for your roles template to help eliminate duplication in buying group membership and journey activities.
To use list membership as a role condition, expand Special Filters and drag the Member of List condition into the filter space. Then complete the filter definition to evaluate membership in one or more Marketo Engage lists.
Change the completeness score settings change-the-completeness-score-settings
By default, completeness for a role is defined as one member assigned to the role. When using buying group completeness to indicate sales readiness, use these settings to align the score with the number of members required to close an opportunity.
For example, closing a deal for your solution X requires multiple marketing decision makers to be identified and engaged because multiple marketing teams across an organization would use the solution. In this case, you want to increase the threshold to calculate a complete buying group by requiring at least two marketing decision makers.
See Completeness scores for detailed information about completeness scoring and calculations.
-
At the top right of the roles template page, click Completeness score settings.

-
In the dialog, change the Members required value for each defined role as needed.
You can enter the value, or click + or − to increase or decrease the value.

-
Click Save.
Publish the roles template
If the template is ready for use, click Publish at the top-right.
Publishing the template sets the status to Live and makes it available for association with a solution interest. There must be at least one defined role to publish the roles template.
After you publish, the template status is Live on the Roles Templates tab and you can select it when you create a solution interest.
Edit a draft roles template
When a roles template is in a Draft state, you can continue to edit the defined roles. Any changes that you make are automatically saved.
Change the role card header settings, such as the buying group role, weighting, auto-assignment, or completeness scoring requirement.

Modify the conditions for a role
To change the condition/filtering logic for any of the roles, click the Edit (

Delete a role card
If you want to remove a role from the template, click the Delete (

Set the priority for roles
You can re-order the roles within the template, which determines the priority for assigning leads to a role. There is a Priority controller displayed to the right of each role card. Click the Up or Down arrow at the right to move the role card up or down in priority.

Delete a roles template
You can delete a roles template if it is in the Draft status.
-
Select the roles template from the list to open it.
-
Click Delete at the top right.

-
In the dialog, click Delete to confirm.
After you confirm, the roles template is removed from the Roles Templates inventory list.