[AEM Assets]{class="badge positive" title="Applies to AEM Assets)."}
Bulk import assets using Assets view bulk-import-assets-view
Bulk Import in Adobe Experience Manager (AEM) Assets view enables administrators to import large numbers of assets directly from an external data source into AEM Assets in a single, streamlined operation. This capability eliminates the need to upload individual assets or folders one at a time, making it particularly valuable for large-scale asset migrations, digital asset consolidation, and onboarding content from existing cloud storage repositories.
By connecting AEM Assets directly to a supported data source, administrators can migrate entire libraries of images, videos, documents, and other digital assets efficiently, reducing manual effort and accelerating time-to-value when populating an AEM Assets environment.
Supported data sources for bulk import supported-data-sources
Administrators can import assets from the following data sources, which span the major cloud storage and file-sharing platforms commonly used in enterprise environments:
- Azure — Microsoft’s cloud storage platform for scalable asset storage.
- AWS (Amazon Web Services) — a widely used cloud storage and infrastructure provider.
- Google Cloud — Google’s cloud storage and computing platform.
- Dropbox — a popular file-hosting and sharing service.
- OneDrive — Microsoft’s cloud-based file storage and sharing service.
This breadth of supported sources means administrators can consolidate assets stored across multiple platforms into a single AEM Assets repository, streamlining governance and ensuring digital assets are centrally managed.
Prerequisites prerequisites
Before importing content into Adobe Experience Manager (AEM) Assets, ensure the required credentials and configuration values are available for your chosen cloud data source. Each data source requires a specific set of authentication and connection parameters, as summarized below.
- Azure Storage Account
- Azure Blob Container
- Azure Access Key or Shared Access Signature (SAS) Token (the credential required depends on the selected authentication mode)
- AWS Region
- AWS Bucket
- AWS Access Key
- AWS Access Secret
- Google Cloud Platform (GCP) Bucket
- GCP Service Account Email
- GCP Service Account Private Key
- Dropbox Client ID (App key)
- Dropbox Client Secret (App secret)
- OneDrive Tenant ID
- OneDrive Client ID
- OneDrive Client Secret
These credentials authenticate the connection between Adobe Experience Manager (AEM) Assets and the external storage provider, so gather them from your cloud provider’s console before beginning the import.
In addition to the source-specific prerequisites listed above, you must identify the source folder name in your data source. This is the folder that contains all the assets you intend to import into AEM Assets. Knowing the exact source folder name is essential because AEM uses it to locate and retrieve the correct set of assets during the import process.
Configure the Dropbox developer application dropbox-developer-application
Before importing assets from your Dropbox account to Adobe Experience Manager (AEM) Assets, create and configure the Dropbox developer application. This application generates the credentials and grants the permission scopes that AEM Assets requires to authenticate with Dropbox and transfer files securely.
Complete the following steps to create and authorize the Dropbox developer application:
-
Sign in to your Dropbox account and click Create apps.
If you are using an Enterprise Dropbox account, you need to have access to the Content Admin role, because app creation on Enterprise accounts is restricted to that administrative role. -
In the Choose an API section (Application Programming Interface), select the only available radio button.
-
In the Choose the type of access you need section, select one of the following options based on the scope of assets you plan to import:
-
Select App folder to grant access to a single dedicated folder created for your application within your Dropbox account. This limits the application to that folder only.
-
Select Full Dropbox to grant access to all files and folders within your Dropbox account.
-
-
Specify a name for your application and click Create app.
-
In the Settings tab of your application, add https://experience.adobe.com to the Redirect URIs section. This Redirect URI (Uniform Resource Identifier) ensures Dropbox returns the authorization response to Adobe Experience Cloud after sign-in, completing the secure connection between the two services.
-
Copy the values for the App key and App secret fields. The App key is the public identifier for your application, and the App secret is the confidential credential used to authenticate it. Both values are required while configuring the bulk import tool in AEM Assets, so store them securely.
-
On the Permissions tab, add the following permissions within the Individual scopes section. Each scope authorizes a specific action that the bulk import tool performs:
-
account_info.read — permits reading basic information about the Dropbox account.
-
files.metadata.read — permits reading file and folder metadata, such as names and paths.
-
files.content.read — permits reading the actual content of files, enabling assets to be imported.
-
files.content.write — permits writing content to files and folders within the account.
-
-
Click Submit to save the changes. The application is now configured and ready to be connected to the bulk import tool in AEM Assets.
Configure the OneDrive developer application onedrive-developer-application
Importing assets from your Microsoft OneDrive account into Adobe Experience Manager (AEM) Assets requires a registered OneDrive developer application. You must create and configure this developer application before any import can take place, because the application establishes the authenticated connection that allows AEM to access files stored in OneDrive.
The OneDrive developer application serves as the trusted intermediary between AEM Assets and your OneDrive account. Registering the application provides AEM with the credentials it needs to authenticate through Microsoft’s identity platform and retrieve assets securely on your behalf.
Key reasons the developer application is a prerequisite:
- Authentication: The registered application supplies the credentials AEM uses to sign in to Microsoft’s identity platform, so AEM can act on your behalf without exposing your personal login.
- Authorized API access: The application grants AEM permission to read and import files through the OneDrive API, ensuring that only approved operations occur.
- Secure asset transfer: By routing the connection through a configured application, asset transfers between OneDrive and AEM Assets remain controlled and traceable.
Complete the creation and configuration of the OneDrive developer application first. Once the application is configured, AEM Assets can connect to OneDrive and begin importing your assets.
Create an application for OneDrive bulk import
Registering an application in your OneDrive (Azure) portal establishes the trusted identity and credentials that authenticate the connection between your OneDrive storage and Adobe Experience Manager (AEM) Assets. Complete the following steps to create the application and gather the credentials required for the bulk import configuration:
-
Sign in to your OneDrive account and click New registration.
-
Specify a name for the application, select Accounts in this organizational directory only (Adobe only - Single tenant) from Supported account types.
-
Execute the following steps to add redirect Uniform Resource Identifiers (URIs):
-
In the Select a platform dropdown menu, select Web.
-
Add https://experience.adobe.com to the Redirect URIs section. This URI defines where the authentication response is returned after sign-in.
-
-
Click Register. The application is created successfully.
-
Copy the values for the Application (client) ID and Directory (tenant) ID fields. The values are required while configuring the bulk import tool in Adobe Experience Manager (AEM) Assets, because they uniquely identify your registered application and its directory during authentication.
-
Click Add a certificate or secret corresponding to Client credentials option.
-
Click New client secret, provide the client secret description, expiration and click Add. The client secret functions as the password that authorizes your application to access OneDrive data.
-
After creating the Client Secret, copy the Value field. Do not copy the Secret ID field, because the bulk import configuration in AEM Assets authenticates using the secret Value, not the Secret ID. This Value is required while configuring bulk import in AEM Assets, and it is displayed only once — copy and store it immediately before leaving the page.
Add API permissions
Configuring API permissions grants the registered application the specific access rights it needs to communicate with Microsoft Graph on behalf of a signed-in user. The Application Programming Interface (API) permissions defined here determine exactly what data and actions the application is authorized to request. Complete the following steps to add the required API permissions for the application:
- Click API permissions in the left pane and click Add a permission.
- Click Microsoft Graph > Delegated permissions. The Select Permission section displays the available permissions. Delegated permissions allow the application to act on behalf of the signed-in user rather than as a standalone service.
- Select the
offline_accesspermission fromOpenId permissionsand theFiles.ReadWrite.Allpermission fromFiles. Theoffline_accesspermission enables the application to obtain a refresh token so it can maintain access without repeatedly prompting the user to sign in, whileFiles.ReadWrite.Allgrants full read and write access to files the signed-in user can reach. Both permissions are required for the application to authenticate persistently and manage file content. - Click Add permissions to save the updates. Saving finalizes the permission configuration and registers these access rights against the application, ensuring the application can successfully authenticate and access the specified files once granted.
Create bulk import configuration create-bulk-import-configuration
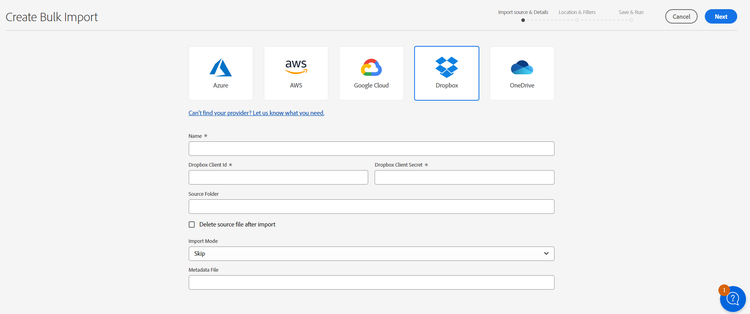
Execute the following steps to create a bulk import configuration in Experience Manager Assets. This configuration defines the data source, credentials, target location, and filtering rules that govern how assets are ingested from an external storage provider into Experience Manager Assets:
-
Click Bulk Import in the left pane and click Create Import.
-
Select the data source. The available options include Azure, AWS, Google Cloud, Dropbox, and OneDrive.
-
Specify a name for the bulk import configuration in the Name field.
-
Specify the data source specific credentials, as mentioned in Prerequisites.
-
Provide the name of the root folder that contains assets in the data source in the Source Folder field.
note NOTE If you are using Dropbox as the data source, specify the source folder path based on the following rules: - If you select Full Dropbox while creating the Dropbox application and the folder which contains the assets exists at
https://www.dropbox.com/home/bulkimport-assets, then specifybulkimport-assetsin the Source Folder field. - If you select App folder while creating the Dropbox application and the folder which contains the assets exists at
https://www.dropbox.com/home/Apps/BulkImportAppFolderScope/bulkimport-assets, then specifybulkimport-assetsin the Source Folder field, whereBulkImportAppFolderScoperefers to the name of the application.Appsis automatically added afterhomein this case.
note NOTE If you are using OneDrive as the data source, specify the source folder path based on the following rules: - Specify the Root folder name only, without the domain. If the full URL path of the folder is
https://my.sharepoint.com/my?id=/personal/user/Documents/Importfolder/, specify/Importfolder/in the Source Folder field. - If the folder name contains multiple words separated by spaces, specify the name with the spaces in the Bulk Import configuration.
- The source folder must be located at the root of the directory. Folder paths are not supported.
- If you select Full Dropbox while creating the Dropbox application and the folder which contains the assets exists at
-
(Optional) Select the Delete source file after import option. When enabled, this option removes the original files from the source data store after those files are successfully imported into Experience Manager Assets, which helps prevent duplicate storage and reduces retained data in the source location.
-
Select the Import Mode, which determines how the ingestor handles assets that already exist in the target location. Choose one of the following:
- Skip — the default mode. In Skip mode, the ingestor skips importing an asset if it already exists, preserving the existing asset unchanged.
- Replace — overwrites an existing asset with the incoming asset from the data source.
- Create Version — imports the incoming asset as a new version of the existing asset, retaining prior versions in the version history.
-
(Optional) Specify the metadata file to import, provided in CSV format, in the Metadata File field. The metadata source file must be located in the source folder. Click Next to navigate to Location & Filters.
note NOTE Depending on your organization’s security rules, you may require administrator consent for this application to connect to the Bulk Import tool. If this is required, the administrator needs to provide consent before the bulk import configuration can be saved. -
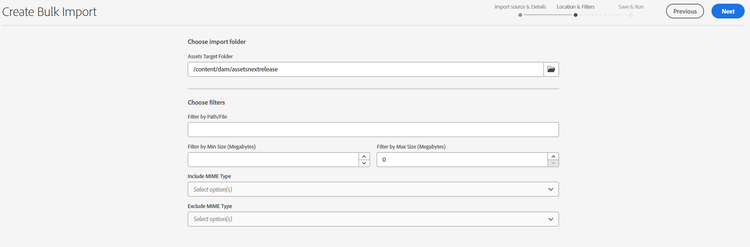
To define a location in the Digital Asset Management (DAM) repository where assets are to be imported using the Assets Target Folder field, specify a path. For example,
/content/dam/imported_assets. -
(Optional) In the Choose Filters section, provide the minimum file size of assets in MB in the Filter by Min Size field. Assets smaller than this value are excluded, so only files meeting the minimum size are included in the ingestion process.
-
(Optional) Provide the maximum file size of assets in MB in the Filter by Max Size field. Assets larger than this value are excluded from the ingestion process.
-
(Optional) Select the MIME types to include in the ingestion process using the Include MIME Type field. You can select multiple MIME types within this field. If you do not define a value, all MIME types are included in the ingestion process.
-
(Optional) Select the MIME types to exclude from the ingestion process using the Exclude MIME Type field. You can select multiple MIME types within this field. If you do not define a value, all MIME types are included in the ingestion process.
-
Click Next. Select one of the following options as per your preference:
- Save import to save the configuration for now so that you can run it later.
- Save & run import to save the configuration and run the bulk import immediately.
- Save & schedule import to save the configuration and schedule the bulk import for a later time. You can choose the frequency of the bulk import and set the date and time for the import. The bulk import runs on the set date and time at the chosen frequency, allowing recurring imports without manual intervention.

-
Click Save to apply and execute the selected option, committing your chosen configuration. Selecting Save finalizes the action, applies the option you have chosen, and completes the workflow step. Once you click Save, the system processes the selected option and retains your settings so that the change takes effect.
Handling filenames during bulk import filename-handling-bulkimport-assets-view
When you import assets or folders in bulk, Experience Manager Assets imports the entire structure that exists in the import source. Experience Manager follows its built-in rules for special characters in asset and folder names, therefore these filenames require sanitization to ensure they conform to repository naming constraints and render reliably across the platform. For both folder names and asset names, the title defined by the user remains unchanged and is stored in the jcr:title property. This means the sanitization affects the underlying node name while the human-readable display title is preserved as originally entered.
During bulk import, Experience Manager performs the following checks before applying sanitization rules for new imports:
- Checks for existing folders — Experience Manager checks for existing folders to avoid reimporting assets and folders that are already present.
- Verifies parent folder sanitization — Experience Manager verifies the sanitization rules applied in the parent folder where the import takes place.
As a result, when sanitization rules are already applied in the parent folder, Experience Manager applies the same rules to the import source, ensuring consistency across the imported hierarchy. For a new import, the sanitization rules are then applied to manage the filenames of assets and folders.
For more information on disallowed names, handling asset names, and handling folder names during bulk import, see Handling filenames during bulk import in Admin view.
View existing bulk import configurations view-import-configuration
The Bulk Imports page provides a centralized view of all bulk import configurations, allowing administrators to monitor past activity, reuse saved definitions, and manage upcoming automated runs from a single location.
To view the existing bulk imports, follow these steps:
- Select the Bulk Imports option in the left pane.
- The bulk imports page appears, displaying the list of Executed Imports by default.
- Use the dropdown option to switch between the available import views, including Saved Imports and Scheduled Imports.
Import types available import-types-available
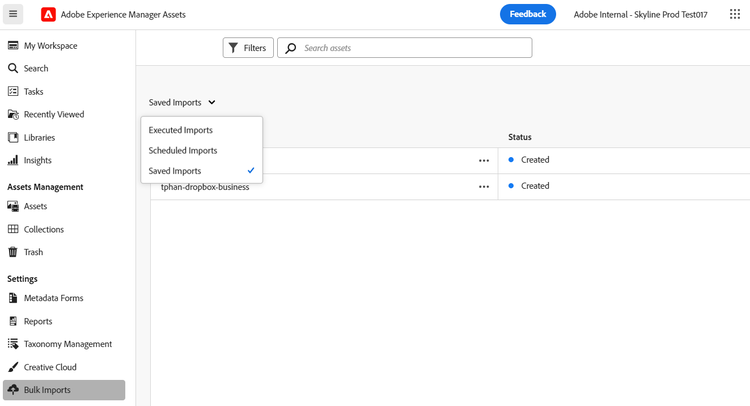
The dropdown organizes bulk import configurations into three distinct categories:
- Executed Imports — The default view, listing imports that have already run. This view is used to review the history and outcome of completed bulk import operations.
- Saved Imports — Import configurations that have been defined and stored for reuse. Saved imports allow the same configuration to be run again without recreating it from scratch.
- Scheduled Imports — Import configurations set to run automatically at a defined time. This view lets administrators confirm which imports are queued for future execution.
Reviewing these configurations helps ensure that completed imports finished as expected, that reusable definitions remain accurate, and that scheduled runs are correctly set up before they execute.
Edit bulk import configuration edit-import-configuration
Edit the configuration details of an existing bulk import through the following steps:
-
Locate the configuration you want to change and click

-
Click Edit to open the configuration in edit mode.
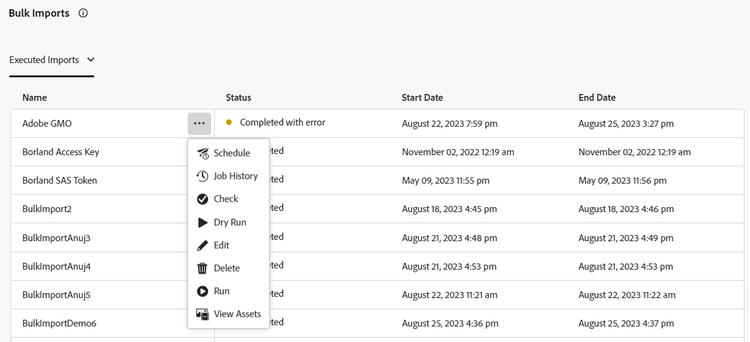
-
Update the editable fields as needed, then save your changes.
The configuration title and the import data source cannot be modified during an edit operation. These two fields remain fixed once a configuration is created. This ensures that the import retains a stable identity and that previously mapped source data continues to align correctly, preserving the integrity of both executed and scheduled runs.
Edit a configuration from any of the following tabs: the Executed, Scheduled, or Saved Imports tabs. Each tab exposes the same edit controls, so an administrator can update a configuration from whichever view lists it — whether the import has already run, is scheduled to run, or has been saved for later use.
Schedule one-time or recurring imports schedule-imports
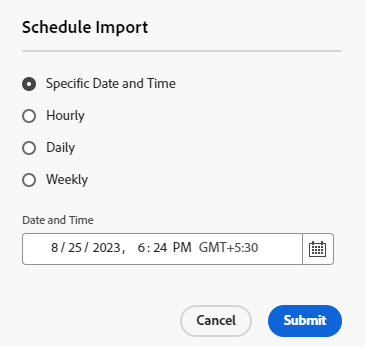
Scheduling imports lets you automate data ingestion so your datasets stay current without manual re-uploads. To schedule a one-time or a recurring bulk import, execute the following steps:
-
Click
-
Set a one-time ingestion, or schedule a recurring import on an hourly, a daily, or a weekly basis. Choose the frequency that matches how often your source data changes, then click Submit to confirm the schedule. A one-time ingestion runs the import once, while recurring schedules automatically re-run the import at the selected interval, ensuring your data remains up to date without repeated manual effort.
Perform an import health check import-health-check
The import health check validates the connection between your import configuration and its data source before you run or schedule an import. Running this check confirms that Adobe Experience Manager (AEM) Assets can reach the configured source, authenticate successfully, and retrieve assets — preventing failed or partial imports caused by broken credentials, incorrect endpoints, or unreachable services.
To validate the connection to the data source, complete the following steps:
-
Locate the configuration you want to test.
-
Click the
-
Click Check.
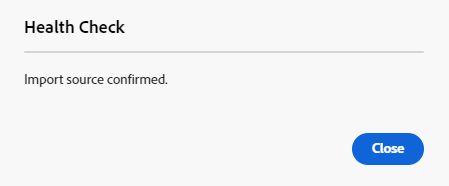
AEM Assets then tests the connection and reports the result:
- If the connection is successful, Experience Manager Assets displays a confirmation message indicating that the connection to the data source has been established. A successful result confirms that the configuration is valid and ready to be used for importing assets.
- If the connection fails, Experience Manager Assets displays an error indicating that the connection could not be established. A failed result signals that you should review the configuration details — such as the source location, authentication credentials, and access permissions — before attempting the import again.
Performing this health check before each import run reduces the risk of import errors and ensures that your source configuration remains valid and reachable.
Perform a dry run before executing an import dry-run-bulk-import
A dry run is a non-destructive test execution that validates a Bulk Import job before any assets are actually imported. Running a dry run first is strongly recommended, because it lets you preview and verify the job configuration without committing changes to the repository. This prevents common issues such as unexpected conflicts, misconfigured source paths, or unintended overwrites from occurring during the live import.
To perform a dry run, click
Experience Manager Assets then displays a summary of the details it detected for the Bulk Import job, allowing you to confirm the scope before proceeding. This summary typically includes:
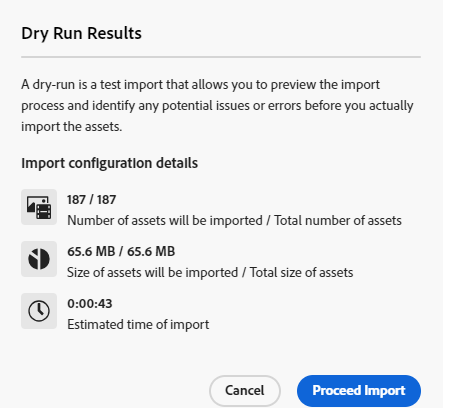
- The assets identified for import, reflecting what the job would ingest from the configured source location.
- Validation results, indicating whether the source, credentials, and target paths are correctly configured.
- Potential conflicts, such as assets that already exist at the destination and would be affected by the import.
- The overall scope of the job, giving you a preview of what the live import would process.
Reviewing these dry run results before executing the import ensures the job behaves as expected. As a result, you can correct any configuration problems early, reducing the risk of failed or partial imports when the Bulk Import job is run for real.
Run a bulk import run-bulk-import
A bulk import can be triggered from either of two locations, depending on whether the import configuration has been saved during setup or has already been executed at least once. Both paths use the
Run a saved import run-saved-import
If you saved the import while creating the configuration, run it from the Saved Imports tab:
- Navigate to the Saved Imports tab.
- Click the
- Click Run to execute the import.
Re-run a previously executed import rerun-executed-import
To run an import that has already been executed, use the Executed Imports tab. This lets you re-process or refresh previously ingested data without recreating the configuration:
- Navigate to the Executed Imports tab.
- Click the
- Click Run to execute the import again.
Stop or schedule an ongoing import schedule-stop-ongoing-report
You can schedule or stop an ongoing bulk import directly from the bulk import status dialog, which displays on the Bulk Import home page while an import is in progress. This dialog gives you real-time control over the operation, so an active import can be paused, deferred to a scheduled time, or halted entirely without leaving the home page.
Managing an active import managing-active-import
Use the bulk import status dialog to control the current import:
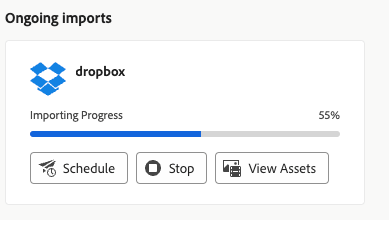
- Schedule an ongoing import — Defer the import so that it runs at a designated time rather than continuing immediately. Scheduling is useful when you want large imports to run during off-peak periods to reduce system load.
- Stop an ongoing import — Halt the import that is currently running. Stopping the import prevents any further assets from being processed until the import is restarted.
Because these controls appear during the import itself, you can adjust or cancel the operation as soon as the status dialog indicates that action is needed.
Verify imported assets verify-imported-assets
You can also view the assets that have already been imported into the target folder by clicking View Assets. This lets you confirm that the import is progressing as expected and validate the results directly in the target folder, ensuring the correct assets have been transferred before the import completes.
Delete a bulk import configuration delete-bulk-import-configuration
Delete any Bulk Import configuration directly from the interface using the Delete action. A Bulk Import configuration can appear in one of three tabs depending on its state: the Executed Imports tab (configurations that have already run), the Scheduled Imports tab (configurations queued to run at a set time), or the Saved Imports tab (configurations saved for later use). The delete action is available from whichever tab currently lists the configuration.
To delete a Bulk Import configuration:
- Locate the configuration name in the Executed Imports, Scheduled Imports, or Saved Imports tab.
- Click
- Click Delete to remove the Bulk Import configuration.
This permanently removes the selected Bulk Import configuration from the list, ensuring it no longer runs, remains scheduled, or stays available for reuse.
Navigate to assets after performing bulk import view-assets-after-bulk-import
After a Bulk Import job completes, you can navigate directly to the target location where the imported assets are stored. Confirming this destination is an essential verification step: it lets you validate that the assets landed in the intended folder, review their metadata, and confirm that the import ran successfully before you begin working with the content.
To view the Assets target location where the assets are imported after running the Bulk Import job:
- Locate the configuration name associated with the completed bulk import.
- Click
- Click View Assets.
Selecting View Assets opens the Assets target location, taking you directly to the folder that received the imported files. This gives you immediate access to the imported assets so you can verify the results, inspect individual items, and continue with downstream tasks such as tagging, review, or publishing.
Limitations and authentication constraints limitations-authentication-constraints
- OneDrive Bulk Import supports delegated (user-based) OAuth (Open Authorization) only. App-only and service principal authentication are not supported. Because delegated OAuth requires an interactive user sign-in to grant access on behalf of a signed-in user, it is not suited to fully automated, background processing. For unattended imports, use Azure Blob Storage or Amazon S3 (Simple Storage Service) instead, as these storage-based sources do not depend on interactive user authentication and therefore run without a person present to authorize each session.
See also
- Translate Assets
- Assets HTTP API
- Assets supported file formats
- Search assets
- Connected assets
- Asset reports
- Metadata schemas
- Download assets
- Manage metadata
- Manage Dynamic Media templates
- Manage reports in Assets view
- Search facets
- Manage collections
- Bulk metadata import
- Publish Assets to AEM and Dynamic Media