在此頁面上:瞭解如何在電子郵件設計工具中設定電子郵件正文、檢視區、結構和欄位層級的背景色彩和影像。
背景設定有助於強化您的品牌識別,並吸引使用者關注電子郵件中的重要區塊。在電子郵件設計工具中,您可在內容的不同層級 (從整體主體到個別結構與欄位) 設定背景顏色或影像,讓您能精確掌控背景在整封電子郵件中的呈現方式。
在電子郵件設計工具中設定背景時,請留意以下最佳實務:
- 只有在設計需要時,才將背景顏色套用至內文。
- 儘可能在欄層級設定背景顏色。
- 避免在影像或文字元件上使用背景顏色,因為這些顏色較難管理。
- 傳送前,請於實際電子郵件用戶端中測試背景影像效果,因其呈現結果可能與電子郵件設計工具的預覽畫面不同。
下列設定可讓您在電子郵件內容的任何層級 (從內文到個別結構與欄位) 套用背景顏色或影像。
設定背景顏色 background-color
-
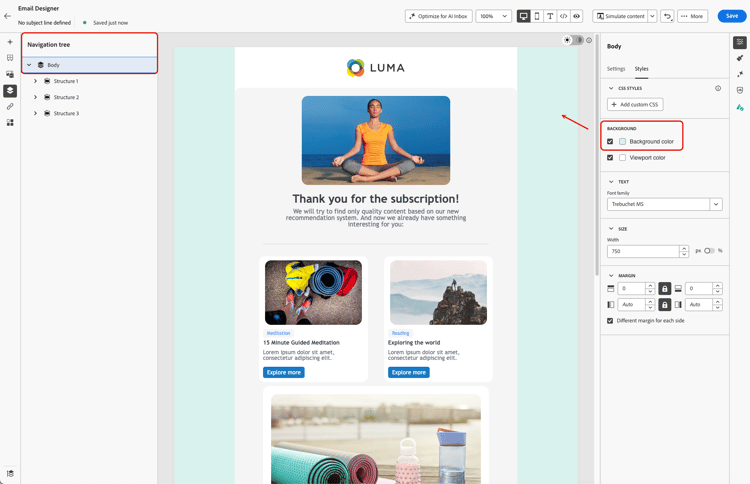
主體背景顏色 — 為整封電子郵件設定背景顏色。請確認已於左側面板可存取的 導覽樹狀結構 中選取內文,並於右側 樣式 索引標籤中使用專屬選項進行設定。
-
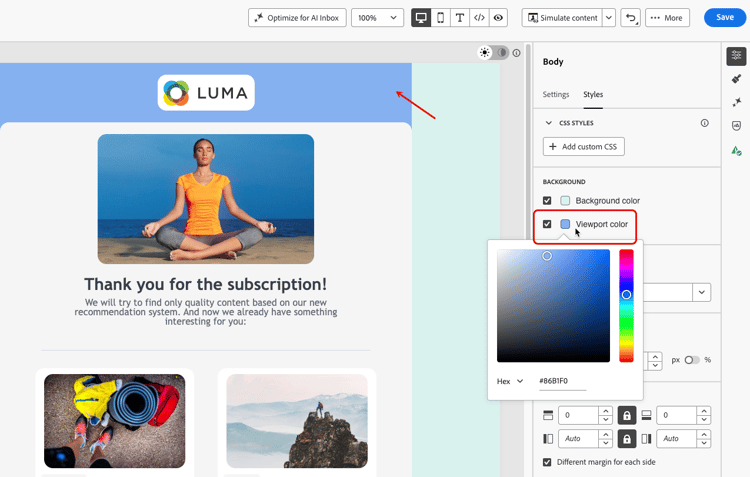
檢視區背景顏色 — 設定檢視區顏色,可將相同背景顏色套用至所有結構元件,且不受內文背景色顏色定的影響。
-
結構背景顏色 — 若要將背景顏色套用至單一結構元件,請直接在畫布或從左側面板中選取該元件,然後為該結構設定特定顏色。
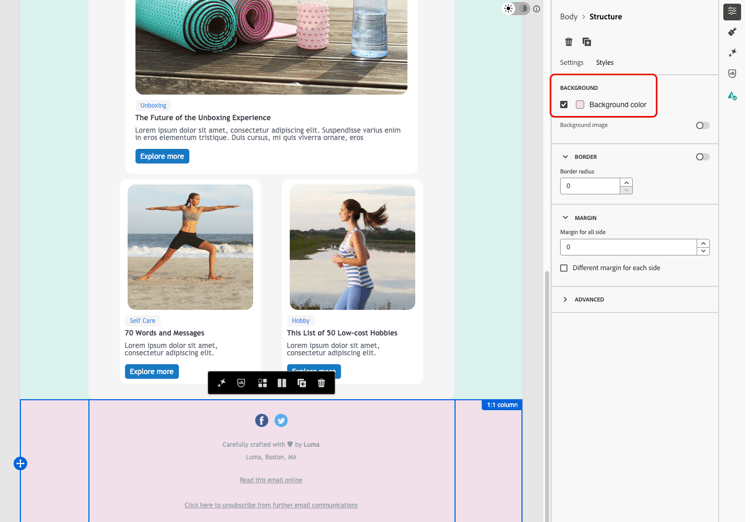
note tip TIP 在此情況下,請確認未設定檢視區背景顏色,以免遮蔽該結構的背景顏色。 -
欄位背景顏色 — 在欄層級設定背景顏色。同樣地,請於左側面板選取所需欄,並為該欄設定特定顏色。
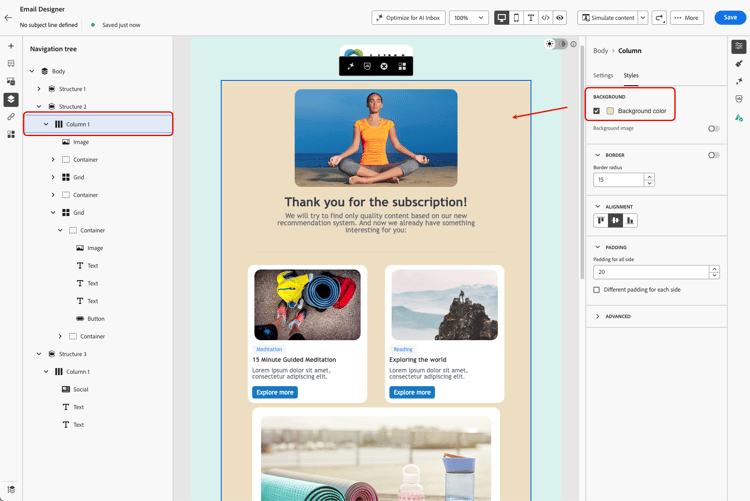
note tip TIP 這是最常見的使用案例和最佳實務,因為它讓您在編輯其餘電子郵件內容時擁有更多彈性。
設定背景影像 background-image
您也可為結構或欄元件的內容設定背景影像。這最常用於結構層級;雖可於欄層級進行設定,但很少採用。
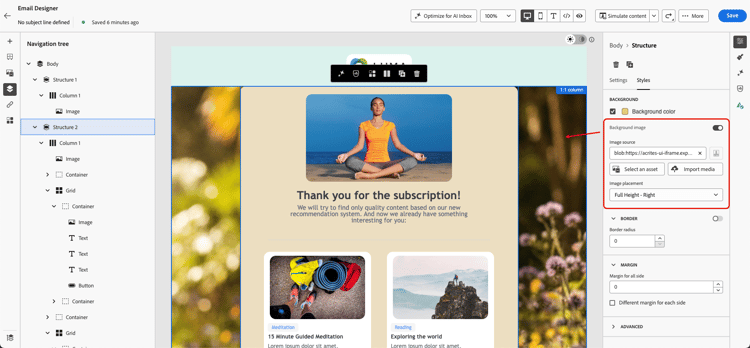
設定背景影像後,使用 影像位置 下拉式清單控制影像如何填滿結構或欄。以下選項可供選取:
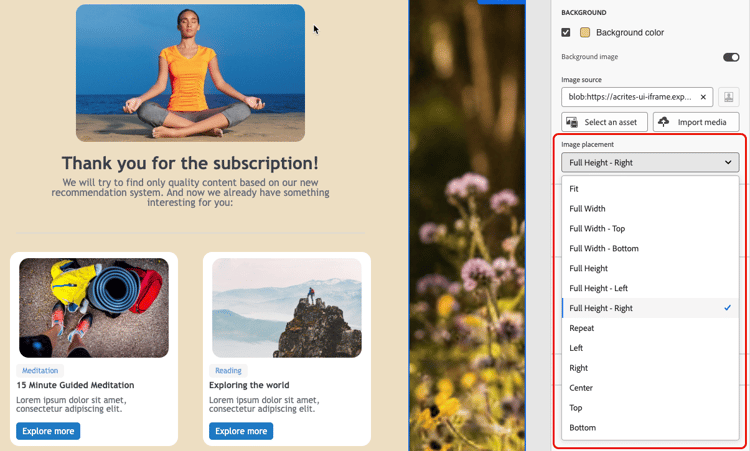
縮放以填滿,置中:
- 適合 - 在兩個軸上延展影像以填滿容器,不保留寬高比。
- 全寬 - 依照容器的寬度按比例縮放影像,並垂直置中。
- 全高 - 依照容器的高度按比例縮放影像,並水平置中。
縮放以填滿,錨定至邊緣:
- 全寬 - 頂端 - 與 全寬 相同,錨定在容器頂端。溢位會在底部裁切。
- 全寬 - 底部 - 與 全寬 相同,錨定在容器底部。溢位會在頂端裁切。
- 全高 - 左側 - 與 全高 相同,錨定在容器左側。溢位會在右側裁切。
- 全高 - 右側 - 與 全高 相同,錨定在容器右側。溢位會在左側裁切。
應用程式拼貼:
- 重複 - 以原始大小應用程式拼貼影像來填滿容器。
定位但不縮放:
- 左、右、置中、上、下 - 以原始大小放置影像,並錨定在容器的對應邊緣或中央。
This section contains structured knowledge intended to support interpretation, retrieval, and question answering related to this topic.
For complete understanding, this information should be combined with the documentation on this page. Neither source is intended to stand alone; the page describes the feature, while this section provides additional context that helps disambiguate terminology, intent, applicability, and constraints.
- TL;DR: This page explains how to set background colors and images at the body, viewport, structure, and column levels of an email in the Email Designer, and Adobe’s best practices for doing so.
Intents:
- Set a Background color for the whole email at the body level
- Apply the same background color to all structure components using Viewport background color
- Set a different background color for a specific structure component
- Set a background color for a specific column
- Set a Background image for a structure or column component and choose an Image placement option
Glossary:
- Background color: A color applied to the whole email when Body is selected in the navigation tree (product-specific)
- Viewport background color: A setting that applies the same background color to all structure components, independently of the body’s background color (product-specific)
- Background image: An image set for the content of a structure or column component; falls back to the background color when not supported (product-specific)
- Image placement: A dropdown that controls how a background image fills its container — by scaling it centered, scaling it anchored to an edge, tiling it, or positioning it without scaling (product-specific)
Guardrails:
- Some email programs / clients do not support background images; when not supported, the background color is used instead, so select an appropriate fallback background color.
- When setting a different background color per structure component, do not set a viewport background color, as it may hide the structure background colors.
- Column-level background color is the most common use case and Adobe’s recommended best practice, for more flexibility when editing the rest of the email content.
- Avoid using background colors on image or text components, as they are harder to manage.
- Apply a background color to the body only if the design requires it.
- A background image can also be set at the column level, though this is rarely used; the same fallback color and Image placement options apply there too.
Terminology:
- Canonical name: Background — Acronym: n/a — variants: background color, background image, image placement
- Do not confuse: “Background color” (body-level, whole email) ≠ “Viewport background color” (same color applied to all structure components)
- Do not confuse: “Background color” (supported broadly by email clients) ≠ “Background image” (not supported by all email clients, falls back to background color)
- Do not confuse the “Scale to fill, centered” Image placement options (Fit, Full Width, Full Height) with the “Scale to fill, anchored to an edge” options (Full Width - Top, Full Width - Bottom, Full Height - Left, Full Height - Right), which control which side is cropped instead of centering the image
FAQ:
- Q: Where does Adobe recommend setting background colors? — At the column level, which is the most common use case and best practice, allowing more flexibility when editing the rest of the email content.
- Q: What happens if a background image is not supported by an email client? — The background color is used instead, so select an appropriate fallback background color.
- Q: How do I apply the same background color to all structure components? — Select Viewport background color, which can be set independently of the body’s background color.
- Q: Why might my per-structure background colors not appear? — A viewport background color may hide the structure background colors; do not set one in that case.
- Q: Can I set a background image at the column level? — Yes, though it is rarely used; the same fallback color behavior and Image placement options described for structures apply there too.
- Q: What is the difference between “Full Width” and “Full Width - Top” / “Full Width - Bottom”? — “Full Width” scales the image proportionally to the container’s width and centers it vertically. The “Top” and “Bottom” variants anchor it to that edge instead, cropping the opposite side rather than centering.
- Q: What is the difference between “Full Height” and “Full Height - Left” / “Full Height - Right”? — “Full Height” scales the image proportionally to the container’s height and centers it horizontally. The “Left” and “Right” variants anchor it to that side instead, cropping the opposite side rather than centering.