使用Workfront Fusion将Workfront问题转换为包含Adobe Experience Manager工作流的项目
如果您通过Workfront Fusion创建项目并希望在项目上包含Adobe Experience Manager工作流,则必须使用特定的Fusion模块配置,如本文所述。
此功能在新的“文档”区域中不可用。
访问权限要求
| table 0-row-2 1-row-2 2-row-2 3-row-2 html-authored no-header | |
|---|---|
| Adobe Workfront 包 |
任意 Adobe Workfront Workflow 包以及任意 Adobe Workfront 自动化和集成包 Workfront Ultimate Workfront Prime 和 Select 包,且需额外购买 Workfront Fusion。 |
| Adobe Workfront 许可证 |
参与者或更高版本 请求或更高版本 |
| 产品 |
Adobe Experience Manager:
Workfront Fusion:
|
| 访问级别配置 | 编辑对文档的访问权限 |
先决条件
开始之前,
-
您的Workfront管理员必须在Adobe Experience Manager集成中配置工作流。 有关详细信息,请参阅配置Experience Manager Assets as a Cloud Service集成。
-
您必须使用Adobe Experience Manager集成链接文件夹工作流配置项目模板。
-
您必须在Workfront中创建OAuth应用程序才能配置此模块的连接。
有关说明,请参阅本文中的创建OAuth应用程序。
模块配置
在Workfront Fusion中,如果要创建包含Adobe Experience Manager工作流的项目,则必须使用Workfront >杂项操作模块。
-
将Workfront > 杂项操作模块添加到您的方案。
-
在 连接 字段中,选择连接到此模块将使用的帐户的Workfront连接。
有关创建连接的说明,请参阅Workfront模块一文中的连接 Workfront 到 Workfront Fusion。
有关创建客户端ID和客户端密钥的说明,您将需要创建连接,请参阅本文中的创建OAuth应用程序。
-
在 记录类型 字段中,选择
Issue。 -
在 操作 字段中,选择
convertToProject。 -
在 ID 字段中,输入或映射要转换为项目的问题的ID。
-
启用显示高级设置。
-
滚动到模块的底部,并找到 项目(高级集合) 字段。
-
将以下文本粘贴到 项目(高级收藏集) 字段中。
code language-none { "aemNativeFolderTreeIDs": ["Folder Tree ID here"], "aemNativeFolderWorkflowEnabled": "true", "name": "New project name here", "templateID": "Template ID here" } -
将
Folder tree ID here替换为文件夹ID。要查找文件夹树ID,请参阅本文中的查找文件夹树ID。
要使用多个文件夹树,请使用逗号分隔ID:
"aemNativeFolderTreeIDs": ["Folder tree ID here","Second folder tree ID here"], -
将
New project name here替换为新项目将具有的名称。 -
将
Template ID here替换为您用于新项目的模板的ID。您可以映射上一个模块(如Workfront >搜索模块)中的模板ID,或在Workfront中模板页面的URL中找到它。
-
单击 确定 以保存模块配置。
查找文件夹树ID
要查找文件夹树ID,请执行以下操作:
-
在Workfront中,打开要用于此项目的模板。 此模板必须包含要用于项目的Adobe Experience Manager配置。
-
打开浏览器的开发人员工具。
-
在开发人员工具中打开 网络 选项卡。
-
在 筛选器 框中,输入
object-workflow。 -
在“名称”列中,单击显示的字母数字ID。
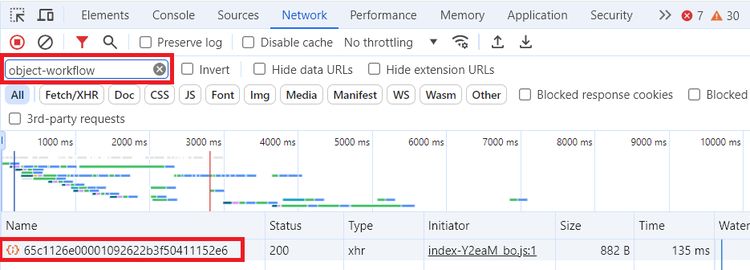
-
单击字母数字ID右侧的 预览 选项卡。
-
打开以下折叠的部分:
dataobjectWorkflowworkflowsenhancedLinkedFolderCreationWorkflowenhancedLinkedFolderCreationWorkflowConfigurations
每个文件夹树都由一个数字表示。 0(零)表示列表中的第一个文件夹,1表示第二个文件夹,依此类推。 如果模板只包含一个文件夹树,则其值为0。
-
打开要用于新项目的文件夹树。 记下
_id字段值。 如果要使用多个文件夹树,请记下要使用的文件夹树的所有_id字段值。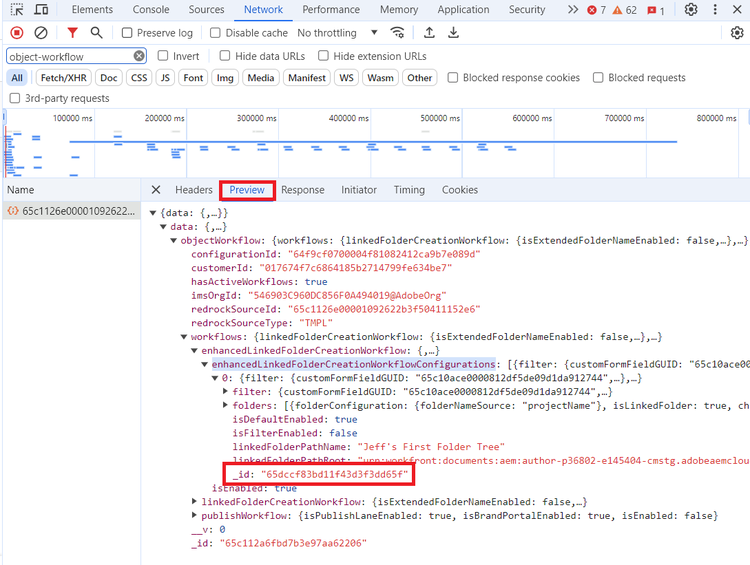
在Workfront > 其他操作 Fusion模块的 项目(高级收藏集) 字段中,您将输入这些
aemNativeFolderTreeIDs值。
创建OAuth应用程序
您必须在Workfront中为此模块的连接设置OAuth应用程序。 您只需对Fusion中的给定Workfront连接执行一次此操作。
-
在Workfront中,开始创建OAuth应用程序,如文章为Workfront集成创建OAuth2应用程序中的使用用户凭据(授权代码流)创建OAuth2应用程序中所述。
-
将客户端ID和客户端密钥复制到安全位置。
-
在 重定向URI 字段中,输入以下内容:
code language-none http://app.workfrontfusion.com/oauth/cb/workfront-workfront -
单击保存。
在Fusion中配置模块的连接时,您将使用此客户端ID和客户端密钥。
有关创建连接的说明,请参阅Workfront模块一文中的连接 Workfront 到 Workfront Fusion。
故障排除
问题:自定义表单意外附加到Fusion创建的项目
解决方法:
将categoryID从高级项目JSON移出并移入project_new.categoryID(使用Fusion UI中的结构化字段)。
具体而言,将映射器更改为:
// project_new — set just this one field via the structured UI
{
    "categoryID": "5d3a292300b69eb5d80c37e8ce6269d3"
}
// project (advanced JSON) — remove categoryID from here
{
    "aemNativeFolderTreeIDs": ["693c40280e09eb1bd4085a5e"],
    "aemNativeFolderWorkflowEnabled": "true",
    "name": "{{1.name}}",
    "templateID": "{{if(...)}}",
    "ownerID": "{{1.ownerID}}",
    "sponsorID": "{{1.ownerID}}",
    "priority": "2",
    "programID": "{{ifempty(7.ID; null)}}",
    "description": "test",
    "portfolioID": "{{ifempty(8.ID; null)}}",
    "scheduleMode": "S",
    "completionType": "AUT"
}
为什么它有效:
isCtgyIDsGiven现在看到project_new.categoryID = "5d3a292300b69eb5d80c37e8ce6269d3"→返回truthy →temp.isCtgyIDsGiven = true- 跳过了步骤(
getAttachedAndAttachableCategoryID),其条件为!temp.isCtgyIDsGiven - 相反,此步骤会触发:
ctgyIds = split(parameters.project_new.categoryID, ',')→ [“5d3a292300b69eb5d80c37e8ce6269d3”] prepareMiscActionData仍对所有特定于AEM的字段使用高级项目JSON(它优先于project_new),然后叠加objectCategories: [{ categoryID: "5d3a292300b69eb5d80c37e8ce6269d3" }],仅包括其预期形式,无意外形式- 使用
isCopyCustomData: true将自定义字段值从源OPTASK复制到新项目的步骤仍按预期运行
AEM字段(aemNativeFolderTreeIDs, aemNativeFolderWorkflowEnabled)保留在高级字段中不受影响。 此进程仅在找到categoryID时更改。