将at.js库替换为Platform Web SDK
创建对象:
- 中级
- 有经验的
- 开发人员
了解如何替换页面上的Adobe Target实施,以便从at.js迁移到Platform Web SDK。 基本替换包含以下步骤:
- 查看Target管理设置并记下您的IMS组织ID
- 将at.js库替换为Platform Web SDK
- 更新用于同步库实施的预隐藏代码片段
- 配置Platform Web SDK
查看Target管理设置
将Target迁移到Platform Web SDK的第一步是查看Target界面的 管理 部分中的设置。
实施
帐户详细信息
- IMS组织ID — 请记下此值,因为配置Platform Web SDK需要此值。
- 设备上决策 - Platform Web SDK不支持此功能。 如果您迁移后不再在任何网站上使用at.js,或者不再有任何设备上决策的服务器端用例,则可以禁用此设置。
实施方法
实施方法 部分中的所有可编辑设置仅适用于at.js。 这些设置用于为您的实施生成自定义的at.js库。 查看这些设置以检查您是否有任何自定义代码,或是否为跨域用例设置第一方和第三方Cookie。
配置文件生命周期 设置只能由Adobe客户关怀更改。 Target访客配置文件生命周期不受您的实施方法的影响。 at.js和Platform Web SDK均使用相同的访客配置文件生命周期。
Privacy
- 模糊处理访客IP地址 — 此设置会影响地理定位功能。 at.js和Platform Web SDK都使用相同的后端IP模糊处理设置进行地理定位。
环境
Platform Web SDK使用数据流配置,允许您为单独的开发、暂存和生产数据流显式定义环境ID。 此配置的主要用例适用于不存在URL以轻松区分环境的移动应用程序实施。 设置是可选的,但可用于确保所有请求都与指定的环境正确关联。 这与at.js实施不同,在该at.js实施中,您必须根据域和主机组规则分配Target环境。
有关详细信息,请参阅数据流配置指南和Target 主机文档。
部署Platform Web SDK
Target功能由at.js和Platform Web SDK提供。 如果同时使用这两个库,则可能会遇到渲染和跟踪问题。 要成功迁移到Platform Web SDK,第一步是删除at.js并将其替换为Platform Web SDK (alloy.js)。
假定一个使用at.js的简单Target实施:
- 靠近页面顶部的数据层为Target和其他应用程序提供信息
- 一个或多个第三方帮助程序库,其功能可在Target活动中使用(例如,jQuery)
- 用于缓解闪烁的预隐藏代码片段
- Target at.js库会使用默认设置异步加载,以自动请求和渲染活动:
<!doctype html>
<html>
<head>
<title>Example page</title>
<!--Data Layer to enable rich data collection and targeting-->
<script>
var digitalData = {
// Data layer information goes here
};
</script>
<!--Third party libraries that may be used by Target offers and modifications-->
<script src="https://ajax.googleapis.com/ajax/libs/jquery/3.6.1/jquery.min.js"></script>
<!--prehiding snippet for Target with asynchronous deployment-->
<script>
;(function(win, doc, style, timeout) {
var STYLE_ID = 'at-body-style';
function getParent() {
return doc.getElementsByTagName('head')[0];
}
function addStyle(parent, id, def) {
if (!parent) {
return;
}
var style = doc.createElement('style');
style.id = id;
style.innerHTML = def;
parent.appendChild(style);
}
function removeStyle(parent, id) {
if (!parent) {
return;
}
var style = doc.getElementById(id);
if (!style) {
return;
}
parent.removeChild(style);
}
addStyle(getParent(), STYLE_ID, style);
setTimeout(function() {
removeStyle(getParent(), STYLE_ID);
}, timeout);
}(window, document, "body {opacity: 0 !important}", 3000));
</script>
<!--Target at.js library loaded asynchonously-->
<script src="/libraries/at.js" async></script>
</head>
<body>
<h1 id="title">Home Page</h1><br><br>
<p id="bodyText">Navigation</p><br><br>
<a id="home" class="navigationLink" href="#">Home</a><br>
<a id="pageA" class="navigationLink" href="#">Page A</a><br>
<a id="pageB" class="navigationLink" href="#">Page B</a><br>
<a id="pageC" class="navigationLink" href="#">Page C</a><br>
<div>Homepage Hero Banner Content</div>
</body>
</html>
要升级Target以使用Platform Web SDK,请首先删除at.js:
<!--Target at.js library loaded asynchonously-->
<script src="/libraries/at.js" async></script>
并且将替换为alloy JavsScript库或您的标记嵌入代码以及Adobe Experience Platform Web SDK扩展:
<!--Platform Web SDK base code-->
<script>
!function(n,o){o.forEach(function(o){n[o]||((n.__alloyNS=n.__alloyNS||
[]).push(o),n[o]=function(){var u=arguments;return new Promise(
function(i,l){n[o].q.push([i,l,u])})},n[o].q=[])})}
(window,["alloy"]);
</script>
<!--Platform Web SDK loaded asynchonously. Change the src to use the latest supported version.-->
<script src="https://cdn1.adoberesources.net/alloy/2.13.1/alloy.min.js" async></script>
<!--Tags Header Embed Code: REPLACE WITH THE INSTALL CODE FROM YOUR OWN ENVIRONMENT-->
<script src="//assets.adobedtm.com/launch-EN93497c30fdf0424eb678d5f4ffac66dc.min.js" async></script>
在标记属性中,添加Adobe Experience Platform Web SDK扩展:
预建独立版本要求直接将“基础代码”添加到页面,以创建名为alloy的全局函数。 使用此函数与SDK交互。 如果要将全局函数命名为其他名称,请更改alloy
名称。
有关其他详细信息和部署选项,请参阅安装Platform Web SDK文档。
更新内容预隐藏方法
根据异步还是同步加载库,Platform Web SDK实施可能需要预隐藏代码片段。
异步实施
与at.js一样,如果Platform Web SDK库异步加载,则页面可能会在Target执行内容交换之前完成渲染。 这种行为可能会导致所谓的“闪烁”,在这种情况下,会先短暂显示默认内容,然后再将该内容替换为Target指定的个性化内容。 如果要避免出现这种闪烁情况,Adobe建议在紧靠异步Platform Web SDK脚本引用或标记嵌入代码之前的位置添加一个特殊的预隐藏代码片段。
如果您的实施是异步的(如上面的示例所示),请将at.js预隐藏代码片段替换为与Platform Web SDK兼容的以下版本:
<!--Prehiding snippet for Target with asynchronous Web SDK deployment-->
<script>
!function(e,a,n,t){var i=e.head;if(i){
if (a) return;
var o=e.createElement("style");
o.id="alloy-prehiding",o.innerText=n,i.appendChild(o),setTimeout(function(){o.parentNode&&o.parentNode.removeChild(o)},t)}}
(document, document.location.href.indexOf("mboxEdit") !== -1, "body { opacity: 0 !important }", 3000);
</script>
预隐藏代码片段使用您选择的CSS定义在页面头中创建样式标记。 在收到来自Target的响应或达到超时时,将删除此样式标记。
预隐藏行为由代码片段末尾的两个配置控制。
-
body { opacity: 0 !important }
指定在Target加载之前要用于预隐藏的CSS定义。 默认情况下,将隐藏整个页面。 您可以将此定义更新为要预隐藏的选择器,以及要如何隐藏选择器。 您可以包括多个定义,因为此值只是插入到预隐藏样式标记中的内容。 如果您的导航下有一个可轻松识别的容器元素封装内容,则可以使用此设置限制仅对该容器元素使用预隐藏。 -
3000
指定预隐藏的超时时间(以毫秒为单位)。 如果在超时之前未收到来自Target的响应,则将删除预隐藏样式标记。 达到此超时的情况应该很少见。
alloy-prehiding
。 如果使用了适用于at.js的预隐藏代码片段,则可能无法正常使用。同步实施
Adobe建议异步实施Platform Web SDK,以获得最佳的总体页面性能。 但是,如果同步加载alloy.js库或tags嵌入代码,则不需要预隐藏代码片段。 而是在Platform Web SDK配置中指定预隐藏样式。
可以使用prehidingStyle
选项配置同步实施的预隐藏样式。 下节将介绍Platform Web SDK配置。
要了解有关Platform Web SDK如何管理闪烁的更多信息,请参阅指南部分: 管理个性化体验的闪烁
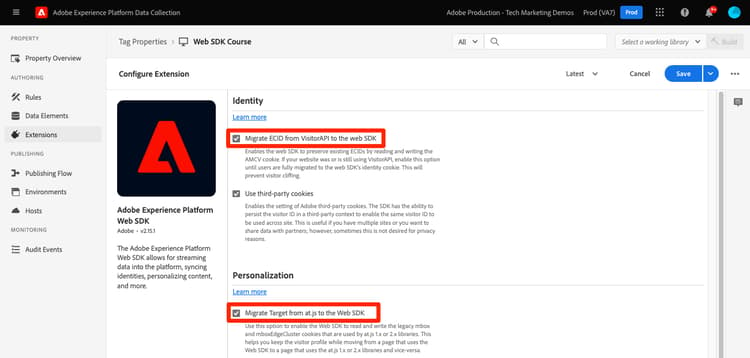
配置Platform Web SDK
每次加载页面时都必须配置Platform Web SDK。 以下示例假设整个站点正在单个部署中升级到Platform Web SDK:
configure
命令必须始终是调用的第一个SDK命令。 edgeConfigId
是数据流ID
alloy("configure", {
"edgeConfigId": "ebebf826-a01f-4458-8cec-ef61de241c93",
"orgId":"ADB3LETTERSANDNUMBERS@AdobeOrg"
});
在标记实施中,许多字段可自动填充或从下拉菜单中进行选择。 请注意,可以为每个环境选择不同的Platform 沙盒和数据流。 数据流将根据标记库在发布过程中的状态进行更改。
如果您计划逐页从at.js迁移到Platform Web SDK,则需要以下配置选项:
alloy("configure", {
"edgeConfigId": "ebebf826-a01f-4458-8cec-ef61de241c93",
"orgId":"ADB3LETTERSANDNUMBERS@AdobeOrg",
"targetMigrationEnabled":true,
"idMigrationEnabled":true
});

下面列出了与Target相关的值得注意的配置选项:
edgeConfigId
ebebf826-a01f-4458-8cec-ef61de241c93
orgId
ADB3LETTERSANDNUMBERS@AdobeOrg
targetMigrationEnabled
true
idMigrationEnabled
true
thirdPartyCookiesEnabled
true
prehidingStyle
body { opacity: 0 !important }
有关选项的完整列表,请参阅配置Platform Web SDK指南。
实施示例
正确实施Platform Web SDK后,示例页面将如下所示。
<!doctype html>
<html>
<head>
<title>Example page</title>
<!--Data Layer to enable rich data collection and targeting-->
<script>
var digitalData = {
// Data layer information goes here
};
</script>
<!--Third party libraries that may be used by Target offers and modifications-->
<script src="https://ajax.googleapis.com/ajax/libs/jquery/3.6.1/jquery.min.js"></script>
<!--Prehiding snippet for Target with asynchronous Web SDK deployment-->
<script>
!function(e,a,n,t){var i=e.head;if(i){
if (a) return;
var o=e.createElement("style");
o.id="alloy-prehiding",o.innerText=n,i.appendChild(o),setTimeout(function(){o.parentNode&&o.parentNode.removeChild(o)},t)}}
(document, document.location.href.indexOf("mboxEdit") !== -1, ".body { opacity: 0 !important }", 3000);
</script>
<!--Platform Web SDK base code-->
<script>
!function(n,o){o.forEach(function(o){n[o]||((n.__alloyNS=n.__alloyNS||
[]).push(o),n[o]=function(){var u=arguments;return new Promise(
function(i,l){n[o].q.push([i,l,u])})},n[o].q=[])})}
(window,["alloy"]);
</script>
<!--Platform Web SDK loaded asynchonously. Change the src to use the latest supported version.-->
<script src="https://cdn1.adoberesources.net/alloy/2.13.1/alloy.min.js" async></script>
<!--Configure Platform Web SDK-->
<script>
alloy("configure", {
"edgeConfigId": "ebebf826-a01f-4458-8cec-ef61de241c93",
"orgId":"ADB3LETTERSANDNUMBERS@AdobeOrg"
});
</script>
</head>
<body>
<h1 id="title">Home Page</h1><br><br>
<p id="bodyText">Navigation</p><br><br>
<a id="home" class="navigationLink" href="#">Home</a><br>
<a id="pageA" class="navigationLink" href="#">Page A</a><br>
<a id="pageB" class="navigationLink" href="#">Page B</a><br>
<a id="pageC" class="navigationLink" href="#">Page C</a><br>
<div id="homepage-hero">Homepage Hero Banner Content</div>
</body>
</html>
页面代码:
<!doctype html>
<html>
<head>
<title>Example page</title>
<!--Data Layer to enable rich data collection and targeting-->
<script>
var digitalData = {
// Data layer information goes here
};
</script>
<!--Third party libraries that may be used by Target offers and modifications-->
<script src="https://ajax.googleapis.com/ajax/libs/jquery/3.6.1/jquery.min.js"></script>
<!--Prehiding snippet for Target with asynchronous Web SDK deployment-->
<script>
!function(e,a,n,t){var i=e.head;if(i){
if (a) return;
var o=e.createElement("style");
o.id="alloy-prehiding",o.innerText=n,i.appendChild(o),setTimeout(function(){o.parentNode&&o.parentNode.removeChild(o)},t)}}
(document, document.location.href.indexOf("mboxEdit") !== -1, ".body { opacity: 0 !important }", 3000);
</script>
<!--Tags Header Embed Code: REPLACE WITH THE INSTALL CODE FROM YOUR OWN ENVIRONMENT-->
<script src="//assets.adobedtm.com/launch-EN93497c30fdf0424eb678d5f4ffac66dc.min.js" async></script>
</head>
<body>
<h1 id="title">Home Page</h1><br><br>
<p id="bodyText">Navigation</p><br><br>
<a id="home" class="navigationLink" href="#">Home</a><br>
<a id="pageA" class="navigationLink" href="#">Page A</a><br>
<a id="pageB" class="navigationLink" href="#">Page B</a><br>
<a id="pageC" class="navigationLink" href="#">Page C</a><br>
<div id="homepage-hero">Homepage Hero Banner Content</div>
</body>
</html>
在标记中,添加Adobe Experience Platform Web SDK扩展:
并添加所需的配置:
需要注意的是,仅包含并配置如上所示的Platform Web SDK库,不会执行任何对Adobe Edge网络的网络调用。
接下来,了解如何请求并将基于VEC的活动应用到页面。