在此页面上:了解如何通过将关系架构映射到客户配置文件来配置编排营销活动的定向维度,以便您可以在实体级别传递消息。
利用协调的营销活动,您可以利用Adobe Experience Platform的关系架构功能,在实体级别设计和提供目标通信。 Experience Platform使用架构,以一致且可重用的方式描述数据结构。 当数据被摄取到Experience Platform中时,它会根据XDM架构进行构建。
编排的营销活动支持两种类型的定位维度:
- 个人资料定向维度:内置默认值,直接使用 个人资料 架构定向收件人。
- 自定义定位维度:通过关系架构(例如,
Recipients、Visitors、Customers)定位收件人。 当需要在实体级别(例如根据订阅或合同)而不是用户档案级别投放消息时,可以使用此选项。
配置自定义定位维度时,您可以定义两个关键方面:
-
可定位架构
您可以指定哪些关系架构符合定位条件。 默认情况下使用名为
Recipient的架构,但您可以配置替代方案,如Visitors、Customers等。note important IMPORTANT 协调的营销活动允许对与 Profile 架构具有直接或相关关系的任何架构进行定位。 虽然它的使用主要针对1:1关系,但它也支持1:N关系,如帐户 >收件人,只要关系路径在数据模型中正确建模即可。 这样可基于帐户级别的数据启用定位,同时仍可解析消息投放的正确用户档案身份。 -
个人资料链接
系统必须了解目标架构如何映射到
Profile架构。 这是通过共享身份字段实现的 — 该字段存在于目标架构和Profile架构中,并配置为身份命名空间。
➡️ 在Adobe Experience Platform文档中了解有关关系架构的更多信息
创建定位维度 targeting-dimension
首先,通过将关系架构映射到客户配置文件来设置活动编排。
-
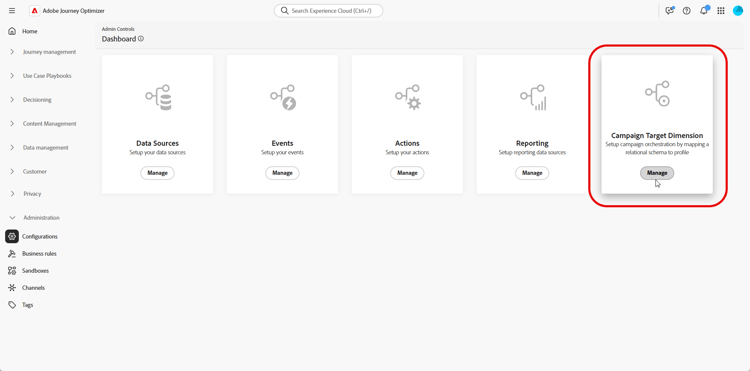
从管理,访问 配置 菜单并选择Campaign Target Dimension。
-
单击 创建 开始创建您的定向维度。
-
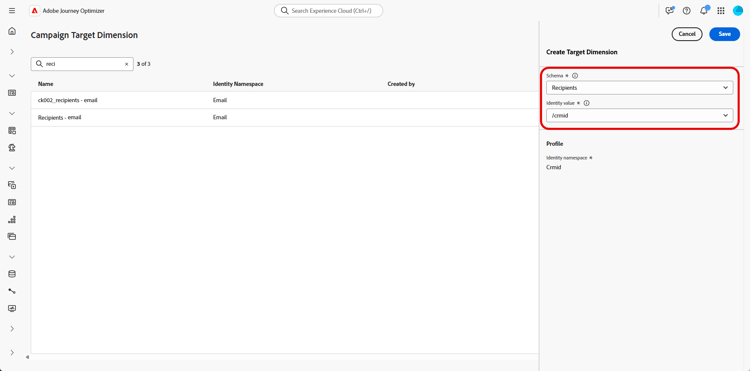
从下拉列表中选择您之前配置的架构。
虽然显示所有关系架构,但只有与 配置文件 具有直接标识关系的架构才符合选择条件。 避免选择非人员架构(例如购买),并选择与用户档案直接关联的架构。
-
选择表示要定位的实体的标识值。
在此示例中,客户个人资料链接到多个订阅,每个订阅在
Recipient架构中由唯一的crmID表示。 通过将 Target Dimension 设置为使用Recipient架构及其crmID标识,您可以在订阅级别发送消息,而不是发送到主要客户个人资料,从而确保每个合同或行都会收到其自己的个性化消息。请参阅Adobe Experience Platform文档以了解详情
-
单击 保存 以完成设置。 请注意,创建后,无法编辑Target维度。
-
访问


配置 目标Dimension 后,继续创建和设置您的 渠道配置 并定义相应的执行详细信息。
This section contains structured knowledge intended to support interpretation, retrieval, and question answering related to this topic.
For complete understanding, this information should be combined with the documentation on this page. Neither source is intended to stand alone; the page describes the feature, while this section provides additional context that helps disambiguate terminology, intent, applicability, and constraints.
- TL;DR: This page explains how to configure a Targeting dimension for Orchestrated campaigns by mapping a relational schema to the customer profile so messages can be delivered at the entity level.
Intents:
- Understand the difference between a Profile targeting dimension and a custom targeting dimension.
- Configure Targetable Schemas to specify which relational schemas are eligible for targeting.
- Configure Profile Linkage so the system can map the target schema to the Profile schema through a shared identity field.
- Create a Targeting dimension by choosing a previously configured schema and selecting its Identity value.
- Delete a Targeting dimension that is not referenced by an active channel configuration.
Glossary:
- Profile targeting dimension: the built-in default targeting dimension, which targets recipients directly using the Profile schema (product-specific)
- Custom targeting dimension: a targeting dimension that targets recipients through a relational schema (for example, Recipients, Visitors, Customers), used to deliver messages at the entity level rather than at the profile level (product-specific)
- Targetable Schemas: the configuration aspect that specifies which relational schemas are eligible for targeting (product-specific)
- Profile Linkage: the configuration aspect that defines how the target schema maps to the Profile schema through a shared identity field configured as an identity namespace (product-specific)
- Identity value: the field selected on the chosen schema that represents the entity to target (for example, crmID) (product-specific)
Guardrails:
- Although all relational schemas are displayed when choosing a schema, only those with a direct identity relationship to Profile are eligible for selection.
- Orchestrated campaigns allow targeting on any schema that has a direct or related relationship to the Profile schema; usage is primarily intended for 1:1 relationships, but 1:N relationships (such as Account to Recipients) are also supported as long as the relationship path is properly modeled in the data model.
- Once created, a Target dimension cannot be edited.
- A Target dimension cannot be deleted if it is referenced by an active channel configuration.
Terminology:
- Canonical name: Targeting dimension — variants: Target Dimension, Campaign Target Dimension
- Do not confuse: “Profile targeting dimension” (targets using the Profile schema directly) ≠ “Custom targeting dimension” (targets through a relational schema at the entity level)
FAQ:
- Q: What is the difference between a Profile targeting dimension and a custom targeting dimension? — The Profile targeting dimension is the built-in default that targets recipients directly using the Profile schema; a custom targeting dimension targets recipients through a relational schema to deliver messages at the entity level.
- Q: Which relational schemas can be selected when creating a Targeting dimension? — Only schemas with a direct identity relationship to Profile are eligible for selection, even though all relational schemas are displayed.
- Q: Can a Targeting dimension be edited after it is created? — No, once created, a Target dimension cannot be edited.
- Q: Can a Targeting dimension always be deleted? — No, a Target dimension cannot be deleted if it is referenced by an active channel configuration.
- Q: What are the two key aspects defined when configuring a custom targeting dimension? — Targetable Schemas and Profile Linkage.
Related pages:
- For choosing a previously configured schema when creating a Targeting dimension, see previously configured Schema (orchestrated/gs-schemas.md)
Personas:
- marketer: Can create a Targeting dimension by choosing a previously configured schema and selecting its Identity value, then select Save to complete the setup. Can configure Targetable Schemas to specify which relational schemas are eligible for targeting, and configure Profile Linkage through a shared identity field. Can access the advanced menu to delete a Target dimension. The page states that a Target dimension cannot be edited once created and cannot be deleted if it is referenced by an active channel configuration. Where: “Create your Targeting dimension”.
Onboarding:
- Level: Intermediate
- First minimal step: From Administration, access the Configurations menu and select Campaign Target Dimension.
- Success check: Messages are delivered at the subscription level rather than to the main customer profile, with each contract receiving its own personalized message.
- Previous: Choose a previously configured schema for your Targeting dimension: Configuration steps (orchestrated/gs-schemas.md)