이 페이지에서: 권한, 데이터 세트, 푸시 자격 증명, 채널 구성 및 설정 테스트를 포함하여 Adobe Journey Optimizer에서 웹 푸시 알림 채널을 구성하는 방법에 대해 알아봅니다.
Journey Optimizer에서는 여정을 만들고 타겟팅한 대상자에게 메시지를 보낼 수 있습니다. Journey Optimizer을(를) 사용하여 웹 푸시 알림을 전송하기 전에 Adobe Experience Platform에 구성 및 통합이 제대로 되어 있는지 확인해야 합니다. Adobe Journey Optimizer의 푸시 알림 데이터 흐름을 파악하려면 이 페이지를 참조하십시오.
시작하기 전 start-push
권한 설정 setup-permissions
모바일 애플리케이션을 만들기 전에 먼저 Adobe Experience Platform의 태그에 대한 올바른 사용자 권한이 있는지 확인하거나 사용자에게 할당해야 합니다. 자세한 내용은 태그 설명서를 참조하세요.
속성 및 회사 권한을 할당하려면 아래 단계를 따르십시오.
-
Admin Console에 액세스합니다.
-
제품 탭에서 Adobe Experience Platform 데이터 수집 카드를 선택합니다.

-
기존 제품 프로필을 선택하거나 새 프로필 버튼을 사용하여 새 프로필을 만드십시오. Admin Console 설명서에서 새 새 프로필을 만드는 방법을 알아보세요.
-
권한 탭에서 속성 권한을 선택합니다.

-
모두 추가를 클릭합니다. 이렇게 하면 제품 프로필에 다음 권한이 추가됩니다.
- 승인
- 개발
- 환경 관리
- 확장 관리
- 게시
Adobe Experience Platform Mobile SDK에서 Adobe Journey Optimizer 확장을 설치 및 게시하고 앱 속성을 게시하려면 이러한 권한이 필요합니다.
-
그런 다음 왼쪽 메뉴에서 회사 권한을 선택합니다.

-
다음 권한을 추가합니다.
- 앱 구성 관리
- 속성 관리
이러한 권한은 모바일 앱 개발자가 Adobe Experience Platform 데이터 수집에서 푸시 자격 증명을 설정하고 Adobe Journey Optimizer에서 푸시 알림 채널 구성(즉, 메시지 사전 설정)을 정의하는 데 필요합니다.

-
저장을 클릭합니다.
이 제품 프로필을 사용자에게 할당하려면 아래 단계를 따르십시오.
-
Admin Console에 액세스합니다.
-
제품 탭에서 Adobe Experience Platform 데이터 수집 카드를 선택합니다.
-
이전에 구성한 제품 프로필을 선택하세요.
-
사용자 탭에서 사용자 추가를 클릭합니다.

-
사용자의 이름 또는 이메일 주소를 입력하고 사용자를 선택합니다. 그런 다음 저장을 클릭합니다.
note NOTE 사용자가 이전에 Admin Console에서 만들어진 것이 아니라면 사용자 추가 설명서를 참조하세요. 
데이터 세트 확인 push-datasets
푸시 알림 채널에서는 다음 스키마 및 데이터 세트를 사용할 수 있습니다.
데이터 집합
CJM 푸시 프로필 데이터 세트
Adobe CJM ExperienceEvent - 메시지 프로필 세부 정보
Adobe CJM ExperienceEvent - 메시지 실행 세부 정보
애플리케이션 세부 정보
환경 세부 정보
CJM 푸시 추적 경험 이벤트 데이터 세트
pushNotification 속성 구성 push-property
웹 푸시 알림을 사용하려면 먼저 pushNotifications 속성이 웹 SDK 내에서 올바르게 구성되어 있는지 확인해야 합니다. 이 속성은 웹 애플리케이션에서 푸시 알림을 처리하는 방법을 제어합니다.
또한 Journey Optimizer에서 앱 푸시 자격 증명을 구성하는 데 필요한 VAPID 키를 생성해야 합니다.
1단계: Journey Optimizer에서 앱 푸시 자격 증명 추가 push-credentials-launch
올바른 사용자 권한을 부여한 후 이제 Journey Optimizer에서 모바일 애플리케이션 푸시 자격 증명을 추가해야 합니다.
Adobe이 사용자를 대신하여 푸시 알림을 전송하도록 승인하려면 모바일 앱 푸시 자격 증명 등록이 필요합니다. 아래에 자세히 설명된 단계를 참조하십시오.
-
채널 > 푸시 설정 > 푸시 자격 증명 메뉴에 액세스합니다.
-
푸시 자격 증명 만들기를 클릭합니다.
-
플랫폼 드롭다운에서 웹을 선택합니다.

-
앱 ID를 제공하십시오.
-
VAPID 공개 키 및 개인 키를 입력하십시오.
-
앱 구성을 만들려면 제출을 클릭합니다.
2단계: 푸시할 채널 구성 만들기 message-preset
푸시 자격 증명을 만든 후에는 Journey Optimizer에서 푸시 알림을 전송할 수 있는 구성을 만들어야 합니다.
-
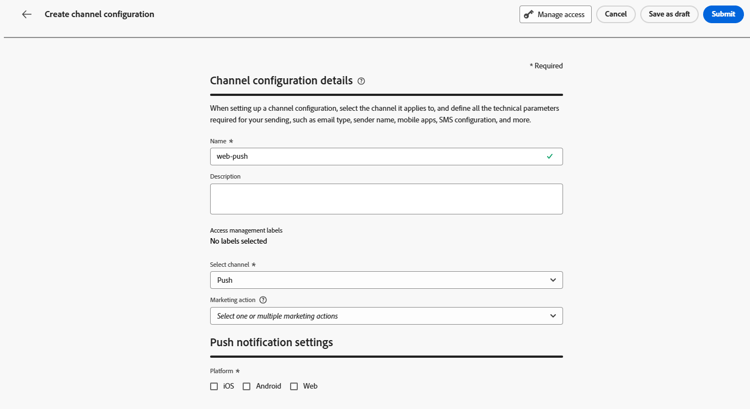
채널 > 일반 설정 > 채널 구성 메뉴에 액세스한 다음 채널 구성 만들기를 클릭하십시오.

-
구성의 이름 및 설명(선택 사항)을 입력합니다.
note NOTE 이름은 문자(A-Z)로 시작해야 합니다. 영숫자만 포함할 수 있습니다. 밑줄 _, 점., 하이픈-도 사용할 수 있습니다. -
구성에 사용자 지정 또는 핵심 데이터 사용 레이블을 할당하려면 액세스 관리를 선택할 수 있습니다. OLAC(개체 수준 액세스 제어)에 대해 자세히 알아보세요.
-
푸시 채널을 선택하십시오.
-
이 구성을 사용하여 동의 정책을 메시지에 연결하려면 마케팅 액션을 선택하십시오. 마케팅 액션과 관련된 모든 동의 정책은 고객의 선호도를 존중하기 위해 활용됩니다. 자세히 알아보기
-
플랫폼: Android, iOS 및/또는 웹을 선택하세요.
-
위에 구성된 푸시 자격 증명과 동일한 앱 ID을(를) 선택하십시오.
-
변경 내용을 저장합니다.
이제 푸시 알림을 만들 때 구성을 선택할 수 있습니다.
3단계: sendPushSubscription 속성 구성 sendPushSubscription-property
푸시 자격 증명과 채널 구성이 설정되면 웹 애플리케이션에서 sendPushSubscription 명령을 구현해야 합니다. 이 명령은 사용자 푸시 구독을 Adobe Experience Platform에 등록하여 시스템에서 푸시 알림을 받도록 선택한 사용자를 추적하고 구독 상태를 유지할 수 있습니다. 이 등록은 Journey Optimizer이 타깃팅된 푸시 알림을 사용자에게 전송하는 데 필수적입니다.
4단계: 이벤트로 모바일 앱 테스트 mobile-app-test
Adobe Experience Platform 및 Adobe Experience Platform Data Collection에서 웹 푸시 구성을 완료한 후 웹 푸시 알림을 프로필로 전송하기 전에 구현을 테스트할 수 있습니다. 테스트를 통해 구독이 제대로 등록되고 알림이 사용자의 브라우저에 올바르게 전달되는지 확인할 수 있습니다.
웹 푸시 설정의 유효성을 확인하기 위해 이벤트를 사용하여 테스트 여정을 만드는 방법에 대한 자세한 지침은 모바일 및 웹 푸시 채널 모두에 적용할 수 있는 포괄적인 테스트 워크플로를 제공하는 모바일 앱 푸시 알림 구성 설명서를 참조하십시오.
This section contains structured knowledge intended to support interpretation, retrieval, and question answering related to this topic.
For complete understanding, this information should be combined with the documentation on this page. Neither source is intended to stand alone; the page describes the feature, while this section provides additional context that helps disambiguate terminology, intent, applicability, and constraints.
- TL;DR: This page explains how to configure the web push notification channel in Journey Optimizer, covering permissions, datasets, the pushNotifications property and VAPID keys, adding Web push credentials, creating a Push channel configuration, the sendPushSubscription command, and testing the setup.
Intents:
- Set up the tags user permissions (Property and Company rights) required for web push configuration
- Add Web app push credentials in Journey Optimizer using a VAPID public and private key
- Create a Push channel configuration and associate marketing actions and platforms
- Configure the pushNotifications property and the sendPushSubscription command in the Web SDK
- Test the web push implementation before sending to profiles
Glossary:
- Web push notification channel: The Journey Optimizer channel used to send push notifications to users’ browsers (product-specific)
- Push credential: The app push credential registered in Journey Optimizer that authorizes Adobe to send push notifications on your behalf (product-specific)
- Channel configuration: A configuration (i.e. message preset) created so you can send push notifications from Journey Optimizer (product-specific)
- VAPID keys: The public and private keys required to configure the Web app push credentials (product-specific)
- pushNotifications property: A Web SDK property that controls how push notifications are handled by your web application (product-specific)
- sendPushSubscription command: A Web SDK command that registers user push subscriptions with Adobe Experience Platform and maintains their subscription status (product-specific)
Guardrails:
- Push configuration must be performed by an expert user; you may need to assign the full set of permissions to a single product profile or share permissions between the app developer and the Adobe Journey Optimizer administrator.
- Property rights require the Approve, Develop, Manage Environments, Manage Extensions, and Publish rights; Company rights require Manage App Configurations and Manage Properties.
- Configuration names must begin with a letter (A-Z), can only contain alpha-numeric characters, and may also use underscore, dot, and hyphen characters.
- The pushNotifications property must be configured in the Web SDK, and VAPID keys must be generated, before adding Web app push credentials.
- When selecting the App id in the channel configuration, use the same App id as the push credential configured earlier.
- When push tracking events are ingested into the CJM Push Tracking Experience Event dataset, missing mapped fields cause warnings that appear as ‘failed’ in batch status but reflect partial ingestion success and do not prevent ingestion of valid data.
Terminology:
- Canonical name: Web push notification channel — Acronym: n/a — variants: web push, web push notifications
- Synonyms: “channel configuration” = “message preset”
- Do not confuse: “Push credentials” (authorize Adobe to send push) ≠ “Channel configuration” (message preset used to send push)
- Do not confuse: “Warnings” (logged, do not prevent ingestion) ≠ ingestion failure (valid data is still ingested)
FAQ:
- Q: What keys do I need to add Web push credentials? — A VAPID public key and private key, along with the App ID; VAPID keys must be generated beforehand.
- Q: Where do I add Web push credentials? — Under Channels > Push settings > Push credentials, then Create push credential and select the Web platform.
- Q: What does the sendPushSubscription command do? — It registers user push subscriptions with Adobe Experience Platform, tracking which users have opted in and maintaining their subscription status.
- Q: Which schemas and datasets are used? — CJM Push Profile Schema/Dataset (Register Push Token) and CJM Push Tracking Experience Event Schema/Dataset (track interactions and provide reporting data).
- Q: Where can I find the testing workflow for web push? — Refer to the mobile app push notification configuration documentation, which provides a testing workflow applicable to both mobile and web push channels.