AEM as a Cloud Service에 프로그래밍 방식 에셋 업로드
aem-upload Node.js 라이브러리를 사용하는 클라이언트 애플리케이션을 사용하여 AEM as a Cloud Service 환경에 자산을 업로드하는 방법을 알아봅니다.
학습 내용
이 자습서에서는 다음 사항을 학습합니다.
- aem-upload Node.js 라이브러리를 사용하여 AEM as a Cloud Service 환경(RDE, Dev, Stage, Prod)에 에셋을 업로드하는 직접적인 바이너리 업로드 방법을 사용하는 방법.
- 자산을 AEM as a Cloud Service 환경에 업로드하도록 aem-asset-upload-sample 응용 프로그램을 구성하고 실행하는 방법입니다.
- 샘플 애플리케이션 코드를 검토하고 구현 세부 사항을 이해합니다.
- AEM as a Cloud Service 환경에 프로그래밍 방식으로 에셋을 업로드하는 모범 사례를 이해합니다.
직접적인 바이너리 업로드 방법 이해
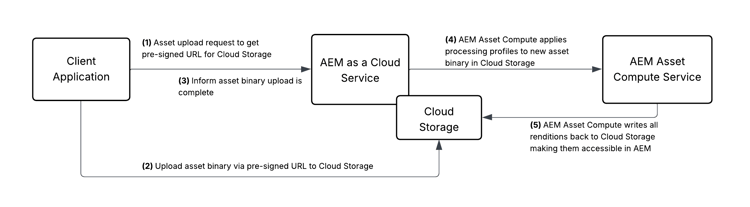
직접적인 바이너리 업로드 접근 방식을 사용하면 사전 서명된 URL을 사용하여 소스 시스템의 파일을 AEM as a Cloud Service 환경의 클라우드 저장소에 직접 업로드할 수 있습니다. AEM의 Java 프로세스를 통해 바이너리 데이터를 라우팅할 필요가 없으므로 업로드 속도가 빨라지고 서버 로드가 줄어듭니다.
샘플 애플리케이션을 실행하기 전에 직접적인 바이너리 업로드 흐름을 이해해 보겠습니다.
직접적인 바이너리 업로드 흐름에서, 바이너리 데이터는 사전 서명된 URL과 함께 클라우드 스토리지에 직접 업로드됩니다. AEM as a Cloud Service은 사전 서명된 URL을 생성하고 AEM Asset Compute 서비스에 업로드 완료를 알리는 것과 같은 간단한 처리를 담당합니다. 다음 논리 흐름 다이어그램은 직접적인 바이너리 업로드 흐름을 보여 줍니다.
aem 업로드 라이브러리
aem-upload Node.js 라이브러리는 직접적인 이진 업로드 접근 방식의 구현 세부 정보를 추출합니다. 업로드 프로세스를 오케스트레이션하는 두 가지 클래스를 제공합니다.
- FileSystemUpload - 디렉터리 구조 지원을 포함하여 로컬 파일 시스템에서 파일을 업로드할 때 사용합니다.
- DirectBinaryUpload - 스트림 또는 버퍼에서 업로드하는 것과 같이 이진 업로드 프로세스를 보다 세밀하게 제어하는 데 사용합니다.
샘플 애플리케이션
aem-asset-upload-sample 응용 프로그램을 사용하여 프로그래밍 방식의 에셋 업로드 프로세스를 알아봅니다. 샘플 응용 프로그램에서는 aem-upload 라이브러리에서 FileSystemUpload 클래스와 DirectBinaryUpload 클래스를 모두 사용하는 방법을 보여 줍니다.
사전 요구 사항
샘플 응용 프로그램을 실행하기 전에 다음 사전 요구 사항이 있는지 확인하십시오.
- RDE(Rapid Development Environment), 개발 환경 등 AEM as a Cloud Service 작성 환경.
- Node.js(최신 LTS 버전)
- Node.js 및 npm에 대한 기본 이해
샘플 애플리케이션 다운로드
-
aem-asset-upload-sample 애플리케이션 zip 파일을 다운로드하고 압축을 풉니다.
code language-bash $ unzip aem-asset-upload-sample.zip -
즐겨 찾는 코드 편집기에서 추출한 폴더를 엽니다.
code language-bash $ cd aem-asset-upload-sample $ code . -
코드 편집기 터미널을 사용하여 종속성을 설치합니다.
code language-bash $ npm install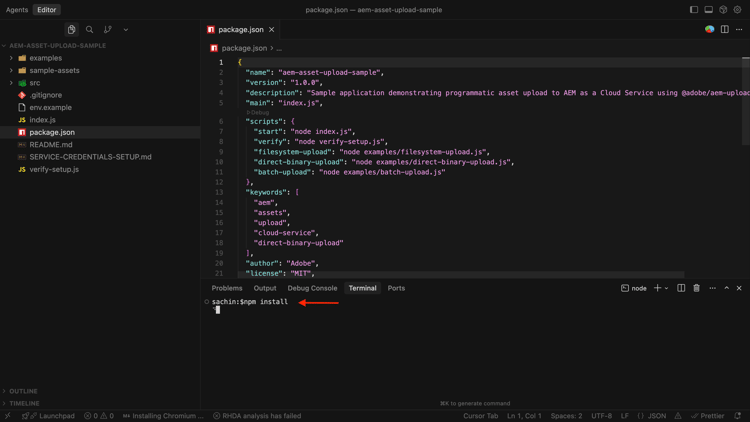
샘플 애플리케이션 구성
샘플 응용 프로그램을 실행하기 전에 AEM 작성자 URL, 인증 방법 및 에셋 폴더 경로와 같은 필요한 AEM as a Cloud Service 환경 세부 정보로 구성해야 합니다.
aem-upload Node.js 라이브러리에서 지원하는 여러 인증 방법이 있습니다. 다음 표에는 지원되는 인증 방법 및 해당 용도가 요약되어 있습니다.
샘플 응용 프로그램을 구성하려면 아래 단계를 수행합니다.
-
env.example파일을.env파일로 복사합니다.code language-bash $ cp env.example .env -
.env파일을 열고AEM_URL환경 변수를 AEM as a Cloud Service 작성자 URL로 업데이트합니다. -
다음 옵션에서 인증 방법을 선택하고 해당 환경 변수를 업데이트합니다.
기본 인증을 사용하려면 AEM as a Cloud Service 환경에서 사용자를 만들어야 합니다.
-
AEM as a Cloud Service 환경에 로그인합니다.
-
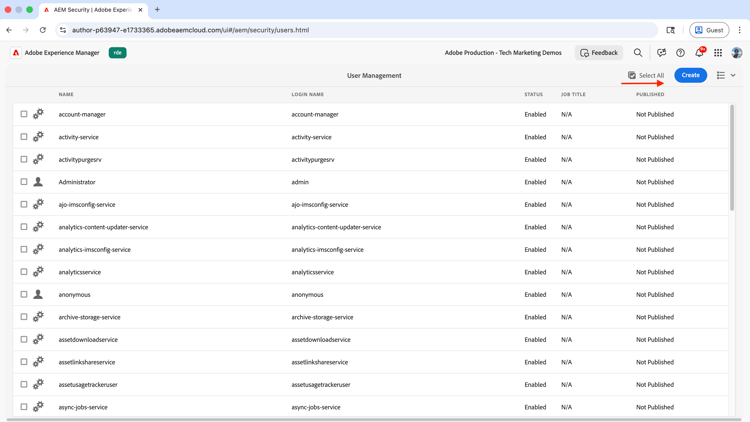
도구 > 보안 > 사용자(으)로 이동한 다음 만들기 단추를 클릭합니다.
-
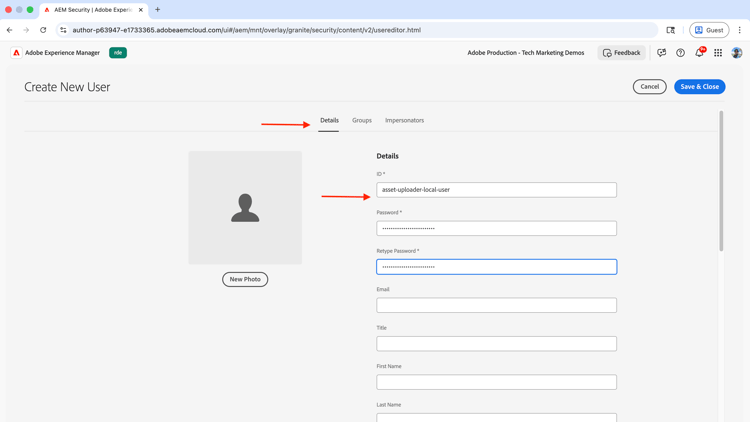
사용자 세부 정보 입력
-
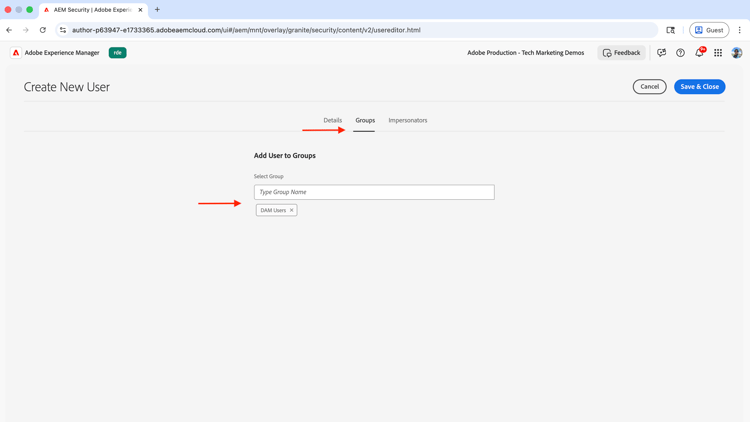
그룹 탭에서 DAM 사용자 그룹을 추가합니다. 저장 후 닫기 단추를 클릭합니다.
-
AEM_USERNAME및AEM_PASSWORD환경 변수를 만든 사용자의 사용자 이름과 암호로 업데이트합니다.
로컬 개발 토큰을 가져오려면 AEM Developer Console을 사용해야 합니다. 생성된 토큰은 JSON 웹 토큰(JWT) 유형입니다.
-
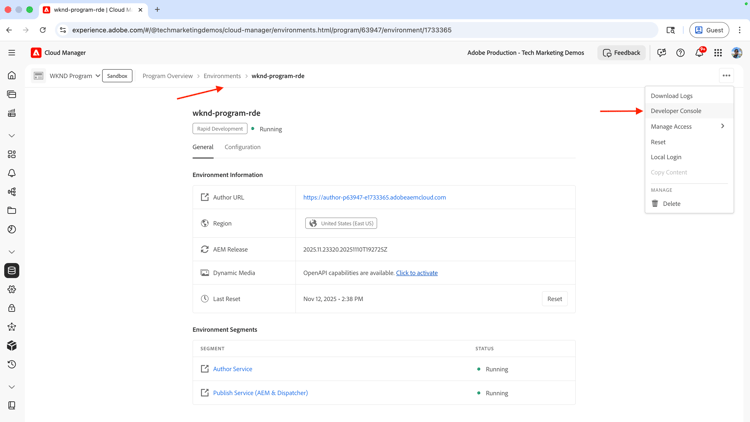
Adobe Cloud Manager에 로그인하고 원하는 환경 세부 정보 페이지로 이동합니다. “…” 클릭 Developer Console을(를) 선택하십시오.
-
AEM Developer Console에 로그인하고 새 콘솔 단추를 사용하여 새 콘솔로 전환합니다.
-
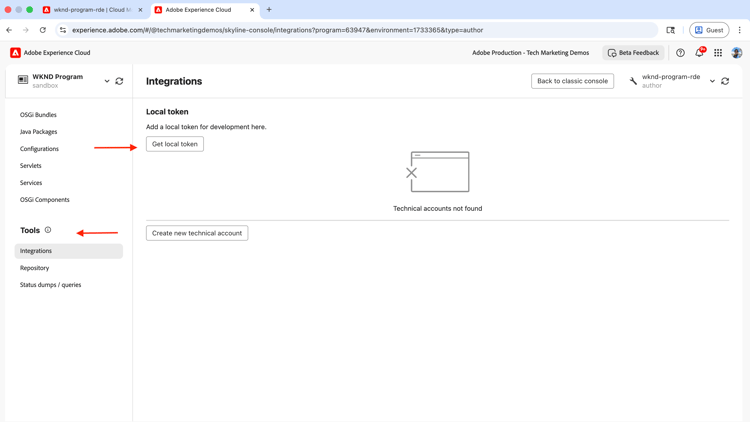
도구 섹션에서 통합을 선택하고 로컬 토큰 가져오기 단추를 클릭합니다.
-
토큰 값을 복사하고 토큰 값으로
AEM_BEARER_TOKEN환경 변수를 업데이트하십시오.
로컬 개발 토큰은 24시간 동안 유효하며 토큰을 생성한 사용자에 대해 발급됩니다.
서비스 자격 증명을 가져오려면 AEM Developer Console을 사용해야 합니다. jwt-auth npm 모듈을 사용하여 JSON 웹 토큰(JWT) 유형의 토큰을 생성하는 데 사용됩니다.
-
Adobe Cloud Manager에 로그인하고 원하는 환경 세부 정보 페이지로 이동합니다. “…” 클릭 Developer Console을(를) 선택하십시오.
-
AEM Developer Console에 로그인하고 새 콘솔 단추를 사용하여 새 콘솔로 전환합니다.
-
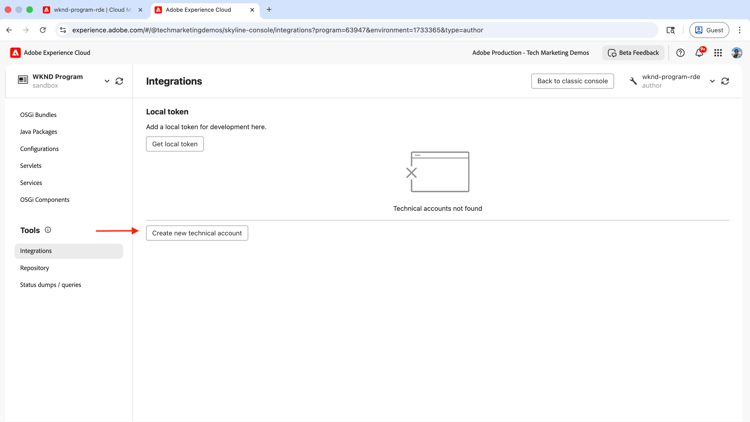
도구 섹션에서 통합을 선택하고 새 기술 계정 만들기 단추를 클릭합니다.
-
서비스 자격 증명 JSON을 복사하려면 보기 옵션을 클릭하십시오.
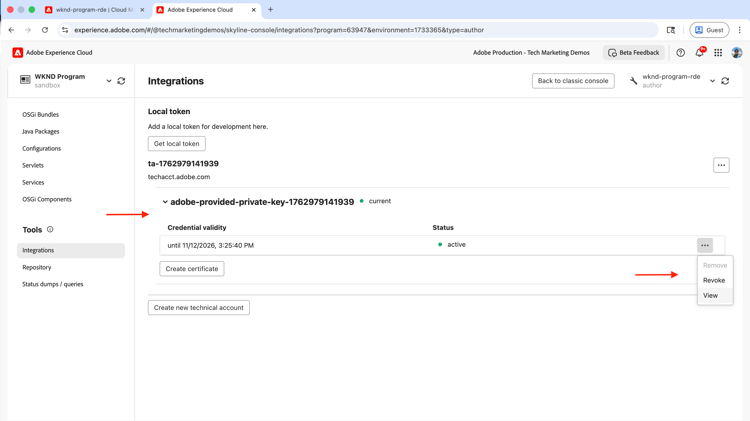
-
샘플 응용 프로그램의 루트에
service-credentials.json파일을 만들고 서비스 자격 증명 JSON을 파일에 붙여 넣습니다. -
AEM_SERVICE_CREDENTIALS_FILE환경 변수를 service-credentials.json 파일의 경로로 업데이트합니다. -
서비스 자격 증명 사용자에게 AEM as a Cloud Service 환경에 에셋을 업로드하는 데 필요한 권한이 있는지 확인하십시오. 자세한 내용은 AEM에서 액세스 구성 페이지를 참조하십시오.
세 가지 인증 방법이 모두 구성된 전체 샘플 .env 파일입니다.
# AEM Environment Configuration
# Copy this file to .env and fill in your AEM as a Cloud Service details

# AEM as a Cloud Service Author URL (without trailing slash)
# Example: https://author-p12345-e67890.adobeaemcloud.com
AEM_URL=https://author-p63947-e1733365.adobeaemcloud.com

# Upload Configuration
# Target folder in AEM DAM where assets will be uploaded
TARGET_FOLDER=/content/dam

# DirectBinaryUpload Remote URLs (required for DirectBinaryUpload example)
# URLs for remote files to upload in the DirectBinaryUpload example
# These demonstrate uploading from remote sources (URLs, CDNs, APIs)
REMOTE_FILE_URL_1=https://placehold.co/600x400/red/white?text=Adobe+Experience+Manager+Assets

################################################################
# Authentication - Choose one of the following methods:
################################################################

# Method 1: Service Credentials (RECOMMENDED for production)
# Download service credentials JSON from AEM Developer Console and save it locally
# Then provide the path to the file here
AEM_SERVICE_CREDENTIALS_FILE=./service-credentials.json

# Method 2: Bearer Token Authentication (for manual testing)
AEM_BEARER_TOKEN=eyJhbGciOiJSUzI1NiIsIng1dSI6Imltc19uYTEta2V5LWF0LTEuY2VyIiwia2lkIjoiaW1zX25hM....fsdf-Rgt5hm_8FHutTyNQnkj1x1SUs5OkqUfJaGBaKBKdqQ

# Method 3: Basic Authentication (for development/testing only)
AEM_USERNAME=asset-uploader-local-user
AEM_PASSWORD=asset-uploader-local-user

# Optional: Enable detailed logging
DEBUG=false
샘플 응용 프로그램 실행
샘플 애플리케이션은 샘플 에셋을 AEM as a Cloud Service 환경에 업로드하는 세 가지 방법을 보여 줍니다.
- FileSystemUpload - 디렉터리 구조 지원 및 자동 폴더 만들기를 사용하여 로컬 파일 시스템에서 파일을 업로드합니다.
- DirectBinaryUpload - 원격 파일을 업로드합니다. AEM as a Cloud Service 환경에 업로드하기 전에 파일 바이너리가 메모리에 버퍼링됩니다.
- 일괄 업로드 - 자동 재시도 논리 및 오류 복구를 사용하여 로컬 파일 시스템에서 여러 파일을 일괄적으로 업로드합니다. 백그라운드에서
FileSystemUpload클래스를 사용하여 로컬 파일 시스템에서 파일을 업로드합니다.
업로드할 자산은 sample-assets 폴더에 있으며 각각 몇 개의 샘플 자산을 포함하는 img, video 및 doc개의 하위 폴더를 포함합니다.
- 샘플 응용 프로그램을 실행하려면 다음 명령을 사용합니다.
$ npm start
- 다음 선택 항목 중 원하는 옵션 number을(를) 입력하십시오.
╔════════════════════════════════════════════════════════════╗
║      AEM Asset Upload Sample Application                   ║
║      Demonstrating @adobe/aem-upload library               ║
╚════════════════════════════════════════════════════════════╝

Choose an upload method:

1. FileSystemUpload - Upload files from local filesystem with auto-folder creation
2. DirectBinaryUpload - Upload from remote URLs/streams to AEM
3. Batch Upload - Upload multiple files in batches with retry logic
4. Exit
다음 탭은 각 업로드 방법에 대해 AEM as a Cloud Service 환경에서 실행된 샘플 애플리케이션, 그 출력 및 업로드된 에셋을 보여줍니다.
FileSystemUpload옵션에 대한 샘플 응용 프로그램 출력:
| code language-bash |
|---|
|
-
Assets이 AEM as a Cloud Service 환경에서
FileSystemUpload옵션을 사용하여 업로드됨: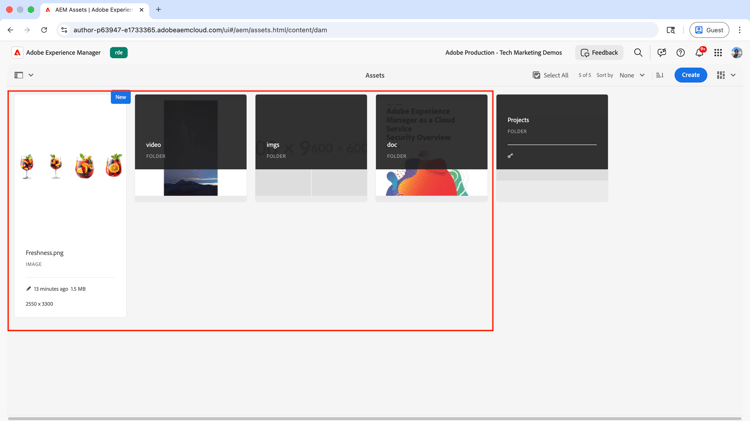
DirectBinaryUpload옵션에 대한 샘플 응용 프로그램 출력:
| code language-bash |
|---|
|
- Assets이 AEM as a Cloud Service 환경에서
DirectBinaryUpload옵션을 사용하여 업로드됨:
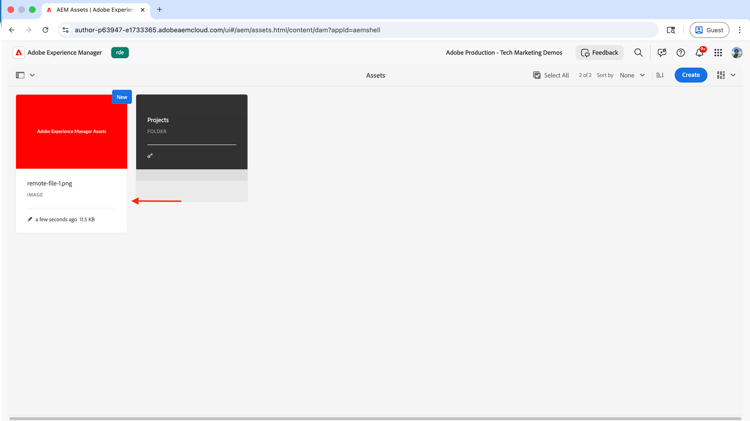
Batch Upload옵션에 대한 샘플 응용 프로그램 출력:
| code language-bash |
|---|
|
- Assets이 AEM as a Cloud Service 환경에서
Batch Upload옵션을 사용하여 업로드됨:
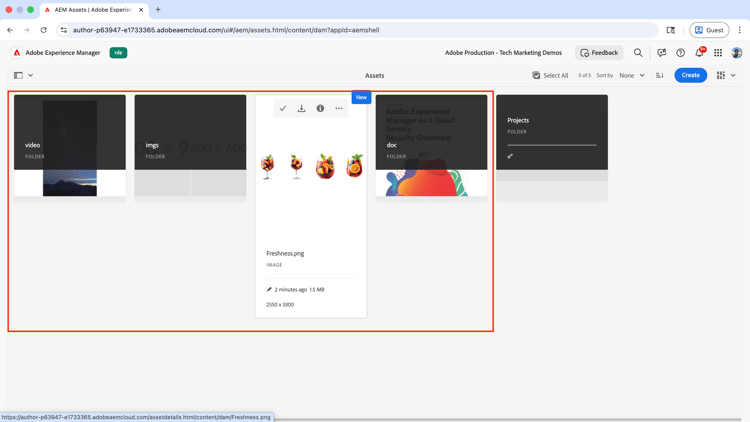
샘플 애플리케이션 코드 검토
샘플 응용 프로그램의 주 진입점은 index.js 파일입니다. 여기에는 사용자에게 선택을 묻는 메시지를 표시하고 선택한 예제를 실행하는 promptUser 함수가 포함되어 있습니다.
/**
 * Prompts user for choice and executes the selected example
 */
function promptUser() {
  rl.question(chalk.bold('Enter your choice (1-4): '), async (answer) => {
    console.log('');

    try {
      switch (answer.trim()) {
        case '1':
          console.log(chalk.bold.green('\n▶ Running FileSystemUpload Example...\n'));
          await filesystemUpload.main();
          break;

        case '2':
          console.log(chalk.bold.green('\n▶ Running DirectBinaryUpload Example...\n'));
          await directBinaryUpload.main();
          break;

        case '3':
          console.log(chalk.bold.green('\n▶ Running Batch Upload Example...\n'));
          await batchUpload.main();
          break;

        case '4':
          rl.close();
          return;

        default:
          console.log(chalk.red('\n✗ Invalid choice. Please enter 1, 2, 3, or 4.\n'));
      }

      // After example completes, ask if user wants to continue
      rl.question(chalk.bold('\nPress Enter to return to menu or Ctrl+C to exit...'), () => {
        displayMenu();
        promptUser();
      });

    } catch (error) {
      console.error(chalk.red('\n✗ Error:'), error.message);
      rl.question(chalk.bold('\nPress Enter to return to menu...'), () => {
        displayMenu();
        promptUser();
      });
    }
  });
}
전체 코드는 샘플 응용 프로그램의 index.js 파일을 참조하십시오.
다음 탭은 각 업로드 메서드의 구현 세부 사항을 보여 줍니다.
FileSystemUpload 클래스는 디렉터리 구조 지원 및 자동 폴더 생성을 사용하여 로컬 파일 시스템에서 파일을 업로드하는 데 사용됩니다.
| code language-javascript |
|---|
|
전체 코드는 샘플 응용 프로그램의 examples/filesystem-upload.js 파일을 참조하십시오.
DirectBinaryUpload 클래스는 원격 파일을 AEM as a Cloud Service 환경에 업로드하는 데 사용됩니다.
| code language-javascript |
|---|
|
전체 코드는 샘플 응용 프로그램의 examples/direct-binary-upload.js 파일을 참조하십시오.
자동 재시도 논리 및 오류 복구를 사용하여 파일을 배치로 분할하고 일괄로 업로드합니다. 백그라운드에서 FileSystemUpload 클래스를 사용하여 로컬 파일 시스템에서 파일을 업로드합니다.
| code language-javascript |
|---|
|
전체 코드는 샘플 응용 프로그램의 examples/batch-upload.js 파일을 참조하십시오.
또한 샘플 응용 프로그램의 README.md 파일에는 샘플 응용 프로그램에 대한 자세한 설명서가 포함되어 있습니다.
모범 사례
-
올바른 인증 방법을 선택하십시오.
프로덕션 환경에는 서비스 자격 증명을 사용하고 개발/테스트에는 로컬 개발 토큰 및 기본 인증을 사용합니다. 서비스 자격 증명 사용자에게 AEM as a Cloud Service 환경에 에셋을 업로드하는 데 필요한 권한이 있는지 확인하십시오. -
올바른 업로드 방법을 선택하십시오.
자동 폴더 생성이 있는 로컬 파일의 경우 FileSystemUpload, 세분화된 제어가 있는 스트림/버퍼/원격 URL의 경우 DirectBinaryUpload, 재시도 논리가 필요한 1000개 이상의 파일이 있는 프로덕션 환경의 경우 배치 업로드 패턴을 사용합니다. -
Structure DirectBinaryUpload 파일 개체가 올바르게
필수 필드인 { fileName, fileSize, blob: buffer, targetFolder }와 함께 blob 속성(버퍼가 아님)을 사용하고, DirectBinaryUpload가 폴더를 자동으로 만들지 않는다는 것을 기억하십시오. -
샘플 응용 프로그램을 참조로 사용:
샘플 애플리케이션은 프로그래밍 방식 에셋 업로드 프로세스의 구현 세부 사항에 대한 좋은 참조입니다. 고유한 구현을 위한 시작점으로 사용할 수 있습니다.