1.1.5 AEM Edge Delivery Services MarTech プラグイン
AEM MarTech プラグインを使用すると、AEM プロジェクトの完全な MarTech スタックをすばやく設定できます。
1.1.5.1 リポジトリへのプラグインの追加
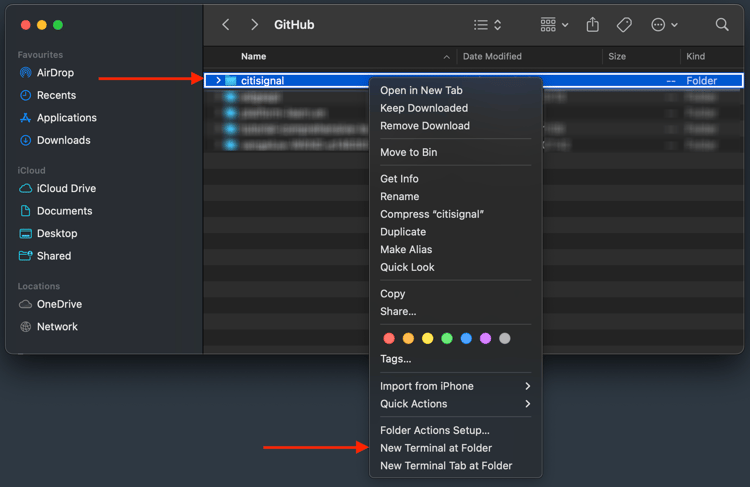
citignal GitHub リポジトリに使用しているフォルダーに移動します。 フォルダ名を右クリックし、[フォルダに新しいターミナル] を選択します。
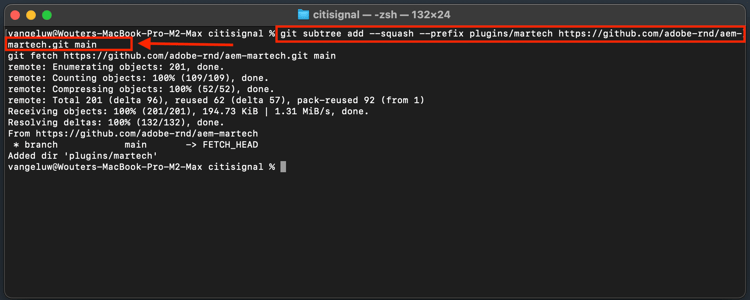
その後、これが表示されます。 次のコマンドを貼り付けて、enter キーを押します。
git subtree add --squash --prefix plugins/martech https://github.com/adobe-rnd/aem-martech.git main
この画像が表示されます。
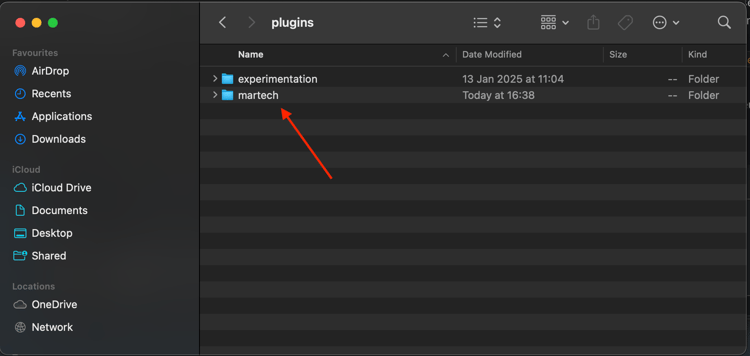
citignal GitHub リポジトリに使用しているフォルダーに移動し、フォルダー plugins を開きます。 martech という名前のフォルダーが表示されます。
1.1.5.2 head.html
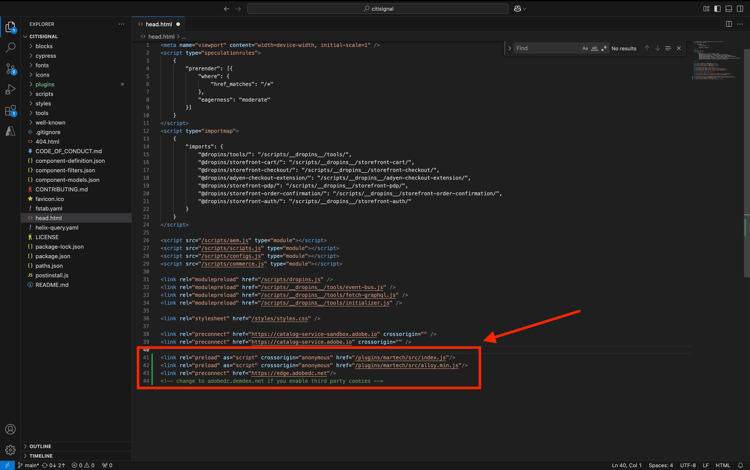
Visual Studio Code で、ファイル head.html を開きます。 以下のコードをコピーして、ファイル head.html に貼り付けます。
<link rel="preload" as="script" crossorigin="anonymous" href="/plugins/martech/src/index.js"/>
<link rel="preload" as="script" crossorigin="anonymous" href="/plugins/martech/src/alloy.min.js"/>
<link rel="preconnect" href="https://edge.adobedc.net"/>
<!-- change to adobedc.demdex.net if you enable third party cookies -->
変更を保存します。
1.1.5.3 scripts.js
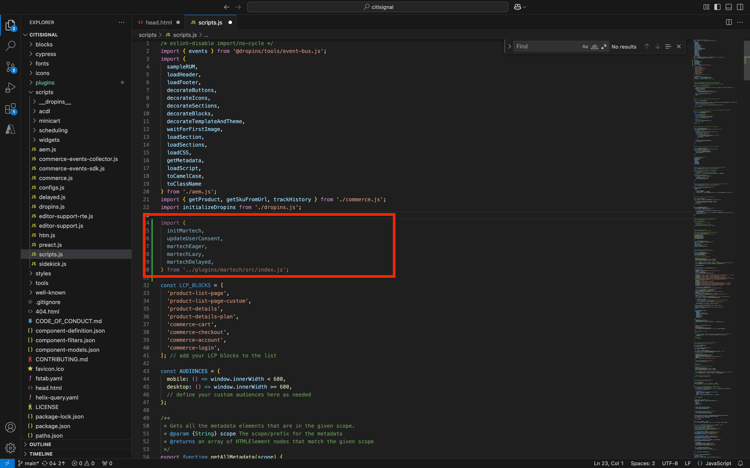
Visual Studio Code で、scripts フォルダーに移動し、scripts.js ファイルを開きます。 以下のコードをコピーして、既存のインポートスクリプトの下の scripts.js ファイルに貼り付けます。
import {
  initMartech,
  updateUserConsent,
  martechEager,
  martechLazy,
  martechDelayed,
} from '../plugins/martech/src/index.js';
変更を保存します。
Visual Studio Code の scripts.js ファイルで、次のコードを見つけます。
const AUDIENCES = {
  mobile: () => window.innerWidth < 600,
  desktop: () => window.innerWidth >= 600,
  // define your custom audiences here as needed
};
const AUDIENCES = {…};の下に 次のコードを貼り付けます。
  const isConsentGiven = true;
  const martechLoadedPromise = initMartech(
    // The WebSDK config
    // Documentation: https://experienceleague.adobe.com/ja/docs/experience-platform/web-sdk/commands/configure/overview#configure-js
    {
      datastreamId: "XXX",
      orgId: "XXX",
      defaultConsent: 'in',
      onBeforeEventSend: (payload) => {
        // set custom Target params
        // see doc at https://experienceleague.adobe.com/ja/docs/platform-learn/migrate-target-to-websdk/send-parameters#parameter-mapping-summary
        payload.data.__adobe.target ||= {};

        // set custom Analytics params
        // see doc at https://experienceleague.adobe.com/ja/docs/analytics/implementation/aep-edge/data-var-mapping
        payload.data.__adobe.analytics ||= {};
      },

      // set custom datastream overrides
      // see doc at:
      // - https://experienceleague.adobe.com/ja/docs/experience-platform/web-sdk/commands/datastream-overrides
      // - https://experienceleague.adobe.com/ja/docs/experience-platform/datastreams/overrides
      edgeConfigOverrides: {
        // Override the datastream id
        // datastreamId: '...'

        // Override AEP event datasets
        // com_adobe_experience_platform: {
        //   datasets: {
        //     event: {
        //       datasetId: '...'
        //     }
        //   }
        // },

        // Override the Analytics report suites
        // com_adobe_analytics: {
        //   reportSuites: ['...']
        // },

        // Override the Target property token
        // com_adobe_target: {
        //   propertyToken: '...'
        // }
      },
    },
    // The library config
    {
      launchUrls: ["XXX"],
      personalization: !!getMetadata('target') && isConsentGiven,
    },
  );
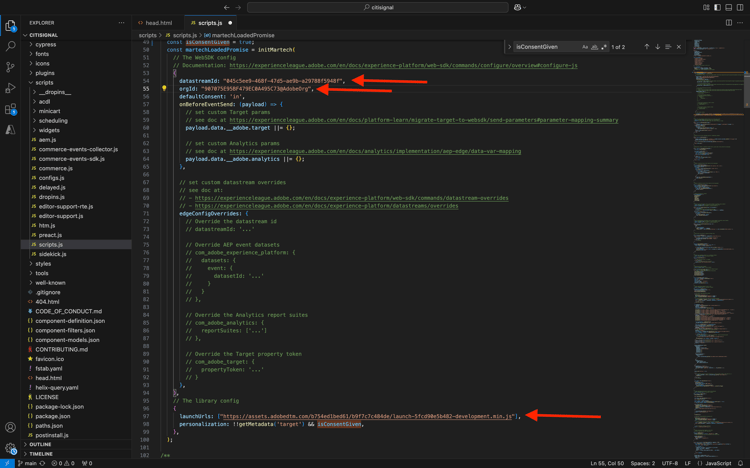
上記のコードでは、いくつかの変数を、独自の環境の変数で置き換える必要があります。
datastreamId: "XXX"orgId: "XXX"launchUrls: ["XXX"]
これらの変数は、次の手順に従って確認できます。
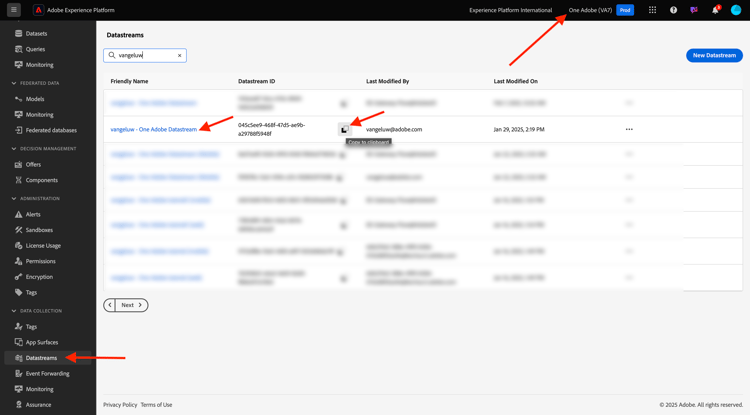
datastreamId
https://platform.adobe.com/ に移動し、左メニューで データストリーム に移動します。 正しいサンドボックスにいることを確認します。これは --aepSandboxName-- です。 このチュートリアルのはじめにの節で作成した、--aepUserLdap-- - One Adobe Datastream という名前のデータストリームを検索します。 「コピー」アイコンをクリックして データストリーム ID をコピーし、Visual Studio Code の scripts.js ファイルに、XXX の横にあるプレースホルダー値 datastreamId: を置き換えて貼り付けます。
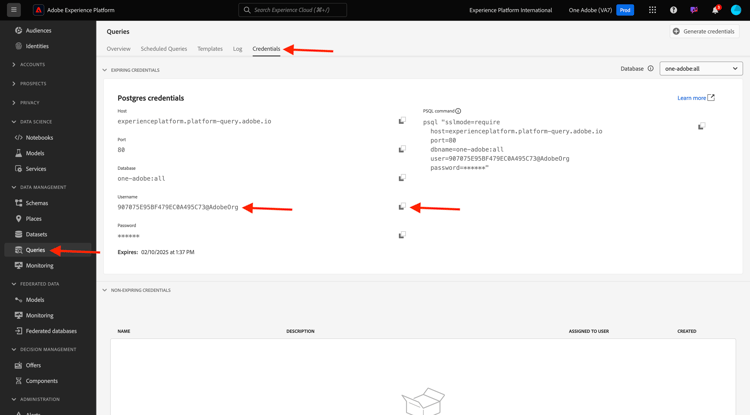
orgId
https://platform.adobe.com/ に移動し、左メニューの クエリ に移動します。 資格情報 の下に、IMS 組織 ID が ユーザー名 として表示されます。 コピー アイコンをクリックして IMS 組織 ID をコピーし、Visual Studio Code の scripts.js ファイルに貼り付けます。XXX の横にあるプレースホルダー値 orgId: を置き換えます。
launchUrls
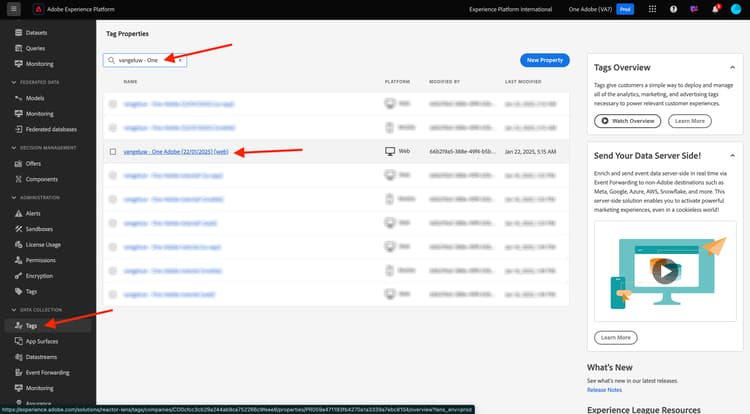
https://platform.adobe.com/ に移動し、左メニューの タグ に移動します。 LDAP を使用してプロパティを検索します。これは --aepUserLdap-- である必要があります。 Web プロパティを開きます。
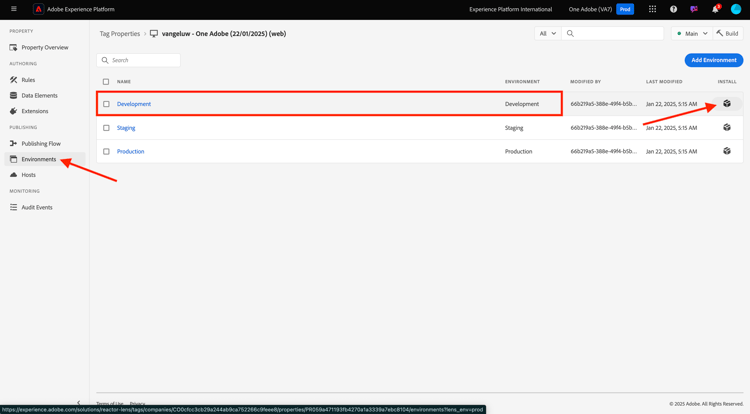
左側のメニューで、環境 に移動し、開発 環境の インストール アイコンをクリックします。
その後、必要な URL がHTML <script></script> タグ内に表示されます。 https から .min.js までの部分のみをコピーしてください。
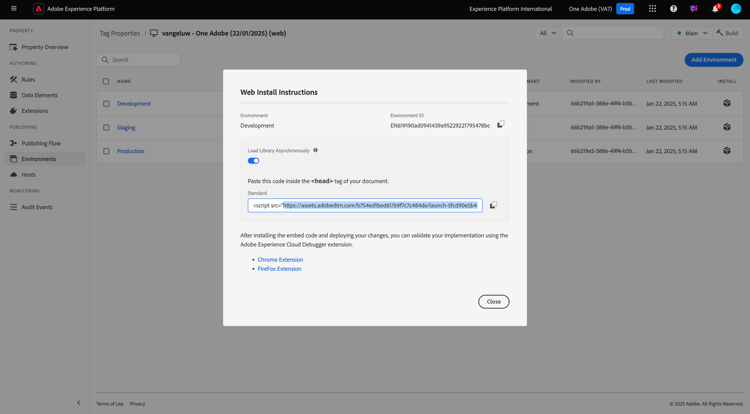
URL は次のようになります。https://assets.adobedtm.com/b754ed1bed61/b9f7c7c484de/launch-5fcd90e5b482-development.min.js エラーの原因となる他のテキストがコピーされていないことを確認してください。 Visual Studio Code の scripts.js ファイルで、XXX 配列のプレースホルダー値 launchUrls: を置き換えます。
これで、必要な 3 つの変数が作成されました。 ファイル scripts.js は次のようになります。
次に、検索して、次のコードブロックを見つけます。
const main = doc.querySelector('main');
  if (main) {
    decorateMain(main);
    document.body.classList.add('appear');
    await loadSection(main.querySelector('.section'), waitForFirstImage);
  }
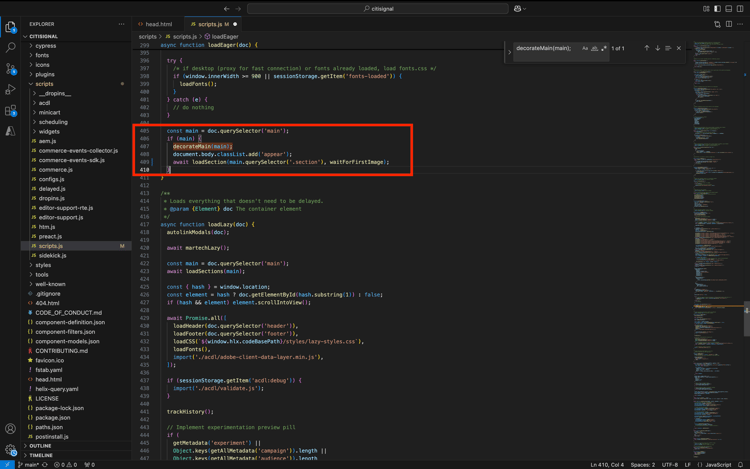
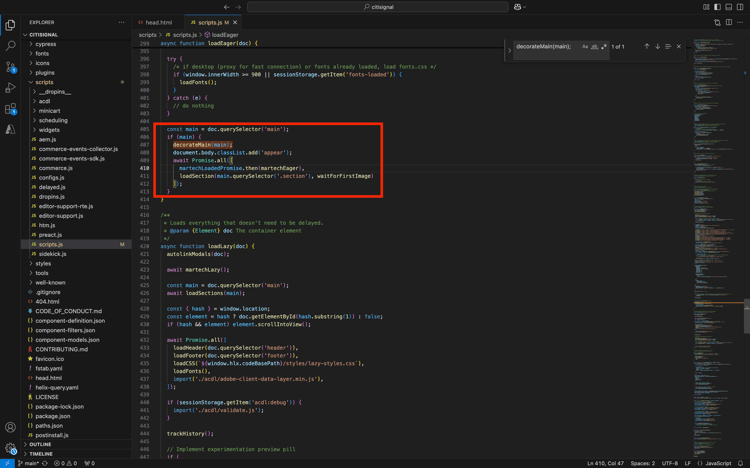
次のコードブロックで置き換えます。
const main = doc.querySelector('main');
  if (main) {
    decorateMain(main);
    document.body.classList.add('appear');
    await Promise.all([
      martechLoadedPromise.then(martechEager),
      loadSection(main.querySelector('.section'), waitForFirstImage)
    ]);
  }
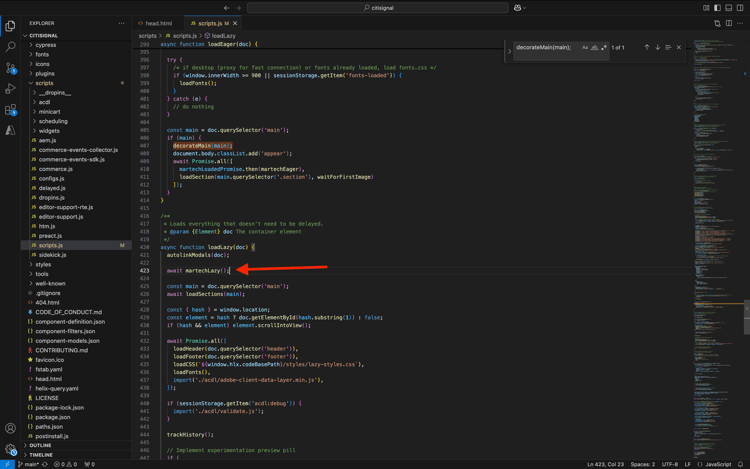
次に、を検索し、下にスクロールして async function loadLazy(doc) { を表示します。
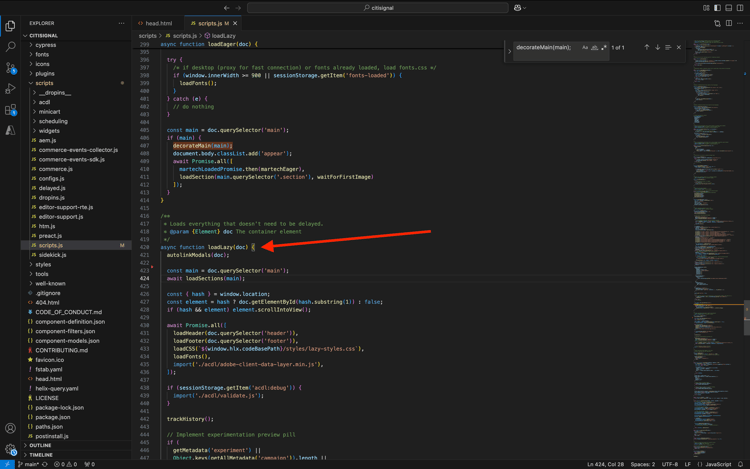
行 autolinkModals(doc); の下に、次のコード行を追加します。
await martechLazy();
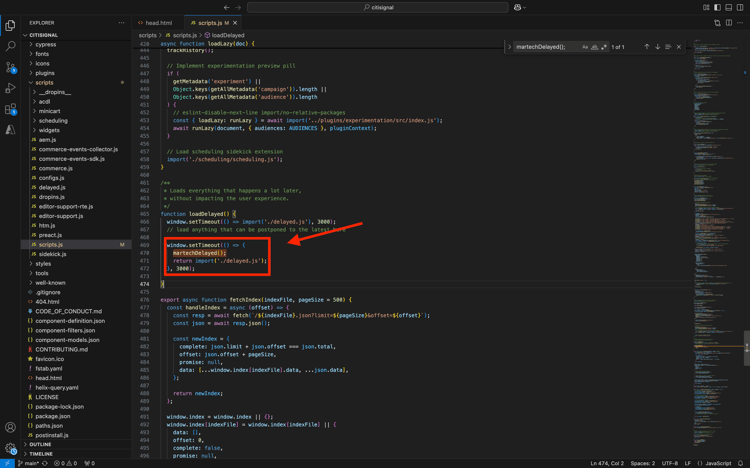
次に、を検索し、行 function loadDelayed() { まで下にスクロールします。
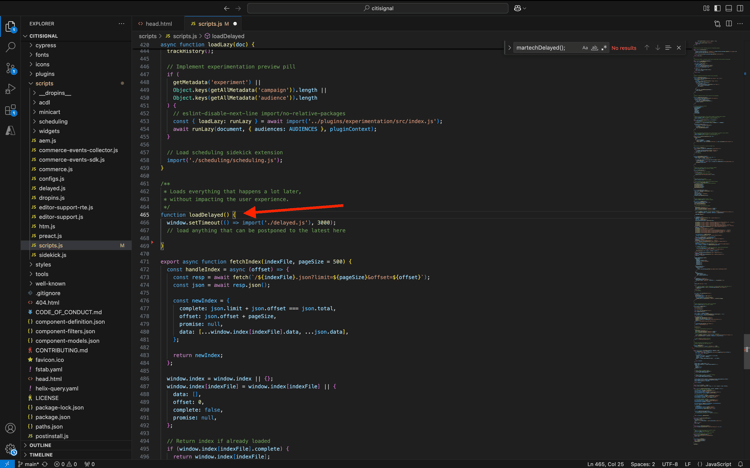
このコードブロックを行 // load anything that can be postponed to the latest here の下に追加します。
window.setTimeout(() => {
    martechDelayed();
    return import('./delayed.js');
  }, 3000);
次に、を検索して、window.adobeDataLayer.push を含む行に移動します。
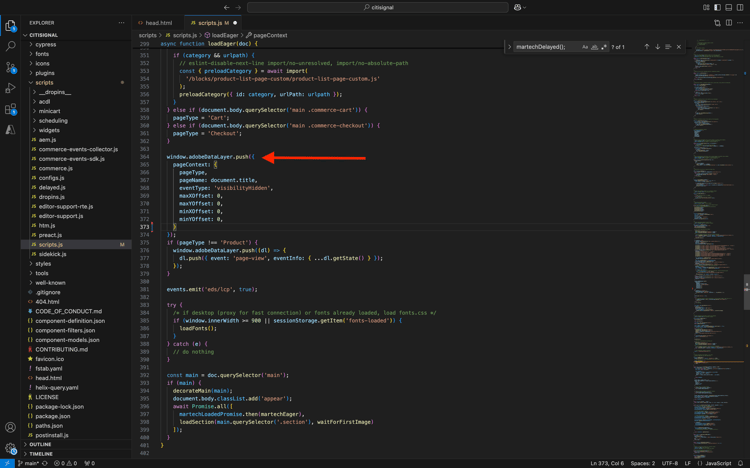
このようにオブジェクト pageContext 定義されていることがわかります。 ここで、pageContext の下に 2 つのオブジェクトを追加する必要があります。
    pageContext: {
      pageType,
      pageName: document.title,
      eventType: 'visibilityHidden',
      maxXOffset: 0,
      maxYOffset: 0,
      minXOffset: 0,
      minYOffset: 0,
    }
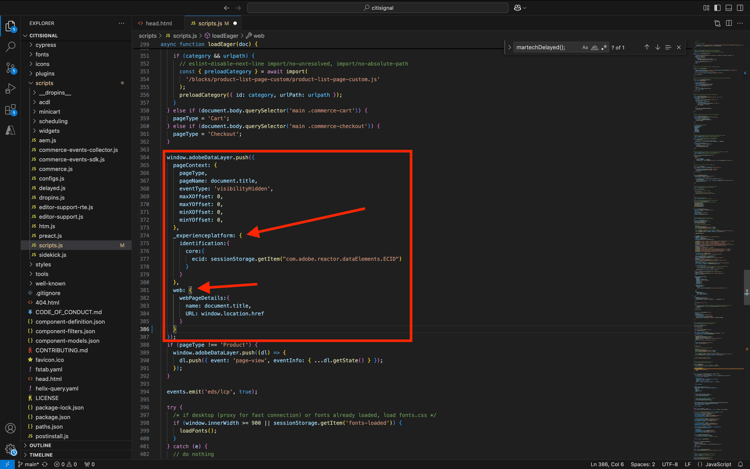
追加する必要があるコードは次のとおりです。
    ,
    _experienceplatform: {
      identification:{
        core:{
          ecid: sessionStorage.getItem("com.adobe.reactor.dataElements.ECID")
        }
      }
    },
    web: {
      webPageDetails:{
        name: document.title,
        URL: window.location.href
      }
    }
window.adobeDataLayer.push は次のようになります。
  window.adobeDataLayer.push({
    pageContext: {
      pageType,
      pageName: document.title,
      eventType: 'visibilityHidden',
      maxXOffset: 0,
      maxYOffset: 0,
      minXOffset: 0,
      minYOffset: 0,
    },
    _experienceplatform: {
      identification:{
        core:{
          ecid: sessionStorage.getItem("com.adobe.reactor.dataElements.ECID")
        }
      }
    },
    web: {
      webPageDetails:{
        name: document.title,
        URL: window.location.href
      }
    }
  });
これで、ファイル scripts.js で必要な変更をすべて行いました。
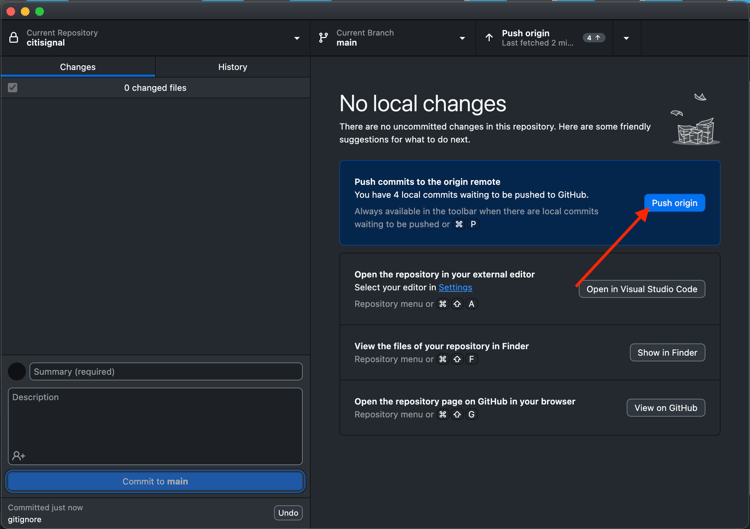
GitHub デスクトップクライアントを開き、変更をコミットします。
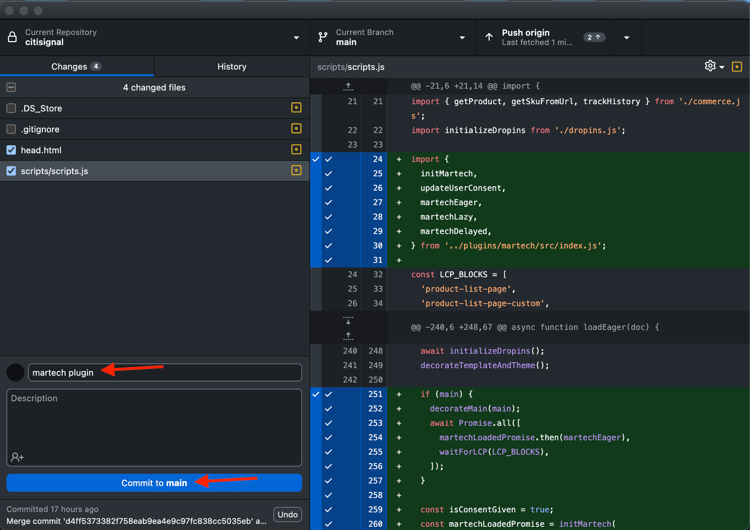
接触チャネルをプッシュ をクリックして、変更を GitHub リポジトリにプッシュします。
タグプロパティの ACDL 拡張 1.1.5.4 能
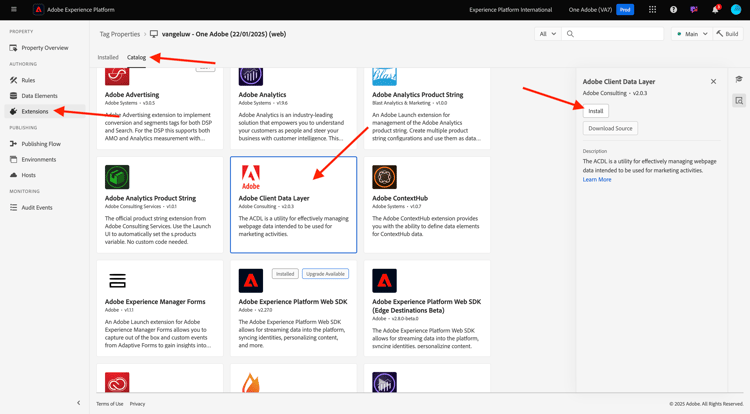
AEM Edge Delivery Services MarTech プラグインを正しく機能させるには、以下の拡張子を追加する必要があります。
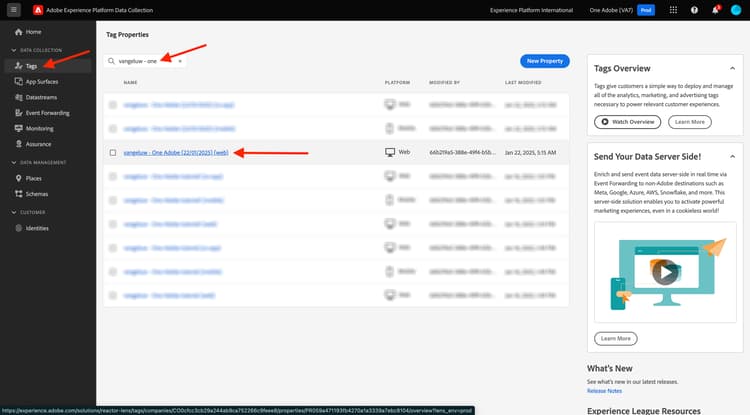
https://experience.adobe.com/#/data-collection/ に移動します。 Web のタグプロパティ(--aepUserLdap-- - One Adobe (DD/MM/YYYY))を検索して開きます。
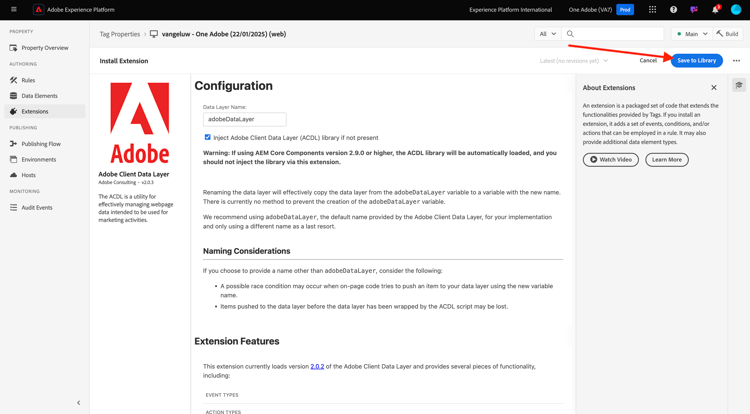
拡張機能、カタログ に移動します。 拡張子 Adobe Client Data Layer をクリックしてから インストール をクリックします。
この画像が表示されます。 現時点では何も変更する必要はありません。 ライブラリに保存 をクリックします。
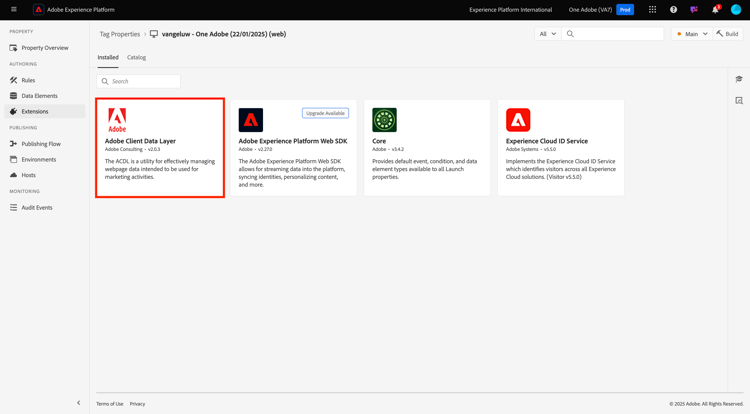
拡張機能がタグプロパティに追加されます。
公開フロー に移動し、メイン ライブラリを開きます。 「変更されたリソースをすべて追加」をクリックし、「開発用に保存およびビルド」をクリックします。
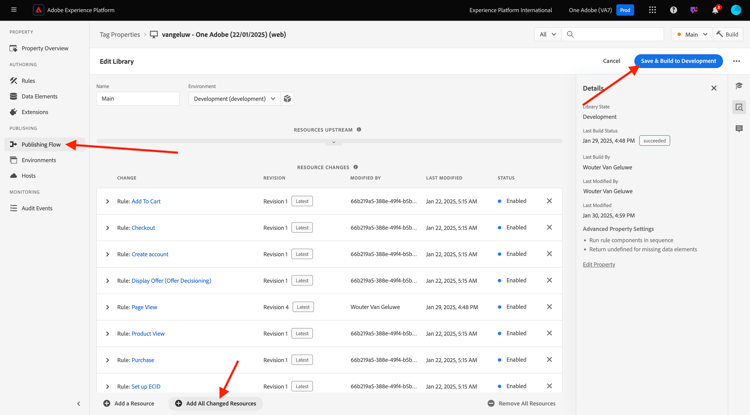
これで、変更がデプロイされました。
Adobe Experience Platform Edge Networkへの 1.1.5.5 データの送信
XXX を GitHub ユーザーアカウント(この例では main--citisignal--XXX.aem.page/us/en/)に置き換えた後、main--citisignal--XXX.aem.live/us/en/ や woutervangeluwe に移動して、web サイトの変更を表示できるようになりました。
この例では、完全な URL は次のようになります。https://main--citisignal--woutervangeluwe.aem.page/us/en/ や https://main--citisignal--woutervangeluwe.aem.live/us/en/。

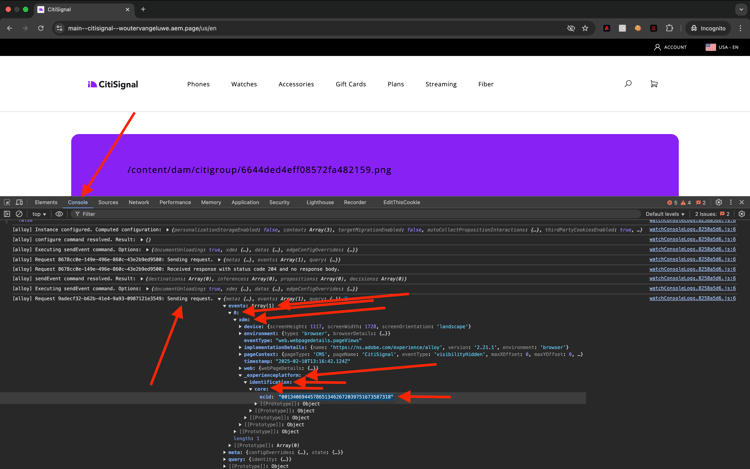
Chromeで、その他のツール/デベロッパーツール に移動して デベロッパーツール を開きます。

コンソール ビューには、[alloy] で始まる行が多数表示されます。 リクエストを見てください。そのうちの 1 つは次のようになり、画像に示されているリクエスト本文を持っている必要があります。
[alloy] Request 55a9ddbc-0521-4ba3-b527-3da2cb35328a: Sending request.
ペイロードを開き、フィールド events[0].xdm._experienceplatform.identification.core.ecid にドリルダウンして、ECID をコピーします。
Adobe Experience Platform1.1.5.6 顧客プロファイルを表示するには
URL:https://experience.adobe.com/platform に移動して、Adobe Experience Platformにログインします。
ログインすると、Adobe Experience Platformのホームページが表示されます。
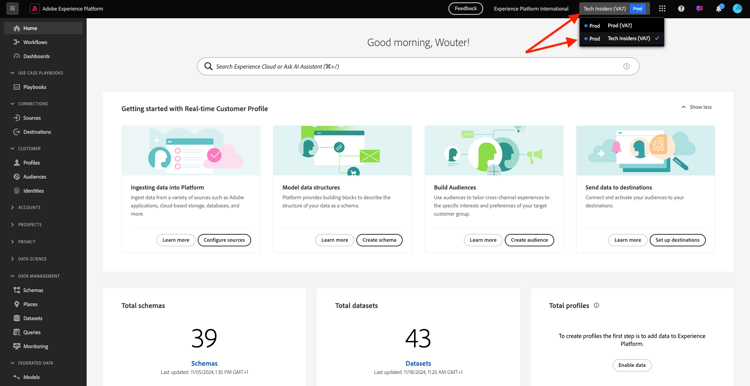
続行する前に、サンドボックス を選択する必要があります。 選択するサンドボックスの名前は --aepSandboxName-- です。 適切なサンドボックスを選択すると、画面が変更され、専用のサンドボックスが表示されます。
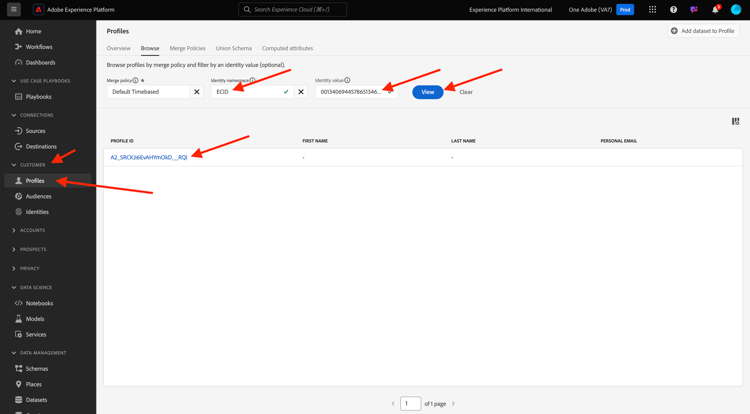
左側のメニューで、顧客/プロファイル/参照 に移動します。 ECID の ID 名前空間 を選択し、前の手順でコピーした ECID を超えます。 表示 をクリックします。 すると、リストにプロファイルが表示されます。 クリックして開きます。
次に、ECID を示す プロファイルダッシュボード の概要が表示されます。 次に、イベント に移動します。
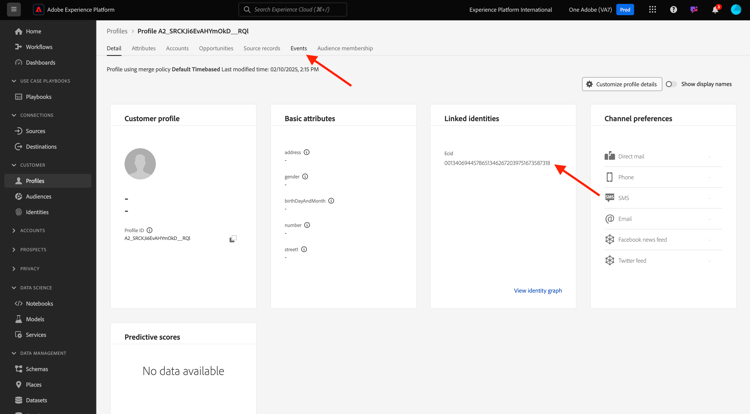
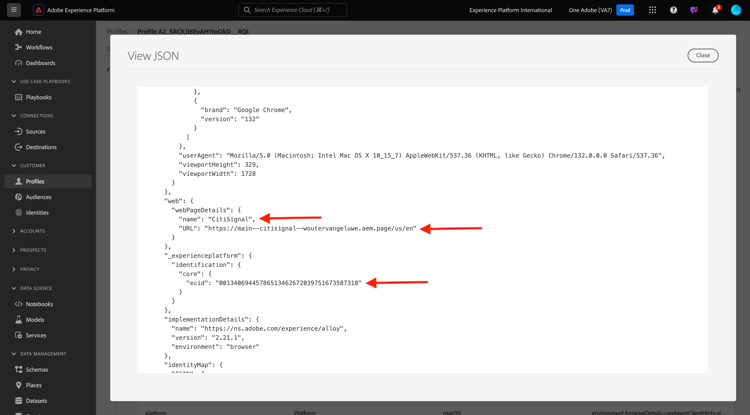
イベント の下に、eventType が web.webpagedetails.pageViews であるイベントを含む、複数のエクスペリエンスイベントが表示されます。 JSON を表示 をクリックして、収集されたすべてのイベントを表示します。
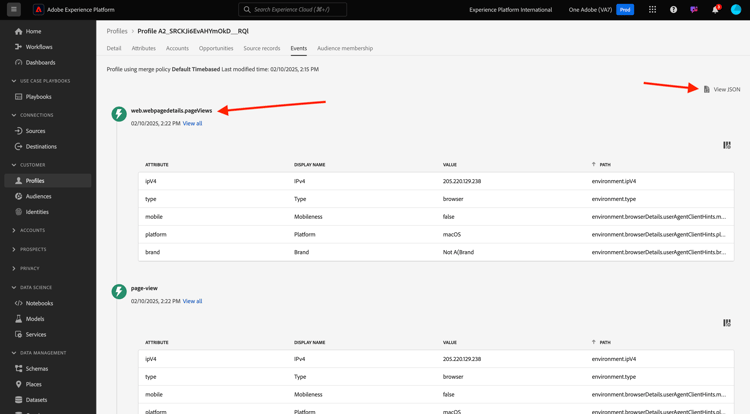
JSON ビューで、eventType web.webpagedetails.pageViews を使用してイベントを検証し、ページ名 や ページ URL などを確認します。
これで、この演習が完了しました。
次の手順: 概要とメリット
Adobe Experience Manager Cloud ServiceとEdge Delivery Services に戻る