AEM-CIF コアコンポーネントと Adobe Experience Platform の統合 aem-cif-aep-integration
Commerce Integration Framework(CIF)コアコンポーネントは、Adobe Experience Platform とのシームレスな統合を実現して、買い物かごに追加などのクライアントサイドのインタラクションで発生するストアフロントイベントとそのデータを転送します。
AEM CIF コアコンポーネントプロジェクトには、コマースストアフロントからイベントデータを収集するための、Adobe Commerce 用 Adobe Experience Platform コネクタと呼ばれる JavaScript ライブラリが用意されています。 そのイベント データは Experience Platform に送信され、そこで Adobe Analytics や Adobe Target などの他の Adobe Experience Cloud 製品で使用されて、カスタマージャーニーをカバーする 360 度のプロファイルが構築されます。 コマースデータを Adobe Experience Cloud 内の他の製品に接続することにより、サイトでのユーザーの行動の分析、AB テストの実行、パーソナライズされたキャンペーンの作成などのタスクを実行することができます。
クライアントサイドのソースからカスタマーエクスペリエンス データを収集できる Experience Platform データ収集テクノロジースイートについて詳しくは、こちらを参照してください。
Experience Platform への addToCart イベントデータの送信 send-addtocart-to-aep
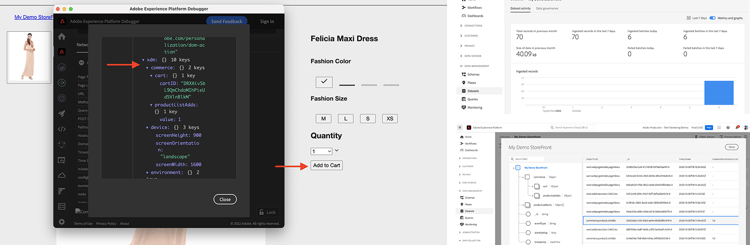
次の手順は、CIF - Experience Platform コネクタを使用して、AEM でレンダリングされた製品ページから Experience Platform に addToCart イベントデータを送信する方法を示しています。 Adobe Experience Platform デバッガーブラウザー拡張機能を使用すると、送信されたデータをテストおよびレビューすることができます。
前提条件 prerequisites
このデモを完了するには、ローカル開発環境を使用します。 これには、Adobe Commerce に設定および接続された AEM の実行インスタンスが含まれます。 AEM as a Cloud Service SDKとのローカル開発の設定に関する要件と手順を確認します。
Adobe Experience Platform へのアクセスと、データ収集用のスキーマ、データセットおよびデータストリームを作成するための権限も必要です。 詳しくは、権限の管理を参照してください。
AEM Commerce as a Cloud Service の設定 aem-setup
必要なコードと設定を備えた AEM Commerce as a Cloud Service ローカル環境を稼働させるには、次の手順を実行します。
ローカル設定
AEM Commerce as a Cloud Service 環境を稼働させるには、ローカル設定の手順に従います。
プロジェクトのセットアップ
新しい AEM Commerce(CIF)プロジェクトを作成するには、AEM プロジェクトアーキタイプの手順に従います。
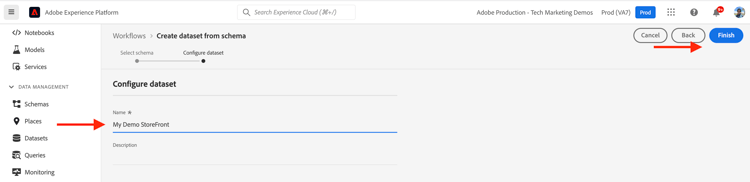
My Demo Storefront ですが、独自のプロジェクト名を選択することができます。
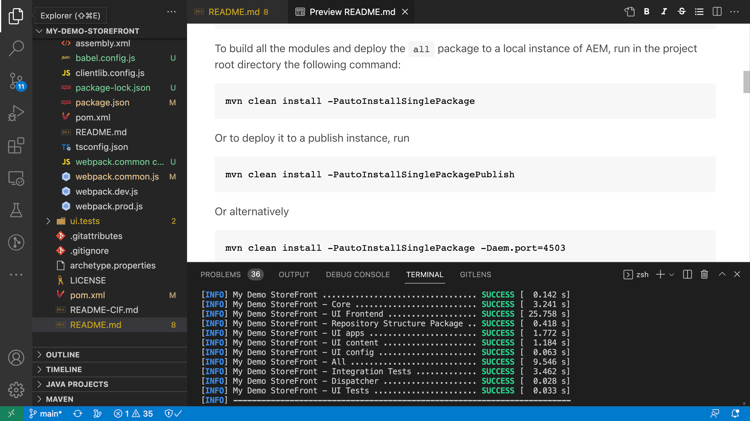
プロジェクトのルートディレクトリから次のコマンドを実行して、作成した AEM Commerce プロジェクトをビルドし、ローカルの AEM SDK にデプロイします。
$ mvn clean install -PautoInstallSinglePackage
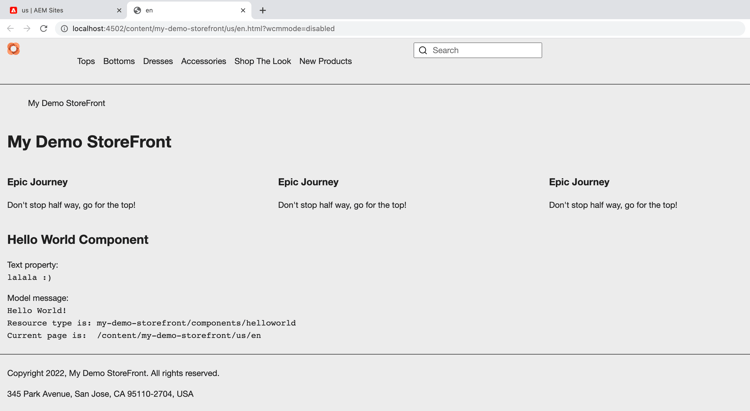
デフォルトのコードとコンテンツを含んだ、ローカルにデプロイされた My Demo StoreFront コマース サイトは次のようになります。
Peregrine および CIF-AEP コネクタ依存関係のインストール
この AEM Commerce サイトのカテゴリおよび製品ページからイベントデータを収集して送信するには、主要な npm パッケージを AEM Commerce プロジェクトの ui.frontend モジュールにインストールします。
ui.frontend モジュールに移動し、コマンドラインから次のコマンドを実行して、必要なパッケージをインストールします。
npm i --save lodash.get@^4.4.2 lodash.set@^4.3.2
npm i --save apollo-cache-persist@^0.1.1
npm i --save redux-thunk@~2.3.0
npm i --save @adobe/apollo-link-mutation-queue@~1.1.0
npm i --save @magento/peregrine@~12.5.0
npm i --save @adobe/aem-core-cif-react-components --force
npm i --save-dev @magento/babel-preset-peregrine@~1.2.1
npm i --save @adobe/aem-core-cif-experience-platform-connector --force
--force 引数が必要になる場合があります。 通常は、これによって問題が発生することはありません。--force 引数を使用するための Maven の設定
Maven ビルドプロセスの一環として、npm クリーンインストール(npm ci を使用)がトリガーされます。 これには、--force 引数も必要です。
プロジェクトのルート POM ファイル pom.xml に移動し、<id>npm ci</id> 実行ブロックを見つけます。 次のようにブロックを更新します。
<execution>
    <id>npm ci</id>
    <goals>
    <goal>npm</goal>
    </goals>
    <configuration>
    <arguments>ci --force</arguments>
    </configuration>
</execution>
Babel の設定形式の変更
.babelrc ファイルのデフォルトの相対設定ファイル形式から babel.config.js 形式に切り替えます。 これはプロジェクト全体の設定形式であり、プラグインとプリセットを node_module に適用して制御を強化できます。
-
ui.frontendモジュールに移動し、既存の.babelrcファイルを削除します。 -
peregrineプリセットを使用するbabel.config.jsファイルを作成します。code language-javascript const peregrine = require('@magento/babel-preset-peregrine'); module.exports = (api, opts = {}) => { const config = { ...peregrine(api, opts), sourceType: 'unambiguous' } config.plugins = config.plugins.filter(plugin => plugin !== 'react-refresh/babel'); return config; }
Babel を使用するための webpack の設定
Babel ローダー(babel-loader)と webpack を使用して JavaScript ファイルをトランスパイルするには、webpack.common.js ファイルを編集します。
module プロパティ値内に次のルールを含めるには、ui.frontend モジュールに移動し、webpack.common.js ファイルを更新します。
{
    test: /\.jsx?$/,
    exclude: /node_modules\/(?!@magento\/)/,
    loader: 'babel-loader'
}
Apollo クライアントの設定
Apollo クライアントは、GraphQL でローカルデータとリモートデータの両方を管理するために使用します。 また、GraphQL クエリの結果を、正規化されたローカルのメモリ内キャッシュに格納します。
InMemoryCache が効果的に機能するには、possibleTypes.js ファイルが必要です。 このファイルを生成するには、possibleTypesの自動生成を参照してください。
また、PWA Studio 参照の実装 と possibleTypes.js ファイルの例も参照してください。
-
ui.frontendモジュールに移動し、ファイルを./src/main/possibleTypes.jsとして保存します。 -
ビルド時に必要な静的変数を置き換えるには、
webpack.common.jsファイルのDefinePluginセクションを更新します。code language-javascript const { DefinePlugin } = require('webpack'); const { POSSIBLE_TYPES } = require('./src/main/possibleTypes'); ... plugins: [ ... new DefinePlugin({ 'process.env.USE_STORE_CODE_IN_URL': false, POSSIBLE_TYPES }) ]
Peregrine および CIF コアコンポーネントの初期化
React ベースの Peregrine と CIF のコアコンポーネントを初期化するには、必要な設定ファイルと JavaScript ファイルを作成します。
-
ui.frontendモジュールに移動し、フォルダーsrc/main/webpack/components/commerce/Appを作成します。 -
次の内容の
config.jsファイルを作成します。code language-javascript // get and parse the CIF store configuration from the <head> const storeConfigEl = document.querySelector('meta[name="store-config"]'); const storeConfig = storeConfigEl ? JSON.parse(storeConfigEl.content) : {}; // the following global variables are needed for some of the peregrine features window.STORE_VIEW_CODE = storeConfig.storeView || 'default'; window.AVAILABLE_STORE_VIEWS = [ { code: window.STORE_VIEW_CODE, base_currency_code: 'USD', default_display_currency_code: 'USD', id: 1, locale: 'en', secure_base_media_url: '', store_name: 'My Demo StoreFront' } ]; window.STORE_NAME = window.STORE_VIEW_CODE; window.DEFAULT_COUNTRY_CODE = 'en'; export default { storeView: window.STORE_VIEW_CODE, graphqlEndpoint: storeConfig.graphqlEndpoint, // Can be GET or POST. When selecting GET, this applies to cache-able GraphQL query requests only. // Mutations will always be executed as POST requests. graphqlMethod: storeConfig.graphqlMethod, headers: storeConfig.headers, mountingPoints: { // TODO: define the application specific mount points as they may be used by <Portal> and <PortalPlacer> }, pagePaths: { // TODO: define the application specific paths/urls as they may be used by the components baseUrl: storeConfig.storeRootUrl }, eventsCollector: { eventForwarding: { acds: true, aep: false, } } };note important IMPORTANT AEM Guides - CIF Venia Project の config.jsファイルに関して既に精通しているかもしれませんが、このファイルにはいくつかの変更が必要です。 まず、TODO コメントを確認します。 次に、eventsCollectorプロパティ内でeventsCollector > aepオブジェクトを見つけ、orgIdおよびdatastreamIdプロパティを正しい値に更新します。 詳細情報。 -
次の内容の
App.jsファイルを作成します。 このファイルは、一般的な React アプリケーションの開始点ファイルに似ており、React およびカスタムフックと、React コンテキストを使用して Experience Platform の統合を簡単にする方法が含まれています。code language-javascript import config from './config'; import React, { useEffect } from 'react'; import ReactDOM from 'react-dom'; import { IntlProvider } from 'react-intl'; import { BrowserRouter as Router } from 'react-router-dom'; import { combineReducers, createStore } from 'redux'; import { Provider as ReduxProvider } from 'react-redux'; import { createHttpLink, ApolloProvider } from '@apollo/client'; import { ConfigContextProvider, useCustomUrlEvent, useReferrerEvent, usePageEvent, useDataLayerEvents, useAddToCartEvent } from '@adobe/aem-core-cif-react-components'; import { EventCollectorContextProvider, useEventCollectorContext } from '@adobe/aem-core-cif-experience-platform-connector'; import { useAdapter } from '@magento/peregrine/lib/talons/Adapter/useAdapter'; import { customFetchToShrinkQuery } from '@magento/peregrine/lib/Apollo/links'; import { BrowserPersistence } from '@magento/peregrine/lib/util'; import { default as PeregrineContextProvider } from '@magento/peregrine/lib/PeregrineContextProvider'; import { enhancer, reducers } from '@magento/peregrine/lib/store'; const storage = new BrowserPersistence(); const store = createStore(combineReducers(reducers), enhancer); storage.setItem('store_view_code', config.storeView); const App = () => { const [{ sdk: mse }] = useEventCollectorContext(); // trigger page-level events useCustomUrlEvent({ mse }); useReferrerEvent({ mse }); usePageEvent({ mse }); // listen for add-to-cart events and enable forwarding to the magento storefront events sdk useAddToCartEvent(({ mse })); // enable CIF specific event forwarding to the Adobe Client Data Layer useDataLayerEvents(); useEffect(() => { // implement a proper marketing opt-in, for demo purpose you hard-set the consent cookie if (document.cookie.indexOf('mg_dnt') < 0) { document.cookie += '; mg_dnt=track'; } }, []); // TODO: use the App to create Portals and PortalPlaceholders to mount the CIF / Peregrine components to the server side rendered markup return <></>; }; const AppContext = ({ children }) => { const { storeView, graphqlEndpoint, graphqlMethod = 'POST', headers = {}, eventsCollector } = config; const { apolloProps } = useAdapter({ apiUrl: new URL(graphqlEndpoint, window.location.origin).toString(), configureLinks: (links, apiBase) => // reconfigure the HTTP link to use the configured graphqlEndpoint, graphqlMethod and storeView header links.set('HTTP', createHttpLink({ fetch: customFetchToShrinkQuery, useGETForQueries: graphqlMethod !== 'POST', uri: apiBase, headers: { ...headers, 'Store': storeView } })) }); return ( <ApolloProvider {...apolloProps}> <IntlProvider locale='en' messages={{}}> <ConfigContextProvider config={config}> <ReduxProvider store={store}> <PeregrineContextProvider> <EventCollectorContextProvider {...eventsCollector}> {children} </EventCollectorContextProvider> </PeregrineContextProvider> </ReduxProvider> </ConfigContextProvider> </IntlProvider> </ApolloProvider> ); }; window.onload = async () => { const root = document.createElement('div'); document.body.appendChild(root); ReactDOM.render( <Router> <AppContext> <App /> </AppContext> </Router>, root ); };EventCollectorContextは、以下を行う React コンテキストを書き出します。- commerce-events-sdk および commerce-events-collector ライブラリを読み込みます。
- これらのライブラリを Experience Platform や ACDS の指定の設定で初期化します。
- Peregrine からのすべてのイベントを購読して、イベント SDK に転送します。
EventCollectorContextの実装の詳細を確認できます。 GitHubのaem-core-cif-componentsを参照してください。
更新された AEM プロジェクトのビルドとデプロイ build-and-deploy
上記のパッケージのインストール、コードおよび設定変更が正しいことを確認するには、Maven コマンド $ mvn clean install -PautoInstallSinglePackage を使用して、更新された AEM Commerce プロジェクトを再ビルドしてデプロイします。
Experience Platform の設定 aep-setup
カテゴリや製品など、AEM Commerce ページからのイベントデータを受信して保存するには、次の手順を実行します。
Commerce フィールドグループを含んだスキーマの作成 create-schema
コマースイベントデータの構造を定義するには、エクスペリエンスデータモデル(XDM)スキーマを作成する必要があります。 スキーマは、データの構造と形式を表現および検証する一連のルールです。
-
ブラウザーで、Adobe Experience Platform 製品ホームページに移動します。 例:https://experience.adobe.com/#/@YOUR-ORG-NAME/sname:prod/platform/home
-
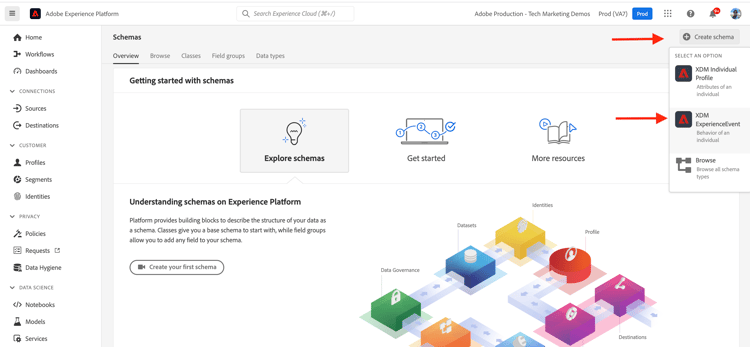
左側のナビゲーションセクションで スキーマ メニューを見つけ、右上のセクションから「スキーマを作成」ボタンをクリックして、「XDM ExperienceEvent」を選択します。
-
スキーマプロパティ/表示名フィールドを使用してスキーマに名前を付け、構成/フィールドグループ/追加ボタンを使用してフィールドグループを追加します。
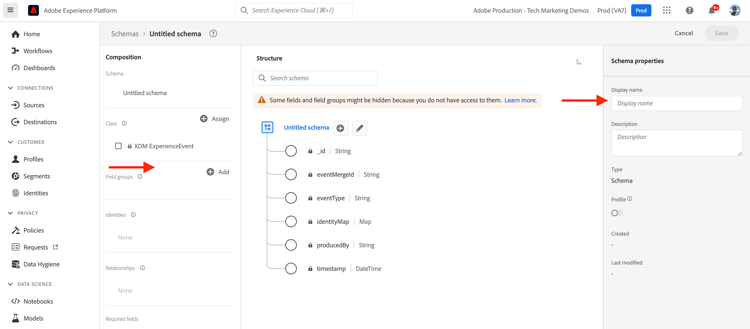
-
フィールドグループを追加ダイアログで、
Commerceを検索し、「コマースの詳細」チェックボックスを選択して、「フィールドグループを追加」をクリックします。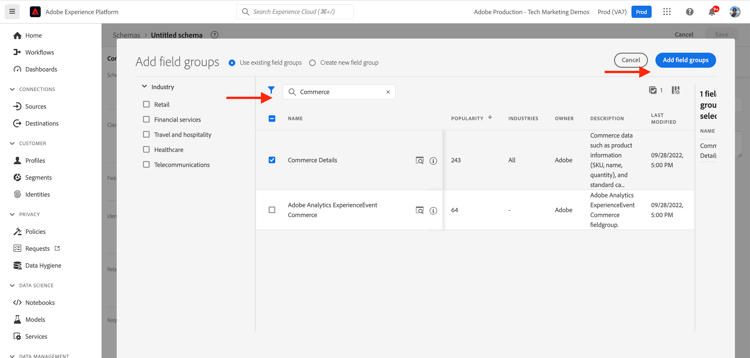
データセットの作成 create-dataset
イベントデータを保存するには、スキーマ定義に準拠するデータセットを作成する必要があります。 データセットは、スキーマ(列)とフィールド(行)を含んだデータコレクション(通常はテーブル)の格納および管理用の構成要素です。
-
ブラウザーで、Adobe Experience Platform 製品ホームページに移動します。 例:https://experience.adobe.com/#/@YOUR-ORG-NAME/sname:prod/platform/home
-
左側のナビゲーション セクションで データセットメニューを見つけ、右上のセクションから「データセットを作成」ボタンをクリックします。

-
新しいページで、スキーマからデータセットを作成カードを選択します。
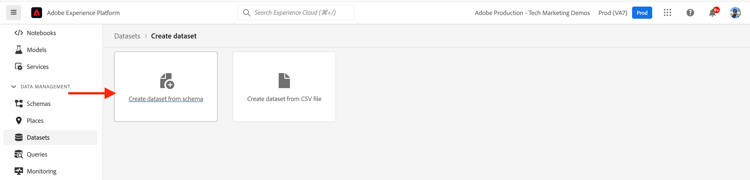
新しいページで、前の手順で作成したスキーマを 検索して選択 し、「次へ」ボタンをクリックします。
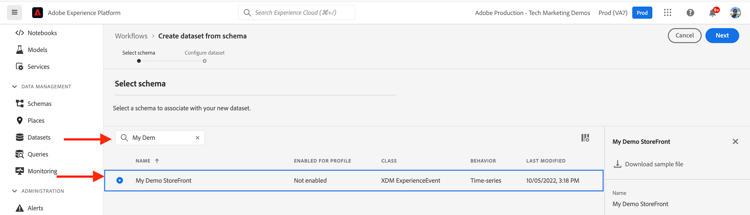
-
データセットを設定/名前フィールドを使用してデータセットに名前を付け、「終了」ボタンをクリックします。
データストリームの作成 create-datastream
Experience Platform でデータストリームを作成するには、次の手順に従います。
-
ブラウザーで、Adobe Experience Platform 製品ホームページに移動します。 例:https://experience.adobe.com/#/@YOUR-ORG-NAME/sname:prod/platform/home
-
左側のナビゲーション セクションで データストリーム メニューを見つけ、右上のセクションから「新しいデータストリーム」ボタンをクリックします。

-
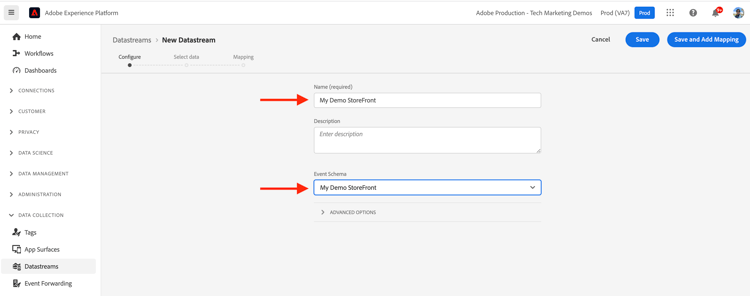
「名前」必須フィールドを使用して、データストリームに名前を付けます。 「イベントスキーマ」フィールドの下で、作成したスキーマを選択し、「保存」をクリックします。
-
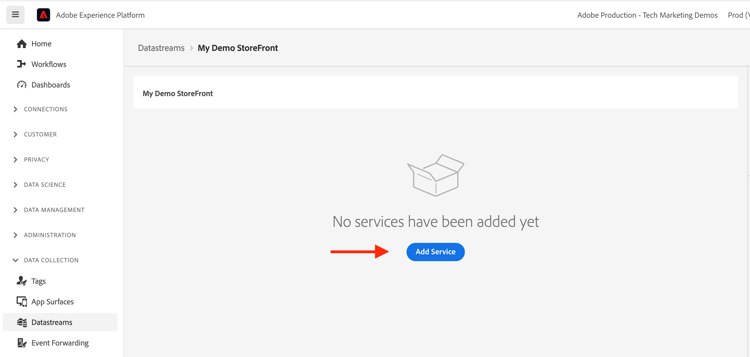
作成したデータストリームを開き、「サービスを追加」をクリックします。
-
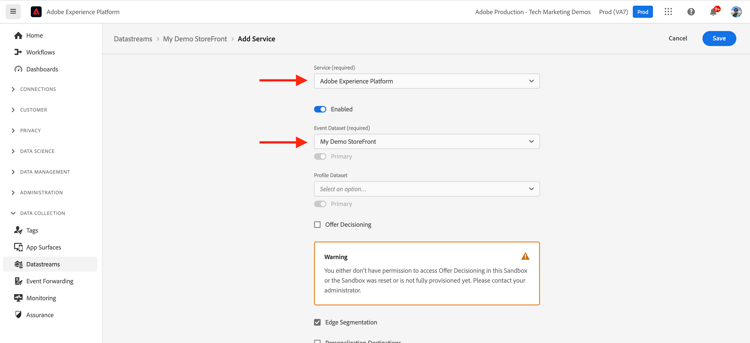
「サービス」フィールドで、Adobe Experience Platform オプションを選択します。 「イベントデータセット」フィールドで、前のステップで指定したデータセット名を選択し、「保存」をクリックします。
AEM Commerce 設定へのデータストリーム値の追加 add-aep-values-to-aem
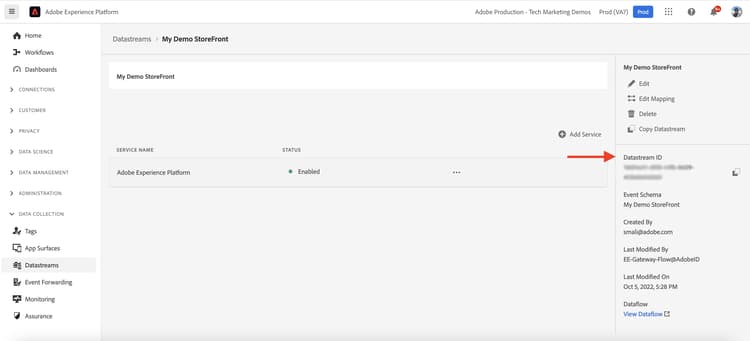
上記の Experience Platform 設定が完了すると、データストリーム詳細の左側のパネルに datastreamId が表示され、プロファイル画像/アカウント情報/ユーザー情報モーダルの右上隅に orgId が表示されます。
-
AEM Commerce プロジェクトの
ui.frontendモジュールで、config.jsファイル、特にeventsCollector > aepオブジェクトのプロパティを更新します。 -
更新された AEM Commerce プロジェクトをビルドしてデプロイします。
addToCart イベントのトリガーとデータ収集の検証 event-trigger-verify
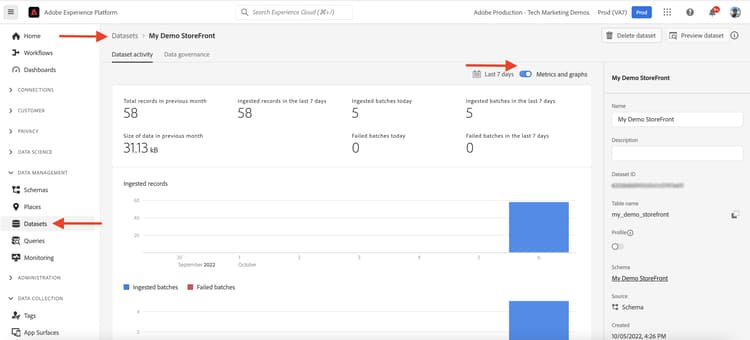
上記の手順で、AEM Commerce とExperience Platform の設定が完了します。 Google Chrome 拡張機能の Snowplow Inspector と、製品 UI のデータセットの 指標とグラフ 切替スイッチを使用して、addToCart イベントをトリガーし、データ収集を検証できるようになりました。
イベントをトリガーするには、ローカル設定から AEM オーサーまたはパブリッシュサービスを使用します。 この例では、アカウントにログインして AEM オーサーを使用します。
-
Sites ページから、My Demo StoreFront/us/en ページを選択し、上部のアクションバーの「編集」クリックします。
-
上部のアクションバーで、「公開済みとして表示」をクリックし、ストアフロントのナビゲーションで任意のカテゴリをクリックします。
-
製品ページで任意の製品カードをクリックし、色とサイズを選択して「買い物かごに追加」ボタンを有効にします。
-
ブラウザーの拡張機能パネルから Snowplow Inspector 拡張機能を開き、左側のパネルで Experience Platform Wed SDK を選択します。
-
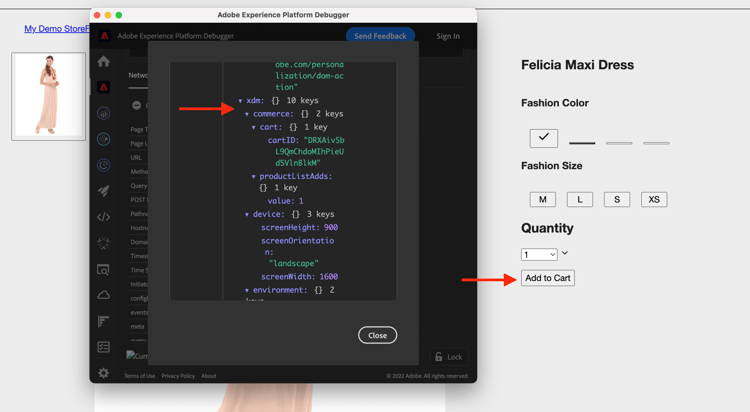
製品ページに戻り、「買い物かごに追加」ボタンをクリックします。 これにより、データが Experience Platform に送信されます。 Adobe Experience Platform デバッガー拡張機能には、イベントの詳細が表示されます。
-
Experience Platform 製品 UI 内で、「データセットアクティビティ」タブ下のデータセット/My Demo StoreFront に移動します。 指標とグラフが有効になっている場合は、イベントデータ統計が表示されます。
実装の詳細 implementation-details
CIF Experience Platform コネクタは、PWA Studio プロジェクトの一部である Adobe Commerce 用データ接続上に構築されています。
PWA Studio プロジェクトを使用すると、Adobe Commerce または Magento Open Source を活用した Progressive Web Application(PWA)ストアフロントを作成できます。 プロジェクトには、ビジュアルコンポーネントにロジックを追加するための Peregrin というコンポーネントライブラリも含まれています。 Peregrin ライブラリには、Experience Platform とシームレスに統合するために Experience Platform コネクタで使用されるカスタム React フックも用意されています。
サポートされているイベント supported-events
現時点では、次のイベントがサポートされています。
Experience XDM Events :
- 買い物かごに追加(AEM)
- ページを表示(AEM)
- 製品を表示(AEM)
- 送信された検索リクエスト(AEM)
- 受信した検索応答(AEM)
Peregrine コンポーネントが AEM Commerce プロジェクトで再利用されている場合:
Experience XDM Events :
- 買い物かごから削除
- 買い物かごを開く
- 買い物かごを表示
- 即時購入
- チェックアウトを開始
- チェックアウトを完了
プロファイル XDM イベント :
- サインイン
- アカウントを作成
- アカウントを編集
その他のリソース additional-resources
詳しくは、次のリソースを参照してください。