画像とビデオの追加(iOS) image-push
このドキュメントでは、Adobe Campaign Standard iOS プッシュ通知から画像を表示する方法について説明します。
手順1:プッシュ通知の設定 set-up-push
プッシュ通知は、Experience Platform SDKでサポートされています。
プッシュ通知を受信するモバイルアプリケーションは、Adobe Campaign インターフェイスで管理者が設定する必要があります。
Adobe CampaignとAdobe Mobile Servicesの両方を設定すると、モバイルアプリケーションのデータをキャンペーンに使用できるようになります。 詳しくは、このページを参照してください。
Experience Cloud SDK アプリケーションでプッシュ通知を送信するには、モバイルアプリをデータ収集UIで設定し、Adobe Campaignで設定する必要があります。 詳しくは、このページを参照してください。
手順2:Adobe Campaignでプッシュ通知をカスタマイズする customize-push
Adobe Campaign では、プッシュ通知のデザイン中に一連の詳細設定オプションにアクセスして、プッシュ通知を微調整することができます。
-
プッシュ通知の作成。 詳しくは、このページを参照してください。
-
プッシュ通知コンテンツ ページから、Advanced options セクションにアクセスします。
-
ファイルのURLをRich media content URL フィールドに入力します。
iOS 10 以降では、画像、gif、オーディオおよびビデオのファイルを挿入できます。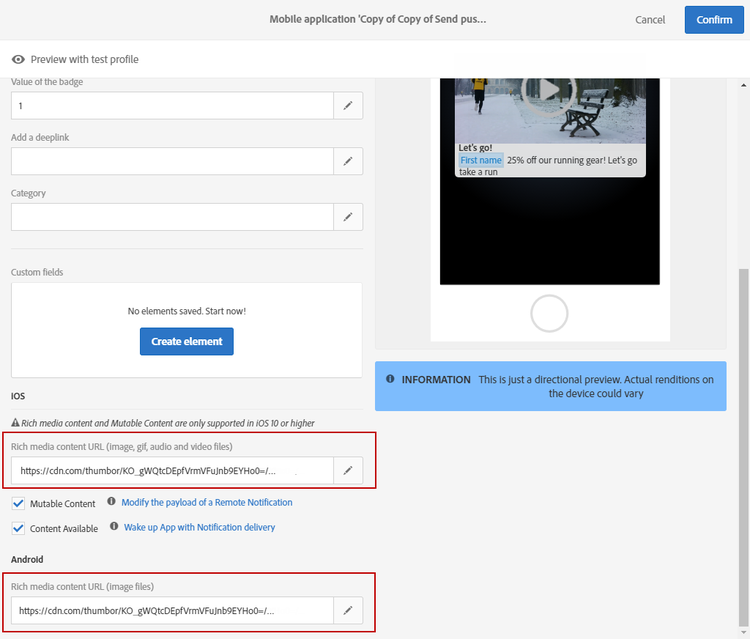
-
プッシュ通知をプレビューして保存します。
手順3:モバイルアプリケーションコードの適応 mobile-app-code
Adobe Campaignでプッシュ通知をカスタマイズした後、モバイルアプリケーションを設定して、画像をデバイスに表示する必要があります。
アプリがSwiftにある場合は、次の手順に従います。
-
Xcode プロジェクトを開きます。
-
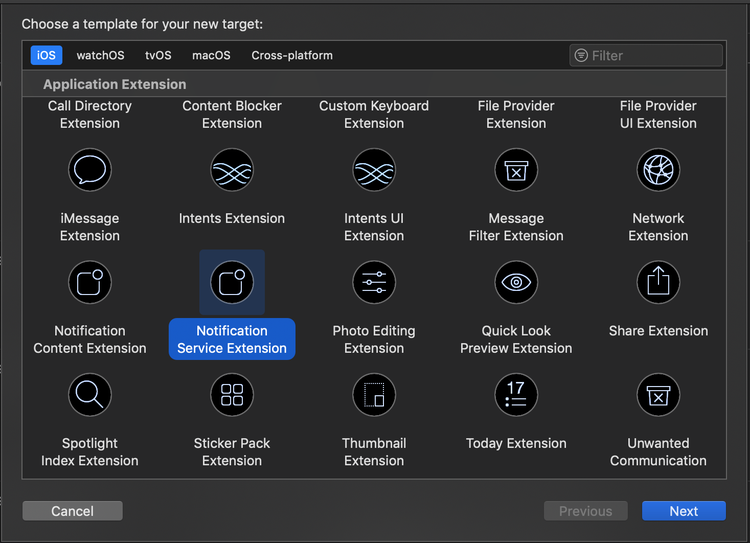
Xcode プロジェクトで、File > New > Targetを選択します。
-
「Notification Service Extension」を選択します。
-
NotificationService.swift ファイルクラスが作成されていることを確認します。
-
このクラスを編集し、デフォルトコンテンツを次の内容に置き換えます。
これにより、アプリケーションは受信パラメーターを画像URLで処理し、それを解析し、ローカルにコピーして、プッシュ通知から表示できます。code language-none import UserNotifications class NotificationService: UNNotificationServiceExtension { var contentHandler: ((UNNotificationContent) -> Void)? var bestAttemptContent: UNMutableNotificationContent? override func didReceive(_ request: UNNotificationRequest, withContentHandler contentHandler: @escaping (UNNotificationContent) -> Void) { self.contentHandler = contentHandler bestAttemptContent = (request.content.mutableCopy() as? UNMutableNotificationContent) if let bestAttemptContent = bestAttemptContent { var urlString:String? = nil if let urlImageString = request.content.userInfo["media-attachment-url"] as? String { urlString = urlImageString } if urlString != nil, let fileUrl = URL(string: urlString!) { print("fileUrl: \(fileUrl)") // Download the attachment URLSession.shared.downloadTask(with: fileUrl) { (location, response, error) in if let location = location { // Move temporary file to remove .tmp extension if (error == nil) { let tmpDirectory = NSTemporaryDirectory() let tmpFile = "file://".appending(tmpDirectory).appending(fileUrl.lastPathComponent) let tmpUrl = URL(string: tmpFile)! try! FileManager.default.moveItem(at: location, to: tmpUrl) // Add the attachment to the notification content if let attachment = try? UNNotificationAttachment(identifier: fileUrl.lastPathComponent, url: tmpUrl) { bestAttemptContent.attachments = [attachment] } } if(error != nil) { print("Failed to download attachment: \(error.debugDescription)") } } // Serve the notification content contentHandler(bestAttemptContent) }.resume() } } } override func serviceExtensionTimeWillExpire() { // Called just before the extension will be terminated by the system. // Use this as an opportunity to deliver your "best attempt" at modified content, otherwise the original push payload will be used. if let contentHandler = contentHandler, let bestAttemptContent = bestAttemptContent { contentHandler(bestAttemptContent) } } }
通知の送信中に、モバイルは次のペイロードを受け取る必要があります。
画像URLは、キーmedia-attachment-urlでマッピングされます。 これは、画像をダウンロードして表示するために、アプリケーションコードの観点から処理する必要があるキーと値のペアです。
userInfo: [AnyHashable("media-attachment-url"): https://pbs.twimg.com/profile_images/876737835314950144/zPTs9b7o.jpg, AnyHashable("_dId"): 1de3ef93, AnyHashable("_mId"): h280a5, AnyHashable("aps"): {

    alert =     {

        body = "Message Body here";

        title = "This a push from Campaign";

    };

    badge = 1;

    "mutable-content" = 1;

}]
手順4:プッシュの送信をテストする test-send-push
これで、上記の手順2で作成したアプリケーションと配信の構築をテストできます。 プッシュ通知の準備と送信について詳しくは、この ページ を参照してください。